Showing posts with label Noise Ninja. Show all posts

Tuesday, March 15, 2016

Topaz DeNoise 6 is Now Available (Special Offer until March 20)


Only $49.99 with coupon code NOISEFREE (until March 20, 2016)

I’ll do a review at some point in the future, but I wanted to get this offer to you as it is only available for a limited time. They have some cool before and after effects on their web site, so click here to learn more.

Other articles you may enjoy

Here’s some of my Topaz Labs software reviews:

If you enjoyed this article, you may also enjoy these articles:

Disclosure

If you make a purchase using links found in this article, I may make a commission. It doesn’t cost you a penny more, but it does help to support future articles like this.

Tuesday, August 7, 2012

Imagenomic Noiseware Professional (Noise Reduction Roundup 3 of 5)–Updated 8-7-2012

 NoisewareBox

See the bottom of this article for a 15% discount offer on this product.

This article refers to version 4.1.1, but as of 8/7/2012 with version 5.0, I still consider it the best noise reduction software product on the market. 

Ever heard of Scott Kelby (founder of NAPP)? Well, if you’ve been reading this blog you sure have because he’s the biggest and best Digital Photography, Photoshop & Lightroom book author on the planet. Well when Scott says something is good, I listen and he recommends Imagenomic Noiseware Professional in his Lightroom 2 for Digital Photographers and The Adobe Photoshop CS4 Book for Digital Photographers. After spending a month with this product, I understand why. This product has the best automatic mode of any product I have ever used. It seems to have the best algorithm for knowing what to sharpen and what to leave alone and how to avoid destroying the sharpness of your image in the process of trying to make that noise go away.

How does it work?

While the user-interface of this product is fairly intimidating, the good news is that it is so damn smart that you really don’t need to use it! Here’s what it looks like on Window Vista system, but it is available on Mac OS as well:

Click to see a larger version It’s smoking fast and the Settings up at the top left corner of the screen were sufficient enough for my needs. These settings are like presets of the sliders below, so Night Scene as shown in the image above is simply raising the Noise Reduction values. This is very much like presets in Adobe Lightroom, and a brilliant way to make the complex simple. For those wanting more control, there’s a wealth of options and ways to set measure points. However, I found that I didn’t need it. This is a run and click OK solution that I just store on a merged (CTRL+SHIFT+ALT+E in Photoshop) layer so I can undo if I change my mind later.

Noise Reduction Roundup Images

This product is one of three excellent after-market products that I am reviewing as part of my Noise Reduction Roundup article.

Initially I was processed the original images in Canon’s Digital Photo Professional (DPP) 3.5. When one of the product engineers raised a concern about JPEG compression I decided that it made more sense to import the RAW into Photoshop via Adobe Camera Raw (ACR) 5.2. I then used that single PSD to work on all the photos.

Here’s the exact process I used:

  1. Open CR2 in Photoshop CS4 32-bit on Windows Vista 32-bit
  2. This launches ACR 5.2, go to the Detail tab and set Noise Reduction to 0 (XMP data from disk has cropping info – XMP was generated from Lightroom 2.3 where I catalog my files)
  3. Open object as a Smart Object at Original Size
  4. Duplicate the layer twice
  5. Rasterize the third layer & copy 3 more times
  6. Name each layer (original, acr, photoshop, noiseninja, dfine, noiseware)
  7. Save PSD (these are huge)
  8. Apply corresponding filter to each named layer (using layer comps to define each layer and hide other layers) using default values (run filter, press OK when dialog appears)
  9. Save PSD
  10. Switch to each layer (using layer comps) and do a File | Save As… JPEG and choose 12 when the dialog comes up (although by accident I did 10 on Tokyo for all of them).
    • For Chicago, I created a Text layer watermark and showed both the image and watermark layers.
  11. I realized that these images had the wrong color profile, so I had to re-open them all, apply the sRGB color profile and save again at JPEG 12.

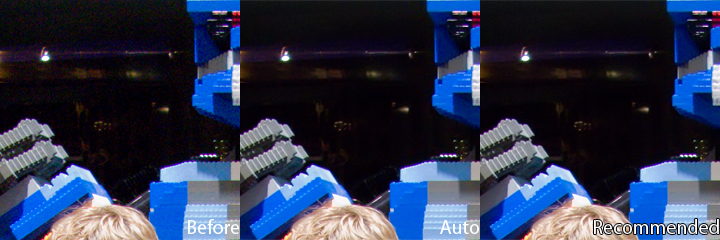
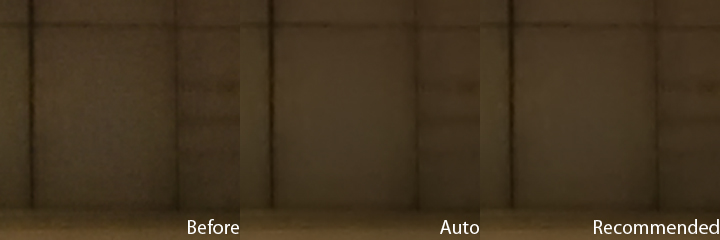
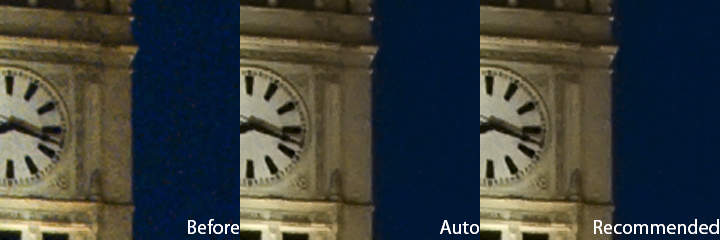
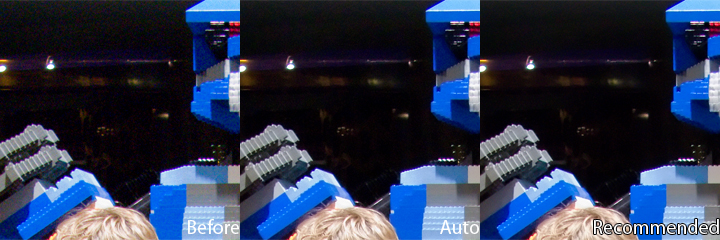
The images below are part of the roundup images. The original link shows a JPEG 12 version of the original with no noise reduction added (the default setting is always to add a little). The Auto link was processed on a duplicate layer using the automatic settings (i.e., the same results you’d get if you ran the filter and just hit OK right after installing this product). This image was saved as JPEG 12 in Adobe Photoshop CS4. The Suggestion version was processed the same way, but with the instructions found below the links.  As you can see from the images below the results are outstanding. Hover over images to see before and after (using auto) results, but you have to look very carefully. Hints about where to look are included for each image, but its best to click the hyperlinks to see the full size images and switch between tabs in your browser to see the differences. You may download and compare them in Photoshop, but please delete them when you are done comparing.

This article includes a before, auto and suggested 100% crop to compare the differences. For the best results, click on these images to view them at 100%.

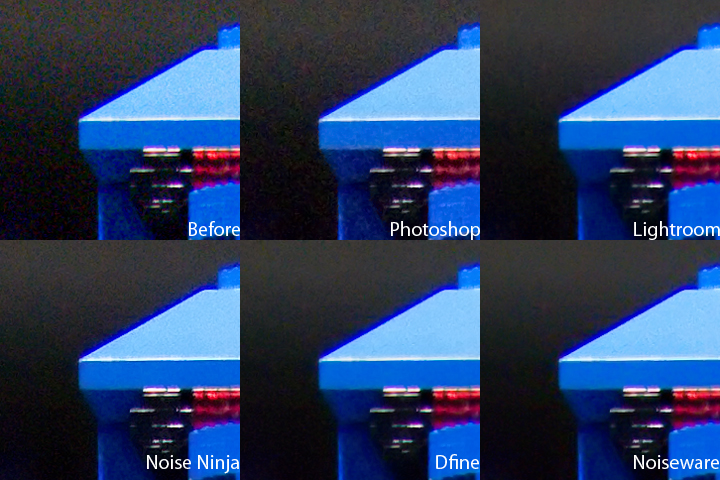
The final article will include six 100% crops next to each other so you can more easily see the differences together, so stay tuned to this entire series for the best results.

Canon G9 @ ISO 400

Here’s a shot I took with a Canon G9 at ISO 400 which was fairly noisy, but thanks to Noiseware you can see how nice it cleans up. Hover over the shot below to see the before and after (pay attention to the top of the image to see the bad noise in the original). This is straight out of camera with no post-processing, so it still needs a little work (especially sharpening):

Mouse over to see before, mouse out to see after

You MUST click to view the original for an accurate comparision

Original Auto Fix Imagenomic Suggestions
 
David McDonell of Imagenomic offered the following suggestions to improve the Noise Reduction improvements of this photo:
  1. Set the Preset to Night Scene.
  2. In the Tonal Range tab, go to the group called Noise Level and set the slider to Shadows +20.
Canon Rebel XTi @ ISO 800

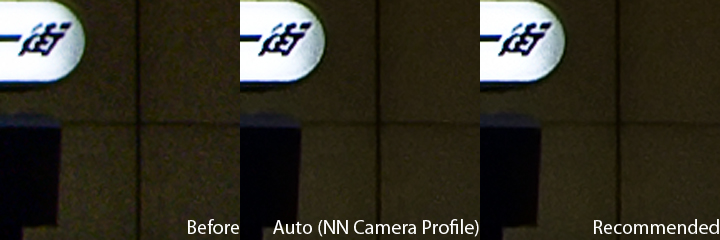
Pay attention to the building in the back of the scene on the bottom left side of the image when you hover in and out below:

Mouse over to see before, mouse out to see after

You MUST click to view the original for an accurate comparision

Original Auto Fix Imagenomic Suggestions
David McDonell of Imagenomic offered the following suggestions to improve the Noise Reduction improvements of this photo:
  1. Set the Preset to Default.
  2. In the Tonal Range tab, go to the group called Noise Level and set the slider to Shadows -20.
Canon 5D Mark II @ IS0 2500

Pay attention to the younger girl’s hair and the older girls cheeks when you hover in and out below:

Mouse over to see before, mouse out to see after

You MUST click to view the original for an accurate comparision

Original Auto Fix Imagenomic Suggestions
David McDonell of Imagenomic offered the following suggestions to improve the Noise Reduction improvements of this photo:
  1. Set the Preset to Default.
  2. In the Tonal Range tab, go to the group called Noise Level and set the slider to Shadows -5.
Canon 1D Mark III @ ISO 3200

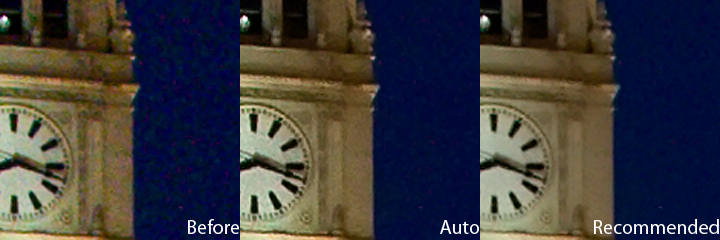
Pay attention to the building on the left side of the image when you hover in and out below:

Mouse over to see before, mouse out to see after 

You MUST click to view the original for an accurate comparision

Original Auto Fix Imagenomic Suggestions
David McDonell of Imagenomic (at the time this was originally written) offered the following suggestions to improve the Noise Reduction improvements of this photo:
  1. Set the Preset to Night Scene.
  2. In the Frequency tab, go to the group called Noise Level and set the slider Mid Freq to 0.
  3. In the Frequency tab, go to the group called Noise Reduction and set the slider Mid Freq to 60%.

Conclusion

This is the product of choice recommended by Photoshop guru, Scott Kelby. I hadn’t heard about this product until he mentioned it in one of his books, and I’ll admit that my expectations for it were low. After all, Noise Ninja was king in my book, so how could this product compete with that? Well, the reality is that this product blew me away and yielded out of box results that knocked my socks off. This is how the default noise reduction should be done in my book, so it is very easy to recommend this product. The user-interface offers lots of powerful adjustments, similar to Noise Ninja, but it offers some ease of use features like its settings list which allows you to select some common user scenarios and get a new automatic result. I wish it had a noise brush or U-Point controls to help with selective noise reduction, but the reality is that I can easily do that myself with a layer mask (as I typically did with Noise Ninja in the past).

15% Off Discount Offer

Be sure to enter the coupon code RONMART2012 when you check out for a 15% discount on the following versions:

Use the links below to view other articles in this roundup:

Disclosure

If you make a purchase using links found in this article, I may make a commission.

Tuesday, October 19, 2010

Deals of the Week: Tamron Rebates, Redipix.com, Imagenomic & Trey Ratcliff HDR DVD Workshop discounts

I’ve tried hard to have my articles stick to reviews and education, but I’ve been getting bombarded with some great deals to stimulate this tough depression we are in so I thought I’d collect them all and pass them along as a new Deals of the Week concept. Feel free to leave comments if you like this and would like me to continue it, or if you hate it and would rather me not do these in the future.


Tamron Rebates

Between now and November 31st, 2010, B&H has instant rebates of up to $150 on Tamron lenses (including its popular 18-270mm).


REDIPix.com (prints) now offers 10% OFF ALL orders!

Effective today, REDIPix.com has changed their policy and is now offering 10% off all orders to readers of this blog when you use the code RONM when checking out. Check out my review where I love the great job they did with my landscape shot, and check out this cool new Gallery Wrap Dazzle which is actually BACKLIT!!!! I’m going to have to get one of those as they are just too cool!


Imagenomic now offers 20% OFF!!!!

Imagenomic, makers of Noiseware (winner of my Noise Reduction Roundup) are also offering 20% off all their products when you use the discount coupon code RONMART when checking out!


HDR DVD Workshop by Trey Ratcliff discount ENDS SOON!

Time is running out for the discount on this series! From now until October 30th, when you USE THIS LINK to get to Trey Ratcliff’s website and enter the promo code, you can save up to 20% off his super successful HDR DVD series (which I will be reviewing soon). Here’s the codes:

  • USE THIS LINK and enter 55BASICDVD to save 10% OFF of the HDR DVD - Basic Edition
  • USE THIS LINK and enter 66PREMIUMDVD to save 20% OFF of the HDR DVD - Premium Edition

Check out my review of Trey’s HDR DVD Workshop – I loved this series and think you might too!

Sunday, April 19, 2009

Noise Reduction Roundup (5 of 5) – And the winner is…

Thank you for joining me in this first “roundup” series. Please comment on these articles if you enjoyed this format and I’ll consider doing more in the future (in fact, one on web hosting sites is in the works). To recap, the following articles were part of this review:

Image Processing Results

In this section I will discuss how each product faired using its default settings on each of the 4 test photos, and awards points for their performance (the more the better). To best view the results, you MUST view them at 100% as the scaled versions shown inline have compression artifacts that keep them for showing the exact results (they are close, but 100% are significantly better). I also award points for the results achieved by the software developers of each product and how they processed the photo, as I assume this to be the theoretical best results you could expect to get.

It is worth noting that noise reduction results are SUBJECTIVE. This means that my rankings may not correspond with your as you may place a higher value on edge preservation than I do, or you might expect zero noise in the final image at all cost. Use these results as a starting point, but I encourage you to experiment with trial version of each product to determine your own winner. When you do, please be sure to post your results on my flickr group so that you can enter to win a FREE copy of your favorite product in our contest. 4 copies of EACH of Noiseware, Noise Ninja and Dfine (12 total) will be given away!

Methodology

To accurately evaluate these photos you MUST click them and view them at 100%.

  1. The way I created these was by opening the CR2 RAW image into Adobe Photoshop CS4 (11.0.1) via Adobe Camera Raw 5.3.0.21 on 32-bit Microsoft Windows Vista SP1 system as a 8-bit sRGB image.
  2. For the original, I set the Noise Reduction Luminance and Color from the details tab to 0. I then did a New Smart Object via Copy to create a new layer copy that has its own independent Adobe Camera Raw settings (duplicate layer just links to the original). I named this layer ACR.
  3. I duplicated the above layer and then chose Rasterize Layer to prevent it from being a smart object, and I named this layer Photoshop.
  4. I duplicated this layer twice and called those layers Noise Ninja and Noiseware. At this point, ALL layers are still exact copies of the original layer and NO filters have been run.
  5. I ran the Dfine filter on one of these original layers because it always creates its own new duplicate layer before performing any changes (a feature I love and wish ALL destructive plug-ins did). When running filters for this test (except ACR/Lightroom), I simply run the filter and click ok to close it on its appropriate layer. I don’t make any changes because I’m wanting to compare the out of box experience that you would get.
  6. I repeat this process for all of the other filters. For Noise Ninja I do click the Profile Image button, and for Noiseware I selected the Default “setting” for the Sledding photo, and Night Scene for the others as I expect that would be what any reasonable person would do when experimenting with these products. Noise Ninja also has the benefit of custom camera profiles I created that it detects and uses to assist in its processing accuracy (see the Noise Ninja review for the difference it makes).
  7. For Lightroom, I actually used Adobe Camera Raw (ACR) as they use the same code behind the scenes and my testing couldn’t detect a difference between the products. I had previously processed all of these images in Lightroom with some level of noise reduction, so I simply used the values I had set by hand when I originally processed these photos. In some cases, like Chicago, that was just Lightroom 2’s default noise reduction setting.
  8. I  then did a 1 inch x 1 inch @ 240 dpi crop of an area I deemed to be the most noisy, and saved the PSD.
  9. Finally I did a select all of this square and did a copy, followed by a paste into a new 3 x 2 inch 240 dpi sRGB target document. I repeated this process for each layer, with the layer in question being the only selected and visible layer at the top I do my copy.
Canon G9 @ ISO 400

This photo was probably the most noisy picture of this roundup. In looking at the results, I was unimpressed with the default experience I got from Photoshop, but it could easily be argued that with a better knowledge of this tool and isolating the changes to only a specific channel I could get better results. However, this was about the default experience and I wasn’t happy with the results I got. In fact, through this article you will see that the results I got in Photoshop using its Reduce Noise filter is simply unacceptable. You’ll also notice that ACR/Lightroom does a decent job of getting rid of the noise, but at the cost of softening the detail of the edges in the image. Noise Ninja seems to favor edge detail preservation and takes a less aggressive default processing, but you are free to tweak that if you want (as I demonstrate with all three of the products in their respective articles thanks to the assistance of a developer from each product). In this image, I found the results from Noiseware to be the most impressive as it maintained nearly as much edge detail as Noise Ninja, yet just a little more noise was eliminated over Dfine.

For this image, I award the following points (more is better):

  1. Imagenomic Noiseware 4.1.1 (WINNER) - 5
  2. Nik Software Dfine 2.0 - 4
  3. PictureCode Noise Ninja 2.x - 3
  4. Adobe Lightroom 2.3 / Adobe Camera Raw (ACR) 5.3 – 2
  5. Adobe Photoshop CS4 - 1

Accurate comparisons are ONLY possible by clicking here for the FULL SIZE version

When the software developers worked on this photo, I felt that David clearly got the best balance of noise reduction and sharpness, followed by Fernando who had an edge on noise reduction at the top of the image. The result by Josh actually felt like a step backwards from the auto default results.

Software Developer Shootout Results (click the name to see their processed image):

  1. David (Imagenomic)  - Winner –5 Points
  2. Fernando (Noise Ninja) – 4 Points
  3. Josh (Dfine) – 3 Points
Canon Rebel XTi @ ISO 800

This photo was the one that most easily hid the noise, and in fact I’ve printed it and didn’t really even notice the noise before this roundup. However, upon close inspection I see that the well lit back corner of this image features some serious noise. Again, Photoshop was pathetic and ACR/Lightroom was just kills the detail in the image. Noise Ninja once again does a great job with detail via less aggressive noise reduction creating results that honestly would print very well. However, I still felt that Dfine maintained a similar level of edge detail, yet it reduced significantly more noise than Noise Ninja. Once again Noiseware offered the most impressive balance of noise reduction and edge preservation (although you MUST click to view the 100% image to see that difference as the image below shows more detail in Noise Ninja).

For this image, I award the following points (more is better):

  1. Imagenomic Noiseware 4.1.1 (WINNER) - 5
  2. Nik Software Dfine 2.0 - 4
  3. PictureCode Noise Ninja 2.x - 3
  4. Adobe Lightroom 2.3 / Adobe Camera Raw (ACR) 5.3 – 2
  5. Adobe Photoshop CS4 - 1

Accurate comparisons are ONLY possible by clicking here for the FULL SIZE version

When the software developers worked on this photo, I felt that Josh clearly got the best balance of noise reduction and sharpness – especially when you look at the back wall used in the 100% crops above. A very close second was Fernando, but he has just a tad too much noise. David’s results were disappointing as his got rid of the noise but at too much of a cost to detail loss, so I thought the default results were much better.

Software Developer Shootout Results (click the name to see their processed image):

  1. Josh (Dfine) – Winner - 5 Points
  2. Fernando (Noise Ninja) – 4 Points
  3. David (Imagenomic)  - 3 Points
Canon 5D Mark II @ IS0 2500

This image suffers from a bit of camera shake in addition to noise. It should be noted here that the might 5D Mark II’s infamous noise reduction ONLY occurs on the JPEG images, so if you shoot raw you don’t see those results unless you develop your RAW images in Canon’s own Digital Photo Professional 3.5.1.0. Click here to see what DPP’s processing of this RAW image – it’s quite impressive. I chose not to include it in this round up since I don’t believe that DPP is going to be a part of most people’s natural workflow, but Lightroom or Adobe Camera Raw will be.

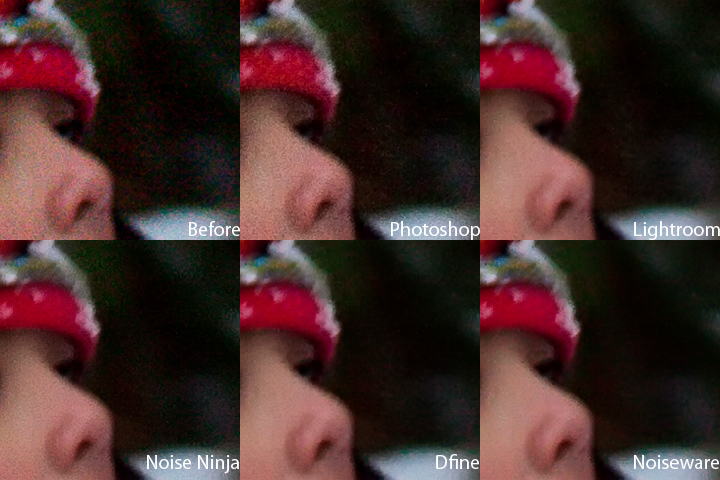
In this case, I found it a lot harder to call a winner as none of them did an especially good job in my opinion. Of course, Photoshop sucked once again, but the softness of ACR/Lightroom actually works on this photo. Noise Ninja’s definitely creates the fewest artifacts around the bridge of the nose which would likely result in the best printing experience. However, it is just too close to call for Dfine and Noiseware, so I’m going to declare this one a tie between them and I am going to award an extra point to Noise Ninja as printing might give it an edge in this case.

For this image, I award the following points (more is better):

  1. Nik Software Dfine 2.0 – (CO-WINNER) - 5
  2. Imagenomic Noiseware 4.1.1 - (CO-WINNER) - 5
  3. PictureCode Noise Ninja 2.x – (SPECIAL AWARD) 4
  4. Adobe Lightroom 2.3 / Adobe Camera Raw (ACR) 5.3 – 2
  5. Adobe Photoshop CS4 - 1

Accurate comparisons are ONLY possible by clicking here for the FULL SIZE version

When the software developers worked on this photo, I felt that Josh clearly got the best balance of noise reduction and sharpness – especially when you look at the greenery and the detail in the older girls hat. A very close second was David, as his results were almost as good. Fernando’s was a bit softer with a little more noise.

Software Developer Shootout Results (click the name to see their processed image):

  1. Josh (Dfine) – Winner - 5 Points
  2. David (Imagenomic)  - 4 Points
  3. Fernando (Noise Ninja) – 3 Points
Canon 1D Mark III @ ISO 3200

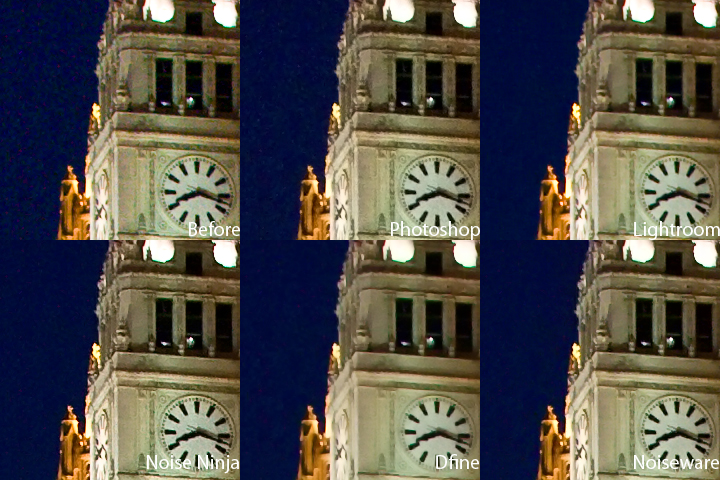
This image seemed to benefit the most from noise reduction as it cleans up quite nicely. In this test, even the pathetic Photoshop seems to yield a nice improvement, and Lightroom does a very good job. When I ran Noise Ninja, I was blown away and I thought for sure it would be the clear winner. It got rid of the noise, yet maintained excellent detail on the area around the clock. Next, I ran Dfine and my jaw dropped! It looked great, but it did lose some detail on the tick marks of the clock so its actually a little softer than ACR/Lightroom. Finally, the results from Noiseware were once again a great balance of noise reduction and edge preservation, and at 100% it is the clear winner in this roundup. It is a tad software on the edge around the clock, but when you view this at 100% you’ll see that the clock details and smoothness in the sky clearly favors Noiseware.

For this image, I award the following points (more is better):

  1. Imagenomic Noiseware 4.1.1 (WINNER) - 5
  2. PictureCode Noise Ninja 2.x - 4
  3. Adobe Lightroom 2.3 / Adobe Camera Raw (ACR) 5.3 – 3
  4. Nik Software Dfine 2.0 - 2
  5. Adobe Photoshop CS4 - 1 

Accurate comparisons are ONLY possible by clicking here for the FULL SIZE version

When the software developers worked on this photo, the results were quite different. I felt that Fernando clearly got the best balance of noise reduction and sharpness, followed by Josh who had an edge on detail in the water. The result by David was good, but not as good as the others.

Software Developer Shootout Results (click the name to see their processed image):

  1. Fernando (Noise Ninja) – Winner – 5 Points
  2. Josh (Dfine) – 4 Points
  3. David (Imagenomic)  - 3 Points

User Interfaces

My day job for the last 15 years at a major software vendor as been as a user-interface (UI) developer. To me a successful user interface is one that can take advantage of the key features of the product without you ever having to read a manual. In this roundup, I define that as Ease of Use and award 5 points for the winner. Photoshop and ACR/Lightroom are not included as the results of the noise reduction test make me feel like they are not serious competitors in this space and they have no mathematical chance of winning this roundup, so they are excluded from this portion. With that, here are my user interface rankings:

User Interface Third Place - Noiseware (Ease of Use - 4 points, Features – 3 points)

All products were easy to use, but Noiseware stood apart from the others in that its best results were obtained by the default results – that’s impressive! If I were batch processing a large group of images, there’s no doubt that this is the product that I would use. As you saw previously, its default results back up that statement! That said, once you get past the Settings dropdown and Noise Reduction sliders, this is a pretty intimidating user interface. A typical user will be baffled at the choices in the Detail, Frequency, etc… tabs, and the graph in the bottom right offers eye candy, but no obvious value. One a positive note, it is probably the fastest UI of the bunch, so if performance were a category it would win hands down.

User Interface Second Place - Noise Ninja (Ease of Use - 3 points, Features – 5 points)

Noise Ninja is clearly targeted to the person who wants full control over everything this product does. It’s chock full of features and that’s both good and bad. My experience tells me that all this detail will be intimidating to most, and its requirement to click the Profile Image is perplexing. Of the products in this roundup, this is the only one that required me to read the manual to use it effectively, and even then I didn’t feel comfortable making certain adjustments (like the Turbo & Coarse noise checkboxes – huh?). It’s noise brush is a great idea as it allows you to say “hey, don’t apply noise reduction here”, which would be real useful for the clock tower on Chicago. It also is the only product to offer the ability for you to create camera profiles to ensure that you’ll get the best possible results with your camera and lenses. If you master this product, you have the ability to create your OWN definition of perfect noise reduction results based on your own balance of detail preservation and noise removal. It is for these reasons, that I feel that feature-wise this is the strongest product here – by far.

User Interface First Place - Dfine (Ease of Use - 5 points, Features – 4 points)

I love Nik Software products because they just work and are very easy to use. Sure, they have little quirks with the horrible way they do zooming, and they lack the proper shortcut keys to switch between the hand and zoom, but its U-Point technology gives you the ability to create complex masks and you’ll never have to know you are even using masks. In addition, its default experience is simple and highly effective. This is how user-interface should be done because it is simple and hides the gory details from you, but if you want more control then you simply go to manual mode and party with your U-Point controls. This product is a pleasure to use, and I frequently find myself using it now when I know I’m going to want to exclude noise reduction in a specific area of my image. It does lack the power of Noise Ninja, so I can’t help but dock a point there. However, it offers more practical features than Noiseware, so while it doesn’t seem as “scientific”, I think it clearly offers more control over features people will actually use to get superior results.

Ranking the Noise Reduction software products, and the Winner is…

Noise reduction is always a trade-off because reducing noise comes at the expense of losing image detail. How much noise reduction you apply is strictly based on how much detail you want to lose, and all of these products let you control that balance. This means that the real winner here is very subjective because what might be excellent for me, might be too much loss of detail for you. As a result, I encourage you to keep your needs in mind and install the free trial versions of these products to see which is right for you.

With that said, I hate articles that are like lawyers who never give you a straight answer or recommendation. I am going to draw a line in the sand and give you the order in which I think the products fell based on how I would use these products. This means I place a high value on the out of  box experience and the ease at which I can use the product (without reading manuals) to tweak those default settings if I think they are too aggressive.

The final order, from worst to best, in this round-up is:

5. Adobe Photoshop CS4’s Reduce Noise Filter – Given the cost of Photoshop, and its complex upgrade rules, it is embarrassing that this is the best that they can do with Noise Reduction. This type of round up shouldn’t be necessary as Adobe should have a great built-in solution, but they don’t. If you have to do Noise Reduction in Photoshop, my recommendation is that you do it in Adobe Camera Raw as that is what Lightroom uses, and you will get much better results.

4. Adobe Lightroom 2.3 / Camera Raw 5.x’s Noise Reduction feature – Lightroom is really just Adobe Camera Raw on steroids, so you can consider the results here applicable to both products. It does a reasonable job of getting rid of noise, but it kills the detail (which you can recover marginally with sharpening, but not enough). It’s much better than what you get in Photoshop, so that’s good, but for me I’d rather any of the products below more than this.

3. PictureCode Noise Ninja (38 points) – Before this round-up, this was the product I had purchased and used regularly as it has long been known as the most popular product used by the pros. I was happy with the results and thought it was a good product, but the user-interface isn’t  as friendly as some of the others here. In real-world use, if it didn’t give me the results I desire, I would do selective noise reduction using masks or on a single channel (usually the blue channel) only. If you want the most advanced noise reduction solution which offers ultimate control via camera profiling, then nobody in this round up can touch Noise Ninja – period. However if you want to make the most of this product then plan on learning what all of those controls in Noise Ninja do, and ordering a camera calibration chart from PictureCode to create profiles specific to your camera. This will mean a significant time investment up front on your part, but in the end it will give you the greatest control over reducing noise without losing detail of any product here.

2. Nik Software Dfine (41 Points) – If you’ve followed my blog, you know that I have recommended every Nik software product I’ve tested. The reason why is simple – they make great software that offers outstanding default results which can easily be tweaked using their revolutionary U-Point controls. The automatic results I got with Dfine were near identical to Noiseware, yet selectively applying those results using U-Point controls or the brush feature made it much easier to control the final image that I could be happy with. In addition to all of this, Nik offers videos on their site and webinars that offer you a chance to see the product in action in the hands of Nik’s imaging gurus. While Dfine lacks the fine level control of Noise Ninja, and some of the advanced features of Noiseware, it offers enough control for my needs and provides results that I am very happy with. As a result, when doing noise reduction I’ll always try this product first to see if I can get the results I want, before I try out the others. However, when I total all the points Dfine falls a point short due to its default performance on the Chicago image. It’s default processing was consistently a little softer than Noiseware’s, so I have to give it a second place but only by a hair. If you already own this product, then stick with it.

A 15% discount on all Nik Software is available for readers of this blog by entering the code rmartinsen when you order online or call to place an order. This offer excludes 3rd party software, bundles and upgrades, but even if you buy an excluded product please include the code when ordering.

1. Imagenomic Noiseware (42 points) – This is the product of choice recommended by Photoshop guru, Scott Kelby. I hadn’t heard about this product until he mentioned it in one of his books, and I’ll admit that my expectations for it were low. After all, Noise Ninja was king in my book, so how could this product compete with that? Well, the reality is that this product blew me away and yielded out of box results that knocked my socks off. This is how the default noise reduction should be done in my book, so it is very easy to recommend this product. The user-interface offers lots of powerful adjustments, similar to Noise Ninja, but it offers some ease of use features like its settings list which allows you to select some common user scenarios and get a new automatic result. I wish it had a noise brush or U-Point controls to help with selective noise reduction, but the reality is that I can easily do that myself with a layer mask (as I typically did with Noise Ninja in the past).

Use the following links to order your copy of Noiseware today. Be sure to enter the coupon code RONMART when you check out for a 15% discount on the following versions:

Conclusion

While Photoshop and Lightroom give you something that is better than nothing, the real players in this game are Noise Ninja, Noiseware, and Dfine. All are great products in their own way, and I would encourage you to experiment with their trial versions to figure out which is right for you. When you do, enter your test photos into the Greatest Saves Contest for a chance to win one of 12 free copies of the top 3 products (4 copies for each product) being given away.

Hopefully you’ve enjoyed this series as much as I have. If you are like me this will save you a lot of money because you are now better prepared to make an intelligent purchase. If this is the case, then please help support this blog by:

  1. Purchasing one of these products using the links in this article,
  2. sharing this article with all of your friends,
  3. and save it in your favorites for future reference.

If the support for this article is positive, then look for more cool round-ups like this in the future! I’d love to hear your thoughts on this article, so comments are greatly appreciated!

Other Products (UPDATE: July 20, 2009)

Since I originally wrote this article, I had the chance to try out another product – DeNoise 3 by Topaz Labs. Several readers of this article had commented about it, and while I was very unimpressed with version 2, version 3 was an improvement. I still stick by my existing recommendations here and would Topaz Labs Denoise 3 right behind PictureCode’s Noise Ninja.

Monday, April 6, 2009

The “Ronmart.blogspot.com Greatest Save” Contest (12 Prizes – Free Software) – Rules Update 4/5/09

For those of you who decided not to enter, this had to be one of the easiest contests because I think everyone that submitted a valid entry won! Click here to view the winning entries. Here’s a list of winners per product, along with a link to their winning entry:

Noiseware

Kevin - www.flickr.com/photos/casadehambone/3461617522/
Daniel - www.flickr.com/photos/37990356@N08/3488344068/
Kamal - www.flickr.com/photos/khathi/3419938363/
Duncan - www.flickr.com/photos/22343315@N02/3460888985/

Dfine

Brian - farm4.static.flickr.com/3575/3424198351_19167957e9_b.jpg
Todd - www.flickr.com/photos/tgroten/3426020660/
Tim - www.flickr.com/photos/tlamey/3461580218/
Justin - www.flickr.com/photos/tiarnachutch/3407926665/

Noise Ninja

Mark - www.flickr.com/photos/markolwick/3424539681/
Karan -
www.flickr.com/photos/37741135@N04/3471822847/
Eric -
www.flickr.com/photos/37919658@N02/3491712269/
berzamora -
www.flickr.com/photos/bzamora/3421695432/

Congrats to all of those who participated and won!

PictureCode, Nik Software & Imagenomic have been kind enough to offer a free license for Noise Ninja 2.x Professional, Dfine 2.0 or Noiseware 4.1.1 for 12 lucky readers of this blog who win my “Greatest Save” contest. Four first place winners will get to pick the product of their choice, and eight runner-up winners will win a license of what is remaining. The rules of the contest are simple. Post a AFTER photo (see camera rules) to my Flickr Blog Reader’s group, and then make your first comment to photo that includes a before photo along with the following information:

  1. The Noise Reduction product you used to reduce the noise from the image (all products featured in this article have free trial versions, so use one or all of them for your submission).
  2. The exact steps you took using the Noise Reduction software to improve the photo.
  3. What you liked and disliked about the product you used.

An example entry is shown here.

Discounts will be available for some of the products featured in this roundup in future articles so stay tuned!

Contest Rules
  1. You must follow the instructions above, and add your photos to Ron Martinsen's Blog Readers group pool with the tag “ronmart.blogspot.com Greatest Save Contest” (use quotes to avoid this becoming 4 different tags).
  2. Shots should come from the higher ISO’s that your camera offers. The before photo MUST show visible noise. Your photo must have EXIF so More Properties works in Flickr to be eligible.
  3. Multiple entries allowed, but only one prize per winner. Winner will be notified via a personal comment by me to their photo and via Flickr mail that that they have one. You will need to provide me with your real email address, name, address and phone number so that you can be registered and then a license will be sent to you from a sponsor or myself.
  4. Void where prohibited, and the winner is responsible for taxes on the prize (if applicable).
  5. I reserve the right to disqualify any entry and the winner will be selected at my discretion. I also reserve the right to cancel the content in the event that the sponsor(s) should be unable to deliver the prizes for any reason. The pictures are subject to the terms of Flickr.
  6. By participating you grant me the royalty-free right to display your entry on this blog (via a direct link from Flickr) for the purpose of noise reduction related articles. If you do not wish for me to do this, then please send me Flickr mail and I’ll exclude you from this clause in email.
  7. Entry deadline is April 24th, 2009 and winners will be announced on this blog with a inline (assuming you aren’t excluded in #6) and direct link to your photo on or near April 26th, 2009.

Sunday, April 5, 2009

PictureCode Noise Ninja 2.2 (Noise Reduction Roundup 4 of 5)

If you talk to most pro photographers (especially photo journalists) and ask them what they use for noise reduction and the answer will almost always be the same – Noise Ninja. This is the standard by which all other noise reduction products will be measured, and the grand daddy of them all. Big name sites like RobGalbraith.com and Luminous-Landscape.com have sworn by this product, and it is the only product I used for noise reduction prior to this article.

PictureCode is all about noise reduction and is very hard core. Just read their docs or talk to anyone on the PictureCode team, and you’ll quickly discover that this company knows a ton about noise reduction. They’ve given their users the most options to calibrate their noise profiling through camera and scanner profiles so you can get the best results possible for your device. In addition they make profiling charts available so you can create your own profile for your camera and lens for the most advanced auto profiling possible.

Visit their site for some samples of what this product can do, and watch their videos which demonstrate how to use Noise Ninja, do batch processing and how to integrate with Lightroom.

How does it work?

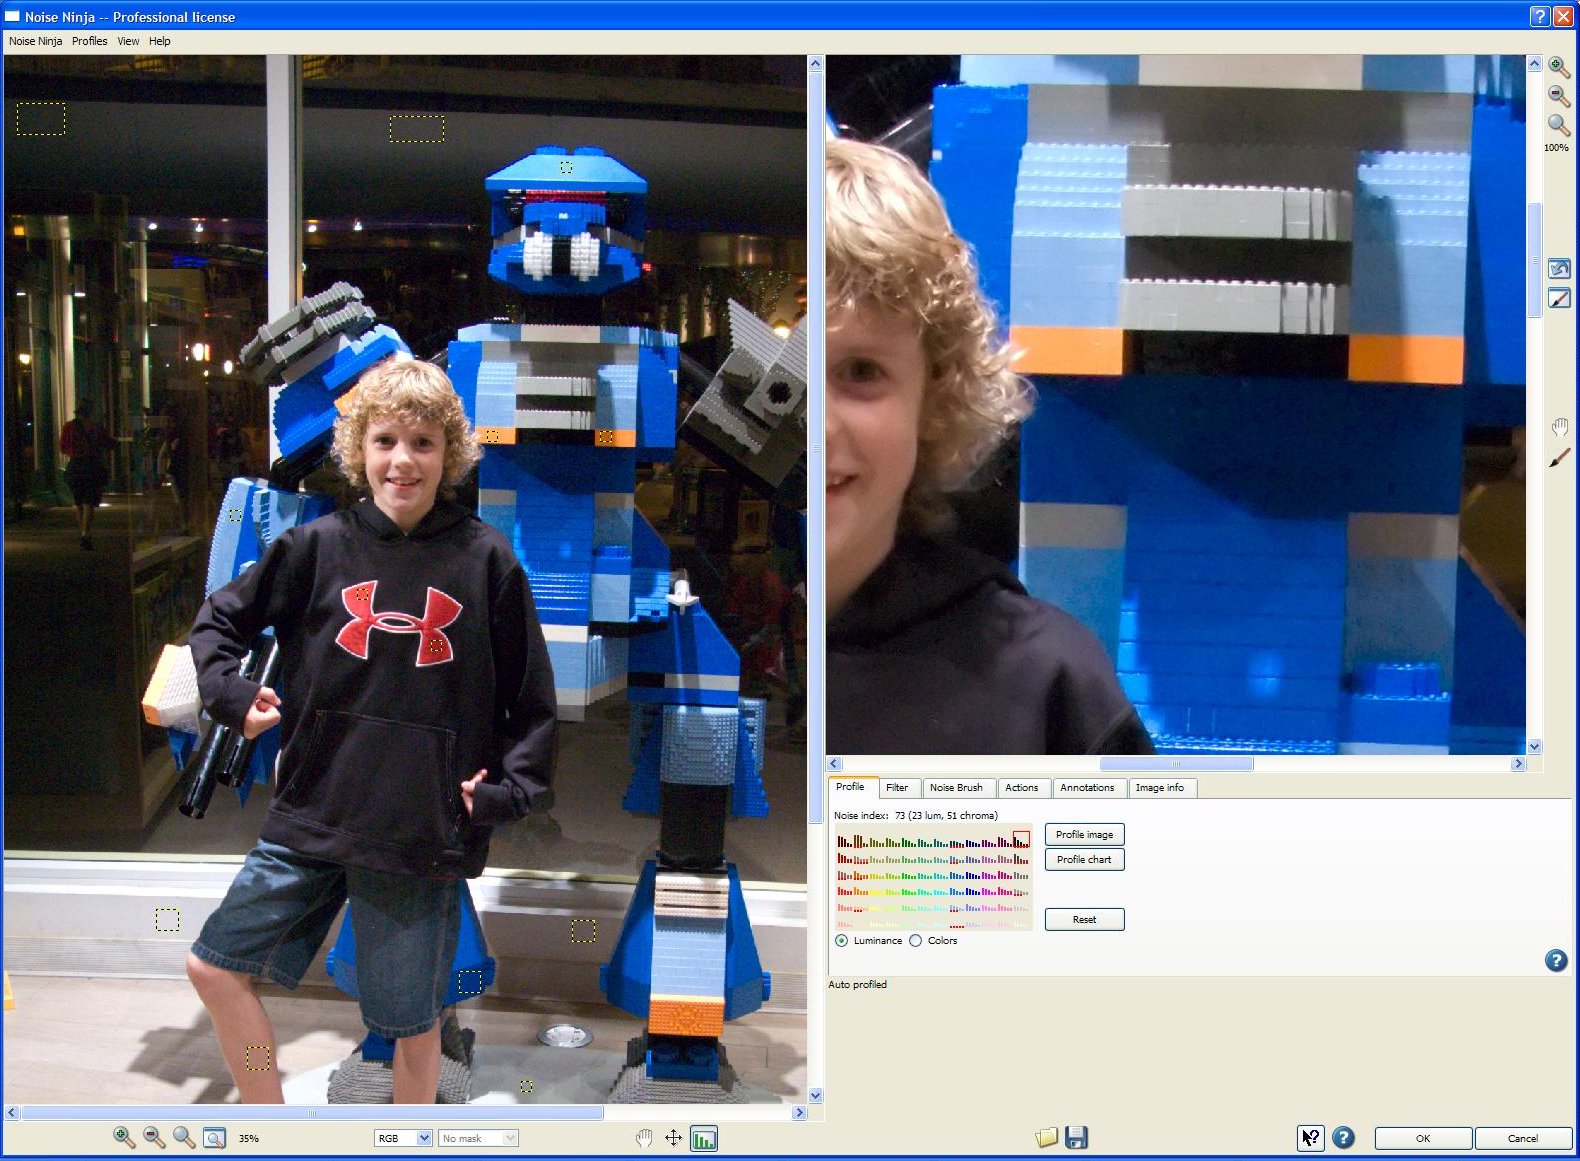
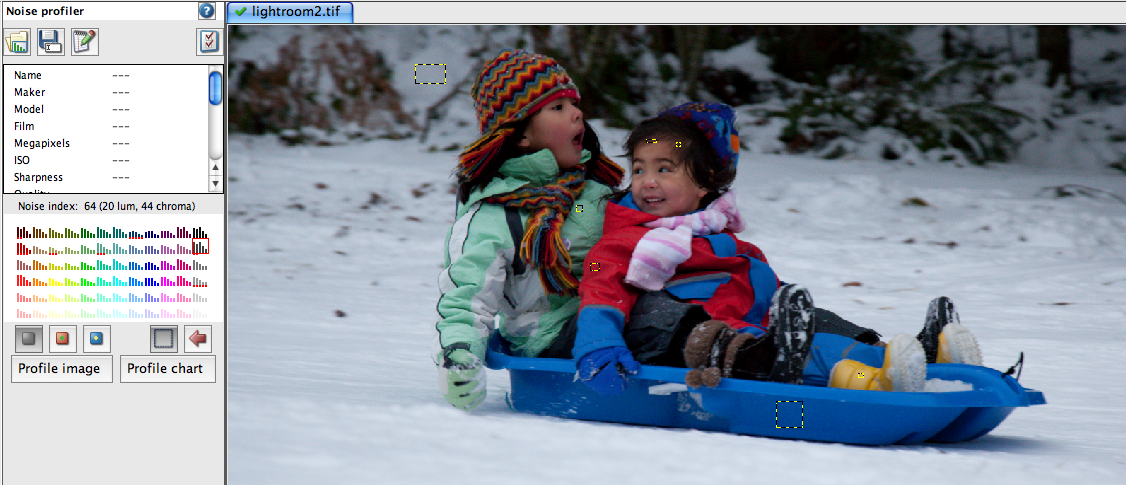
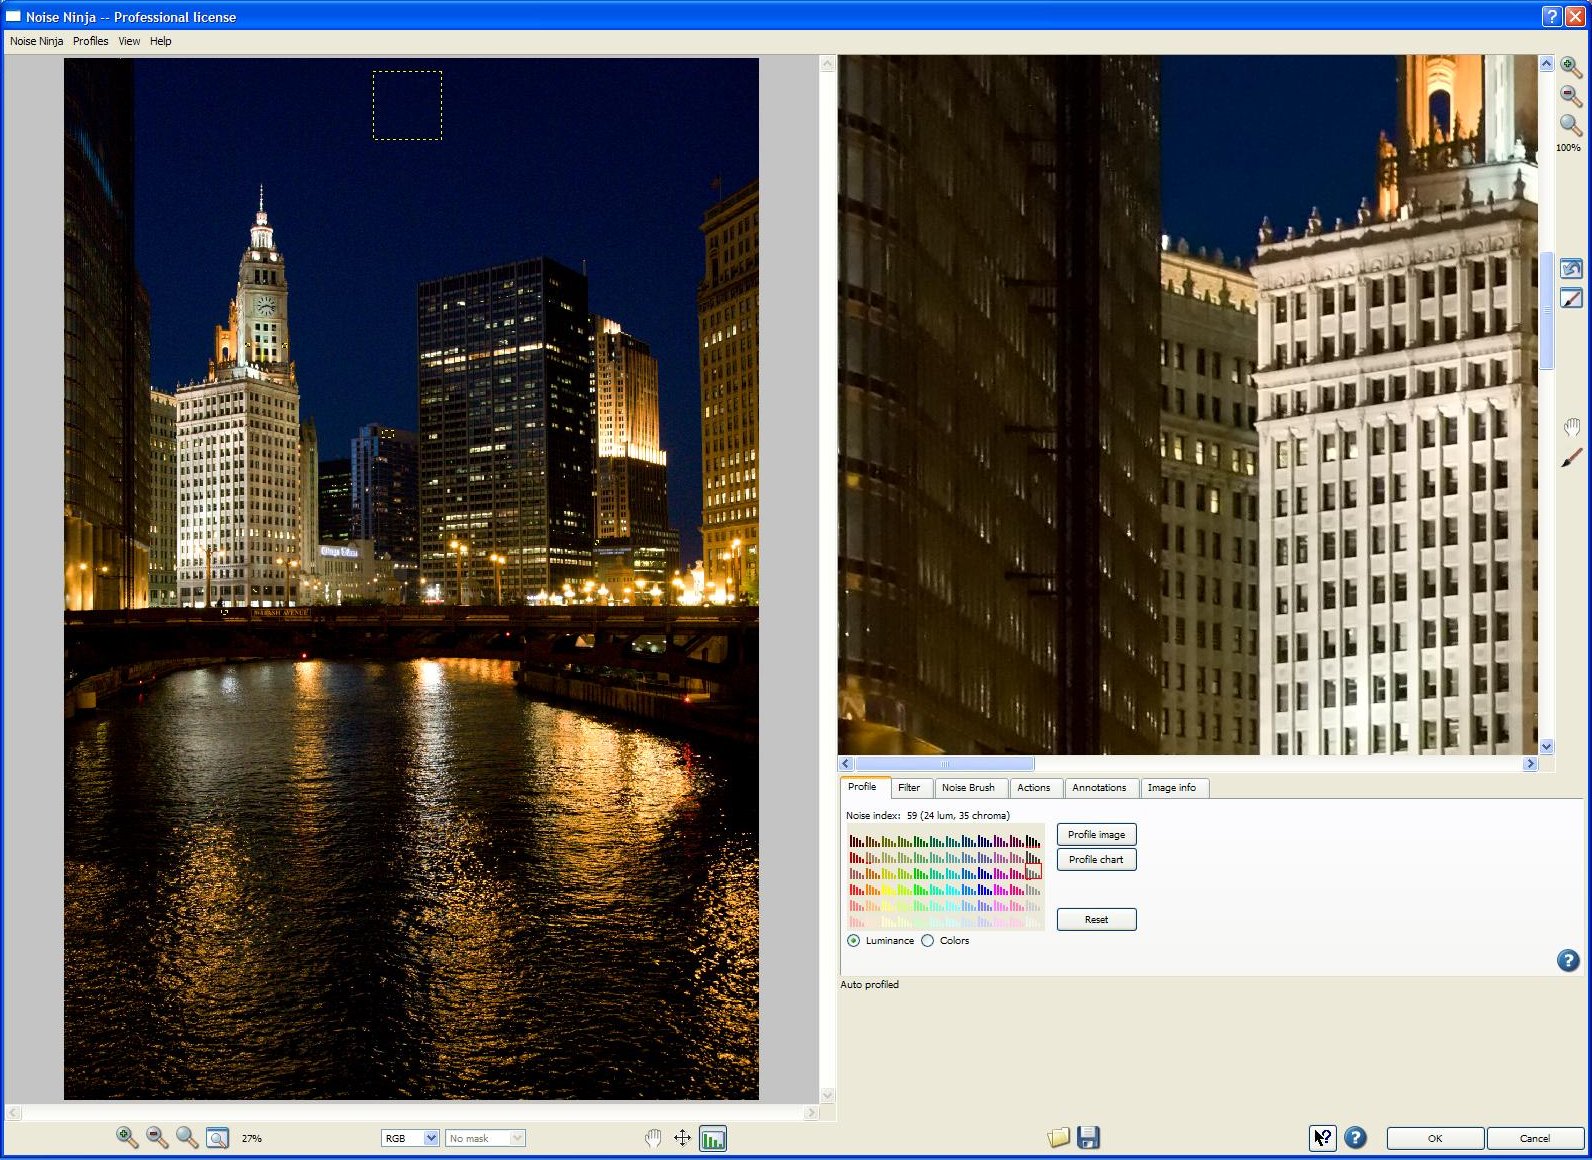
Of all the products in this roundup, the user-interface for Noise Ninja was probably the complex and intimidating. This isn’t necessarily a negative because it is also the most advanced and offers significant control over how your image is processed. Here’s the user interface for Noise Ninja 2.2 (build 2.2.0b):

Click to view a larger version To get the best results you’ll want to see “Auto matched:” followed by your camera (or scanner) profile loaded. This gives Noise Ninja a good idea about what is noise and what is not from your camera. If you are super cautious, you can create your own profiles. You can even go to the extreme and create custom profiles own using the same exact lens, aperture and ISO that was used for the picture in question. I’ll do this later in this article to show what difference it makes, but even if you don’t do that you can download profiles off their site to get you started. While some of you won’t need this kind of precision, it’s a powerful feature to know that you have at your disposal – especially for those doing astrophotography or microscopy work where important data can’t be mistaken for noise.

Just like with Noiseware, I do my noise reduction changes on a merged layer (CTRL+SHIFT+ALT+E) in Photoshop so I can undo if I change my mind later. However, unlike Noiseware, you can use the Noise Brush to control where noise reduction is applied and where it is masked. This is similar to the brush functionality in Nik Software’s Dfine product, but I prefer Dfine’s implementation of U-Point and Brush much better. Some of you might prefer the Noise Brush since it avoids masks and returns results with the edits made in the user interface.

These guys know their stuff

The team at Noise Ninja is all about noise reduction – that’s all they do – so they are hard core about what is required to get the best balance of noise reduction and detail preservation. I found the following excerpt from their users guide to be very useful in determining how to do noise reduction based on image types:

When to apply noise reduction

As a general principle, you should apply noise reduction as early as is practical in your workflow - ideally, before other editing operations like tone adjustment, color balancing, sharpening, or resizing. Adjustments like these can shift pixel values and distort noise levels in unpredictable ways, and this can make it more difficult for Noise Ninja to remove the noise effectively. Sharpening and resizing, in particular, should be deferred until after noise reduction when possible. (Modest amounts of in-camera sharpening are usually okay, however.)

If you shoot RAW: If you use a raw file format like Nikon NEF or Canon [CR2], it might require some experimentation to determine the best way to integrate Noise Ninja into your workflow, and you also might have strong preferences regarding how you want to use the different tools. Raw conversion utilities differ widely in the way they treat noise, and they typically allow numerous adjustments to be made during conversion. Some users apply minimal adjustments during raw conversion, apply Noise Ninja, and then make other adjustments using Photoshop or some other editor. This allows them to profile their camera and re-use the noise profiles for each image. Other users make arbitrary adjustments during raw conversion, and then they use the manual or automatic profiling tools … to create a noise profile for each image.

Noise Reduction Roundup Images

This product is one of three excellent after-market products that I am reviewing as part of my Noise Reduction Roundup article.

Initially I processed the original images in Canon’s Digital Photo Professional (DPP) 3.5. When one of the product engineers raised a concern about JPEG compression I decided that it made more sense to import the RAW into Photoshop via Adobe Camera Raw (ACR) 5.2. I then used that single PSD to work on all the photos.

Here’s the exact process I used:

  1. Open CR2 in Photoshop CS4 32-bit on Windows Vista 32-bit
  2. This launches ACR 5.2, go to the Detail tab and set Noise Reduction to 0 (XMP data from disk has cropping info – XMP was generated from Lightroom 2.3 where I catalog my files)
  3. Open object as a Smart Object at Original Size
  4. Duplicate the layer twice
  5. Rasterize the third layer & copy 3 more times
  6. Name each layer (original, acr, photoshop, noiseninja, dfine, noiseware)
  7. Save PSD (these are huge)
  8. Apply corresponding filter to each named layer (using layer comps to define each layer and hide other layers) using default values (run filter, press OK when dialog appears)
  9. Save PSD
  10. Switch to each layer (using layer comps) and do a File | Save As… JPEG and choose 12 when the dialog comes up (although by accident I did 10 on Tokyo for all of them).
    • For Chicago, I created a Text layer watermark and showed both the image and watermark layers.
  11. I realized that these images had the wrong color profile, so I had to re-open them all, apply the sRGB color profile and save again at JPEG 12.

The images below are part of the roundup images. The original link shows a JPEG 12 version of the original with no noise reduction added (the default setting is always to add a little). The Auto link was processed on a duplicate layer using the automatic settings (i.e., the same results you’d get if you ran the filter and just hit OK right after installing this product). This image was saved as JPEG 12 in Adobe Photoshop CS4. The Suggestion version was processed the same way, but with the instructions found below the links.  As you can see from the images below the results are outstanding. Hover over images to see before and after (using auto) results, but you have to look very carefully. Hints about where to look are included for each image, but its best to click the hyperlinks to see the full size images and switch between tabs in your browser to see the differences. You may download and compare them in Photoshop, but please delete them when you are done comparing.

This article includes a before, auto and suggested 100% crop to compare the differences. For the best results, click on these images to view them at 100%.

The final article will include six 100% crops next to each other so you can more easily see the differences together, so stay tuned to this entire series for the best results.

DISCLAIMER: This isn’t a scientific comparison. The reader should compare these images for relative noise, but any final judgments should be made by conducting your own experiments using your own images on your image editing system.

Canon G9 @ ISO 400

Here’s a shot I took with a Canon G9 at ISO 400 which was fairly noisy. Hover over the shot below to see the before and after (pay attention to the top of the image to see the bad noise in the original). This is straight out of camera with no post-processing, so it still needs a little work (especially sharpening):

Mouse over to see before, mouse out to see after

 You MUST click on this image to view the Original for an accurate comparison

Original Auto Fix PictureCode Suggestions

Fernando Zapata, a Senior Programmer at PictureCode, offered the following suggestions on how to improve the default results:

  1. Used ACR to convert the raw file, using the ACR defaults but with all sharpening and noise reduction turned off.
  2. Modified auto profile (see screenshot below) by adding and removing some selections.
  3. Tweaked luminance strength and smoothness (see settings file).
  4. Used the noise brush on the boys hair.
  5. Used it on his socks (as a test). It brought back some fine detail you can spend a lot of time tweaking with the brush but it is best to pick the areas where it is worth your time. In this case the kids hair.
Click for a larger image

Canon Rebel XTi @ ISO 800

Pay attention to the building in the back of the scene on the bottom left side of the image when you hover in and out below:

Mouse over to see before, mouse out to see after

You MUST click on this image to view the Original for an accurate comparison 

Original Auto Fix
w/o camera profile
PictureCode Suggestions
  Auto Fix
w/ camera profile


Fernando Zapata, a Senior Programmer at PictureCode, offered the following suggestions on how to improve the default results:

  1. Used ACR to convert the raw file, using the ACR defaults but with all sharpening and noise reduction turned off.
  2. Modified profile see screenshot.
  3. Just used the defaults for the filter settings.
  4. Touched up with brush the following areas:
    • The blue sign
    • The portion of the red sign with white letters that is right of the blue sign
    • Used the smallest brush size small portions of the wires between the two lamp posts. This is not necessary but if you wanted to enhance even these very small details you could.

Click for a larger image

Canon 5D Mark II @ IS0 2500

Pay attention to the little girl’s hair when you hover in and out below:

Mouse over to see before, mouse out to see after

This is a 100% view image - no click required

Original Auto Fix 
(No Camera Profile)
PictureCode Suggestions
PictureCode Profile My Custom Profile
 
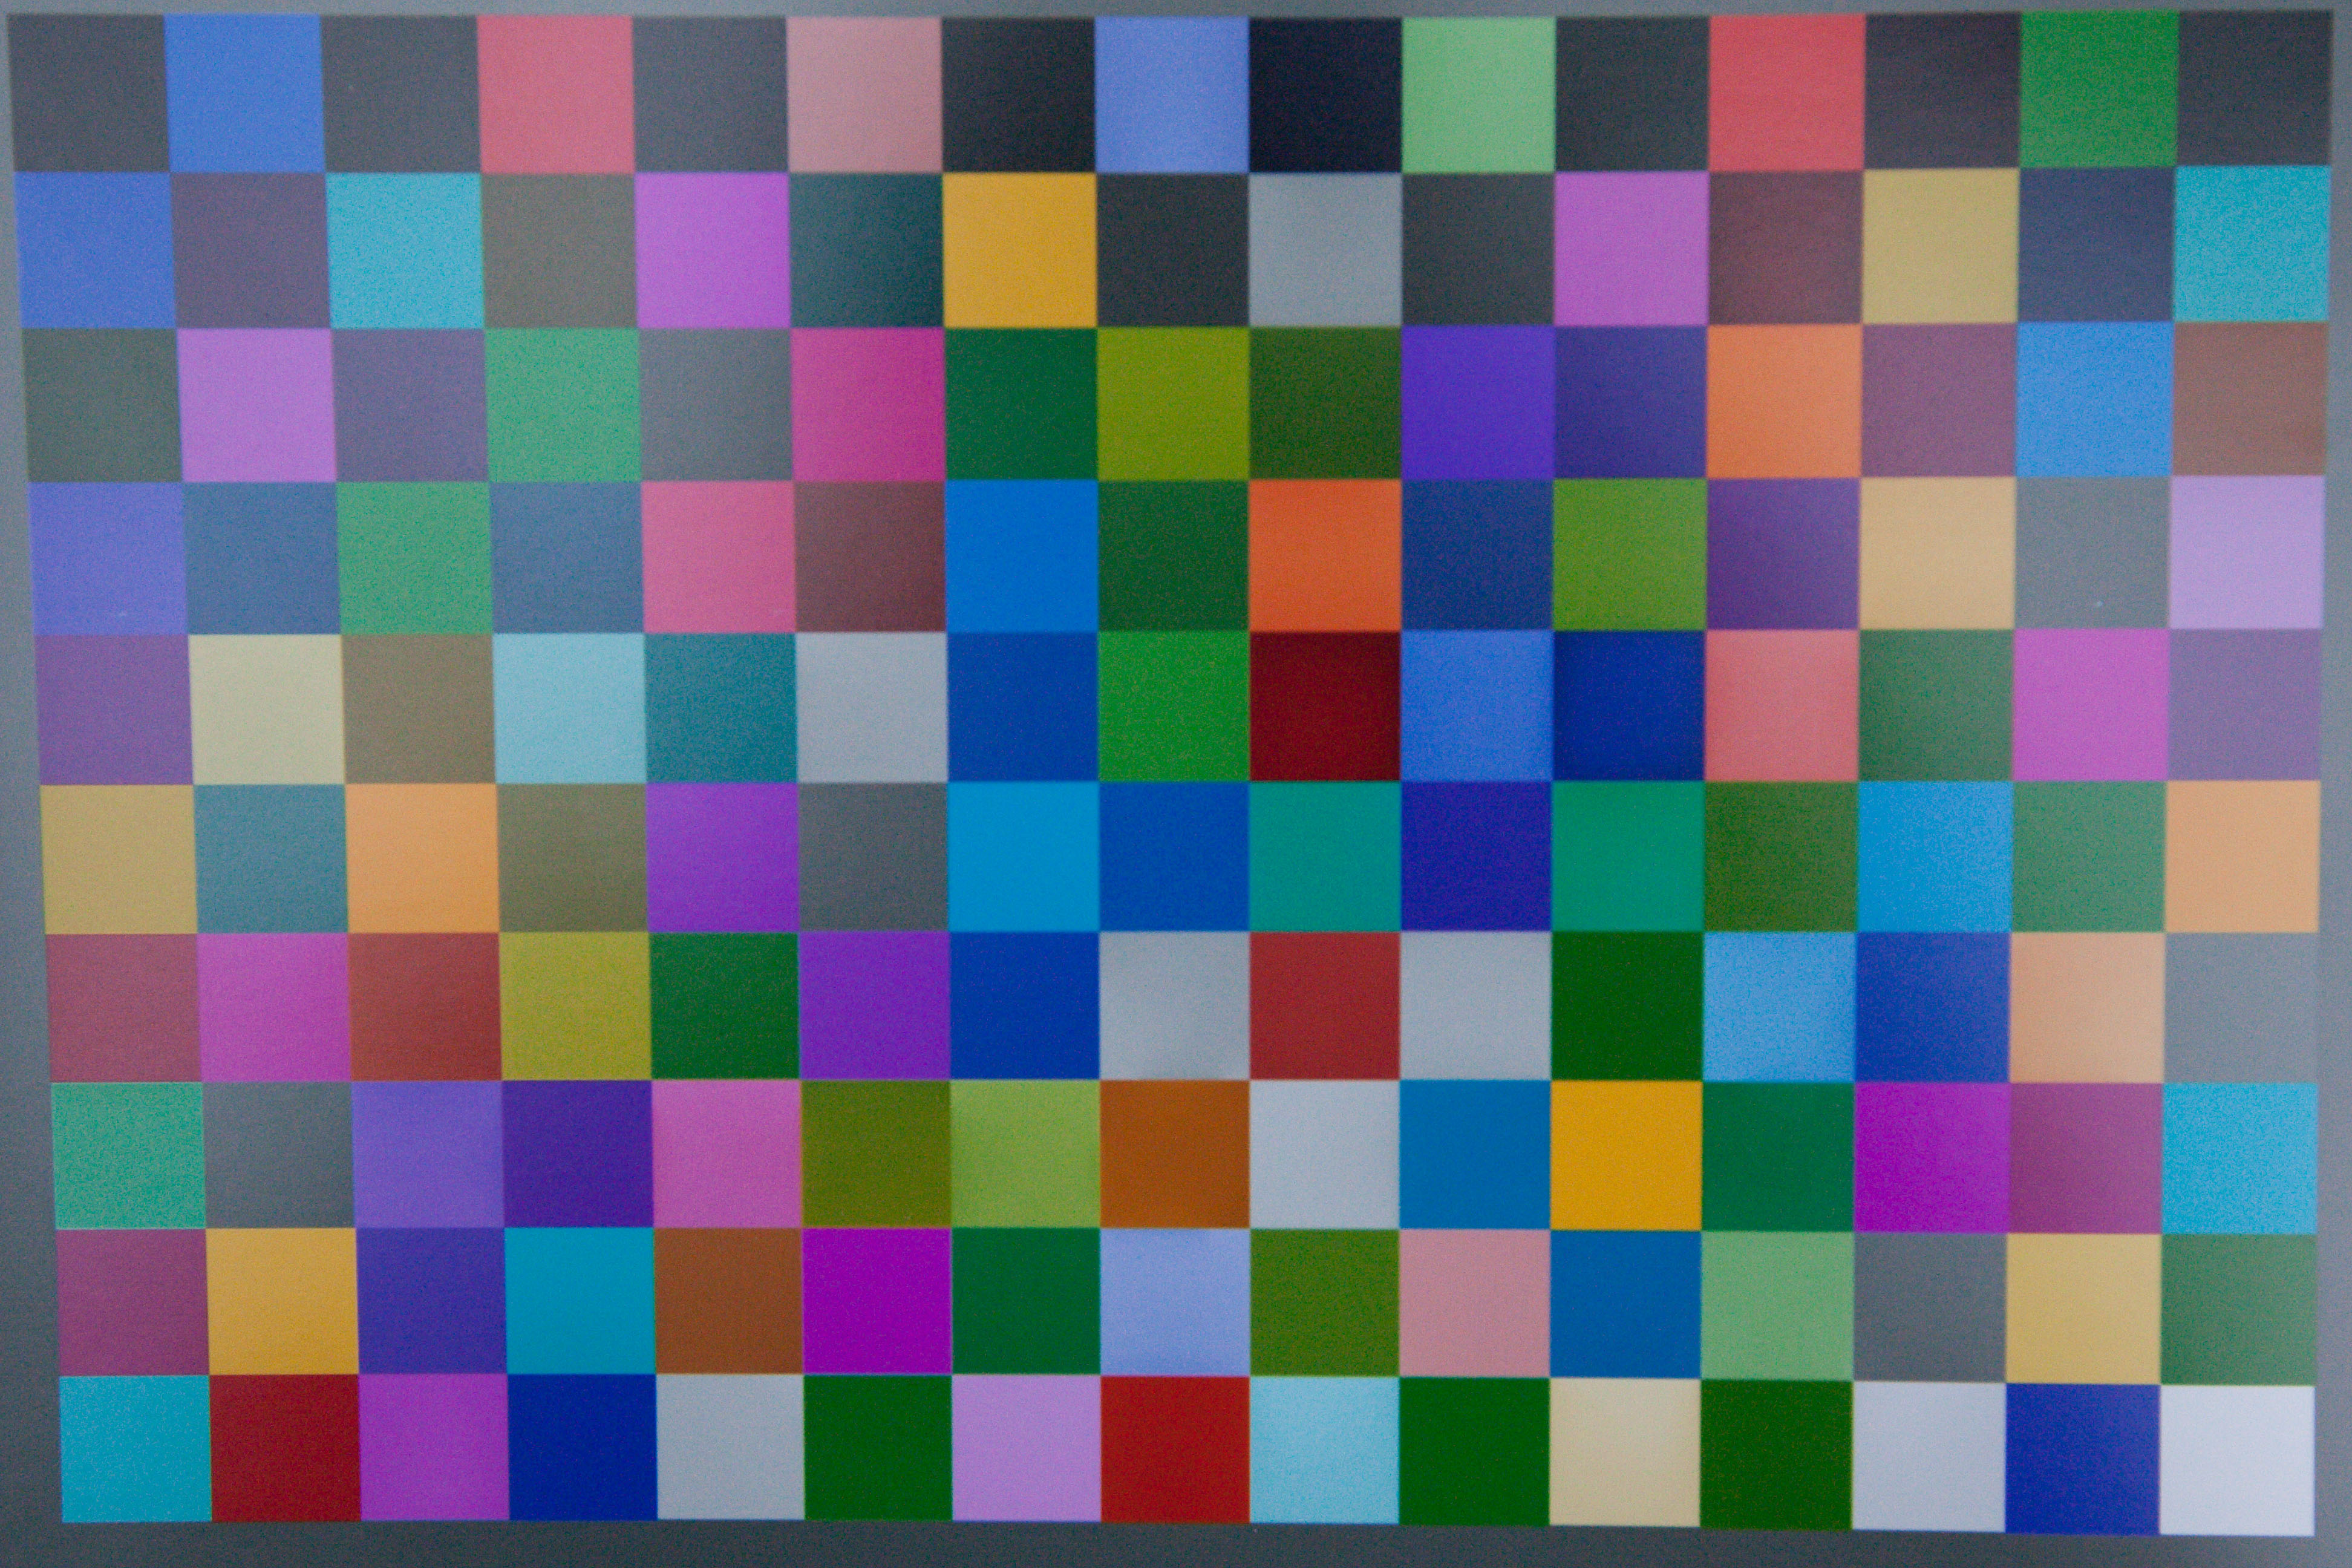
This is the first photo where I created my own custom profile as PictureCode recommends. Here’s a picture of my profile chart, set slightly blurry (to avoid paper texture) and shot with the same lens, ISO, and aperture as the photo of the girls. The only difference was shutter speed which must vary for a proper exposure.
 
Click for Full Size version (JPEG 8)
 
The process was fairly straightforward, but I think my profile might be off just a little bit because the darker squares in the picture are from my fat coconut head blocking the light on the image, so the picture wasn’t lit consistently.
 
Fernando Zapata, a Senior Programmer at PictureCode, offered the following suggestions on how to improve the default results:
  1. Did this one on my Mac [at home].
  2. Used Lightroom with same settings for raw conversion as others in ACR.
  3. Used standalone version (same noise reduction engine).
  4. Used manual profile (see screenshot).
  5. Set chroma settings at max.
  6. Increased luminance smoothness just a tiny bit above the default to help with some of the green noise in the younger girls face.
  7. Didn't use the noise brush on this one as I didn't feel that it needed it but you could use it to touch up the most important parts of the image.
Click for a larger image
Fernando’s version felt a little soft for my taste, so unless I did something wrong in the Mac to PC translation of his notes, I think my favorite version was the PictureCode camera profiles with the Auto settings.
Trouble with Noise Reduction in Reds

One of the observant readers of this blog pointed out to me that none of the products in this review seem to be controlling noise in reds as well as they do in other areas. Here’s a good example that shows the problem:

Jim Christian, Founder of PictureCode, shared this explanation of this phenomenon:

I've noticed this with saturated reds on a few occasions.  I haven't had a chance to analyze it carefully, but I suspect there are multiple factors that may come into play to varying degrees, depending on the image and the camera.  E.g. white balance scaling (red can be scaled twice as much as green and blue for daylight or cloudy white balance for a 5d Mk II); noise-amplifying off-diagonal terms in color correction matrices replace some relatively clean green with high-noise blue in the corrected red channel;  lower "headroom" for saturated reds in some color spaces (i.e. it seems relatively easy to bump up against gamut boundaries in the reds, resulting in lower effective available precision); and the standard methods used to separate luminance and chroma components (and perhaps inaccuracies in their correspondence to human perceptual responses).

Canon 1D Mark III @ ISO 3200

Pay attention to the building on the left side of the image when you hover in and out below:

Mouse over to see before, mouse out to see after 

You MUST click on this image to view the Original for an accurate comparison

Original Auto Fix* PictureCode Suggestions
PictureCode Profile* My Custom Profile

* = There are some slight color variations to these two images due to an accidental AdobeRGB –> sRGB color profile conversion. No other images in this set are impacted by this issue, and all can still be compared for relative noise. The Auto version used in the 100% crops was from the “My Custom Profile” image. Here’s the profile image I used to build my custom profile:

Click for Full Size version (JPEG 8)

Fernando Zapata, a Senior Programmer at PictureCode, offered the following suggestions on how to improve the default results:

  1. Used ACR to convert the raw file, using the ACR defaults but with all sharpening and noise reduction turned off.
  2. Opened in Noise Ninja and created a manual profile by selecting uniform regions at different of various colors and tones.
  3. Tweaked the luminance and strength and smoothness sliders using the standard strategy we recommend in our users guide. This is where each photographers preferences will vary the most. I've gone with what looked best in my eyes.
  4. I turned on the coarse noise option to help with the very low frequency noise.
  5. I looked for areas in the image where I felt to much detail had been lost and use the noise brush set to luminance to bring back the detail. I brushed the following areas:
    • I brushed along building on the left hand side to help bring back the vertical lines.
    • I brushed along the waves to bring back wave detail using large brush strokes as the waves made didn't need much luminance noise reduction. I also brushed along the red waves and with the brush set to chroma.

Click for a larger image

Conclusion

Before this round-up, this was the product I had purchased and used regularly as it has long been known as the most popular product used by the pros. I was happy with the results and thought it was a good product, but the user-interface isn’t  as friendly as some of the others here. In real-world use, if it didn’t give me the results I desire, I would do selective noise reduction using masks or on a single channel (usually the blue channel) only. If you want the most advanced noise reduction solution which offers ultimate control via camera profiling, then nobody in this round up can touch Noise Ninja – period. However if you want to make the most of this product then plan on learning what all of those controls in Noise Ninja do, and ordering a camera calibration chart from PictureCode to create profiles specific to your camera. This will mean a significant time investment up front on your part, but in the end it will give you the greatest control over reducing noise without losing detail of any product here.

PictureCode is a proud sponsor of the The “Ronmart.blogspot.com Greatest Save” Contest, and is donating 4 FREE copies of Noise Ninja Professional to readers of this blog!

Use the links below to view other articles in this roundup: