Showing posts with label GT2531EX. Show all posts

Saturday, May 16, 2020

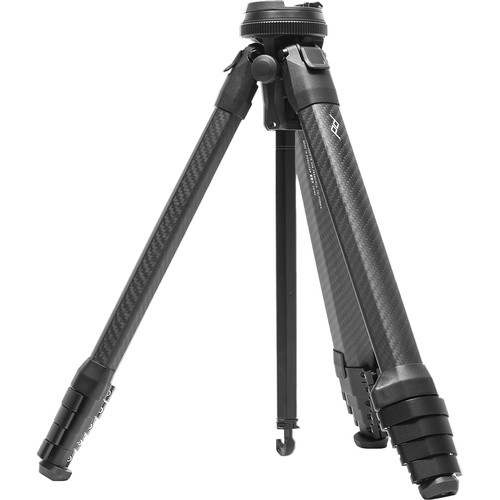
REVIEW: Peak Design Carbon Fiber Travel Tripod

Peak Design Carbon Fiber Travel Tripod at B&H
Peak Design Carbon Fiber Travel Tripod

Years ago I did my tripod recommendations and I settled on a Gitzo GT1541 with a RRS BH-55 head. I also did a tripod head comparison where I switched from the RSS to the Arca-Swiss Monoball Z1 sp (Single Pan) head as my primary ball head of choice.

During some end of year business spending a few years back I also picked up a Gitzo GT2531EX to simplify the process of shooting macros, but the reality is that I usually preferred to the GT1541 so it was used more in the studio than in the field.

All told I probably spent over $2000 for the two complete carbon fiber tripods and ball heads that I still own to this day. With as little as 30 minutes with the Peak Design Carbon Fiber Travel Tripod I found myself wanting to sell all four of them (seriously, make me an offer) so can get this awesome tripod and head combo!

Hands On Thoughts


So lightweight and practical I actually found myself overusing it!

Right up front what I loved the most about this tripod was its lightweight but highly usable built-in ball head design. It addresses the bulkiness challenges I deal with for both my existing ball head and tripod combos I own today, without losing any functionality that I enjoy today. I especially enjoyed the speed and ease at which I could attach and detach my camera with complete confidence.

What surprised me even more was just how well this tripod is built – every detail and texture seems to be meticulously thought about so it makes you feel like Apple designed it. Just take a look at how nice the fast to operate (compared to Gitzo) angle adjustments are below:

Outstanding design and build quality

That knob shown on the right is for height adjustment of the center column, and it has a wonderful soft tactile feel that just screams quality. You can also see the cool looking carbon fiber pattern legs in the shot below.


Sexy Carbon Fiber legs with no pinch height adjustment

Of course pretty means nothing if it doesn’t work well, so I put this camera to use right away with a Sony a7R IV with a Sony FE 24-105mm f/4 G OSS Lens and it never once had any stability issues. I took shots for as long as 25 seconds in portrait orientation as shown below and never did an ounce of shake get introduced into the shot both indoors and outdoors – even with my kids running around me while I was shooting.


Rock solid stability even in portrait orientation

Here’s the result of the shot taken above:


Sony a7R IV with 24-105mm for f/16 @ 36mm for 6 sec at ISO 100

I also found the useful head almost flawless. My only real gripe was the bubble level was very hard to see as shown below, but if your camera has a level (as the one I was reviewing did) then its not really a big deal. Here’s an overhead view of the head:

My biggest complaint about the head is that the level bubble is hard to see

I also agree with other reviewers that the plate for the camera needs support for screwing on with a coin vs requiring a tool which I lost about three times during my review – the last time for good as shown below in the slot where the $20 USD tool once lived:


My recommendation is to NOT leave this plastic mount with the toolkit attached to the tripod as the odds are high you’ll lose it.

Below is a photo that shows the universal plate installed, although the lack of a metal lip does mean you have to re-tighten it time to time to avoid drift when shooting in portrait orientation:


Arca Compatible Standard Plate fits all cameras and only cost $20

It Does Everything Very Well


This thing can almost get to table top size as well as full size

My most heavily used accessory is my Leica Tabletop Tripod & Large Ball Head combo. I literally don’t go anywhere without it, but while I had this tripod out on loan it never left my bag. I enjoyed that I could use this one as a slightly larger but still super low table top tripod (as I did in this random shot when I first unboxed it) as shown above.

Front heavy lenses like the one shown above were no issue for this very solid tripod and ball head combo. I never had any issues with drifting for long exposures either – something that frustrated me with my Really Right Stuff BH-55.

Even my big Canon 1DX Mark II with the 24-105mm f/4L IS II USM lens was no problem for this tripod in portrait mode, but L-Brackets are available for those who get stressed seeing this setup.

Hands On Video

I very rarely do hands on videos, but this tripod just begged for it. Sadly when I got out to shoot I had an equipment failure with my mic so my apologies for using the built-in mic of the iPhone XS Pro with rushing water in the background:


Video Review
(sorry for the bad audio, my remote mic broke)

How Low Can It Go?


It really can go lower then your mama's ever seen it in her life time

If Ludacris was a photographer, he’d approve of this tripod for its ability to get the low shots as shown in these two iPhone snaps I took while out shooting with this tripod.


Even portrait orientation I never would've imagined did not even in my right mind

See the photo above to compare to see how low this tripod starts at compared to my Gitzo GT1541 with a Arca-Swiss Monoball Z1 head mounted on it. Yet even when you put both at max height, its not much shorter as shown below:

The actual tripod is only 2.5 inches taller but the big Arca head on the Gitzo adds another 4 inches of shooting height.

Click here to see a full view of both side by side iPhone snapshot if you are interested.

Easy To Carry Around All Day Long

Because my old tripod was so big I used to carry it on the outside of my bag, but when I did that with this tripod it seemed so unnecessary as shown above. As a result, I started putting it inside my back when I could which was very convenient – especially when sitting down with my bag on my back.

This is a really big deal when you are travelling or hiking with a bag on your back all day, so to say I was excited about this is an understatement.

But Wait There’s More – Mobile Phone Support!

One of the coolest, yet simplest features of this tripod is the fact that the center stalk hook actually hides a cell phone attachment in it. It’s so small and subtle that I almost missed this wonderful feature.


An excellent cell phone tripod mount included and nicely hidden in the center stalk


This is the best cell phone tripod I've ever used

Conclusion


My New Favorite Tripod In Its Cool Box

In case you haven’t figured it out yet, I love this tripod. Yes, its expensive but if you consider the fact that it has a ball head included then its actually about $500 USD cheaper than most recommended carbon fiber tripod and head combos.

If your budget is tight and you don’t mind an extra half pound of weight and 20% less stability then you can save $200 USD (at the time this article was written) and get the aluminum version. At that point its cheaper than the average ball head and you get the head, mounting plate (again which usually costs extra), a great mobile camera mount, and carrying case.

Simply put, this is is the best tripod and head combo I have ever seen so I highly recommend it.

Where to Buy?

CLICK HERE to learn more or buy today at B&H.

You can also see some cool videos and more details about the carbon fiber and aluminum models on the Peak Design website.

See cool videos and more details on the Peak Design website

Other articles you may enjoy

Enjoy more reviews on the Reviews tab as well as Ron's Recommendations.

Sales Tax Reimbursement with Payboo

Don’t forget, with the B&H Payboo card most buyers can get the sales tax reimbursed. Click here to learn more.

Disclosure

If you make a purchase using links found in this article, I may make a commission. It doesn’t cost you a penny more, but it does help to support future articles like this.

Tuesday, August 13, 2013

Tripod Recommendations–2013 (Updated Aug 13, 2013)

Gitzo GT3530LS, Silk 700DX, Gitzo GT2531EX & GT1541 Tripods
Recommended Tripods From Left to Right:
Gitzo GT3530LS (replaced by Gitzo GT3532LS
), Slik 700DX, Gitzo GT2531EX & GT1541
Photo by Ron Martinsen - All Rights Reserved

Thom Hogan back in 2003 wrote the definitive article on tripods where he states that he can save you at least $700 if you by the right stuff the first time, but I didn’t listen. I followed the exact path he says most consumers follow and guess what – he was right. I ended up wasting about $700!

As great as Thom’s article is, it’s woefully out of date which is no surprise giving the dizzying array of tripod choices. In this article I hope to offer some selections based on my conversations with experts at B&H as well as a non-scientific poll of pro photographers and club members.

My objective was to find at least 4 excellent tripods that met the needs of most photographers, and I’ve accomplished that goal. I think all of the tripods I’ll mention are an excellent investment and worth owning, but which one depends on your needs. Like most things in photography, there is no good “one-size fits all” solution. I REALLY wish there was, but there isn’t.

Like you, I face the dilemma of needing to purchase a new tripod myself and as much as I wish to win the lottery, I haven’t. As a result, I must decide where to spend my limited resources for my next tripod so I invite you to join me as I go in-depth on my research on each of these tripods.

My needs may not be the same as yours, so you can purchase any of these with confidence that you aren’t getting a piece of junk that you’ll replace in a few months. However, there are tradeoffs for each one so consider your needs carefully before making the right choice. Going for the cheapest, the most expensive, the lightest, or the most flexible could be a critical mistake if you don’t really give thought to how you’ll actually use your tripod.

My 2013 Tripod Recommendations

Thanks to the great people at B&H,I have had the pleasure of reviewing some of the coolest Gitzo tripods on the market right now as well as a excellent value tripod by Slik & Induro.

The models featured in this multi-part series are:

You will notice that there are no Bogen Manfrotto legs in this list. This is because the legs I replace are Bogen Manfrotto and they have really let me down. I’ve had some serious problems with Manfrotto products over the last year, and my current Bogen Manfrotto legs are falling apart (see my Induro CT014 review for details). As a result, I went to the brand that everyone seems to trust the most – Gitzo for what is arguably the best legs in the business. To learn more about Gitzo, visit http://www.gitzo.com/.

What about Heads & Kits?

In August 2011, I did a tripod head comparison where you can learn more about some of the great products on the market. My recommendations are still the same in 2013.

Here’s what I used before switching to the Arca-Swiss Monoball Z1 sp (Single Pan):

Really Right Stuff BH-55 - Photo by Ron Martinsen - All Rights Reserved

When it comes to heads my favorite used to be the BH-55 made by Really Right Stuff (RRS), but after having the knobs come unscrewed on me a couple times while I was teaching workshops, I switched to the Arca-Swiss Monoball Z1 sp (Single Pan). I still use and enjoy the BH-55 because it’s a nice head, but I just prefer the Arca Swiss when I can’t afford a failure in the field.

Yes, good heads are insane expensive. I hate the price and I resisted them for years because I thought it was nuts to spend that much money on a stupid head. I still feel that way, but the BH-55 is the head that many people will tell you to get. It’s flexible and works extremely well.

Yes, RRS does nickel and dime you to death. Yes, their web site leaves a lot to be desired. Yes, they shouldn’t cost that much. Yes, there are Acratech, Gitzo, Induro, Kirk, Markins, etc… that people will swear on the Internet that are just as good or better. I encourage you to read my tripod head comparison article to see how they stack up against this head and make an informed decision about which head is right for you.

But what about the BH-40?

Don’t buy a BH-40 new, instead search for one used. You’ll find plenty. It’s a great head, but you’ll find that most end up needing the added support of the BH-55, so this becomes a frequent buyers remorse purchase that ends up on the used market so that the person in question can get the BH-55. You can also get a lighter head that works well for hiking by getting one of the less expensive alternatives in my tripod head comparison.

What about Monopods?

Click here to see my monopod recommendations article.

Will you be doing any other tripod reviews?

Yes. Like many of you out there, I have limited funds and would love a tripod that met more of my needs than any of the offerings in this series. I love them all, but all have trade-offs that cause me to pause when spending this kind of money (excluding the Slik & Induro). If in the future I find a better tripod, I will update this article to include a link to my review.

Aug 2013 Update: Send me your favorites and I’ll consider them for the next update

Links to Tripod Reviews

I am doing in-depth reviews of EACH of the tripods mentioned at the top of this article. Come back to this page and click the links below (when they become live) to see my reviews and photos of my 2011 tripod recommendations:

Disclosure

B&H has provided me with the tripods featured in this series on a loaner basis. I do not get to keep them and will be returning them back to B&H if I choose not to buy them. I will probably purchase one using my own money with no special discount from B&H or the maker. Induro, Gitzo and Slik had nothing to do with this article and as of this point and time I’ve never spoken to anyone from either company.

The selections made from this article were purely based on popularity recommendations from a variety of sources. I make no guarantees of any type, but all products that I am considering to purchase for my own needs. I am simply sharing my shopping experience with you.

If you purchase using the links in the article from B&H, I may get a commission. Thank you for supporting this blog by using my links when you make your purchase.

Monday, December 26, 2011

High Speed Drop Photography–Getting Started by Joseph Calev

There are many things in photography that if given enough time and financial resources, I’d probably try out. However the reality of my life is that I don’t have enough time or money to do cool things like High Speed Drop Photography. As a result, my friend Joseph Calev is here to guest blog again to tell you about his experience getting into this cool new world.

NOTE: The content that follows is Joe’s opinion. I have not made edits beyond fixing typos or sizing.

Ron

Enjoy and Happy Holidays!

Introduction

For quite some time I have been interested in high speed photography.  Last week I finally bit the bullet and picked up some gear to make this a lot easier.  In the following article I will discuss my setup and some of the decisions I have made thus far.  Keep in mind when reading this that I have been doing high speed photography (so far just drops) for only a week and I am still figuring a lot of things out.  Below is one of the first shots I took with my setup.

clip_image002
Water Drop by Joseph Calev

The basics of high speed photography

Some time ago I spent a great deal of effort photographing drops from melted ice.  I spent several hours outside with my camera in the exact position I needed it and continuously pressed the shutter at the right moment.  More often than not I missed my goal and out of every 100 shots I would wind up with about four or five in focus.  Of course, of the photos in focus many of them were quite uninteresting.  As you can imagine, it took quite a few shots and a lot of time to get something decent.

The real problem in high speed photography is improving the odds by making sure you have something in focus in the viewfinder with each shot.  This allows you to spend more of your time working on the most crucial part - making a photo that is actually interesting.  The key here is firing your camera and flash at the exact moment you need to.  There are really four parts to high speed photography.

The trigger - This is the thing that has to happen for some action to start.  For all of my water drops thus far this has been the act of pushing a button.  There are many types of triggers though.  You have infrared and laser triggers, microphones, and special triggers for ballistics.  The idea is something needs to happen to start the events in motion that will lead to your photo.

The flash - This is one case where it is better to have a small speedlight rather than a larger powered light.  You need your flash to freeze your subject as most cameras only go down to 1/8000 second - too slow for a lot of high speed work.  What many do not know about lights is that a 'more powerful' flash creates this by holding the light for a longer period.  Therefore for high speed photography you need to set your flash at the lowest setting.  I currently use two 580EX flashes set to 1/128 - which gives a duration of around 1/40,000 second.  At some point I hope to pick up the Microflash Pro.  This flash gives the same power as two 580EX flashes at full power at a speed of 1/28,000 second.  Alternatively it can go down to speeds of 35 microseconds.  However, at a price of £1800 it was too much to include in my initial setup.

The camera - As I previously mentioned it is the flash that illuminates the subject.  The camera doesn't do much in the equation except cause problems. :) The main issue is there exists a lag between when the camera is triggered and when it actually fires.  On Canon cameras, this lag actually varies unless you use mirror lock.  With mirror lock, I measures my 5D Mark II to have a shutter lag of 83.7 milliseconds.  For drops this is not much of an issue.  You simply need to factor your shutter lag into the equation.  However when photographing things that move invariably and quickly - such as insects - this will not work at all.  For this type of photography you need a special solenoid shutter that typically fits in front of your lens.  You then place your camera in bulb mode and trigger your solenoid.  A good solenoid shutter will have a lag of less than 5 milliseconds.  I currently do not have such a shutter but I anticipate having one by the summer.

The orchestrator - The most crucial piece of equipment you need is something that reacts to the trigger by firing the flash and the camera.  There are several triggers available on the market today.

  • Hiviz - These are very simply hobbyist triggers that depend on the camera being placed in bulb mode in a dark room.  Given a particular trigger it then fires a flash.  Images from these triggers typically have dark backgrounds.  The triggers themselves are not very sophisticated compared to the other options.
  • Mumford Time Machine - This is one of the first high speed devices I heard of and I almost purchased this model.  It is close to the Stopshot in functionality, but I found the specs of the Stopshot to be more flexible.  Stopshot offers more outputs and a lighted screen (add ons to the Time Machine) and it is possible to connect two Stopshots together.  The user interface of the Stopshot also appears to be better.
  • Cognisys Stopshot - This is what I ended up purchasing.  I had a lot of questions about this device before I purchased it and they were very prompt and helpful in answering them.  They are also continuously innovating - unlike the other triggers which seem more like static products.
  • Phototrap - While I am sure this trigger works just fine, from looking at the specs it appears to do less than the Stopshot.  I have the feeling this trigger is more geared towards wildlife photographers in the field, but they do seem to heavily push their system through wildlife photography classes.  Basically you take a wildlife photography class where a photographer shows you some of the great things you can do with the trigger and you wind up buying it before you are done.  From what I can tell though the Stopshot and Time Machine will do more for less money.

My setup

Below is a shot of my current setup.  As I have already stated, keep in mind that I have only had this gear for a week and am still working on things.

clip_image003

One aspect in which I have deviated significantly from many drop photographers is I prefer to use store bought components rather than building things myself.  A quick search on the web will reveal a number of different ways to create a drop setup from wood.  However I wanted something that offered more flexibility.  I am also quite limited in time.  Therefore the following is what I put together.

  • On the sides you can see two light stands.  It doesn't really matter which ones they are.  I tend to prefer taller air cushioned ones but I currently own four different light stands - none of them the same.
  • At the top of the light stand I have a Bogen Clamp on either side.  Between the two light stands I then have a Bogen Arm.  Originally my plan was to attach a background stand holder to each clamp and then rest the arm on the holders.  However this allowed the arm to spin - which is very bad for precision scenarios.  Therefore I have the arm actually held by each clamp and the clamps screwed in to the top of the stands.  This is one great advantage of buying flexible parts as it allows me to improvise when necessary.  This setup allows me to easily vary the height of the siphon.
  • On the top you can see the water siphon from Cognisys.  This comes as part of their water drop kit.  Here is a close-up.

clip_image004

The siphon is attached to Cognisys's tripod holder for the siphon.  I am not crazy about this holder but it works.  The most annoying thing is I have to unscrew it to take the siphon out.  I would have preferred some type of clamp and someday I may look into whether there is some type of bracket the will attach to a Bogen Clamp that will do a better job.  The tripod holder is screwed into another Bogen Clamp (can you tell I really like Bogen Clamps?!)  Immediately below the siphon is the water valve (with the red wires attached).  This connects to the Stopshot and releases the water.  Below the water valve is a small infrared trigger.  I am actually not using this right now as the trigger is a button push but this will factor in when I begin using multiple liquids.  To the left of the siphon I have another Bogen Clamp with a heavy duty Bogen Flexible Arm holding another tripod bracket.  In the future this will hold another siphon - which I already have.  This will allow me to work with multiple liquids at the same time.  On the far right of the shot is yet another Flexible Arm + Bogen Clamp for a third siphon.  The blue inside the siphon is from food coloring.  The upside down Sub-Zero box behind the setup is a fort my kids made (most expensive fort yet).

Here is a close-up of the bottom setup.

clip_image005

I am currently targeting the drops to a setup of brightly colored bowls I bought at a local store.  In the future I plan to also buy some straight pans and put a white background behind it.  I can then change the color of the background by modifying the flash illuminating it.  I am still playing with lighting setups but for now I have one 580EX on a small Gorillapod.  The other is held up by another Bogen Flexible Arm attached to another Bogen Clamp.  I have no preference for one way or the other but I only own one Gorillapod.  In this shot I have both flashes gelled with Rosco modifiers from the Color Effects kit (which comes in sheets that I cut to 3" x 5" gels).  In this particular shot IMHO I would have been better off without the gels.

In the corner of the table you can see the Stopshot.  The Stopshot is connected to the water valve above.  A special cable connects the Stopshot to my camera and I have both flashes connected to the same output via an RCA Y cable.  The camera itself is on my tripod that I previously discussed on Ron's blog [see Ron’s tripod & head recommendations].  It is a Gitzo 2541EX with an Acratech GP ball head and two Really Right Stuff macro rails.  It is the same tripod I typically use for macro photography.  On the camera itself is the 100mm 2.8 IS Macro.

Other miscellaneous items on the table are a ruler to measure the height of the water valve (to do calculations for the timing), a pencil I use for focusing, and a measuring glass I use for pouring liquids (don't tell my wife though - she still wonders where it went to...)

Below are some of my results so far.

clip_image007
Drop Monster by Joseph Calev
clip_image009
Water Man by Joseph Calev

Overall I am very pleased with the Stopshot thus far.  Once you figure it out it works quite well - though this is definitely one piece of equipment where you need to read the manual.  It also provides a good lesson in cable organization as I counted exactly 30 cables in the box with my kit.  I now have a rack in my garage just for cables.  I still have a lot of things to learn.  For example I have not dealt with the following yet.

  • Different liquids provide different types of drops.  I have yet to work with milk are additives to water other than food coloring (rinse aid, guar gum).
  • As previously stated I want to try setting the background color via a white background and a gelled flash.
  • I currently own three siphons, but am only working with one thus far.  In the future I want to use multiple drops of different liquids.  With a single siphon multiple drops are supported but are obviously of the same liquid.
  • I also own the cross laser trigger.  In the future I will use this for insects but it has other uses I haven't had time to investigate yet.
  • I also own a microphone trigger, but haven't played with that yet either.

Disclosure

Joe approached me about his excitement getting these products, so I extended an offer for him to blog about his experience. Neither Joe nor I have any known direct affiliation with most of the companies mentioned on this blog. In the limited cases where I do (i.e., Amazon, Adorama, & B&H), I may make a commission if you make a purchase from their site.

Tuesday, November 22, 2011

Holiday Gift Guide for Canon Macro Photographers by Joseph Calev

Today I’m happy to have blog reader Joseph Calev share with you his thoughts on what you might want to add to your holiday wish list to get great macro shots. Joe shoots exclusively with Canon, so my apologies for the lack of Nikon coverage. However, Nikon has equivalent lenses to several mentioned below so in most cases the same recommendations would still apply.

Introduction

Macro photography can be both difficult and rewarding. For me, it grew out of a lack of time to take a day off to photograph. With two young kids at home that simply isn’t an option. However, it is quite easy to go outside or to a nearby park to take a few photographs. With macro photography you rarely need to go very far.

Unlike many other types of photography, macro photography does require specialized gear. It also requires significantly different technique from ‘normal’ photography. As this is a holiday gift guide, I will not discuss the technique at all here. I will also not cover macro gear in general, but instead will discuss specifically what I use on a day to do basis to take macro photographs.

Cameras

The truth is almost any SLR will work for macro photography. The lenses are what make the difference. It is true that many point and shoot cameras work very well for macro photography as they allow very close focus. For example, cameras like the G12 and X10 claim to do macro, but I haven’t experimented with that yet. As a result, I will only focus discuss Canon DSLR’s in this article as that is what I use..

I use two different cameras on a day to day basis – a 5D Mark II and a 7D. The 7D has a few advantages – such as a 1.6 crop and supposedly it works better with the image stabilization in the 100mm f/2.8L Hybrid IS Macro, but I almost never use it for macro. Instead I typically use my 5D Mark II. Why? There are two main reasons.

  • The 5D Mark II provides much better low light performance. I shoot many of my macro photographs hand held and high ISO definitely helps there. With the 5D Mark II I can receive fairly good quality up to ISO 3200. With the 7D I do not feel comfortable going past ISO 400.
  • Due to the pixel pitch of the 5D Mark II, it has much lower diffraction than the 7D. For those not familiar with diffraction, it is an optical phenomenon that causes pictures to lose clarity as one increases magnification and pixel pitch. This results in quite poor quality at higher magnifications on my 7D than with my 5D Mark II.
  • If you are looking for a DSLR camera specifically for macro, low light performance and larger pixels are what you should consider. For this reason I already have a 1D-X on preorder that will eventually replace both cameras.

    Lenses

    Most people are not aware that “macro” photographs may be taken with many different types of lenses. The easiest way to get into macro is to buy either a Canon 500D Close-up Lens (called a diopter) or Kenko Extension Tubes. Canon also makes extension tubes, but unless you are putting them on a large telephoto such as a 400mm the Kenko ones will work just fine. Typically you use a diopter on a telephoto lens (particularly the 100-400mm) and extension tubes on shorter lenses. I will not go further into the details on the difference here – other than to say I have owned both of them and sold the diopter long ago while I still own and use the extension tubes often.

    I will first discuss the lenses I use for macro purposes that are not true macro lenses. Note that I am using a fairly loose definition of “macro”. True macro is 1:1 or 1x – meaning on a 35mm sensor a 35mm subject takes the entire frame. However, when I say macro in this article I just mean “close”.

    Canon 70-200mm & 2x Extender Combo

    One of my favorite lenses for macros is my 70-200mm f/2.8L IS II USM. Below is a shot taken with it.

    Nature's Pumpkin by Joseph Calev (jcalev)) on 500px.com Nature's Pumpkin by Joseph Calev

    The 70-200 2.8 II has a respectable magnification of .21x.  It is also an extremely versatile lens - usable for many other purposes than just macro.  When combined with the 2x III Extender, the magnification doubles and provides even better macro abilities - though it does reduce the sharpness. 

    The photograph below was also taken with this combo:. 

    The Trap by Joseph Calev (jcalev)) on 500px.com
    The Trap by Joseph Calev

    My 70-200 2.8 II and combined with the 2x III Extender work great for macro, but that is not the only use for this configuration. I also use it for many different purposes - from photographing my kids to travel photography. I also use this combo most often for wildlife photography, so this is a case where an investment in this combo can serve many needs.

    Canon 300mm f/4L IS

    Another lens with strong macro capabilities is the 300L F4 IS.  In fact, this is the main purpose I purchased the lens.  This makes a great lens for photographing dragonflies and butterflies.  Dragonflies in particular can be skittish so it is extremely useful there.  The shot below was taken with this lens:

    IMG_5298-Edit.jpg

    As is the case with my 70-200 2.8 II, macro is not the main thing I use this lens for. I also use it for sports, so once again you don’t have to limit yourself to specialty “macro” lenses to get great results.

    Canon TS-E 24mm f/3.5L II Tilt-Shift Manual Focus Lens

    Wide angle lenses can also make nice macro lenses.  They offer a different perspective than the traditional "telephoto" macro and are very useful for taking a close up shot combined with its environment.  Not all wide angle lenses work well for macro, but my favorite one is the TS-E 24 II.  As with my 70-200 2.8 II and 300/4 IS macro is not the main purpose for this lens either.  I use it primarily for architecture but it does a decent job with macro as well.  The photo below was taken with it.

    The Country by Joseph Calev (jcalev)) on 500px.com
    The Country by Joseph Calev

    As you can see with the above three lenses, they are excellent lenses that have macro capabilities, but they are not typically thought of as specialized “macro” lenses.

    While we are on the subject of tilt-shift lenses, it is worth mentioning that I also use the TS-E 90.  I use this lens occasionally for portraits and non-macro reasons, but I primarily use it for macro - often with an extension tube.  With a native magnification of .29x and the abilities to shift and tilt, this is my preferred lens when photographing flowers. 

    When photographers hear the word "tilt-shift", they often think of those cute little miniature-like shots, but the truth is they have far more practical uses.  One particular use is to selectively blur parts of the background.  The shot below was taken with it.

    Orchid Dance by Joseph Calev (jcalev)) on 500px.com
    Orchid Dance by Joseph Calev

    What about dedicated macro lenses?

    Thus far I’ve showed you how you don’t have to use specialized macro lenses to get great macro photos. However, I do actually use some dedicated macro lenses as well. I’ll now describe which ones I use and why.

    100mm f/2.8L IS USM Macro

    The most useful macro lens in a general case is the 100mm 2.8 IS Macro.  This lens is very similar to the much cheaper 100mm 2.8 Macro that lacks the image stabilization. However, I think the image stabilization is well worth it based on my experience with both lenses.

    This lens is my second most used macro lens overall and the only true macro lens I take on vacations.  With the image stabilization, I am able to take many shots hand held that simply would not be possible without it.  My main targets for it are nature and small objects in stores.  The image quality is outstanding and given the price this is one of the biggest bangs you can get for the buck Canon lens-wise.  The shot below was taken with it:

    Flowers by Joseph Calev (jcalev)) on 500px.com
    Flowers by Joseph Calev

    Canon 180mm L Macro

    Another lens that I have owned in the past is the 180L Macro.  My copy this lens was a disappointment as it was nowhere near as sharp as my other macro lenses, so I never really enjoyed using it. Personally I’d recommend the other lenses I’ve suggested thus far over this one as a better use of your money.  Ron didn’t care for it much either when he borrowed my copy and wrote this article.

    Canon Macro Photo MP-E 65mm f/2.8 1-5x Manual Focus

    My most used macro overall is the MP-E 65.  This lens is significantly different than all others mentioned so far because it can only take macro photographs.  This lens compensates for this limitation by offering a native magnification between 1x to an astonishing 5x. 

    While I love this lens, beginners should not start with this lens.  It is an extremely challenging lens to use and requires either a very good tripod or a macro flash to be usable at all.  At higher magnifications the depth of field becomes extremely shallow and diffraction becomes an issue. In fact, at this magnification even breathing can violently shakes the camera and ruin a shot. 

    Another challenge when using this lens is that the viewfinder can be extremely dark making focusing difficult (and this is a manual focus only lens), so a camera with Live View is a must. 

    I typically use this lens with an MT-24 EX Flash along with the CP-E4 battery back.  I also use some specialized sto-fen diffusers and a special hood to both soften the light and prevent some of it from reflecting back into the lens.  While this lens is a challenge to use, the results can be extraordinary.  The following photos were taken with this combo:

    IMG_0501-Edit.jpg IMG_7430-Edit.jpg Hangin' Around

    Lighting

    Lighting is a huge concern in macro.  As you move in close to subjects, shadows may become more visible.  Also, higher apertures are typically required for macro shots - which reduces the light available to the camera.  As I previously mentioned, I do shoot many of my photographs hand held - often with just ambient light.  Most of the time, however, I need to either use a tripod or artificial lighting.  I will discuss artificial lighting first.

    There are a number of lighting solutions out there.

  • Canon 580EX II and other variants.  This typically works poorly for macro because the subject is often too close to the lens - resulting in a shadow.  I have seen adaptations using tin foil and other things to provide lighting, but I prefer the flexibility I have with a good macro light.
  • Canon MR-14EX.  I do not own this flash, but it is the cheapest macro flash available from Canon.  I find the light from it to be a bit flat and it is far less flexible than the MT-24EX.
  • Canon MT-24EX.  This is the main flash I use for macro. In fact,  I use it so often that I bought a CP-E4 battery pack for it to extend the battery life between recharges and to reduce the recycle time.  The flash is extremely flexible and allows me to change the position of the flashes, their angle, their power, and the balance between them.  It is almost always on my camera whenever my MP-E 65 is there.  I also own an adapter to use it on my 100mm 2.8 IS Macro, though I rarely use it there and typically use ambient light when photographing with that lens.
  • Generally I attach the heads of my MT-24EX to the specialty hood made for the MP-E 65.  Occasionally this doesn't provide the angle I need - particularly in highly reflective drops from ice.  In this case I have a pair of Wimberley Flash Brackets that I attach to the RRS lens plate attached to the lens.  These arms allow me to move the flash further away from the subject or even put the flashes slightly behind the lens.  In cases where I need to change the angle of light in order to prevent it from bouncing back into the lens this is critical.  When I used to own the 180L macro I used these brackets all the time.  Now I only use them for the most reflective of surfaces.

    Support

    Insects typically require a flash at the minimum as a fill light.  This is necessary due to their quick movements and to ensure all of the details and facets of their eyes are visible.  For flowers and other subjects, however, flash tends to not look very good.  The is particularly the case for flowers - where ambient light is generally the preferred way to go.  While I do take many of these shots hand held, there are times when a tripod is a necessity.  Macro tripods tend to be pricy because they must be extremely strong and capable of holding your gear in very strange positions.

    I own a tripod specifically for macro.  For the tripod body I use the Gitzo 2540EX, which is a discontinued 4 leg version of the GT2531EX that Ron featured in his tripod recommendations article. 

    If you read Ron’s Gitzo Primer, then you know this is one of the Explorer type tripods with the extendible arm.  In retrospect, I wish I would have ordered the version that has the geared arm instead - though so far I have been able to get around it.  Precision is hugely important in macro - as a single millimeter is often the difference between in focus and not or even having your subject in the viewfinder, so the gear can be super helpful. 

    Attached to my tripod, I have the Acratech GP ball head like Ron featured in his tripod head comparison.  I bought this ball head specifically because it is very flexible and I can move the camera to a 90 degree angle.  It is also quite strong.

    Attached to the ball head I have two Really Right Stuff Macro Rails.  These macro rails allow me to change focus with precision in the x and y dimensions.  I used to own the Kirk Macro Rail which unlike the Really Right Stuff versions can be switched between holding camera plates and lens plates.  While the Kirk rail may be moved quicker, the Really Right Stuff version is much stronger and more precise.  If you want to use only a single macro rail for both camera plates and lens plates you need a special adapter.  This adapter is not necessary if you use two rails.

    Finally, attached to the tripod I have a Wimberley Plamp.  I use my plamp all the time to hold leaves and flowers.  Sometimes I use it to hold back a leaf or flower that is distracting in the shot while at other times I use it to prevent my subject from blowing with the wind.  Very often I have my tripod setup just for the plamp and take the actual shot hand held.  This does tend to be a rather expensive way just to hold a plamp though.

    Conclusion

    As you can see, you don’t have to use specialized macro lenses to get great results – but they are a great tool to have if you are going to do mostly macro photography. I should also point out that Canon is the leader in macro specific products, so this is why I’ve taken a bias to Canon. Simply put, several products mentioned have no counterpart by Nikon or Sony.

    Disclosure

    I may receive a commission if you make a purchase using links in this article. Thanks for supporting my blog by using my links!

    Friday, June 3, 2011

    REVIEW: Gitzo GT3530LS-Maximum Stability for Long Exposure, Landscape and Studio Photography


    *** PLEASE NOTE that the tripod featured in this article
    has been replaced by the Gitzo GT3532LS ***

    Gitzo GT3530LS with Really Right Stuff BH-55 Ball Head
    Gitzo GT3530LS with Really Right Stuff BH-55 Ball Head
    Maximum Stability

    We buy tripods because we need a way to have the stability of putting our camera on solid level surface in places where no such surface exists. As a results early tripods were no more than a solid surface with legs. However, as time has evolved tripod makers have discovered that people want something that allows them to position their gear into odd configurations for things like macro photography, so octopus-like tripods like the Gitzo GT2531EX are their solution.

    Gitzo GT3530LS trades a center column for stablility
    This huge flat surface for mounting your head is as solid as it gets

    For those doing landscape photography or even portrait photography in the studio, all of that flexibly offered by flexible tripods or hiking tripods like the Gitzo GT1541 come at the expense of stability. Some argue that the flexible center column has a tremendous impact on stability as do the tiny surfaces for which many other tripods give you to mount your head. To satisfy the needs of this crowd, Gitzo offers the GT3501LS which is about as solid as a wall which is especially critical for those doing extremely long exposures. Under very long exposure conditions even the slightest movement can ruin the sharpness of the image, so the GT3530LS is the ultimate solution in maximum stability for up to 39.6lbs (18kg) of gear. However, thanks to the carbon fiber design, yet it only weighs 4 lbs (1.840kg)!

    Gitzo GT3530LS - Mouse over to see unlocked and mouse out to see locked
    The leg angle locks were both fast to operate and rock solid under pressure
    In fact Gitzo claims the get even more solid the the more you put weight on them

    This tripod features three position angle locks for the legs that actually become more stable under load. Mouse in and out the image above to see how to lock and unlock the legs.

    Gitzo GT3530LS in its minimum height configuration of only 4+ inches

    Thanks to the lack of a center column, you can get this tripod down to a minimum height of 4.3” (11cm) and quickly raise it back up to its maximum height of 58.3”(148cm). As you can see below, I’m 6’1” and this height is a usable operating height for me, but for those who want a higher operating height and don’t mind an extra leg segment then Gitzo offers the GT3541XLS which goes up to 6’6” (198cm).

    Gitzo GT3530LS in its maximum height configuration next to me standing at 6'1"
    I’m 6’1” and the L version offers a comfortable height
    but the
    GT3541XLS will go all the way up to 6’6”

    But I WANT A Center Column

    Gitzo GS3511S Compact Rapid 6x Carbon Fiber Center Column
    GS3511S Compact Rapid 6x Carbon Fiber Center Column

    I know some people can’t deal without the center column, so Gitzo has a solution – the Gitzo GS3511S Compact Rapid 6x Carbon Fiber Center Column as a way to have your cake and eat it too. There’s even a Gitzo GS3511KB Carbon 6X Low Level Column Kit if for some reason you want a center column when down low with this tripod.

    Conclusion

    This is a rock solid tripod that is a must for gimbal head users that are carrying big 400mm lenses and up. It’s also the perfect solution for studio photographers and those doing long exposures like landscape photographers. While the GT3541XLS will offer some additional height, the stability of the three section design is my preference for this class of tripod.

    This will be the tripod I get for my studio use, when I can managed to afford it! I therefore highly recommend this tripod for the uses described above, and I have no negative comments about this product beyond its price. For those looking for more flexibility or much lighter weight then I’d suggest you check out my tripod recommendations.

    If you found this article helpful, please support this blog by purchasing your GT3530LS at B&H.

    *** PLEASE NOTE that the tripod featured in this article
    has been replaced by the Gitzo GT3532LS ***

    To learn more about the Gitzo system, check out my Gitzo Primer.

    Disclaimer

    B&H has provided me with the tripods featured in this series on a loaner basis. I do not get to keep them and will be returning them back to B&H if I choose not to buy them.

    Gitzo had nothing to do with this article and as of the time of this writing, time I’ve never spoken to anyone from Gitzo. I do not have a relationship with Really Right Stuff (RRS) and I DO NOT make a commission if you purchase any RRS products.

    If you purchase using the links in the article from B&H, I may get a commission. Thank you for supporting this blog by using my links when you make your purchase.

    Wednesday, May 11, 2011

    REVIEW: Gitzo GT2531EX–A Macro Photographers Dream–Stability In Any Position You Desire (UPDATED: 5-13-11)

    Gitzo GT2531EX Rapid Column Horizontal
    Gitzo GT2531EX offers a multi-angle Rapid Column
    that allows you to position your camera any way you want in a 360 radius

    If you have ever tried doing macro photography with a tripod you know that the position you NEED your tripod to be in, is not one that it can support so you have to make compromises. Some of those compromises end up showing in your shots because your lens isn’t on the same plane as the subject so DOF suffers. Many photographers frustrated by this situation will just go to shooting freehand, but that can result in camera shake which is amplified when doing macro photography so the net result is a missed shot.

    Gitzo GT2531EX Rapid Column Vertical with Level
    Rapid Column features a Level
    and Endless Configurations

    While using a tripod is tough for moving subjects like bugs or butterflies, for those cases when you are shooting flowers or dead bugs (you do know that many macro shots are of dearly departed bugs right?), then the Gitzo GT2531EX is just the ticket to allow you to place your tripod EXACTLY where you need it!

    Now the Rapid Column is certainly important for getting the position you need, but what if the ground itself isn’t level and the traditional 3 position leg angle lock won’t work? This is where this tripod is revolutionary. Thanks to the cool locks shown below, this tripod will allow for a stable lock at ANY angle:

    Gitzo 2431EX Leg Locks - Mouse over to see opened, mouse out to see closed
    Lock the legs at any angle from 0 to 90 degrees
    independent of the other legs with these clever leg angle locks

    This important design along with the clever design of the Anti Leg Rotation (ALR) system allows you to quickly adjust the legs at any individual height or angle you desire to get stability where you need it on all terrains.

    All that is well and good, but honestly when I first saw this tripod my bigger was concern was getting it to stay straight! By using the built-in level and ideally having a hot shoe bubble level to make sure the camera is properly level, I could get a perfect level configuration anywhere I set up my camera.

    I will also point out that the design of the leg angle locks on this tripod means that you have a chance to pinch your hand. I found getting these opened and closed harder than I would have liked and not nearly as quick and easy to operate as the standard design shown below:

    Gitzo GT3530LS Leg Lock Design
    Normal Gitzo Leg Lock found on the Gitzo GT1541 and  GT3530LS

    With that gripe aside, I the flexibility that this design offers make it worth the risk of the occasional pinch!

    I enjoyed pairing up the Gitzo GT2531EX with Really Right Stuff BH-55 Ball Head as shown below:

    Gitzo GT2531EX with Really Right Stuff BH-55 Ball Head
    Gitzo GT2531EX with Really Right Stuff BH-55 Ball Head

    This tripod supports up to 26.5 lbs (12kg) when configured as shown above, but if you rotate the rapid column to be horizontal to the ground (as shown a the top of the article) then you’ll end up only being able to support half that weight as you’ll need to counterbalance the other side of the arm with roughly the same weight for maximum stability (and the safety of your camera).

    At 4.1 lbs (1.85kg) this tripod is twice as heavy as the wonderfully light Gitzo GT1541, but the addition of this marvelous rapid column and leg lock design means you’ll have more options to position this tripod exactly the way you need it – for all occasions.  However, this weight is still very light for a full size tripod.

    Gitzo GT2531EX extended to to 66.9” (170cm)
    GT2531EX extended to to 66.9” (170cm)

    As you can see above, even though I’m 6’1” I can get this tripod up to 66.9” (170cm) with the column extended with three solid leg sections keeping it steady. I can also get it down to 1.2” but the center column rains on the parade as it doesn’t appear to have brilliant ground level set design of the Gitzo GT1541 that allows you to completely eliminate the center column. The net result of this problem is that you can get low, but the column is high:

    Gitzo GT2531EX lowered and it can go lower, but the center column rains on the parade 
    Feedback from readers pointed out that the only workaround is to do like I did below to get you lower, but it still kind of high when you consider the size of the head. It works, but I wish that it would just work like the 1541.

    Gitzo GT2531EX as low as it can go in this special configuration
    Getting low requires the right ball head and some acrobatic efforts

    Conclusion

    The center column issue and the price are the only two things keeping me from ordering one of these tripods for my personal use today. This tripod supports a wide range of accessories found on the Gitzo website, and this thing is so flexible that I can’t imagine a realistic scenario where I couldn’t get it in to the exact position I needed for a stable shot. As a result I’m struggling to decide if this or the Gitzo GT1541 will be my next tripod purchase. I want both, but can only afford one for now.

    I highly recommend this tripod for those who need the flexibility it offers – especially macro photographers. Hikers might prefer the lighter weight of the Gitzo GT1541 and studio or landscape photographers will benefit from the lack of a center column in the wall-like stability of the GT3530LS.

    Click here to buy or learn more about this tripod on B&H. You can also check out my tripod recommendations for other tripods that might suite your needs.

    To learn more about Gitzo tripods, check out my Gitzo Primer.

    Disclaimer

    B&H has provided me with the tripods featured in this series on a loaner basis. I do not get to keep them and will be returning them back to B&H if I choose not to buy them.

    Gitzo had nothing to do with this article and as of the time of this writing, time I’ve never spoken to anyone from Gitzo. I do not have a relationship with Really Right Stuff (RRS) and I DO NOT make a commission if you purchase any RRS products.

    If you purchase using the links in the article from B&H, I may get a commission. Thank you for supporting this blog by using my links when you make your purchase.