Showing posts with label travel. Show all posts

Saturday, May 16, 2020

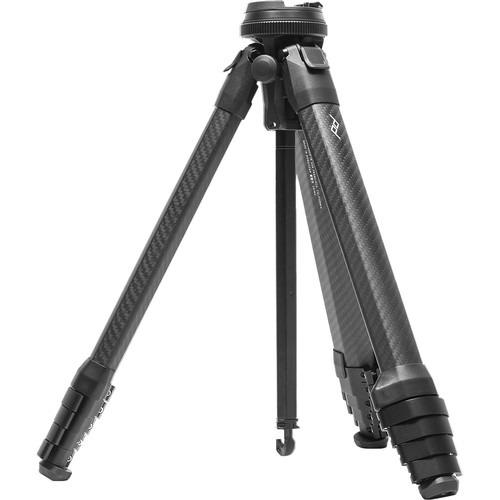
REVIEW: Peak Design Carbon Fiber Travel Tripod

Peak Design Carbon Fiber Travel Tripod at B&H
Peak Design Carbon Fiber Travel Tripod

Years ago I did my tripod recommendations and I settled on a Gitzo GT1541 with a RRS BH-55 head. I also did a tripod head comparison where I switched from the RSS to the Arca-Swiss Monoball Z1 sp (Single Pan) head as my primary ball head of choice.

During some end of year business spending a few years back I also picked up a Gitzo GT2531EX to simplify the process of shooting macros, but the reality is that I usually preferred to the GT1541 so it was used more in the studio than in the field.

All told I probably spent over $2000 for the two complete carbon fiber tripods and ball heads that I still own to this day. With as little as 30 minutes with the Peak Design Carbon Fiber Travel Tripod I found myself wanting to sell all four of them (seriously, make me an offer) so can get this awesome tripod and head combo!

Hands On Thoughts


So lightweight and practical I actually found myself overusing it!

Right up front what I loved the most about this tripod was its lightweight but highly usable built-in ball head design. It addresses the bulkiness challenges I deal with for both my existing ball head and tripod combos I own today, without losing any functionality that I enjoy today. I especially enjoyed the speed and ease at which I could attach and detach my camera with complete confidence.

What surprised me even more was just how well this tripod is built – every detail and texture seems to be meticulously thought about so it makes you feel like Apple designed it. Just take a look at how nice the fast to operate (compared to Gitzo) angle adjustments are below:

Outstanding design and build quality

That knob shown on the right is for height adjustment of the center column, and it has a wonderful soft tactile feel that just screams quality. You can also see the cool looking carbon fiber pattern legs in the shot below.


Sexy Carbon Fiber legs with no pinch height adjustment

Of course pretty means nothing if it doesn’t work well, so I put this camera to use right away with a Sony a7R IV with a Sony FE 24-105mm f/4 G OSS Lens and it never once had any stability issues. I took shots for as long as 25 seconds in portrait orientation as shown below and never did an ounce of shake get introduced into the shot both indoors and outdoors – even with my kids running around me while I was shooting.


Rock solid stability even in portrait orientation

Here’s the result of the shot taken above:


Sony a7R IV with 24-105mm for f/16 @ 36mm for 6 sec at ISO 100

I also found the useful head almost flawless. My only real gripe was the bubble level was very hard to see as shown below, but if your camera has a level (as the one I was reviewing did) then its not really a big deal. Here’s an overhead view of the head:

My biggest complaint about the head is that the level bubble is hard to see

I also agree with other reviewers that the plate for the camera needs support for screwing on with a coin vs requiring a tool which I lost about three times during my review – the last time for good as shown below in the slot where the $20 USD tool once lived:


My recommendation is to NOT leave this plastic mount with the toolkit attached to the tripod as the odds are high you’ll lose it.

Below is a photo that shows the universal plate installed, although the lack of a metal lip does mean you have to re-tighten it time to time to avoid drift when shooting in portrait orientation:


Arca Compatible Standard Plate fits all cameras and only cost $20

It Does Everything Very Well


This thing can almost get to table top size as well as full size

My most heavily used accessory is my Leica Tabletop Tripod & Large Ball Head combo. I literally don’t go anywhere without it, but while I had this tripod out on loan it never left my bag. I enjoyed that I could use this one as a slightly larger but still super low table top tripod (as I did in this random shot when I first unboxed it) as shown above.

Front heavy lenses like the one shown above were no issue for this very solid tripod and ball head combo. I never had any issues with drifting for long exposures either – something that frustrated me with my Really Right Stuff BH-55.

Even my big Canon 1DX Mark II with the 24-105mm f/4L IS II USM lens was no problem for this tripod in portrait mode, but L-Brackets are available for those who get stressed seeing this setup.

Hands On Video

I very rarely do hands on videos, but this tripod just begged for it. Sadly when I got out to shoot I had an equipment failure with my mic so my apologies for using the built-in mic of the iPhone XS Pro with rushing water in the background:


Video Review
(sorry for the bad audio, my remote mic broke)

How Low Can It Go?


It really can go lower then your mama's ever seen it in her life time

If Ludacris was a photographer, he’d approve of this tripod for its ability to get the low shots as shown in these two iPhone snaps I took while out shooting with this tripod.


Even portrait orientation I never would've imagined did not even in my right mind

See the photo above to compare to see how low this tripod starts at compared to my Gitzo GT1541 with a Arca-Swiss Monoball Z1 head mounted on it. Yet even when you put both at max height, its not much shorter as shown below:

The actual tripod is only 2.5 inches taller but the big Arca head on the Gitzo adds another 4 inches of shooting height.

Click here to see a full view of both side by side iPhone snapshot if you are interested.

Easy To Carry Around All Day Long

Because my old tripod was so big I used to carry it on the outside of my bag, but when I did that with this tripod it seemed so unnecessary as shown above. As a result, I started putting it inside my back when I could which was very convenient – especially when sitting down with my bag on my back.

This is a really big deal when you are travelling or hiking with a bag on your back all day, so to say I was excited about this is an understatement.

But Wait There’s More – Mobile Phone Support!

One of the coolest, yet simplest features of this tripod is the fact that the center stalk hook actually hides a cell phone attachment in it. It’s so small and subtle that I almost missed this wonderful feature.


An excellent cell phone tripod mount included and nicely hidden in the center stalk


This is the best cell phone tripod I've ever used

Conclusion


My New Favorite Tripod In Its Cool Box

In case you haven’t figured it out yet, I love this tripod. Yes, its expensive but if you consider the fact that it has a ball head included then its actually about $500 USD cheaper than most recommended carbon fiber tripod and head combos.

If your budget is tight and you don’t mind an extra half pound of weight and 20% less stability then you can save $200 USD (at the time this article was written) and get the aluminum version. At that point its cheaper than the average ball head and you get the head, mounting plate (again which usually costs extra), a great mobile camera mount, and carrying case.

Simply put, this is is the best tripod and head combo I have ever seen so I highly recommend it.

Where to Buy?

CLICK HERE to learn more or buy today at B&H.

You can also see some cool videos and more details about the carbon fiber and aluminum models on the Peak Design website.

See cool videos and more details on the Peak Design website

Other articles you may enjoy

Enjoy more reviews on the Reviews tab as well as Ron's Recommendations.

Sales Tax Reimbursement with Payboo

Don’t forget, with the B&H Payboo card most buyers can get the sales tax reimbursed. Click here to learn more.

Disclosure

If you make a purchase using links found in this article, I may make a commission. It doesn’t cost you a penny more, but it does help to support future articles like this.

Sunday, April 24, 2016

PhotoFocus: Travel Photography Tips & Tricks Hangout (Special Offers)

PhotoFocus Travel Webinar

Thanks for joining me for my a hangout with photofocus.com here. If you didn’t make it you can click the photo above to watch the video archive and learn more. You can also get the PowerPoint for the presentation here or the PDF of the presentation here.

During this video I gave some practical advice about travel photography as well as doing some demos in Perfectly Clear.  Here’s a special 15% discount for those who watched using the coupon code Springclean:

Save 15% - Coupon Springclean

If you already have a coupon code, replace it and use this one by clicking Update Coupon to save even more!

Here’s links to some of the things that may come up during the hangout:

Software

Gear

Printing Advice

Deals / Special Offers

General Advice

CLICK HERE to learn how to join Ron to Meet Scott Kelby in Seattle on Tuesday April 26th – limited availability.


Click here for my Topaz Labs discount coupon code

Thursday, December 13, 2012

Seoul Korea–It’s Spectacular!

Click to see Seoul Korea travel guides on Amazon
Copyright Ron Martinsen – All Rights Reserved

I’m hard at work behind the scenes working on my next articles, but sadly none are ready for tonight.

This photo here was taken in the streets of Seoul, South Korea (travel guides). I’m a big fan of Japan, but after seeing Korea I was blown away at how awesome it is too. I’m looking forward to sharing some of the beauty of this city with you in the near future, but in the meantime I thought I’d share this one.

This was taken with a Canon 1D X on a Gitzo GT1541 tripod using my 24-70mm f/2.8L II lens for 6 seconds at f/11 and ISO 100. There was lots of city traffic, but I thought the light trails added something fun to this shot so I didn’t let it bother me. There’s minor editing with Topaz Adjust 5 and Nik Color Efex Pro 4.

Thanks for your support during this blogging drought period – I hope to catch up soon!

Best wishes,
Ron

P.S. This article does contain links which may result in a commission if you make a purchase.

Thursday, September 20, 2012

UPDATED: New York City Street Photography Workshop – October 25th, 2012 during the PhotoPlus Expo

UPDATE: This is almost sold out, please let me know if you are interested in the last remaining spots!

Ron Martinsen heads to the big apple to do a street photography workshop in the heart of Times Square that you’ll never forget! Learn how to approach strangers and get flattering shots on the fly like this one:

Learn how to quickly respond to unpredictable surprises and get the shot like I did when my assistant pointed out that Elmo was on his Elmo cell phone and we got this shot:

Have fun experimenting with your fisheye lens to see New York in a whole new way like I did here:

We’ll do this and much more on this unforgettable evening tour New York’s Times Square. I will also have at least one assistant on hand to make sure you have the light you need to get the shot (Nikon shooters will need to bring Pocket Wizards or equivalent).

Details

This event will take place on the evening of October 25th, 2012. While you are in town you can do like me and go see the PDN Photo Plus Expo where all of the latest photography goodies are on display (see my report from last year) and you can rub shoulders with the who’s who of photography and see some of the biggest products announcements of the year (like the Canon 1D X and Nikon 1 last year)!

This workshop will be 4 hours in duration and will be in the form of a photo walk around Times Square. I’ll be teaching you how to see the city differently and how to get interesting shots of people, places and things in a crowded and busy environment. I’ll help you approach strangers to get their photo and teach you how to avoid the common pitfalls of travel and street photography.

This class will take place rain or shine as the primary objective is to learn how to make great shots in any conditions. Dress and plan according to the weather!

The cost for this workshop will be $150 and space will be limited to keep the group size small. If you are interested attending, then order now and send mail to ronmartblog@martinsen.com to reserve your spot today. You will be responsible for your own transportation to and from the workshop and for having all of your own equipment. The course registration is for instruction only.

More details will only be provided to those who sign up for this workshop, and the class may be enhanced to better meet the needs of the attendees.

About Ron Martinsen

Copyright Ron Martinsen - ALL RIGHTS RESERVED
Self-Portrait (Copyright Ron Martinsen – 2012)

Ron Martinsen has been teaching Photography, Lightroom and Photoshop since 2008.

His blog has been enjoying exponential growth and has been enjoyed by over a million visitors in over 180 countries around the world. More recently, Ron has been gaining recognition from major players in the industry including Scott Kelby, John Paul Caponigro, Trey Ratcliff, Joe McNally, Nik Software, NEC, B&H and so many more.

You can find Ron’s work in magazines around the world including GQ (France), Robb Report (Russia), Cycle World (Los Angeles) and many more.

To see a small sample of Ron’s work, visit his portfolio site and photography notebook. You can also learn more about his Printing 101 eBook on his popular printing series page.

Since his last workshop and the last two he’s taught with Bryan Peterson, Ron has had numerous requests to do another workshop so now is your chance!

Disclosure

If you make a purchase using select links in this article (not the Photo Plus Expo link), then I may make a commission. This is a for profit educational event.

Thursday, December 22, 2011

Travel Photography: Photographing People At Night In New York City (Manhattan)

A Distorted View of New York (c) Ron Martinsen - ALL RIGHTS RESERVED
Manhattan Nightscape
All photos in this article are Copyright Ron Martinsen – ALL RIGHTS RESERVED

How many times have you gone on a trip where you see some cool nightscape and you tell your loved one – “hey, let me take a photo of you against that great view”?

Now think about how many times you’ve been happy with the result. If you are like most people, the answer is usually “very few” (at best). For most when you throw in the challenge of the evening shooting where high ISO’s and slow shutter speeds are virtually inevitable then things get even worse!

I’m no stranger to this problem myself, but I’ve learned a few things over the years that certainly help – A LOT! All of the shots in this article were taken in New York City in 2011 while I was there attending the PhotoPlus Expo. Most shots are at ISO 3200 or 6400, but I was also lucky to have a great assistant or two and borrowed lights to get some shots that I’m happy with.

I hope you’ll enjoy both the advice and the shots as you read through this article.

Introduction

Shooting at night in a big city like New York introduces some serious problems.

Your subjects are typically backlit against bright lights or mixed lighting. If you’ve been to the Flash Bus Tour, Strobist or Planet Neil then you probably know that you’ve gotta start by exposing your background first and then adding your fill light. This means you’ll be shooting manual and you’ll not always trust what your camera meter is telling you.

To get good results, you’ve gotta know your gear. If you don’t then I highly recommend you read my Which Books Should I Read? article and possibly get a subscription to Kelby Training (see my discount coupon code page for details).This article will not go into those details as that is beyond the scope of this article. Off-Camera Flash Techniques, Speedliter's Handbook, and Sketching Light all offer great advice on how to to get the shots shown in this article.

1. If you plan to shoot when travelling then come prepared


A Lastolite EzyBox and an assistant will get you great shots in the field

Many of us don’t have the budget to shoot on location, so our travels will be business trips or family vacations. If your goal is to get great shots during your limited shooting time on one of these events, then you really have to be prepared. While more gear is always better, there’s way to be smart and still have a great shoot.

First and foremost you need to be realistic about what you can accomplish with the gear on hand and the objective of your trip. What I mean by this is that if the objective of your trip is to get great photographs, then bring (or rent) the gear you need to get the job done. Companies like LensRentals.com will drop ship your rental gear to your destination so you can have what you need without hauling it on the plane.

Here’s the minimum kit that I recommend (in addition to your favorite camera):

  1. A comfortable backpack like the Streetwalker Pro or if you have a lot of gear then a roller bag like the ThinkTankPro Airport Security. Your shots will be much better if you are comfortable and can bring everything you need. For me I always load my Airport Security bag with everything I need when shooting is my primary objective.
  2. I like to have a 70-200mm lens and a 16-35mm lens so I can do both wide angle and telephoto shots. I usually use sneaker zoom for the rest. I’ll take my 24-105mm when I just want the one size fits all compromise lens.
  3. A Lastolite EzyBox and an assistant will get you great shots in the field. This is really how the big boys do it, so if you want to look like a pro you’ve gotta bring the good stuff. This also means you’ll need some remote triggers like the Pocket Wizard Mini TT1, Flex TT5 and AC7.
  4. At least one good reflector like the Lastolite TriGrip. Even better, consider using what small flash master Joe McNally uses as shown here at B&H. See the 2nd part of my PhotoPlus Expo article for my 2 cents on Joe’s collection.
  5. Rogue FlashBender and Rogue Lighting Filters are a must to help you throw light where you need it as well as control the color of the light.

Sure there are a bazillion other things you can bring, so you can see my gear page or my holiday gear guide to get ideas on what else you can bring. Personally I pack my bag as full as I can stand it.

2. At a MINIMUM, bring a good flash for outdoors

If you want good shots then you are going to need good light.

At a minimum this can be an on-camera flash like a 580EX II or SB-910. Indoors the cheaper flashes can work, but outdoors you are going to want a the best flash money can buy (e.g., the Quantum QFlash is great too).

The shot above of Sandy is an example of a shot done just with a 580EX II on my camera with it pointing directly at my subject (something you can kinda get away with outdoors). I also had an orange Rogue Gel on my flash to warm up the light hitting her skin.

Tip: If you haven’t already, read On-Camera Flash Techniques to learn how to get great shots with the on-camera flash.

3. Avoid photographing your subject in the dead center of the frame

As Rick Sammon says, Dead Center is Dead Wrong. If you want to convey a sense of being in a different location, then your photos should include a little of the location with you. How subtle or pronounced it is depends on your proximity of the subject and the ability of your equipment, but the key thing is to have both – with one dominant subject. The way you do that is to put your subject at the left or right edge of the frame and pay attention to the background.

In the photo above I get Wall Street in the background and only let Kaethe occupy 25% of the frame (the minimum your subject should be in most shots). While the physical distance and laws of physics make it impossible for me to have both subjects in focus at the same time, you can appreciate a nice portrait and your memory will fill in the blanks. Wall Street adds a nice splash of color and you can tell that there’s something big happening in the background.

4. Take your cityscape and portraits separately

Your photo should only have one primary subject. While it would be great to have photos of Manhattan and your friend, don’t try to do both in one shot. In the photo above I successful capture beautiful QiaoQiao with a nice Manhattan backdrop for a splash of color and location. However, I don’t try to make them both subjects in the same shot.

When I was done with the shot above I stepped to the side of QiaoQiao and took this Manhattan shot:

The net result is that I have two good shots instead of one crappy shot that doesn’t do justice for either QiaoQiao or Manhattan. (TIP: Topaz Labs Adjust 5 (review) is for processing city shots)

5. Groups - the same rules apply, but it’s more tricky

Mouse over to see before, mouse out to see after
Mouse Over for Before “Fail” Shot
Mouse Out for After (Fixed using
InFocus by Topaz Labs)

Groups are always tough, but they are even more tough to shoot when you are out having fun and are trying to do an impromptu group photo. The key thing to remember is that you need to apply the same rules as your individual shots, but you’ll need to configure the people differently.

In the above shot I decided to line group up in an alternating pattern to make them more interesting, but I also was mindful of the background so I could convey the sense that they were in Times Square. I then tried to use the top third of the shot to get the nightscape to give a sense as to where these girls were.

What I did fail to do in this shot actually is adjust my aperture (hey, shit happens) so f/2.8 got all of the girls except for the foreground girl in perfect focus. The foreground girl was totally blurred, but I used Topaz Labs InFocus to bring her back into the shot. While this photo won’t end up in a portfolio or a gallery, it’s still a decent group shot that these girls can show their friends when talking about their great trip to The Big Apple! Let this be a lesson though – either shoot with a larger f-stop number or get everybody on the same plane.

6. If you have a friend in your destination city, ask them if you can borrow their gear

The last time I was in New York City, I was extremely fortunate to have one of my blog readers – Cliff Pickett – offer to help me out. Not only did he act as an assistant, he also loaned me gear which helped me to get a lot of great shots while I was there. He also got me access to the best place to shoot in all of New York City!

Keep this in mind when you are travelling – there may be a friend, or long lost cousin that might be able to help you out when you are in town. You never know, that cousin you never met that your Mom tells you to see when you visit city X, might just be a cool photography geek that can be a huge help to you!

They may save you some rental expenses or extra luggage fees too, so plan to treat them to dinner too! :)

7. Be ready for the unexpected

Seriously, I wouldn’t have guessed in a million years that I’d see Elmo in Times Square on his cell phone making a call in front of a huge bottle of Corona beer! Shit happens when you are in the big city, so always have your camera ready to shoot. This means flash on, lens cap off, and camera settings dialed in as conditions change.

If I didn’t have my camera (and in this case my crew) ready to go, there’s no way I would have go this shot.

8. Be spontaneous and get your subjects to come to life

As a photographer we need to think of so many things when shooting that it is easy to make a technically strong, but terribly boring shot. Instead of taking DMV mug shots outside, ask your subject to get a little crazy and then start firing away. Have them look off camera and think about something that makes them happy and fire away.

Another thing I’d like to point out is that keeping an eye on what is behind your subject is important. The crap in the background like power lines, signs, lamp posts, garbage cans, planters, etc…. are all nasty to look at in your photo so try to avoid them if you can. While a quick shot of Elmo dancing my get you a free pass on the background clutter, generally speaking it can just ruin a shot.

9. Photograph strangers

This is a tough one for many people, but you’d be surprised how many people will let you take their photo if you ask. It helps to have a business card and tell them who you are and what you do first, and you should always offer to give them a free image in exchange for their time. An 8x10 print or 800px on the long side JPEG is sufficient. What’s more, is that you can have them fill out a release for you after they contact you to get their print. This keeps you from shoving a contract in their face while on the street, and lets them go about their business.

Tip: Ask the people who you find attractive! Yep, that’s right, try asking the good looking folks because generally good looking people are happy to get their photo taken, and you’ll be happier with shots of people you find pleasing to look at! Once you do, you’ll have people of all sorts of looks asking to have their photo taken!

10. Find or recruit buddies to help assist


Taken with the Canon 8-15mm f/4L Fisheye Zoom (review)

There are lots of photographers in the world these days, and local groups for strobist, smugmug, etc… mean there are always people willing to go out and do a photo walk. As a result, you can recruit these people to help you out and help them in exchange as well. It’s tough to get great shots without an assistant, so I highly recommend you find one and plan ahead!

I’d like to thank my buddy Joe Gambardella who I met at the Bryan Peterson Workshop in Seattle (review) and Cliff Picket for their generous time and support during my Times Square and Rooftop shoots.

Conclusion

Travel Photography is one of my favorite things to do, but I’m only able to travel once or twice a year. Being out of my element sparks new creativity possibilities, but also new challenges.

Most of us aren’t Joe McNally so while we read great books like Sketching Light and think I’d like to try that sometime”, few of us actual do – especially when we are out of town. However, I’d like to encourage you to stop making boring shots when you travel. Haul a little more gear with you and go make some great shots! 

Feeling Trapped And Longing For More Creative Outlets?

As photographers we get into creativity ruts from time to time, but travelling is the best way to see the world differently. Reading books like Learning to See Creatively or taking a course from The Perfect Picture School of Photography can really help inspire some new thinking, so a new environment may be just what you need to get those creative juices flowing again. I know it always helps me!

See the introduction part of this article for more ideas on how to improve your camera skills too!

If you like this article and want to see more like it, please leave a comment on the blog to let me know what you think.

Disclosure

I may get a commission if you make purchases using links in this article. Thanks for supporting this blog by using my links!

Thursday, August 4, 2011

Guest Blog: Uzbekistan & Tajikistan Trip Report by Joseph Calev

I’m pleased to announce that my friend and co-worker Joseph Calev has decided to share his trip report to Uzbekistan and Tajikistan with us. You can see more of Joe’s work at http://calevphoto.com/ and on Flickr.

Where we went

The Registan

We travelled to Uzbekistan and Tajikistan in Central Asia.  In Uzbekistan we flew into Tashkent, spent a day there, then headed to Samarkand for a few days.  From Samarkand we traveled north to visit the fortress at Navoi from Alexander the Great, then further north to stay at a yurt by Lake Aidarkul near the Kazakh border.  We then traveled back down to Bukhara, where we stayed for several days, then drove on further to Khiva.  From Khiva we drove to Urgench and took a flight back to Tashkent.  From there we spent a day hiking the mountains in Chimgan on the Kyrgyz border and then drove to Khujand in Tajikistan.  We visited with friends in Khujand and then drove back to Tashkent and came home.

Aidarkul Yurt

Favorite parts

I liked everything except for Tashkent.  My favorite was probably Lake Aidarkul.  There we no hotels around this huge lake and it was crystal clear blue and very warm.  There was a gentle slope in the water so we just relaxed with literally no one for miles and watched sussliki on the shore and colorful birds fly overhead.  At night there were tons of stars and they sang traditional Uzbek songs.

Tashkent was a very strange city.  It has tons of huge buildings and parks in the center but there is almost no one there.  In the park next to our hotel there were several cleaning people waiting for something to get dirty, but I never saw more than ten people in the park at a time.  Tashkent also has a somewhat Soviet mentality and had a number or ridiculous rules.  Tashkent did have some nice historical structures that are interesting as long as you see them first (because the rest of Uzbekistan blows it away).

Samarkand at nightSamarkand Ceiling

Samarkand has the Registan and the tomb of Amir Timur - two of the more impressive buildings I have seen.  It also has a section that looks straight out of Aladdin and the ruined ancient city on the periphery where you can still see bones sticking out of the dirt from soldiers who died during the Mongol invasion.  The city is rather built up so between the structures it is not so interesting as most of the old city was destroyed.  However the buildings still standing are very impressive.  Samarkand was the capital of Timur’s empire and is where he is buried.  [My kids] got a kick out of the ancient city of Samarkand where you can see the bones of soldiers who died in the Mongol invasion sticking out of the dirt.

Bukhara Morning

Bukhara is famous for its old city and ancient bazars.  The bazars here were far better than the Grand Bazar in Istanbul and the old city is very charming.  Bukhara has a lot more structures than Samarkand to see, though none are as impressive as Samarkand's "Big 3".  However, Samarkand does not have the old city that Bukhara has and it was a lot of fun wandering through the narrow alleyways.  Bukhara had the most tourists and in particular was the only place I saw backpackers.  Bukhara was the capital of the Emirate of Bukhara

Khiva at Night

Khiva is simply amazing and was the capital of the Khorezm Khanate.  It is magnificently preserved and within the city walls you feel you are back in time.  Many of the structures are not as old as Bukhara and Samarkand but they are very beautiful.  Khiva was my wife's favorite place and its sad many tourists to Uzbekistan do not get there as it is a bit tricky to get to right now.  The road from Bukhara took ten hours and was extremely bumpy – being a one lane road with tons of pot holes.

Chimgan was very beautiful and I really wore myself out hiking there.  I found a lot of interesting insects to photograph there and the mountain scenery is also very nice.  It is also much cooler there (temperatures were over 100 during the middle of the day everywhere else).

I did not see the highlights of Tajikistan but I can say the people are extremely friendly.  Tajikistan has none of the border problems found in Uzbekistan and people there are more relaxed.  It is a very poor country though so the facilities are not as good.  We did not have air conditioning, water for showers ran out in two minutes, the water smelled horrible, and occasionally we lost electricity for a few hours.  I would like to return to Tajikistan someday to see the Fann Mountains and the Pamirs.

Least favorite parts

Locked Up

As I mentioned, Tashkent is very Soviet like and the bureaucracy there can be ridiculous.  The other issue was Uzbekistan customs.  We were aware of the issues ahead of time and made sure to declare all of our money and camera equipment.  If you do not declare these, when leaving the country they will be confiscated.  They did have me open my wallet and count my money, then searched my bags for more, to verify the amount I wrote was correct.  They also did go through my camera equipment and asked to see my photos (though ironically only on my son's G11) to make sure the photos did not portray Uzbekistan in an improper light (which is illegal).  The customs form is also a pain to fill out correctly as certain things go in certain sections.

On the contrary, when we arrived in Tajikistan we went through a big building marked “customs” with a single guy standing there smiling.  Upon entering he welcomed us to Tajikistan and asked if we knew any words in Tajik.  I said a few words and he laughed and let us through.  On the way back he asked me if I learned any more words.

Adventures

IMG_4052.jpg

The biggest adventure was getting over the border from Tajikistan to Uzbekistan.  The two countries are not friendly at all and there was a long line and we had a driver who had to leave by a specific time.  In order to get through the crowd we convinced them that we were American diplomats.  Amazingly, they bought it.

Other adventures included having our car break down in the middle of the desert (twice) and getting invited to an Uzbek wedding (they saw my camera and invited me in).

Food

IMG_3998.jpg

As my wife is from Tajikistan, we were already very familiar with the food.  The national dish of Uzbekistan is plov.  In English this is often called pilaf and consists of rice, carrots, garbanzo beans, and either beef or chicken.  The Tajiks also consider this their national dish.  Other prominent foods are shish-kebabs (shish is “six” in their language and this is where it comes from) and mantu and sambusa – which are a form of meat filled dumpling.  Of course, they do not call them “shish” kebabs there but instead have many different names depending on the meat and style.  Pretty much every dish contains some type of meat and these are not good countries for vegetarians.

Strange things

Angles

In Uzbekistan, the money is quite comical.  The official rate is 1,700 sums to the dollar, but in the black market you can get 2,400.  The problem is the largest bill is 1,000 sums.  No one accepts credit cards and restaurants do not accept dollars (when you buy souvenirs you can use dollars though) so I always had to carry a huge wad of sums around.  The stack overwhelmed my wallet so I had to dedicate a pocket just to sums.  In Tajikistan the money is more normal.

Uzbekistan had some odd policies.  For instance at the hotel they had a cooler with water in it.  My wife filled a cup with it and was reprimanded that the water is only for visiting athletes.  When we visited a water park in Tashkent, the tickets are only good for three hours.  The park contains a number of restaurants, but you are not allowed back in the park fully clothed to eat at any of them.

As I mentioned Tashkent is a very strange city.  Imagine that you took all of the main government and artistic buildings (opera, performing arts center, theater) and put them in one place.  Each one is a huge grand building and between them are huge parks with large monuments.  Then imagine no one went there.  That is kind of like Tashkent – the center of town consists of huge buildings, huge parks, and no people except for a large army of cleaning people waiting for something to clean and police officers making sure everything is in order.

Safety

Safety was not a concern at all.  I felt very safe walking around with my equipment - often alone - in the early morning and late at night.  In Uzbekistan the penalties for stealing are very severe.  Tajikistan was slightly more dangerous, though I was always with locals there.

Photography

Khiva Walls

I was a bit worried about reports that there were many things that you cannot photograph there, but the truth is only the borders, airport, rail station, and metro are illegal.  Everywhere else is fair game.  It is also OK to photograph women there, though some would ask to not have their photo taken and we found it best to always ask.  In some cases people were not OK with me taking the picture - but were OK with my wife taking it with the same camera.

Photography is allowed pretty much everywhere.  In many of the historical places there was a camera fee that was generally $1-$2.  No one has an issue with tripods, though I didn't carry mine with me during the day - just at night and sunrise/sunset.

Professional cameras are rare there and you will receive some attention.  Most people just want to know where you're from.  Occasionally I was mistaken for a portrait photographer and people would ask me how much to take their photo.

Equipment

I brought with me a Canon 5D Mark II and 7D bodies, and for lenses a 70-200mm f/2.8L IS II USM, TS-E 24 II, TS-E 17, 100mm macro, 16-35mm f/2.8, and 50mm f/1.4.  I used all of the lenses, though my 70-200/2.8 and TS-E 24 were by far the most used.  I used the 100mm macro for market shots and the TS-E 17 for some of the interiors.  The ceiling shot was taken with my 16-35.

Conclusion

I hope you enjoyed Joe’s trip report. If you want to learn more, visit part II of his report here.

Please use the comments to let me know if you’d like to see more articles like this and/or have your own to share.

Disclosure

I may get a commission if you make a purchase using selected links in this article.