Showing posts with label II. Show all posts

Friday, March 17, 2017

The New Canon 24-105mm f/4L IS II on a Rainy Northwest Hike


f/9 @ 45mm for 0.6 sec at ISO 100
Shot with the new Canon 24-105mm f/4L IS II lens

While I own the Canon 24-70 f/2.8L II, I've never had the heart to get rid of my oldest and one of my most beloved lenses - the Canon 24-105mm f/4L IS. I always loved the extra focal length and image stabilization, so despite having a sharper 2.8 lens, when travelling I've always chosen the 24-105 over the 24-70.

Last year my friend Rick Sammon came to Seattle and I got my first glimpse of images taken with this new lens and I got excited because it appeared to be razor sharp. My cherished lens was definitely my softest lens, so I was way over due for a replacement.
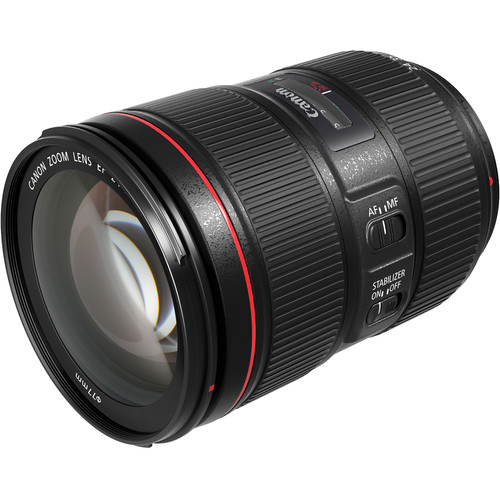
Canon 24-105mm f/4L IS II at B&H
Canon 24-105mm f/4L IS II

Aside for a slightly different hood and lens cap, it's hard to tell the old lens from the new one apart at first glance. However, you only need to shoot a few handheld shots before you realize that Canon has another winner on its hands. The sharpness is like all of the new Canon L lenses - incredibly sharp - and the image stabilization performed as good as the best I've tested by any manufacturer.

To challenge myself, I decided to take this lens out for a walk on a rainy day in the Northwest without a tripod. I really wanted to see how it would work under tough conditions when mounted to my 1DX Mark II, and Mother Nature decided to toss in plenty of rain to allow me to experience the weather sealing too!

I'm pleased to report, it did great as I never had any leaks and the hood did a great job of keeping the rain off the front lens element.

Real World Shots

All outdoor images featured in this article are 100% unedited and taken from the in-camera JPEG's. Cloudy or Shade white balance was used with the Landscape creative style for most of the shots.

All images are copyright Ron Martinsen - ALL RIGHTS RESERVED. You may view the images while reading the article, but you may not print, edit, save, display or distribute these images in any way without an ink on paper signed written contract.


f/11 @ 27mm for 0.5 sec at ISO 160
While I did support part of the camera on solid surfaces for shots under 1/10 sec, I still had to hand hold it under conditions that would normally result in a blurry image.

While I naturally would have got better shots with a tripod, I was pleased that I could do long exposure shots of streams and still pull off a reasonably sharp shot. The IS did great and allowed me to pull off impressive hand held shots that were sharper than my tripod shots with my old 24-105.

Click the images to examine full-size originals to see what I mean!


f/4 @ 70mm for 1/60 sec at ISO 500

Auto Focus (AF) accuracy was great and the color and contrast
with this lens/body combo was excellent!


f/4 @ 95mm for 1/50 sec at ISO 640
You have to click and view screen to really appreciate the detail and sharpness of this shot, but at the time I was shooting I was pleased with the minimum focus distance (MFD) as I was closer than what B&H reports for the MFD


f/11 @ 46mm for 1/50 sec at ISO 3200

f/11 handheld in these conditions? That's something I'd normally never do without a tripod, but this lens begged me to say "why not, let's see"


f/6.3 @ 43mm for 1/30 sec at ISO 2500

I was pleased with the sharpness of the ferns while still getting a good look ahead down the trail and the brightness of this lens allowed my 1/30 sec handheld exposure to only need ISO 2500 on this dark dreary day. My previous 24-105 would have definitely need ISO 4000 or greater.


f/5.6 @ 42mm for 1/100 sec at ISO 2500

I found the corner sharpness even at f/5.6 to be consistently good


f/9 @ 56mm for 0.8 sec at ISO 200
By the end of my hike I was using flimsy objects for added support and holding my breath to see if I could pull off a sharp semi-hand held shot, and despite a few failures due to human error I always got at least one sharp one like this


f/5 @ 105mm for 1/200 sec at ISO 20,000
As I was putting my lens away (hence the odd camera settings and framing), I spotted this squirrel and did a quick point and shoot before he ran off. It's fast AF helped me lock on to the eye and get a shot before I was really ready. Since I was in One-Shot mode, I couldn't spray and pray, so I credit this lens for helping me capture this little guy


f/4 @ 24mm for 1/60 sec at ISO 640
24 isn't wide, but it's still wide enough to provide context like in this shot


f/4 @ 105mm for 1/125 sec at ISO 500

While you'll never enjoy the bokeh of a f/2.8, getting close at 105mm and f/4 does help isolate by gives the viewer a sharp and clear subject


f/4 @ 50mm for 1/60 sec at ISO 1000

At the nifty 50 range this lens is outstanding with no obvious real world distortion and crazy sharp - even wide open at f/4

Click here to check out the full gallery of unedited images

Conclusion

No tripods were used in this article and that's the real value this lens offers - especially for travel photographers like me. The fact that I can take this one lens out and get wide shots or long shots and push my shutter speeds down to ridiculous levels and still pull off a shot is a big deal. It keeps me out of the high ISO's for shots of static subjects and it does it with crisp sharpness edge to edge on every shot.

I love this lens and definitely will be upgrading my copy for my next trip to Asia.I highly recommend it for anyone who wants the versatility of this highly useful 24-105mm focal range in a lens that offers incredible sharpness and image stabilization for an incredible value for the quality and performance it offers.

Where to Buy?

CLICK HERE to learn more or buy today.

Other articles you may enjoy

If you enjoyed this article, you may also enjoy these:

Disclosure

If you make a purchase using links found in this article, I may make a commission. It doesn’t cost you a penny more, but it does help to support future articles like this.

Tuesday, October 13, 2015

Sony A7R II–Yes, This Is Game Changing Autofocus BUT …


f/4 @ 38mm for 1/1000 sec at ISO 640

Parents and grandparents will appreciate how impossible shots like this are to capture with any camera, much less one sporting 42 megapixels! The Eye Sensing AF system is simply brilliant even in cases like this where subjects quickly come into focus.

I’m a Canon 1D X owner who is used to using advanced AF systems and dialing the settings to get high accuracy AF, but I’ve also seen intelligent people completely fail with their settings and get nearly every shot out of focus. I gushed over the amazing AF performance of the Nikon D4s because it was more foolproof and it just got the shot right more times than any camera I’ve ever tested. However both of these super expensive professional cameras have a long way to go to reach the overall ease of use and performance of the AF system that I’ve been testing in the Sony A7R II.

I don’t follow Sony closely, but I can definitely say that this AF system is a big improvement over what I observed in any previous Sony camera I’ve tested up to this point – including the original A7 and A7R as well as the a6000.

What’s more astonishing is that super megapixel cameras like the Nikon D810 and Canon 5Ds/5DsR fail to match the performance of their lesser megapixel siblings, yet this camera destroys nearly every AF system I’ve ever tested. This is huge news for hobbyist photographers and parents who are always struggling to keep up with their fast moving subjects that rarely give you the perfect pose to capture a fleeing moment. As a result, we rely on good AF systems to help us get the shot, and what I’ve seen on the A7R II thus far is that it simply doesn’t get any better than this as of October 13, 2015.

BUT, make sure you have the latest firmware

I’ve been offline helping my sweet preggy wife prepare for the birth of our daughter – today (October 13, 2015) – so my distracted mind led me to forget to make sure I had the latest firmware. Typically this isn’t a huge problem when I test cameras as the firmware updates rarely have a huge impact on the images. In fact, many updates are often more about user interface bugs or extreme scenarios so they are valuable to have but they generally don’t have an impact on the quality of images that you’ll capture.

After my testing when examining the images carefully on my 4k display I did notice that my lens was suffering from a little focusing error that I didn’t notice in the field. With such a high resolution image packed on a tiny screen it’s easy to chimp and think “wow, that’s spot on”, so this is something that is easy to get burned by in the field.

When I discovered the problem I immediately checked to see if I had the latest firmware (which I usually do for review units), but sadly I discovered I had version 1.0. Firmware 1.10 or greater allegedly addresses this problem and the others issues listed below:

  1. Reduces the chance of the camera changing to front focus when shooting certain scenes.
  2. Decreases chroma noise when Long Exposure NR (Noise Reduction) is set to Off.
    Note: The noise does not occur when Long Exposure NR is set to On.
  3. Improves continuous shooting at Hi speed so that it can be used just as long when using the flash as without the flash.

I seemed to be getting burned by issue #1 above, even though Sony claims that it rarely occurs. Click here for the US location of firmware updates if you use this camera, and make sure you get your update.

During my testing the focus was spot on or close enough in most real world scenarios, but when pixel peeping – as I must do when reviewing a camera – I noticed that there seemed to be a consistent offset from where the focus actually was and where it should be. The consistency of this error throughout my testing validated that this offset was not a general AF system because if the shots were generally focused where they should be. However if this offset issue was addressed every shot would have been 100% perfect, so this indicated that there was either a lens issue (most common) or something else (such as a general problem in the AF system). 

Normally for this type of problem, I’d do a AF microadjustment to ensure I had the most precise accuracy, but when I tried to do that with the Sony Vario-Tessar T* FE 24-70mm f/4 ZA OSS lens I was disappointed to discover that it doesn’t support AF micro adjustments.

I’ve got the latest firmware for future testing, but all images I’ve uploaded to the gallery on or before October 11, 2015 may experience this error (including all featured in this article). With this disclaimer out of the way, I’m still very impressed with the AF system in this camera in real world usage because out of the roughly 100 cameras I’ve tested in my lifetime, only the D4s has been this good or precise out of the box – even when you factor in this minor AF issue. The only real world impact of this problem are those scenarios where you do extreme crops or very large crops to view the pixels at 100% or more is that you’ll sometimes notice that adjacent areas are slightly sharper than your intended target (especially noticeable on people).

Eye AF In Action


f/4 @ 61mm for 1/320 sec at ISO 100

Even when Kai was spinning out of control, the eye AF managed to stay locked on to his eye – something that would be near impossible to do in any other system I’ve ever tested

There’s a lot of advanced features of the Sony AF system, but Sony actually does a pretty poor job documenting and touting them. As a result, I completely missed the Eye AF feature until one of my awesome blog readers, Robert Good, sent me an email to remind me to check it out. Once I used it, I was impressed to see how effective it was in real world scenarios.

Simply put, I love this feature because it really does work!

Here’s a short video that DPReview did that shows how it it locks on to an eye whenever possible, but it will switch to a face when an eye can’t be found:

To enable this feature you need to turn the auto focus system on to AF-C (Continuous) and while it is not a requirement, it seems to perform best when you set the Focus Area to  Lock-on AF Expand Flexible Spot. It doesn’t matter where your flexible spot is, but when you engage this feature it will find the eye and focus on that. Here’s the settings I used for the best results:

  • Face Recognition:  Off
  • Focus Area:  Lock-on AF Expand Flexible Spot
  • Focus Mode:  AF-C

To engage this feature, you’ll want to program any of the custom buttons (I chose AEL) to the Eye Autofocus feature. Once you do this you’ll want to press this button and the shutter halfway to acquire an eye and then shoot as normal. It literally takes less than a second on average for the camera to find an eye, but I didn’t discover any way to force it to choose a different eye other than the one it automatically detects. This can be problematic if the eye it chooses isn’t the eye in the foreground of the scene, but in practice it usually got the one I wanted about 90% of the time.


f/4 @ 70mm for 1/1000 sec at ISO 500

Under normal shooting conditions when your subject is more stationary the Eye AF system nails a perfectly focused eye which helps to capture those split second precious moments that you’ll get when photographing kids

Great, but not flawless


f/4 @ 70mm for 1/1000 sec at ISO 500

No AF system I’ve ever tested, even the mighty Nikon D4s,
is completely flawless and this camera is no different.

Like any AF system, there’s still some user input required to dial in the settings for the best possible results. As a result, if you try to go beyond what Eye AF is designed to do you’ll get out of focus shots like this. This is easily fixed by simply using AF Expand Flexible Spot or sometimes even Face Recognition without the Eye AF feature. Put another way, don’t just set the AF system to one setting like Eye AF and expect 100% perfectly focused shots as you won’t get it – just like every camera I’ve ever tested for $100,000 USD or less.

More Real World Example Shots

The purpose of my real world shots have always been to just take a review camera out and use it like a typical consumer would in every day settings. This is why super high megapixel cameras like the D800 fail so miserably because they are more suitable for specialty scenarios like landscape shots on tripods, super sunny day shooting, or when used with studio lights. However, I’ve been hearing a lot of buzz about how good the AF system is on the A7R II despite it being a super high megapixel camera.

With some skepticism I decided to treat this camera like a typical consumer would in one of the toughest situations – a photographing a hyper 6 year old at a playground. This is a scenario where I’d typically tell people not to even bother trying unless you have a camera with a great AF system and a super fast burst mode (to increase your odds of getting a sharp shot), and definitely never bother trying to photography kids unless you enjoy blurry photos.

Times change and technology improves, so I was actually quite impressed with the results that I got with this camera. Instead of relying on burst mode and a single AF point as I’d do with DSLR’s, I let the full magic of the AF system do its work for me to see if it was up to the task. In my opinion, it was as you can see from the shots in this article. Even allegedly “sports” cameras like the Canon 7D Mark II have failed to give me the level of auto focus accuracy on my intended focus point that I have achieved here, so the need for a super fast burst mode was less critical to get shots that captured the action (and in this case the joy of a child).

All of the camera default settings were used in aperture priority or shutter priority (those at 1/1000 sec) using Lock-on AF Expand Flexible Spot with Eye Focus engaged about 90% of the time. Shooting mode was burst mode for the shutter priority shots and single shot for the others, and I was always shooting RAW+JPEG which is the slowest performing mode possible for this camera. Nevertheless, it still did an admirable job at coming away with shots that prove its potential and demonstrates that carefully thought out shots in the hands of a creative photographer would easily be magical with the power of this AF system.

All other camera settings were at factory default including metering, white balance, etc… Click here for the beginning of a full gallery of images – including the out of focus shots where the system failed – for this AF test.


f/4 @ 49mm for 1/1000 sec at ISO 400

Focus offset issue aside, I was pretty jazzed when I saw that this impossible shot for nearly any other camera was a keeper to capture the moment. Now if it could just auto erase that pesky garbage can we’d be in business!


f/4 @ 43mm for 1/1000 sec at ISO 320

The default metering was a bit on the dark side in this shutter priority burst mode series, but capturing in RAW with all of these megapixels means that this is an easy fix in post-processing


f/4 @ 65mm for 1/1000 sec at ISO 800

Any parent who has tried to do this style of shot of a kid coming out of a tube slide with anything but a small sensor camera (like a cellphone) on a super sunny knows how easy it is to miss this shot. I was pretty happy with the reliability at which the A7RII would come away with keepers on every attempt.


f/4 @ 54mm for 1/500 sec at ISO 100

My wife was happy to see that the Eye Focus AF feature was even easy for her to use and that it handled this scene with four eyes and glasses exactly as she hoped it would


f/4 @ 35mm for 1/500 sec at ISO 100

With kids you have lots of times where they are behind you and do something that you want to capture, so I turned completely around and shot this using Eye AF for the very first time. I was pleased with the camera performance, but less pleased with the lady on her cell phone in the background but I can’t blame Sony for that – ha, ha.


f/4 @ 24mm for 1/1000 sec at ISO 250

While I was disappointed with the in-camera metering shooting this scene so dark and the AF wasn’t as precise as I think this camera is capable of achieving, I do think that most users would be plenty happy with the results form this series of burst mode shots especially after a quick touchup in Lightroom

Conclusion

See my complete a7R Mark II review here.

Where to order

Click here to learn more or order on the B&H web site.

Other articles you may enjoy

If you enjoyed this article, you may also enjoy these:

Disclosure

If you make a purchase using links found in this article, I may make a commission. It doesn’t cost you a penny more, but it does help to support future articles like this.

Thursday, September 24, 2015

First Look: Sony A7R II–Holy $#!+

Sony Alpha a7R II Mirrorless 42MP/4k Video Digital Camera

I’ve lost track of how many cameras I’ve reviewed, but it’s been a lot – including many Sony cameras. I’m not an easy guy to impress, but HOLY $#!+ this camera has my jaw on the ground and slobber dripping from my chin!

As a result, I couldn’t hold back and had to share a few photos I took recently with this much hyped camera – which I can honestly say deserves the praise. For my testing, B&H sent me this lens:

Sony Vario-Tessar T* FE 24-70mm f/4 ZA OSS Lens

I wish I would have got the Sony 24-70mm f/2.8 ZA SSM II Vario-Sonnar T* Lens, but the f/4 hasn’t disappointed me thus far.

Real World Shots

These are 100% unedited shots taken straight from the camera using in-camera JPEG default processing. Only the shoes shot features studio lights, otherwise these shots are taken with available light and no additional light sources or reflection. All shots are handheld with in-camera stabilization turned on.


f/5 @ 70mm for 1/160 sec at ISO 4000

The detail and dynamic range are breathtaking, but when you notice it is ISO 4000 it’s impossible not to be blown away! No camera has ever touched my hands that has done this well at such a high ISO!


f/5.6 @ 40mm for 1/125 sec at ISO 6400

Again, ISO 6400 – Are you kidding me?!!!!
Super crisp foreground detail, gorgeous
bokeh and bang on color!


f/4 @ 30mm for 1/125 sec at ISO 3200

Even a crap shot like this becomes stare worthy in the excellent B&W creative style shown here with +3 contrast and +3 sharpness (in-camera)


f/8 @ 30mm for 1/160 sec at ISO 160

Having fun above, I decided to toss a spotlight on some black shoes to see the range of blacks in a dark scene – I wasn’t disappointed, but what was even more impressive was the detail that remained in the hot spots! Oh yes, there’s lots of potential for great things with this sensor!


f/5.6 @ 33mm for 1/30 sec at ISO 6400

This is a torture test for any camera, but what blew me away here is that this is the only camera to capture this much of the tonal range without losing detail – and it did it at ISO 6400 handheld! Imagine if I was using a tripod at ISO 100?!!!


f/5.6 @ 26mm for 1/125 sec at ISO 5000

No other camera I’ve tested, at any ISO, has captured this much detail in one exposure – and this was a super bright day with the sun coming in hard from the right. Imagine if you did HDR with this camera?!!!


f/5.6 @ 41mm for 1/100 sec at ISO 6400

Again, dynamic range like I’ve never seen – ever – yet this is ISO 6400!!!
The camera meter with default settings was bang on too!


f/9 @ 36mm for 1/25 sec at ISO 6400

The in-camera stabilization is impressive especially for such a high megapixel camera. While the in-camera noise reduction smeared the details pretty bad, it still did an admirable job of having something very publish worthy with no editing – well done Sony!


f/4 @ 70mm for 1/160 sec at ISO 12800

Yeah, ISO 12,800 – try that with a D810 or 5DsR! Nothing I’ve tested can touch this camera!

This isn’t my review as I’ll have more to come after I get out and do some more serious shooting, but I had to share some of my early results because I’m so happy with what I see!

For more files, visit the full gallery at http://photos.ronmartblog.com/sony/a7rii which will be updated when I do my review.

Conclusion

See my complete a7R Mark II review here.

Where to order

Click here to learn more or order on the B&H web site.

Other articles you may enjoy

If you enjoyed this article, you may also enjoy these:

Disclosure

If you make a purchase using links found in this article, I may make a commission. It doesn’t cost you a penny more, but it does help to support future articles like this.

Wednesday, September 23, 2015

Getting The Shot: “Indonesian Beauty II” by Douglas Dubler 3


Indonesian Beauty II

This image was captured with a Sony A7II  at f/4 @ 1/30 sec using ISO 400 with a Zeiss Otus 85mm (using a Novoflex adapter).
Retouching by
Irfan Yonac

Here’s the story behind this image in Douglas Dubler’s own words (edited by Richard Hood):

As an art form based in “the actual,” photography has always provided a meeting-ground for both beauty and truth. In over forty years shooting fashion and beauty portraits, I have consistently sought to explore this intersection, looking for moments that define a visual tapestry, woven out of  the “why,” as well as the “who.” My photography depends upon finding the right tools, creating the right environment, and establishing the right rapport with a subject, to display something of the truth within the beauty I'm capturing.  My recent creation of a portrait entitled, “Indonesian Beauty” demonstrated the process of combining technique, technology, and timing in order to capture a compelling, and transcendent image.

In the 1990s, I visited seven Asian countries in four weeks, lecturing to photographers on behalf of Fuji film. After such an intense working experience, I decided to take a rest-and-recovery stop in Bali. There, I established a routine that involved catching the sunrise each morning from a different location,  working for an hour or so until the light got too high, then retiring for some sleep and food. I'd then go out for the sunset in a new location. I had planned to spend a week in Bali, but was so captivated by colors and culture, I remained for three weeks.

When I returned to New York I was introduced to Gde Arsa Artha, who has since become a good friend, and who has, over the years, continued to teach me about Balinese art and culture.  Just last month, Gde was responsible for my visit to the Indonesian Consulate, where we were invited to attend a fashion show  they were hosting for four Indonesian couture designers, who were in New York for the Couture Show.  Always wanting to put my best foot forward and following Pasteur’s mantra “Chance favors always the prepared mind,” I organized a mini entourage consisting of a digital tech/1st assistant, 2nd assistant, hair and make-up artist, and several others to help with the equipment. Out of this visit would come my  portrait of Chitra, the “Indonesian Beauty,” featured here in an earlier blog, and the current portrait of Sarah Azca, shown here.

Figuring on just a simple main light and one light for a background if necessary, I packed one of my Broncolor Grafit 3200 wt./sec packs with one of my “signature” Lightbar 120s and a regular Pulso head.  (over $18,000 worth of lighting equipment at retail).  When we arrived at the Indonesian Consulate, they were in the process of dressing the models and doing their walk-throughs in preparation for the show.  I took a few minutes to survey the three floors looking for the best place to set up, where I could at least take advantage of some of the wonderful available light that was entering through a beautiful domed skylight, similar to a mini-Guggenheim.

I decided that the second floor would be more central as that was where the dressing rooms were and I could capture the models both coming and going.  I had the Lightbar 120 set up and proceeded to do a few captures to check the light.

I didn’t like what I saw.

But more of an issue was the fact that no matter where I positioned the light, someone was always walking in front of it and almost tripping on the power cord or head extension.  I quickly realized that, even if I got the light worked out to my liking, the logistics were such that the decision to  light the shoot had been wrong.  In the past, this would probably have been the end of my day.  Here is where the importance of having the best tools comes to the fore:  after a few readings with my Sekonic Litemaster Pro light meter, I decided that with the super fast Zeiss lenses I had and the image stabilized Sony A7II camera, I could work with the available light, filling when and where necessary with my Roscopak silver/white reflector. 

My next objective was to find one or two models with whom I thought I would be able to work well. Initially, I had assumed  that the majority of the girls were from Indonesia. But after speaking to several of them, I learned that, in fact, most were from New York City.   My hair and make-up artist, Sylvia Pichler, while touching-up the make-up,  was alerting me to interesting looks on the girls.  One of the first models she brought to my attention was Sarah Azka, an Indonesian  who had been flown to New York by one of the designers.  Instantly, I thought she had a great look and the dress and headpiece she was wearing were a beauty photographer’s dream.  We took a few photographs on the lower floor,, where the light wasn’t to my liking so I told her that when she was done with the show I would like to take some more photographs.

I continued to work basically filing time waiting for her to be finished.  When she appeared, I immediately had my friend Gde tell her to follow me upstairs and I found a spot where the light had a beautiful bounce quality, though because it was after 3:00 P.M. my f-stop was starting to drop quickly.  I knew I had to work quickly. I changed my ISO to 400 and put the incomparable Zeiss Otus 85mm f1.4 on the A7II with the Novoflex adapter.  At f 4 I was at 1/30 sec. which was about as slow as I wanted to go, hand-holding this heavy piece of glass.  With my “previous” camera, I would have had to be at 1/320 sec. which would have increased my ISO to over 3200. A definite “quality” deal breaker.

I shot 230 images that day.  This photograph was number 227.  When I shot it I knew there was no need to continue. I had the shot!

So it all came together. I had the right tools in the right place at the right time. I had the right model, and, though there was a definite language barrier, I was able to establish that few precious moments of rapport with her, so necessary to capturing the intangible magic that makes up a great beauty or portrait shot.

Follow Douglas on Social Media

Want to follow Douglas on social media? Click on the following links and start to follow him:

Want to do a fashion photography workshop with Douglas and Ron in New York City?

Douglas is an iconic fashion and beauty photographer with hundreds of magazine covers to his credit. If you are interested in joining him in Manhattan for a workshop, please contact me and I’ll add you to the list for future workshop announcements. Exact details will be included when space for the next workshop opens up.

Other articles you may enjoy

If you enjoyed this article, you may also enjoy these:

Disclosure

If you make a purchase using links found in this article, I may make a commission. It doesn’t cost you a penny more, but it does help to support future articles like this.

Tuesday, September 1, 2015

Getting The Shot: “Indonesian Beauty” by Douglas Dubler 3

Copyright Douglas Dubler 3 - ALL RIGHTS RESERVED
Indonesian Beauty

This image was captured with a Sony A7II  at f/4 @ 1/60 sec using ISO 100 with a Zeiss Makro-Planar T* f/2 100mm (using a Novoflex adapter). 
Retouching by Irfan Yonac

Introduction

Douglas is a good friend of mine who was the driving force behind my successful Printing Series and eBook. Click here to see my printing series article about him, and you can read his latest bio at the end of this article.

In Douglas’ Own Words

The most successful photographs have at least three things in common. They are, and not necessarily in order of importance; concept, technique, and execution.

Last week I attended an Indonesian festival celebration in New York City with my Balinese friend, Tjokorda Gde Arsa Artha. The Indonesian Consulate General on 68th Street between Madison and 5th Avenue had the block closed to traffic and had food and craft vendors selling their wares to the public.

With my friend Gde’s guidance and contacts we were able to enter the Indonesian embassy where they were about to begin a “fashion” show with exotic Indonesian beauties dressed in their colorful ethnic costumes.

The first thing that caught my eye was the bright 3 P.M. sun backlighting these large pieces of red fabric that were serving as curtains for the fashion show. I quickly had my friend’s son Dalem Arsa Artha stand in front of the curtain and I did a portrait of him. The red background was like a large backlit transparency which reminded me of a technique I used in the studio years ago creating backgrounds using front and rear projection screens which gave me saturation and color palette impossible to achieve with the standard choice of seamless papers. It quickly became one of my trademarks.

Fast forward to last week. Being a beauty photographer, I immediately began looking at the 20 or so girls and women for a beautiful and interesting subject. One woman in particular, Chitra Irawan, caught my attention with the combination of her colorful costume, elaborate beaded veil and beautifully reserved demeanor. I had my Friend Gde approach her and ask her if she would pose for me. She agreed and quickly told me she had no experience as a model. I knew I would only have a few minutes to try and get a good shot. Her connection with the camera would make or break the shot. Somewhat of a tall order to expect from a non-professional.

I had her stand directly in front of the red curtain which was still backlit by full sunlight. On my Sony A7II 24MP camera I attached my superb Zeiss 100mm f2 lens via the Novoflex adapter. I set the aperture to f4 to give me about one inch or so of depth of field at the distance I was at. I used the “focus peaking” feature on the camera to ascertain that just the beads were sharp and let her face and eyes go slightly soft. I gave her a minimum of direction but she understood perfectly and in this shot gave me just the “right” look. Instinctively I knew I had the shot.

The whole process took about 15 minutes at most. I took exactly 23 exposures and every one was focused precisely where the yellow “marching ants” indicated. Remember I was doing this with a manual focus lens. With the IBIS camera stabilization and a shutter speed of 1/60 sec., I still had no problem capturing razor sharp images. Something I have never been able to do with a DSLR. Within 5 minutes the sun had gone behind some clouds and the”red” background was no more.

As an aside comment to photographers who are complaining about Sony’s compressed raw file I say get a life and take some pictures! I pushed this file .17 of a stop, not the 5 or 6 stops that apparently produces the digital artifacts that the “pixel peepers” are seeing. I come from an analog background where my typical film push was +1/8 stop. So slight that only one lab in New York City could do it.  So to me +5 or whatever is incomprehensible.

To conclude, the success of this photo is tied to my many past experiences over forty years as a photographer. When I find myself in a new situation, I usually use as a point of reference/departure one of those experiences or a combination of them. I generally make creative decisions very quickly and for the most part edit in the camera.

The lighting for me is always number one. I can’t make it in Photoshop. Next, the right choice of lens and aperture. The Zeiss 100mm f2 has that holy grail of sharpness and beautiful bokeh that you can’t get from any other lens (except my favorite Zeiss 135mm f2 APO Sonnar). Next, the perfect composition.

And last and most important, the connection with your model/subject. Without that all of the above is for naught. Of the 23 captures this is the only one with this feeling. Some people might say that I was lucky…

Color managed by X-Rite Photo software.

About Douglas Dubler

Douglas Dubler is a fashion and beauty photographer who seamlessly joins craft and creativity to produce some of the most memorable images in editorial, advertising and fine art photography. Dubler has been able to achieve this union by synthesizing right and left brain thinking. His early training in Fine and Liberal Arts at Boston University enriched him with an articulate sense of form, color, and composition. Initial experiences as a plastic sculptor and silk screen artist instilled in him a great respect for the craft and workmanship necessary to create fine art, and produced the dedication to detail that appears in his work as a photographer. Early mentors in his creative life were Ansel Adams and Isamu Noguchi.

Dublerʼs professional photographic career began in the late ʻ60ʼs in California and the Virgin Islands where he photographed underwater life. Seeking dry ground, he made the transition to studio photography in the early ʻ70ʼs. In 1976 his desire for commercial success drew him to Los Angeles where he began to specialize in fashion and beauty photography. During this period Douglas was mentored by renowned fashion photographer Neal Barr with whom he has maintained a decades long friendship. Working primarily with major motion picture studios, Douglas photographed celebrities and subsequently obtained cosmetic assignments from Max Factor and Redken Laboratories. In addition he also began working as a photographic consultant and special photographer on feature films.

Access to European editorial markets and major cosmetic accounts lured Douglas to New York in 1982. His editorial assignments brought him primarily to Italy where he spent extensive amounts of time working for Amica, Lei, and Italian Vogue. His celebrity editorial clients include Jacqueline Bisset, Jane Fonda, Shirley MacLaine, Dolly Parton, Brooke Shields, Andie MacDowell and Sharon Stone.

Dublerʼs innovative techniques and his consistent ability to reproduce accurate, pleasing skin tones with minimal retouching has produced a client list of major cosmetic companies including Max Factor, Revlon, Clairol, Coty, Redken, Avon, Charles of the Ritz, Sally Hansen, and Alexandra de Markoff. His commercial successes have been recognized by the industry with awards from the Starch Report, Communication Arts, Art Directors Club and Clio.

For the past decade, Douglas has been working as a creative director/ photographer for the majority of his clients. Prompted by his desire to be involved at the conceptual phase of a project, he finds the challenge more fulfilling and is a vocal advocate of this holistic approach to the type of images he creates. Recent clients in this phase of his career are LVMH, Paspalley Pearls, CNN, Epson, Broncolor, Nikon and Nik Software.

His personal work, unlike his commercial work, is eclectic and runs the gamut from surreal abstract to still life to architectural. His digital fine art prints are represented by Mertens Fine Art in Montecito, California and Throckmorton Fine Art in New York City. Teaching venues include The School of Visual Arts where he is a graduate instructor, Brooks Institute, International Center of Photography, Hallmark Institute of Photography, the University of Miami and Palm Beach Photographic Center.

The ability to meld technology with creative imagery has firmly established Douglas Dubler as an innovator and artist and will continue to create a constant demand for his iconographic beauty and fine art images.

Want to do a fashion photography workshop with Douglas and Ron in New York City?

Douglas is an iconic fashion and beauty photographer with hundreds of magazine covers to his credit. If you are interested in joining him in Manhattan for a workshop, please contact me and I’ll add you to the list for future workshop announcements. Exact details will be included when space for the next workshop opens up.

Other articles you may enjoy

If you enjoyed this article, you may also enjoy these:

Disclosure

If you make a purchase using links found in this article, I may make a commission. It doesn’t cost you a penny more, but it does help to support future articles like this.

Monday, June 15, 2015

Adorama Deals on Canon 5DS/5DSR, Sony, Fuji, SSD drives, Manfrotto, Elinchrom and More

Canon 5Ds IN STOCK with up to $400 Cash Back Rebate!


Buy lenses with this camera and get a mail in rebate at http://www.adorama.com/pdfs/rebates/5dsmir.pdf


This offer expires on Limited in stock

Canon 5Ds R IN STOCK with up to $400 Cash Back Rebate!

image
Buy lenses with this camera and get a mail in rebate at http://www.adorama.com/pdfs/rebates/5dsmir.pdf

This offer expires on Limited in stock

WHITE Canon EOS Rebel SL1 DSLR 3 Lens, Printer & Back Bundle for only $549 After Rebate!


Includes 18-55 STM lens, 75-300mm III, 50mm 1.8, PIXMA PRO-100, Paper & Lowepro Camera Bag

Black Canon EOS Rebel SL1 DSLR 3 Lens, Printer & Back Bundle for only $549 After Rebate!


Includes 18-55 STM lens, 75-300mm III, 50mm 1.8, PIXMA PRO-100, Paper & Lowepro Camera Bag

SAMSUNG Portable SSD's as low as $97.99


Instant rebates for up to $100 and free fast shipping

Sony Alpha a7R II Mirrorless Digital Camera Pre-Orders Begin 6/17/15 at 11am EST


Pre-Orders Begin 6/17/15 at 11am EST

Panasonic LUMIX DMC-CM1 Communication Camera with Leica Lens Optics and Bluetooth and 4k


Pre-Order

Canon 70D + Printer only $849.99 after mail in rebate


A $1484.41 Value only $849.99 after mail in rebate

See my review of this product

Nikon Sale - save up to $500 (and more with lens bundles)


Bundles and deals on most models - see link for full details

12mm F/2.8 Zeiss Touit Lens and Lens Bundles


See link for all options

32mm F/1.8 Zeiss Touit Lens and Lens Bundles


Rebate and bundle deals

WD My Passport Ultra 500GB Portable Drive only $59.99 - 2TB only $129.99


See link for all options

3 Legged Thing Evolution 3 Punks Vyv 5-Section Alloy Tripod with Airhed Mohawk Ballhead, 44lbs Maximum Capacity, 55.5" Maximum Height


Only $199

Manfrotto MMC3-01 Compact Monopod, Black only $14.95!!!!


Only $14.95!!!!!!

Sunpak Lightstick 516 LED Dual Panel Photo Video Light


Sale $164.95!!!

Fujifilm X-T10 digital camera only $799.95


Replacement for the X-T1 available to pre-order

Save up to 50% OFF hundreds of Elinchrom Lighting Products!


Major sale on most items

Disclosure

If you make a purchase using links found in this article, I may make a commission. It doesn’t cost you a penny more, but it does help to support future articles like this.