Showing posts with label X-Rite. Show all posts

Thursday, September 14, 2017

A Point and Shoot Beats Most DSLR Portfolio Shots

All of the following photos were taken with a point and shoot (and no, it wasn't a Leica) which I serve up as evidence that it's more about the photographer than camera (although this is a pretty damn good camera too).

All images are Copyright Douglas Dubler 3 - ALL RIGHTS RESERVED. You may click to view full size versions in Google Chrome, but you may not save, print, download, link to, repost, etc... any without written consent.


"Summertime Boy" - 1/1250 at f/5 ISO 100 (-1 1/3 EV)


“Peruvian Jungle Lily” - 24mm at the closest focusing distance ( less than 8 inches) At f5.6


f/6.3 for 1/40 sec at 24mm (-1 EV)


"Lilies" - 24mm (widest) end of the zoom lens. At f4.5 at almost the closest focusing distance

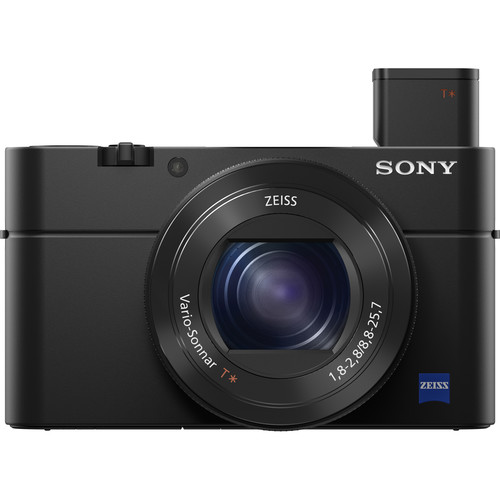
And the camera was...


Sony RX100 IV  at B&H (review)
Also on available at Amazon

Yes, the Sony RX100 IV was used for all of those shots except the first one which was actually taken with he Sony RX100 III!

Of course, to be fair these were taken by one of the greatest living photographers of our time, Douglas Dubler (website). This legendary photographer has shot more magazine covers than most photographers have (or will have) portfolio caliber shots in their lifetime. He's also been the featured photographer for the launch of major products from Nikon, Epson and so many more. Simply put, these weren't taken by a mere mortal, but it does show off what this camera can do.

In Douglas Dubler's own words


24mm for 1/160 sec at f/8 ISO 100 (-1 EV)

Many people who are familiar with my work most likely associate me with high resolution capture and large format gallery prints. Much of this work is/was done on medium format digital backs or high megapixel DSLRs. Lately I have been exploring a different direction. Several years ago I purchased a Sony RX100 III for my girlfriend and began giving her photography lessons. As her photography progressed I noticed a look that I began to admire. 


24mm for 1/80 sec at f/5.6 ISO 100 (-1 EV)

They were done mainly at the 24mm focal length at the closest focusing distance (around 4 or 5 inches ). The small sensor gave her more than adequate depth of field at modest apertures (f4-5.6).  The wide angle lens gave just a little distortion which enhanced the subject. My best description is a hybrid of environmental and semi Macro.


24mm for 1/60 sec at f/5 ISO 100 (-1 EV)

Inspired, I began to emulate the effect with my A6500 and larger A7RII. Even with the APS-C sized sensor in the A6500 with various focal length lenses from the Sony 12-24mm ( on the A6500, a 18-36mm), to many different Zeiss,Sony and Sigma prime lenses I couldn’t get the look.  If I was shooting flowers to get the depth of field I would end up with a shutter speed that was too slow (wind vs. flowers!).  So I borrowed her camera and spent a few days at the New York Botanical Garden seriously photographing flowers. It took me one day to work out my approach but I was very happy with the beginning results.


"Maleficent Tree" - 24mm for 1/160 sec at f/5.6 ISO 100 (-1 1/3 EV) RX100 III

The next step was to make some prints, the whole point of photography.  With a little editing in my favorite Capture One V10 and of course B&W conversion done with Nik’s Silver EFex Pro 2 I was ready for the litmus test..  With my Epson P5000 and Epson’s new Legacy Platine paper I made prints that rivaled the best silver-gelatin prints.   As a test, at the beginning of one of my classes I had the students look carefully at one of  the prints and guess what camera I had used. Unanimously they declared a high resolution professional DSLR or mirrorless camera. I showed them the diminutive Sony and at first they thought I was joking. I assured them I wasn’t.


24mm for 1/60 sec at f/4 ISO 100 (-1 EV)

Since then I went out and purchased a MarkIV model which is around my neck whenever I leave my house. Even on my bike I can easily carry it in a small bag around my waist. Now no one even looks at me and I blend in with the iPhoners. I hand hold almost all of the images and as a result am able to shoot many more images. It doesn’t mean I will abandon my abstract Macro studies with the larger cameras and tripod but I have a feeling I will always have this camera hanging around my neck…

Douglas Dubler's thoughts on a couple shots


Black Dahlia - 24mm@f5.6@1/80sec, ISO 100, exp.comp.-1.3 stops

I found these two blossoms in perfect juxtaposition, full face and profile, which I am always looking for. They were the last shots out of 250 exposures that I did during my B&W class at NYBG last week.

I was actually on my way out of the garden and, in exiting, revisited the flowers I had shot earlier at around 6 P.M. I was tired after a long day of teaching but instinctively knew that those last few minutes of sublime light (exactly 7:11 P.M.) reward those who are patient. 

Processed in Capture One V10 and B&W conversion done in Nik Silver Efex Pro 2.


“Empress Lotus”

I have been trying for quite some time to get a good shot of a lotus blossom. For me that meant getting directly over the flower. Not so easy when you consider they grow in water, in this case, water that is over 5 feet deep. I surveyed all of the lotus in bloom and decided this was aesthetically my favorite. All I had to do was wait for the best light.  At around 7:10 P.M. the sun was no longer directly on the flower but was creating a beautiful soft illumination that seemed to be emanating from within the flower.

With some help from my friend Steve Titus (shown below) I was able to get an almost vertical camera angle and with the advantage of the articulating LCD could precisely compose the shot. It still took over 40 shots to get this precise uncropped composition.

Post processing, I had my friend Irfan Yonac do some digital enhancement using an “analog film” technique. It was the final step in the evolution of this photograph. Shot at 28mm@ 100 ISO @ f5.6 @ 1/200 sec, exp.comp.-1.0 stops.

Processed in Capture One software available at B&H.

Here's a funny behind the scenes shot of what it took to get this shot...


Conclusion

My review shows what mere mortals will get with this camera, but it's fun to see that in the hands of an X-Rite Coloratti Master like Douglas what is possible!

I really hope you enjoyed this guest blog from as much as I did. If so, please leave comments and check out more of Douglas's work on Instagram, Facebook,  or his website. Here's a couple more guest blogs from Douglas with his amazing work:

And here's one where Douglas breaks out the big camera that will really blow your mind:

Thanks Douglas!

Sincerely,
Ron Martinsen

Want to do a workshop with Douglas?

Contact me if you are interested in working with Douglas or doing a workshop with him in New York City.

Other articles you may enjoy

If you enjoyed this article, you may also enjoy these:

Enjoy these and more on the Reviews tab as well as Ron's Recommendations.

Disclosure

If you make a purchase using links found in this article, I may make a commission. It doesn’t cost you a penny more, but it does help to support future articles like this.

Saturday, September 7, 2013

Ron Martinsen added to X-Rite Coloratti

Visit X-Rite Ron Martinsen Coloratti Page

X-Rite is well-known as the color management experts in the business. From color calibration tools from colorimeters to spectrophotometers and industry leading software – nobody is more respected in the business than X-Rite. To help recognize industry experts who understand color management, X-Rite has the prestigious Coloratti program.

I’m very pleased to have been added as an official member of the X-Rite Coloratti for recognition in my work on educating my readers on Color Management as part of my ongoing Printing Series.

Related Articles

To learn more about color management products and printing, you might enjoy these articles:

Disclosure

This is a honor provided by X-Rite. I do not get paid nor am I bound by any restrictions or contracts for this honor. While I do believe their products are class leading, this does not preclude me from reviewing competitive products which I have previously done and will continue to do. As such, if a better product comes along to solve a problem I will state so on this blog as I have always done.

Wednesday, April 11, 2012

X-Rite Announces New i1Pro 2 Professional Color Management Solutions for Photo, Pre-press, Publishing and Digital Printing Markets

New solutions include all-new second-generation i1Pro spectrophotometer delivering increased accuracy, ease of use and expanded professional level feature set

X-Rite i1Publish Pro 2 Color Profiling Software Bundle

GRAND RAPIDS, Mich., (April 11, 2012) X-Rite, Incorporated (NASDAQ: XRIT), the world leader in color management, measurement and communication technologies, today announces its new portfolio of i1 Professional Color Management Solutions which now include a newly redesigned i1Pro 2 spectrophotometer.

Built upon the success of X-Rite’s i1Pro spectrophotometer as the de facto industry standard for more than a decade, the newly enhanced i1Pro 2 device has been redesigned to provide an even higher level of accuracy, versatility, ergonomics, functionality and value. Combined with the recently released i1Profiler software v1.3, which accommodates all levels of proficiency and expertise, the new i1Pro 2 portfolio of four different products is specifically targeted to meet the unique needs of photo, pre-press, digital print and publishing professionals, providing exceptional value at very attractive price points.

This new portfolio, comprised of X-Rite’s i1Basic Pro 2, i1Photo Pro 2, i1Publish Pro 2 and i1Publish products feature groundbreaking new technology and applications. Each Pro solution includes the new i1Pro 2 second generation spectrophotometer – the most accurate and forward thinking profiling device available today accommodating three measurement conditions in one single device. These conditions include the most commonly used M0 (Standard Illuminant A), the emerging M1 (illuminant D50) and M2 (known as UV-cut). Also included are i1Profiler, X-Rite’s entirely new next generation color profiling software, PANTONE Color Manager color swatch bridging software and ColorChecker Camera Calibration software.

“Exceptionally accurate color measurement and calibration remain basic building blocks for professional-level workflow,” commented Vic Stalam, X-Rite’s Senior Vice President Sales & Marketing. “Nowhere is repeatable, predictive color management more critical than in the prepress, digital printing and photography markets that make up the core imaging market customer base for X-Rite. With the introduction of these new products, X-Rite once again delivers to color professionals around the world the products they need that incorporate important emerging color standards.”

About Next Generation i1Pro 2 Spectrophotometer

The i1Pro 2 spectrophotometer introduces a new level of color accuracy, delivering increased ease of use and an expanded professional level feature set, including supporting the latest developments in industry measurement standards. i1Pro 2 solutions are sure to maximize profitability and minimize wasted time, ink and paper, while delivering the confidence that the user’s digital workflow is perfectly and professionally calibrated and profiled.

New i1Pro 2 spectrophotometer highlights:

New illuminant design allows for 3 standard measurement conditions (ISO 13655 M0: Tungsten; ISO 13655 M1: D50; ISO 13655 M2: UV Cut) plus Optical Brightener Compensation (OBC) without changing filters or needing a second instrument.

Enhanced Optical Brightener Compensation allows for the most accurate profiling for today’s enhanced range of substrates. Now users can predict what colors printed on optically brightened paper will look like under different light conditions using a single hand-held device.

Positioning Detection Sensor provides a more robust scanning experience even on special substrates and low-resolution printers. It allows for the measurement of smaller patch sizes (as low as 7mm) in manual mode and enables dual measurement workflows for OBC, M1 and M2.

New Status LED guides users through the measurement process and provides feedback on device status, improving the user experience.

New Design Ergonomics throughout allows for greater usability, flexibility, cleaning, protection, and storage of the precision i1Pro 2 device.

Better temperature stability and higher brightness levels improves emissive measurement, resulting in the best possible calibration and profiling of monitors and projectors.

All new diagnostics and self-correction features

Built-in wavelength calibration technology allows for self-diagnosis of optical grating in relation to sensor during white calibration (with automatic correction and notifications).

Maintaining and protecting the device (and investment) is easier than ever

Self-cleanable aperture protection glass and calibration white tile cover provides additional built-in protection from dust and dirt.

About i1Profiler Software

With the latest release of i1Profiler software v1.3, X-Rite has further enhanced this next generation professional color management software. i1Profiler offers an unprecedented level of flexibility and features a number of unique color management capabilities such as optimizing profiles, creating profiles with ambient light measurements, compensating for optical brighteners in papers, and utilizing simple yet advanced controls for black separation and providing significant ink savings, adding to users’ power and control in creating professional quality profiles. Users can choose between a ‘basic’, wizard-driven interface; or an ‘advanced’, user-driven interface to create high quality, precise, custom color profiles for monitors, projectors, printers, and presses.

New i1Profiler Software v1.3 highlights:

  • i1Pro 2 spectrophotometer support added for monitor, projector and printer profiling
  • M1 measurement condition support added
  • White point editing added – from current measurement, saved measurement, ICC profile, or custom
  • Improved CGATS reading module
  • Improved handling for printer test chart measurement
  • Default patch size reduced to 7mm
  • Two new measurement workflows added:
    • Measure Chart – specify number of rows and columns
    • Measure Reference Chart – import CGATS reference from ProfileMaker 5
  • Improved CMYK+n profile generation
  • Russian language support added

About X-Rite i1 Professional Color Management Solutions

i1Basic Pro 2 is a fundamental solution for high-end monitor and projector profiling, monitor and printing quality verification, and spot color measurement. Designed for an imaging professional’s unique needs, i1Basic Pro is ideal for an effective workflow in a color-managed ecosystem. i1Basic Pro includes i1Profiler software, PANTONE Color Manager software and an i1Pro 2 spectrophotometer. 

i1Photo Pro 2 is specifically designed for discerning photo professionals to manage their RGB workflow from camera to display and projector to print. Professional photo users will enjoy the highest quality color results that especially target highlight and shadow details and delivers greater color accuracy for more neutral grays and natural skin tones. With the new Optical Brightener Compensation capability, photographers can even optimize their prints by taking into account optical brightening agents often found in photo papers and create output profiles for specific lighting conditions in studios or galleries, or wherever the print will be displayed.

i1Publish Pro 2 is the ultimate, fully-featured ICC profiling solutions for imaging professionals that need to color manage their complete RGB, CMYK and CMYK+ (CMYK plus any 4) prepress workflows, complete with quality assurance validation and verification functions. This includes a display QA function to check soft proofing and a printer QA function to check print quality using ISO 12647-7 compliant media wedges (IDEAlliance Digital Control Strip, Fogra Media Wedge, Japan Color Control Strip). With the Optical Brightener Compensation (OBC) capability users can easily adapt to any non-standard viewing environment. With the M1 measurement capability, imaging professionals can rely on consistent measurement for visual matching under emerging industry standard viewing conditions.

i1Photo Pro 2 and i1Publish Pro 2 include i1Profiler software, an i1Pro 2 spectrophotometer, PANTONE Color Manager software, ColorChecker Proof target (for direct viewing analysis of ColorChecker target compared to customer’s printed target and for Optical Brightener Compensation (OBC) evaluation), mini ColorChecker Classic target, and ColorChecker camera calibration software. i1Publish (a standalone software package) includes all of the above except for the spectrophotometer.

Availability and Upgrades

The new i1Pro 2 Professional Color Management Solutions are immediately available from X-Rite’s online store (North America), and also from the company’s worldwide network of resellers. i1Publish Pro 2 will also be offered with two upgrade options based on original solution purchased. For more information, please visit www.xrite.com or www.XritePhoto.com.

Visit the special launch page for this product here.

Preorder now

Related Articles


NOW AVAILABLE - Click Here to learn more

Visit my printing series page to learn more about printing related topics and calibration.

Disclosure

I may get a commission if you make a purchase using links found in this article.

Tuesday, February 7, 2012

Choosing The Right Display Calibration Device (Updated 2/9/2012)

The X-Rite i1Display Pro, ColorMunki Display, NEC SpectraSensor Pro and Eizo (DataColor) EX1 are all current wide gamut colorimeters NOT spectrophotometers. The purpose of this article is to demystify a lot of confusion about display calibration devices on the market and educate you on some new models to let you know which display calibration device is right for you.

WARNING: I go super geeky at first to help clear up terminology and massive confusion, so if you know what you want and can’t deal with the geeky stuff then page down until you see a picture of the product you want to buy or research.

Profile vs Hardware LUT Calibration

What this means is that they are designed to calibrate your display against a series of colors swatches for which the display calibration software used knows exactly what value the sensor should read for each swatch.

The results of this data obtained by the sensor is used by the display calibration software in one of two ways:

  1. To create a display profile (most common) – this is where the display calibration software does what it can to adjust your display to show colors accurately and it creates a lookup table of differences in a file a profile. In simple terms it’s like having yellow paint that is supposed to look green so you keep a measurement of how many drops of blue you mix into the yellow paint until it is the shade of green that you want. The profile is that sheet of paper where you jotted down the information about how much blue is needed. Your computer operating system uses these profiles to work with your display card and monitor to make color adjustments to the red, green and blue channels to render color more accurately. This method works well, but it is system dependent and can’t be dynamic.
  2. To perform a display LUT Adjustment (a.k.a., programming the LUT) – Expensive and advanced displays improve upon the model above to actually write this data into the monitor hardware itself so that the monitor can do a better job than your OS at rendering accurate color. The method has the advantage of allowing you to use the same display with different computers without the need to calibrate because your operating system is bypassed for color rendition. This is less common on inexpensive displays, but very common on high end displays best suited for photography.  The downside to this design is that you usually need to the proprietary software by the display maker (i.e., NEC SpectraView II, Eizo Color Navigator or EasyPIX, etc…) as other third party software (i.e., the software included by X-Rite or DataColor) is sometimes not able to program the display LUT directly and will resort to creating a display profile (very bad when using a LUT based display). X-Rite has partnered with Eizo so that its latest software can program Eizo displays that are compatible with ColorNavigator can be programmed with i1Publish, but NEC still requires SpectraView II.
A Word About NEC & Eizo (proprietary) Display Colorimeters

The NEC SpectraSensor Pro is a colorimeter built by X-Rite specifically for NEC to calibrate wide gamut displays built by NEC using its proprietary SpectraView II software. The Eizo EX1 is a colorimeter built by DataColor specifically to calibrate Eizo displays using its EasyPIX software. They both can be used with their corresponding software to program the LUT of supported displays and therefore are offered as bundle when buying Eizo and NEC displays.

These colorimeters are just fine as they have been developed and tested under the supervision of the display maker to ensure they are able to program the monitors LUT using their proprietary software.

NEC SpectraView (i1 Display) Colorimeter

NEC used to also offer a special version of the i1 Display as shown below that supported wide gamut display calibration (the X-Rite i1 Display DOES NOT support wide gamut):

If you are a NEC display owner with one of these devices (or are considering buying one used), you do not need one of the products discussed in this article as it will still calibrate your NEC wide gamut display accurately. NEC and X-Rite will eventually phase out support for this product, so I wouldn’t invest in one at this point. Using today’s software and this hardware you should be able to accurately display any NEC display that supports SpectraView II, so an upgrade is only necessary in the future when you upgrade your operating system and/or SpectraView software to a version that no longer supports this device (won’t happen overnight).

Spectrophotometers – Display and Printer Calibration


Spectrophotometers like the ColorMunki PHOTO
calibrate displays plus create paper profiles

Click here to read an article that does a good job at explaining the difference between a colorimeter and a spectrophotometer.

A spectrophotometer can be used to create paper profiles which is the process where you print out color swatches of known RGB values it and then measure the colors using a spectrophotometer to compare what color actually gets printed. The operating system, the printer, the inks and paper you use all combine to contaminate the color that ultimately ends up on the paper, so a printer paper profile used in conjunction with a display color profile (or calibrated LUT) is critical to get the colors you see on your screen to look the same way on the paper that comes out of your printer.

This is a tricky process due to all of the variables that come into play, which is why X-Rite created a great product called the ColorMunki PHOTO (which is a spectrophotometer, NOT a colorimeter like the ColorMunki Display (discussed later in this article) along with its proprietary software to make this whole process work smoothly. I talk about this in my color management article, but know that currently this is the most easy to use and accurate method for getting your prints to look like what you see on your display (excluding the limitations of your display).

If your goal of reading this article is to match your prints with your display then my advice is to  go get a ColorMunki Photo from Adorama or B&H as that’s a color management workflow issue. Advanced print master (discussed in my printing 101 eBook) will use even more advanced and complex products like these:


B&H sells the i1iSis – an expensive spectrophotometer


i1 Pro shown with a
i1iO Automated Scan Table

X-Rite has replaced the i1XTreme I reviewed with thei1Photo Pro UVcut Professional Color Management for Photographers and offers the i1iO Automated Scan Table (shown above with a i1 Pro attached). It also offers the i1Sis which is only used for fast creation of paper profiles so a separate colorimeter is required.  It should be noted that this device is offered in a non-UVcut version as well.

Now before you go out and get a spectrophotometer besides the ColorMunki PHOTO, be aware that you will invest thousands of dollars and lots of time so mere mortals are going to find their money best spent on a product like ColorByte ImagePrint (new version 9 is awesome) that just has all the profiles you need available on demand so you are back to only needing a colorimeter to calibrate your display.

Colorimeters

Okay if you read the stuff before this then I’m sure your head is spinning. I’m happy to say that I won’t get too geeky from here on in as I’ll simply focus on which “gizmo” you need to make your display to the best job it can at showing colors accurately.

WARNING: If your display sucks, a colorimeter may not help!!!!

Please keep in mind though that colorimeters aren’t miracle workers. If you are using a crappy display you got free with your computer, then it may not be able to display color accurately no matter what you do. I know that on paper many displays seem like they are “just as good” but as the saying goes “there’s lies, damn lies and statistics”.  Statistics do not tell the whole story my engineer friends, so if you are serious about color management then you’ll need to invest a good wide gamut display (and no you can’t get one off eBay for $100). Here are a few models that I’ve used and have witnessed them display color as accurately as possible with todays technology:

  1. Eizo ColorEdge CG243W – The best photography display I’ve ever used, but also the most expensive. If you have a Ferrari or Rolls Royce sitting in the garage, then this is what you want to buy. Joking aside, it doesn’t get better than this.
  2. Eizo FlexScan SX2762W – You insist on Eizo quality but can’t stomach the price? Then this display is a nice alternative.
  3. NEC PA Series – If you a working middle class grunt who wants near Eizo quality for a fraction of the price, then this will rock your world. I use the PA241W and love it, and only a trained eye will see the difference between this an a Eizo.

I’m told HP has DreamColor displays that are fantastic too, but I’ve had such bad luck with HP products over the last decade that I’d recommend sticking with highly trusted brands like Eizo and NEC.

If you must choose a different brand then you’ll want an IPS display that can display at least 95% of the Adobe RGB color gamut, has a DisplayPort (even on the PC), has a programmable LUT for hardware calibration, and supports a minimum resolution of 1920x1200 (not 1080). 10-bit color is an added plus. If the display you are researching lacks any of these features then I’d advise you to keep shopping.

X-Rite i1Display PRO – (Ron’s Favorite)

Click to visit X-Rite for more info on the i1Display Pro
i1Display Pro ($269.00 MSRP – Adorama, B&H)
Professional Display Calibration for the Most Demanding Color Perfectionists

In the summer of 2011 X-Rite released two new calibration devices to replace their popular X-Rite i1 Display 2 and Pantone Huey PRO colorimeters – neither of the older units supported wide gamut display. The i1Display Pro and ColorMunki Display have the following in common:

  • Wide gamut color calibration
  • X-Rite ADC [Advanced Display Control] to control supported hardware to ensure the highest quality results.
  • Support profiling projectors (i.e., Canon SX-80 Pro Photography Projector) and includes a tripod mount to assist with calibration in large venues
  • Multiple Displays Supported (but more advanced via software for the i1Display Pro)
  • Flare Correct™ compensates for flare light falling on the surface of the display (but honestly I hate this feature <g>)
  • The ability to measure the ambient light to include that data in your profile when your display is not in an ideal viewing environment with a hood
  • and more….

Unique to this model is the bundled software is based on the all new i1Profiler software (which I’ll be reviewing soon). It can run in both a simple mode as well as advanced mode which means this solution can grow with you as your color management skills improve.

This model has advanced multiple displays support that also is useful in workgroups where you need all of the displays in your facility to be viewing colors the same way. Now based on my experience is that you need all of the same series displays built and purchased at the same time for the best result, but that’s not usually possible so this does the best job that I know of at getting you in the right ballpark.

This device will work with the latest version of NEC’s SpectraView II and Eizo ColorNavigator calibration software.

Here’s how to set the preferences for this device in NEC’s SpectraView II:

Click for a larger image

It should be noted that if you use a NEC display that supports hardware calibration then you must use SpectraView II and therefore can not (and should never) use X-Rite’s included software. Windows 7 will automatically detect and install the “i1Display 3” driver and it will work the next time you start SpectraView II and change your calibration sensor preferences as shown above.

If you have a photography business, then this is the device you need.

X-Rite ColorMunki Display – the photography hobbyist ideal solution

Click to visit X-Rite for more info on the ColorMunki Display
ColorMunki Display ($189.99 MSRP Adorama, B&H)
Advanced Display Calibration Made Easy for Color Perfectionists

Simply put, if photography is your hobby and not your profession then this is a great solution for you at a reasonable price. The software is a little more user friendly with no advanced mode, but the colorimeter device itself is identical so the end result of calibrating your display versus a i1Display Pro will be identical on a single display. The i1Display Pro has advantages for multiple displays, but this device supports multiple displays as well so don’t get too hung up on that point.

I like this device because its easy to use and it typically just works (unless you are like me and you are using 6 different devices without rebooting <g>).

Here’s a video walkthrough of the ColorMunki Display calibration process on a MacBook Pro in Easy Mode:


Click here to play in HD. Viewing in full screen is recommended.

Here’s another video walkthrough showing the Advanced Mode:


Click here to play in HD. Viewing in full screen is recommended.

NEC SpectraSensor Pro (NEC Display Owners Only)

NEC SpectraSensor Pro

If you currently own or will in the future own a NEC display that supports hardware calibration and you don’t have a calibration device already, then this is device you’ll want to buy. In fact, if you haven’t purchased your display yet then I’d advise that you purchase the bundle that includes it with your display (only one per computer needed).

When using SpectraView II it can be a little confusing choosing the sensor type if the Auto-Detect button doesn’t work properly (usually it does) or if you have more than one sensor installed. The reason why is because you must choose “XRite iOne Display Pro (i1D3)” as the sensor type as shown here:

image

The software actually reads the model information from the device so you can tell that this is really the NEC SpectraSensor Pro device, but it can be confusing so it’s worth mentioning that here.

Eizo EX1 by Datacolor (Eizo FlexScan Owners Only)

For the last month or so I’ve been using a Eizo FlexScan SX2762W for the purpose of doing my review. To my dismay the only way it could be calibrated was using Eizo’s EasyPIX solution which bummed me out as Eizo’s Color Navigator software is much better. However it worked well enough, so if you own (or are buying) an Eizo FlexScan SX2762W (or equivalent) then go for the bundle and get this.

This is just a Datacolor Spyder 3 rebranded so I was actually able to use it with my NEC SpectraView II software to calibrate my NEC PA241W (note you must physically plug it into the display you are calibrating when doing hardware calibration). Here’s how to configure it in the preferences:

Click for a larger image

NEC SpectraView II Calibration Comparison on a NEC PA241W

To compare the devices in this article I used the NEC SpectraView II software because it does a good job working with a large variety of sensors, it has good reporting info, and the hardware calibration means that no operating system issues will skew the results. With that said, here’s my calibration settings:

NEC SpectraView II Target Settings

The Eizo EX1 (Datacolor Spyder 3) was the sixth device I have used to calibrate this display on this machine so SpectraView is pretty good about letting you most of the popular colorimeter sensors on the market. For as long as I’ve been in the computer industry, I’m honestly shocked I was able to get all but one of working on one machine in harmony without my system crashing – well done X-Rite!

In the sections that follow I’ll discuss how a variety of products performed when calibrating this display. To be fair I had the display turned on for over 6 hours before doing the calibration so the display was fully up to temperature. My methodology for testing on a 64-bit Windows 7 system with was as follows:

  1. Making sure that NEC SpectraView II wasn’t running, I’d plug one and only one sensor directly into the same USB port on the NEC PA241W.
  2. I’d launch the software, go to Edit | Preferences and click Auto Detect to make sure that the sensor type selected was correct. I visually confirmed the model name as well.
  3. I’d run the calibration and also confirmed that the sensor shown during the placement step was the same as what I was using.
  4. At the conclusion of the calibration I pasted the results in this article. I ran each test two or three times more to see if it was statistically any different.
Eizo EX1 (Datacolor Spyder 3)

Eizo EX1 (Datacolor Spyder 3) SpectraView II Information Summary

This was by far the worst result and multiple runs didn’t produce significantly better results. When analyzing a calibration the first thing you want to do is look at the Delta E value. Many say that 2.0 or less is acceptable, but closer to 0.50 or less is realistically possible these days. Chromix has the following statement in their definition of Delta E:

A Delta E of 1 or less between two colors that are not touching one another is barely perceptible by the average human observer; a Delta E between 3 and 6 is typically considered an acceptable match in commercial reproduction on printing presses. (Note: Human vision is more sensitive to color differences if two colors actually touch each other.)

The 1.20 Delta E below my expectations because I’m accustomed to looking at a calibrated display that typically has a Delta E of 0.50 or less. The targeted 6506K white point is being calibrated to 6633K which in practical terms meant my display had an unusual blue cast to it and was not calibrated accurately enough for print soft proofing.

The contrast ratio (the larger the first number, the better) was lower than expected as well at 258:1. As a result I have to give this device, on this display using this software (which granted it’s not purposely built for) a UNSATISFACTORY grade. This device plugs in and runs, but I wouldn’t recommend it for accurate color calibration on this display using this software.

Of course I’ll be fair in reminding you that this device is designed for use in calibrating an Eizo FlexScan SX2762W with the EasyPIX software, so I am using it in an unsupported fashion. When using it on the Eizo with the EasyPIX software I got a Display Luminance of 99.7 and a temperature of 6507K. Easy PIX doesn’t report contrast ratio, but overall the results were acceptable on the Eizo. There was still a touch more of a blue cast on the Eizo than the NEC, but I’d say this device does well for what it is designed for, so perhaps there’s some tweak in it for Eizo that doesn’t translate well to NEC and/or SpectraView.

If you are considering a Datacolor device I’d suggest borrowing a friends Datacolor Spyder 3. You can’t return calibration devices so do your own tests to make sure you are happy before purchasing if possible. In fact, the the new Spyder3 Elite might perform better, so try it if you can.

X-Rite ColorMunki PHOTO Spectrophotometer

Click here to learn more about the ColorMunki Photo on X-Rite's Website

X-Rite ColorMunki PHOTO SpectraView II Information Summary

I was unable to test the ColorMunki Display colorimeter due to the OS not recognizing it for some reason. I plugged it in and tested on my MacBook Pro and Lenovo W510 with no problem so it was an issue specific to my Windows 7 system and this device (perhaps because I had installed the i1Display Pro).

At any rate, I was curious to test its big brother the ColorMunki PHOTO to see how this spectrophotometer would do compared to its big brother, the i1Pro. I ran the test three times and got statistically the same result each time so I was a little disappointed to see that the Delta E was 0.94. Of course this is below 1.0 so in theory this is acceptable.

Ironically with this one the contrast ratio was 615:1 so I’m not sure what to make of that result. The white point was only 14K off its target and the luminance was just 0.4 over 100.0 so to my eyes the result seemed ACCEPTABLE.

NEC SpectraSensor Pro

NEC SpectraSensor Pro SpectraView II Information Summary

This device is made by X-Rite for NEC so it should do the best job, right? I must admit that I was shocked when I ran the results and saw that the Delta E was 0.72. At 6543k and a contrast ratio of 513:1, the calibration felt “about right”, but the data proved it was off more than the maximum 0.50 Delta E that I prefer to see for everyday use. Ironically if I used the i1 Pro sensor type in the preferences dialog I was able to get the Delta E to drop to 0.68.

The Delta E was well below 1.0 so I’m going to give this device a GOOD rating.

My only explanation here is that there’s probably some manufacturing tolerance that comes in to play so this is probably considered within specification so it shipped. Your copy might be better than my copy so I wouldn’t consider this to be a wide enough margin for you to refrain from getting this. In fact, I’d let price be your guide because as I said – under 1.0 is going to be impossible for most to notice.

X-Rite i1 Pro

Note, the UVCut version was used in this test, but a non-UV version exists.

Click here to learn more on the X-Rite Website

image

This is the most expensive sensor I have on hand, but it is a spectrophotometer so it can do paper profiles too. It did a VERY GOOD job with a 0.32 Delta E and a 469:1 contrast ratio. Of course it cost about 4 to 5 times as much as the other devices so it should do well right?

X-Rite i1Display Pro

X-Rite i1Display Pro SpectraView II Information Summary

Before running these tests my gut feel was that this was the best device, and my testing verified that was correct. In fact I ran this test 3 times just to make sure I wasn’t making a mistake. With a Delta E of 0.23 it performed the best and gave me the result that to my eyes seemed most accurate when soft proofing. Again, there’s probably some variation from unit to unit, but it’s no doubt this one is a dandy.

Conclusion

X-Rite is an industry leader in color management solutions, and a brand I trust. This article simply confirms my belief in their products is valid.

My bottom line advice is that if you aren’t going to be doing your own printing then you don’t need a spectrophotometer. If you are using a monitor that supports hardware calibration then get whatever bundled calibration device is offered with it and the display makers software. If you are going to be doing software calibration then go for the i1Display Pro (Adorama, B&H) if you can afford it, but if not then go for the ColorMunki Display (Adorama, B&H).

Amateur printers should get a ColorMunki PHOTO (Adorama, B&H) as the best cost effective solution. See my color management article to learn why. If you are print master then I’ll have more for you soon in my i1Publish article, so stay tuned to this blog to learn more.

Disclosure

Eizo, NEC, and X-Rite all provided me with calibration devices used in this article. The Eizo EX1 was not intended for this testing, so it was only included because I had it on hand. If you make a purchase using the links in this article I may get a commission, so thanks for supporting my blog by using my links when you are ready to make your purchase.

Wednesday, December 14, 2011

Photo Thoughts: Sexy Mrs. Claus 2011 Product Shot

Mouse over to see before, mouse out to see after
Sexy Mrs. Claus 2011 – Miss Erica May

I have been busy behind the scenes working on blog content, so I wasn’t able to get a real article out. As a result I thought I’d do one of my quick photo thoughts for fun.

This shot here features a before (hover over it) and after of  shot I processed tonight. It was taken with a Canon 1D Mark IV using a 24-105mm f/4L IS USM lens set at 32mm for 1/200 sec at f/13 and ISO 100. It was processed using Lightroom (using X-Rite’s ColorChecker Passport Camera Calibration Profile), and then sent to Photoshop CS5 where I did the following:

image

  1. I  started by removing the background which in this case wasn’t too difficult. You could do it using techniques found in Scott Kelby’s The Photoshop Channels Book  or you could use a product like Remask or Perfect Mask (aka Mask Pro). This one was pretty easy except for around the fly away hairs. I decided to use a new feature of Photoshop CS5 and techniques in Photoshop Compositing Secrets, and found them to be both quite good and very fast. My background was gone in about 10 minutes or less.
  2. Next up I needed to soften the skin, so I used Portraiture as I usually do. It worked great, but there was still a little skin touchups to do so I used a healing brush on a new blank layer.
  3. Next up were the eyes where I spent most of my time. I used the techniques described in my favorite portrait editing resource - Professional Portrait Retouching Techniques for Photographers using Photoshop. I probably spent more time than I needed to on this shot and I deviated a bit from Kelby’s advice, but I’m happy with the results.
  4. Next I wanted to sharpen the color checker by itself as it was on a different plan than the model so it was out of focus. I brought back the focus sharpening just it on its own layer (which I created using the quick selection tool).
  5. Finally my final touch was using Tonal Contrast’s Fine preset (only available in Color Efex Pro 4). I moved the saturation down to 2, and the mid-tones down to 0. This gave me what I wanted from the look and avoided making the skin look funky.

Total editing time was about 2 hours – of which over an hour was spent on the eyes.

UPDATE: Where did all of that eye work go?

One of my readers, Tommy Williams, asked me this morning – where did all of that eye work go? He couldn’t see it on the small web image. Well here’s what I started with:


The before eyes weren’t actually that bad.
This is straight out of camera
RAW with no adjustments.

After my hard work here’s what they look like in the final version:


The After Eyes

Now to be fair I probably spent too much time on these eyes as  I probably wouldn’t have used a shot larger than the original one in this article. As a result it was a bit of a wasted effort. However, photo editing is my passion so I do it for fun and to practice my skills. I figure if I’m going to edit, I may as well do it right on the large scale image.

If I were to print a larger version I’d likely see the fruits of my labor on the eye editing. Sloppy work for known small output files has cost me dearly now that I’m printing more, so I just attack every photo as if it will be printed at 24x36”.

Disclosure

This article contains links which may result in a commission to me if you make a purchase. Thanks for supporting this blog by using my links!

Friday, November 11, 2011

REVIEW: NEC SpectraSensor Pro (powered by X-Rite)

NEC SpectraSensor Pro

The NEC SpectraSensor Pro is a specialized version of the i1Display Pro that was built in conjunction with NEC to calibrate their wide gamut displays (like the PA Series 24, 27 and 30” models). You can actually use this, a ColorMunki Photo, ColorMunki Display, i1Display Pro or other wide gamut calibration devices to calibrate your NEC monitors, but this is the new NEC version that was tested to work specifically with NEC monitors.

It is important to note that some monitors like the NEC PA Series have what is called a LUT (look up table) where the calibration information is stored. As a result you MUST use the NEC SpectraView II software to calibrate this display, as that is the only calibration software that can program the LUT in this display. Click here to learn more.

This is a replacement for the older calibration devices by NEC which also supported wide gamut color and could program the LUT, but was less accurate than this newer device. If you old the device or other supported devices, then you only need to make sure that you have the latest version of SpectraView II (recently updated to support Lion).

Use with SpectraView II


When using this sensor with the latest SpectraView II,
Choose XRite iOne Display Pro (I1D3) as your sensor type

If you are using SpectraView II then you should go to the NEC web site an install the latest version. Once you do, you’ll need to choose the new sensor type called “XRite iOne Display Pro (i1D3)”.

Recommendation for new NEC display buyers

If you are buying a new NEC display and don’t have a calibration device, then I recommend you get this or a ColorMunki Photo (a spectrophotometer for print soft proofing). I DO NOT recommend that you get the discontinued bundle that features the older NEC calibration device.

UPDATE: NEC tells me that going forward, all SpectraView bundles will contain the new sensor (even if web sites show the old sensor on their photos). If you should end up with an old sensor at this point, I wouldn’t worry too much. The old ones will work fine and feel more substantial than the new ones, so all you really lose is compactness from what I can tell.

More NEC Related Content

Disclosure

I was given an evaluation copy of this device to test with my NEC PA241W. My display was purchased from B&H at full market prices (i.e., no discount) BEFORE I had established any marketing contact with NEC.

Friday, October 14, 2011

REVIEW: Canon iP2702–Affordable No Frills Printing (with custom paper profile tutorial)

Canon iP2702 - Image Courtesy of B&H
Image Courtesy of B&H

Canon describes this printer as:

[An] entry-level single function printer, the PIXMA iP2702 offers a wide array of advanced features. Utilizing Auto Photo Fix II and Easy-WebPrint EX (Windows only), this new single function printer produces both photos and documents of tremendous quality. Additionally, a 4"x 6" borderless photo can be produced in approximately 55 seconds7, helping to ease the process of creating a keepsake photo album from a special event. In addition, the new matte black and polished finish further adds to the overall aesthetics of this printer making it a welcome addition to any home setting.

I think that’s a good sell, but the truth is that this is plain vanilla printer with no frills and a small footprint. It won’t satisfy the needs of the picky photographer, but it might be great for kids and grandparents. It’s not quiet and its not fast, but it gets the job done. Read my image quality section below to determine if this product meets your quality bar.

Image Quality

Canon iP2702 prints without (top left) and with custom paper profiles (bottom)

To test the image quality of this printer I first started by printing using the Easy-PhotoPrint EX software that is included with the printer (updated versions are available on Canon’s website). Accepting all of the defaults I got the image shown in the upper left hand corner which looks okay in all but the skin. The skin feels very yellow and oversaturated so I didn’t like this result very much. I tried a variety of different options on the printer and got similar results, so this is really the out of box experience for this printer. Images are a bit oversaturated with a strong push to the warm side which is really bad for indoor photos under tungsten light.

To understand the true ability of this printer and ink set I decided to create my own paper profiles using both ColorMunki Photo (because of its affordable price) as well as an i1Pro using i1Publish (available as the i1Publish Pro UV Cut Color Management System). The i1Publish System created the best possible result out of this ink set shown in the bottom right corner, but the limitations of the ink set in this form factor are obvious – you get what you pay for.

Scan of ColorChecker (left) next to a iP2702 print (right)
i1Publish Pro UV Cut Color Management System
creates the best paper profile for this printer

Above is an image on the right that is created by i1Publish that is designed to match against the ColorChecker Passport (review) on the left (from the same scan on a Epson V750. While its not a perfect match, the profile created by the i1Publish is pretty good. The lines indicate colors that can’t be fully represented by the color gamut of the ink set of the printer.

The ColorMunki Photo profile was definitely a big improvement and close enough to the i1Publish profile that many would find it to be “good enough” for a printer at this price point, but naturally the i1Publish gives the best and most accurate results.

One thing you’ll notice in all of the images above is that they feel a little washed out and muddy – that’s my biggest complaint of this printer. The ink set just lacks the rich blacks that you’d get from a higher end printer. Below you can see what a printer like the iPF6300 can do with using its built-in paper profile:

Scan of a Canon iPF6300 Print

I only include this image to show what is possible, but its important to keep in mind that the ip2702 cost less than one of the ink cartridges on the iPF6300!

My conclusion on image quality is simple – I find the printing from what’s included with the printer to be less than desirable. Using your own profile (or mine) you can probably get much better results when printing from Lightroom or Photoshop CS4 or earlier (I do not recommend CS5 for printing).

Using a Custom Profile with the iP2702 Driver

To use your own profile with this printer, you must do the following:


Step 1 – Create a new Setting for use in the future


Step 2 – Change Color/Intensity to Manual and Click Set…

Don't forget to click the Matching Tab
Step 3 – Click the Matching Tab and Choose None


Step 4a – In Lightroom choose OTHER for the profile
and select your custom profile or one of the ones provided by Canon
(at the top of the list above)

image
Step 5a - Lightroom’s Print module
should look something like this


Step 4b – Photoshop should look something like this

For Lightroom and Photoshop, don’t forget that the first three steps are critical from the page setup buttons. You want to use the color management of Adobe’s products, not the driver so steps 1 through 3 are turning off color management so that the software can use your profile.

Conclusion

This is a very simple and basic printer. It has only two ink cartridges – one black and one color and the cost of those is about the same price as the printer. It does three sheet sizes, no rolls, no networking and doesn’t include the required USB cable to connect it to the printer (my biggest gripe). However, this makes a decent printer for kids or grandparents who don’t want complexity –they just want something that works and is easy to maintain. You lose some print quality when using this over more expensive alternatives, but if the target user is handy with Lightroom or Photoshop then they’ll get the most out of it by using a custom paper profile.

While this printer is advertised as providing color lab quality results, I honestly think that the prints you’ll get from Shutterfly, Costco, Smugmug, MPix, etc… are going to be much better than the results from this printer. It’s also a tad slow and noisy (even in quiet mode), but it gets the job done in a reasonably small footprint.

This isn’t a pro photographers printer, but it’s not intended to be. This is a entry consumer product that does a marginal job out of the box, but it can be improved with a good paper profile. At a price point that is under $50, it’s pretty hard to fault it. If you have a little more cash and desk space then I’d suggest stepping up to the iP4920 or perhaps the iP3600.

Ordering Information

You can buy one of these printers from Amazon or B&H, but make sure you also get a printer cable if you don’t have one already. You may also want to get some additional Canon Photo Paper Plus Glossy II from Amazon or B&H in 4x6, 5x7 or 8.5x11 sheets.

Disclosure

Canon USA provided me with a printer and paper to review for this article. I may also get a commission if you purchase using links in this article, so please support this blog by using my links – thanks!