Showing posts with label guest review. Show all posts

Thursday, September 14, 2017

A Point and Shoot Beats Most DSLR Portfolio Shots

All of the following photos were taken with a point and shoot (and no, it wasn't a Leica) which I serve up as evidence that it's more about the photographer than camera (although this is a pretty damn good camera too).

All images are Copyright Douglas Dubler 3 - ALL RIGHTS RESERVED. You may click to view full size versions in Google Chrome, but you may not save, print, download, link to, repost, etc... any without written consent.


"Summertime Boy" - 1/1250 at f/5 ISO 100 (-1 1/3 EV)


“Peruvian Jungle Lily” - 24mm at the closest focusing distance ( less than 8 inches) At f5.6


f/6.3 for 1/40 sec at 24mm (-1 EV)


"Lilies" - 24mm (widest) end of the zoom lens. At f4.5 at almost the closest focusing distance

And the camera was...
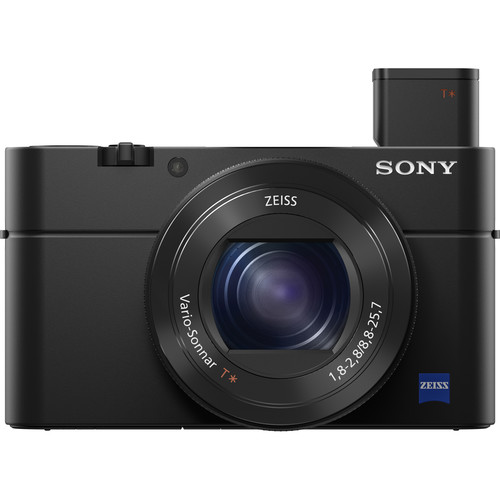

Sony RX100 IV  at B&H (review)
Also on available at Amazon

Yes, the Sony RX100 IV was used for all of those shots except the first one which was actually taken with he Sony RX100 III!

Of course, to be fair these were taken by one of the greatest living photographers of our time, Douglas Dubler (website). This legendary photographer has shot more magazine covers than most photographers have (or will have) portfolio caliber shots in their lifetime. He's also been the featured photographer for the launch of major products from Nikon, Epson and so many more. Simply put, these weren't taken by a mere mortal, but it does show off what this camera can do.

In Douglas Dubler's own words


24mm for 1/160 sec at f/8 ISO 100 (-1 EV)

Many people who are familiar with my work most likely associate me with high resolution capture and large format gallery prints. Much of this work is/was done on medium format digital backs or high megapixel DSLRs. Lately I have been exploring a different direction. Several years ago I purchased a Sony RX100 III for my girlfriend and began giving her photography lessons. As her photography progressed I noticed a look that I began to admire. 


24mm for 1/80 sec at f/5.6 ISO 100 (-1 EV)

They were done mainly at the 24mm focal length at the closest focusing distance (around 4 or 5 inches ). The small sensor gave her more than adequate depth of field at modest apertures (f4-5.6).  The wide angle lens gave just a little distortion which enhanced the subject. My best description is a hybrid of environmental and semi Macro.


24mm for 1/60 sec at f/5 ISO 100 (-1 EV)

Inspired, I began to emulate the effect with my A6500 and larger A7RII. Even with the APS-C sized sensor in the A6500 with various focal length lenses from the Sony 12-24mm ( on the A6500, a 18-36mm), to many different Zeiss,Sony and Sigma prime lenses I couldn’t get the look.  If I was shooting flowers to get the depth of field I would end up with a shutter speed that was too slow (wind vs. flowers!).  So I borrowed her camera and spent a few days at the New York Botanical Garden seriously photographing flowers. It took me one day to work out my approach but I was very happy with the beginning results.


"Maleficent Tree" - 24mm for 1/160 sec at f/5.6 ISO 100 (-1 1/3 EV) RX100 III

The next step was to make some prints, the whole point of photography.  With a little editing in my favorite Capture One V10 and of course B&W conversion done with Nik’s Silver EFex Pro 2 I was ready for the litmus test..  With my Epson P5000 and Epson’s new Legacy Platine paper I made prints that rivaled the best silver-gelatin prints.   As a test, at the beginning of one of my classes I had the students look carefully at one of  the prints and guess what camera I had used. Unanimously they declared a high resolution professional DSLR or mirrorless camera. I showed them the diminutive Sony and at first they thought I was joking. I assured them I wasn’t.


24mm for 1/60 sec at f/4 ISO 100 (-1 EV)

Since then I went out and purchased a MarkIV model which is around my neck whenever I leave my house. Even on my bike I can easily carry it in a small bag around my waist. Now no one even looks at me and I blend in with the iPhoners. I hand hold almost all of the images and as a result am able to shoot many more images. It doesn’t mean I will abandon my abstract Macro studies with the larger cameras and tripod but I have a feeling I will always have this camera hanging around my neck…

Douglas Dubler's thoughts on a couple shots


Black Dahlia - 24mm@f5.6@1/80sec, ISO 100, exp.comp.-1.3 stops

I found these two blossoms in perfect juxtaposition, full face and profile, which I am always looking for. They were the last shots out of 250 exposures that I did during my B&W class at NYBG last week.

I was actually on my way out of the garden and, in exiting, revisited the flowers I had shot earlier at around 6 P.M. I was tired after a long day of teaching but instinctively knew that those last few minutes of sublime light (exactly 7:11 P.M.) reward those who are patient. 

Processed in Capture One V10 and B&W conversion done in Nik Silver Efex Pro 2.


“Empress Lotus”

I have been trying for quite some time to get a good shot of a lotus blossom. For me that meant getting directly over the flower. Not so easy when you consider they grow in water, in this case, water that is over 5 feet deep. I surveyed all of the lotus in bloom and decided this was aesthetically my favorite. All I had to do was wait for the best light.  At around 7:10 P.M. the sun was no longer directly on the flower but was creating a beautiful soft illumination that seemed to be emanating from within the flower.

With some help from my friend Steve Titus (shown below) I was able to get an almost vertical camera angle and with the advantage of the articulating LCD could precisely compose the shot. It still took over 40 shots to get this precise uncropped composition.

Post processing, I had my friend Irfan Yonac do some digital enhancement using an “analog film” technique. It was the final step in the evolution of this photograph. Shot at 28mm@ 100 ISO @ f5.6 @ 1/200 sec, exp.comp.-1.0 stops.

Processed in Capture One software available at B&H.

Here's a funny behind the scenes shot of what it took to get this shot...


Conclusion

My review shows what mere mortals will get with this camera, but it's fun to see that in the hands of an X-Rite Coloratti Master like Douglas what is possible!

I really hope you enjoyed this guest blog from as much as I did. If so, please leave comments and check out more of Douglas's work on Instagram, Facebook,  or his website. Here's a couple more guest blogs from Douglas with his amazing work:

And here's one where Douglas breaks out the big camera that will really blow your mind:

Thanks Douglas!

Sincerely,
Ron Martinsen

Want to do a workshop with Douglas?

Contact me if you are interested in working with Douglas or doing a workshop with him in New York City.

Other articles you may enjoy

If you enjoyed this article, you may also enjoy these:

Enjoy these and more on the Reviews tab as well as Ron's Recommendations.

Disclosure

If you make a purchase using links found in this article, I may make a commission. It doesn’t cost you a penny more, but it does help to support future articles like this.

Sunday, March 9, 2014

COMPARISON: The Sony A7 vs A99 by Shawn Rabourn (Guest Blogger)

The following is a guest blog from one of my readers who has a long history using Sony cameras. His current primary body is an a99, so I invited him to bring his best lenses and give the a7 a test to see how he liked. What follows are Shawn Rabourn’s own words and opinions:

Sony Alpha a7 Mirrorless Digital Camera

Last week Ron posted contacted me about A-mount lenses as he had the Sony A7 and the EA-LA4 Adapter for testing, but no A-mount lenses. As it worked out, I was going to be in town, and I always have my A99 body and an array of A-mount lenses with me. I brought my favorite lenses including the new 50mm f/1.4 SSM ZA, the 85mm f/1.4 ZA, and the 135 f/2.8[T4.5] STF.

After doing some basic testing Ron asked me, as a full time Sony user, to carry the Sony A7 around and write about what I liked about it. He gave me the A7 with the LA-EA4 adapter, along with the new E-mount 35mm f/2.8 Prime lens.

I was a bit overwhelmed by the ask.  I mean, this is the A7! This is the new shiny E-mount full frame body everyone is talking about!

Let me tell you, for the most part the A7 did not disappoint. I wish I would have been able to test the Wi-Fi or the Zebra feature a little bit more, though I did try out the Zebra feature long enough to know I needed more than a couple days with it to give it justice.

The Good


Sony a7 with A-Mount Adapter at f/2.8 @ 85 mm, 1/100, ISO 100, No Flash
, handheld
Sony Zeiss 85mm f/1.4 ZA lens – click for original

Look and feel.  Regardless if the 35mm prime or my 85mm f/1.4 was adapted on the body, the A7 felt fantastic. It looked fantastic. The metal body felt like it could take a beating and it has a James Bond black metal finish to it. I was a little afraid of the smaller body with bigger lenses. For the most part, those fears were extinguished.

The Menu. The menu system is very similar to the menu in the A99 and A77 with a little better organization. More features means more menu options, however Sony does a good job with the menu. I could see how someone used to a 1DX or D4 could be a little lost, however.

The EVF. The EVF was as good, if not better than the A99 EVF with the latest firmware. Sometimes the EVF on the A99 shows more light than the surroundings have. Here was a shot I took testing the A7 in very low light.

The rear scroll wheel. I like how smooth the rear adjustment wheel is. Much nicer than the clicking wheel on the A99 or A77. However this is also a segue…

The Bad

No left pinky AF mode adjustment button or knob. The A99 and A77 have a button or knob where your left pinky finger could adjust the AF mode (or whatever you program the button to do). I don’t know if there is enough real estate for it, but I missed it.

File name sequencing. In swapping memory cards from one in the A99, the A7 resumed the file number sequence the A99 had. So when I have two memory cards writing the same file names from two bodies, things get confusing. This isn’t the first time I have had this happen as I have done this before with Sony bodies, but it is annoying nonetheless.

No focus hold button on the 35mm lens. The 35mm f/2.8 lens carries the Zeiss badge. I wish it were like all of my Zeiss-badged lenses with a focus-hold button. Maybe I am spoiled. I had to put the body in Direct Manual Focus to get the same type of focusing effect I am used to with the A-mount Sony Zeiss lenses.

No stabilization. I missed my in-body “Steady Shot” stabilization. Every A-mount body I own has it, and it makes hand-holding shots easy below about 1/50s…

The Ugly

1/60s. The A7 brain has a love affair with 1/60s with the 35mm lens (1/100s with the 85mm lens adapted). I like to shoot Auto ISO from 100-1600 and in Aperture Priority. The body used the minimum ISO possible for 1/60s. I wish there were a menu setting to accelerate the minimum shutter speed the internal A7 computer uses under these conditions. Sounds like a good idea for the next firmware rev! In all seriousness, 1/60s is probably OK for situations where you have a stabilized camera. No stabilization, you almost need to double it. For 85mm, 1/100 is a little bit better, but still slow. At least if you hold the lens right, you have a fighting chance with a still subject.

NEW (3-24-14) - Image comparisons

I had hoped to do a more comprehensive test with the A99 and A7, apples to apples, however the weather in the Pacific Northwest didn’t cooperate, nor did my work schedule. I did manage to attempt to take similar shots with the A99 and A7 while passing to meetings on separate days.

A99 85mm f/1.4

A7 85mm f/1.4 (85mm f/1.4 lens with EA-LA4 adapter)

A99 85mm f/5.6

A7 85mm f/5.6 (85mm f/1.4 lens with EA-LA4 adapter)


And in trying to compare color I took these shots with identical light. The lenses are different here, but both bodies are using Auto White Balance and Auto ISO.

A99 50mm f/1.4 (50mm f/1.4)

A7 35mm f/3.5 (35mm f/2.8 lens)

With the EA-LA4 adapter I found the A7 and A99 quality to be negligible. More testing is needed. I would expect similar results with maybe a fractional difference since the EA-LA4 adapter has a similar, but newer generation translucent mirror. I did see the third of a stop difference in metering when the 35mm prime was on versus the 85mm or 50mm primes adapted at similar stops.

Where to order

Click here to learn more or order this camera on the B&H web site. My friends at Amazon have it available here.

Other articles you may enjoy

If you enjoyed this article, you may also enjoy these:

Disclosure

If you make a purchase using links found in this article, I may make a commission. It doesn’t cost you a penny more, but it does help to support future articles like this.

Tuesday, May 28, 2013

Guest Blog: Promote Control Mini-Review by Luc Schoonjans (Updated: 5/28/2013) Discount Expires June 11th!

Promote Control
Promote Control
Actual Photo (vs the rendered view found most other places)

I shoot with a Canon 5D Mark II and occasionally dabble with HDR. If you shoot Canon too, you know that the auto-bracketing exposure (AEB) is limited to 3 exposures on all but the 1D Series bodies, while Nikon allows up to 9 exposures. So, what do you do? Short of buying a new camera, you stick to the limits provided by Canon, or you take a set of 3 exposures, change the settings on the camera, take another set of 3 exposures. This is far from ideal as this may cause misalignment between sets of exposures.

Enter the Promote control, from Promote Systems. When I heard Ron had one unit on loan, I had to ask him permission to do some field testing with it.

My first surprise is that the Promote Control is much more than just a snazzy device for taking HDR pictures. A quick run through the various modes and you realize this device does a lot more:

However, there is a little caveat for the Focus Stacking. The unit I used was loaded with firmware 2.25 (beta), which allows Focus stacking, but only for Canon cameras with the Live View feature. This is temporary though, as Promote systems will extend this feature to Nikon as well, in a future firmware release. A quick look at their website reveals that the latest firmware release is now at version 2.36 (beta, as well). Click on this link to see the details of the list of firmware and the features that are added.

The second surprise was the ease of use. It is very intuitive. For each mode you select the parameters that you want to set, hit “Start” and voila. For each mode there are a few pre-requisites for the unit to operate flawlessly. So, before reading the manual, it does pay off to watch the “Quick Start Videos” that are posted on Promote systems main webpage (and here on YouTube). They are short, but they will set you straight away on the right track.

Promote control, in its basic configuration, comes with the following:

  • The unit,
  • 1 USB cable, to connect the unit to the computer (for firmware updates),
  • 1 mini USB cable to connect the control to the camera,
  • a lanyard,
  • and a pouch.

If you shoot HDR, it is strongly recommended you buy the additional Shutter cable, for faster operations (more details below).

This review focuses (no pun intended) on HDR and focus stacking

HDR – Mini field testing

As mentioned earlier, if you want to get the best experience in this mode, get the additional Shutter cable. Among the many advantages, there are 2 that are directly relevant for HDR:

  • Enable faster shutter release
  • Enables mirror lockup functionality

This cable is brand specific, so make sure to get the right one for your camera.

The pre-requisite for this mode are the following:

  1. Set your camera on manual exposure mode
  2. Set the exposure setting on 1/3 of a stop increments
  3. Set the lens on manual focus.

This means that in the field you will want to do the pre-focusing first and then switch to manual focus.

Using the Promote Control is straightforward. Set your camera as indicated above, connect the unit to your camera, select your settings and press “start”. The combo camera/Promote Control does the rest.

What I personally liked about this unit in real life shooting is two-fold:

  1. Once you have focused and connected the unit to you camera, you no longer touch it. You can shoot the same scene using different settings and never lay hands on your camera, hence avoiding misalignment between exposures
  2. It is flexible.

The power of the Promote Control lies with the settings:

  • Number of exposures (it goes up to 29)
  • Interval between exposures are in increments of 1/3 of a stop
  • Mirror lock-up
  • Time lapse HDR
  • Sequence of exposures (from dark to bright, or the opposite)

There are additional options in the Function menu that allows you to customize your unit so that it matches your camera and your shooting style more adequately.

If there is one drawback that I can think of, it is one more accessory to carry with you. The unit is very light, weight is not at all an issue, and the pouch allows you to stow away the unit plus its cable in a very snug way. It is just “one more thing to pack and carry with you. Having said that, you can buy a tripod holder that allows you to attach the Promote Control to the tripod, and / or you can also buy the remote control unit. (I did not have either of those, so I was not able to test them).

Focus Stacking – Mini field testing


Focus Stacking Example
Notice how both the foreground and background objects are in full focus

Focus Stacking is a technique that consists of taking 2 or more pictures at different focus points and combine them later in software, in order to achieve greater depth of field. This particularly handy for situations where depth of filed is a challenge, like macro photography, but of course, this applies to any situations where you want to get the greatest sharpness you can get, from near to far (architecture, landscape …).

This features uses Live View, so in the case, you just need the USB cable that links the unit to your camera (no shutter cable required for this mode).

Click here to see a gallery that shows all 15 shots taken to create the shot above that is perfectly in focus from the rear all the way to the front of the image. Doing this by hand is a pain yet this app makes it easy to capture the images for use by your favorite focus stacking software.

Again, there are some simple pre-requisites. Your camera needs to be set in manual exposure mode, and One-Shot mode. The lens this time will need to be switched to AF. You then connect the unit and adjust the settings. Note that when you start adjusting the settings, Live View turns on automatically, and you see the effect on focus on your LCD as you adjust the settings on the unit. The Promote Systems main page has a video that explains how to use this mode in more details than I could do here, but I must say, using this mode will make you a believer.

Make sure you read the caveat above. This feature is currently available only to Canon cameras (with Live View functionality). It will be extended to Nikon in a future firmware release. With that out of the way, WOW, I would buy the Promote Control just for this feature alone. I absolutely love it.

Conclusion

This mini-review has only scratched the surface. As mentioned earlier, there are additional modes that I have not even used yet. Additionally, one feature I have not included in this review is that you can combine modes together, for instance, Time-lapse HDR, or Focus Stacking HDR. But for what I have seen so far, Promote Control is a very powerful tool. It is very flexible, and allows you to do much more than what you would normally achieve with a regular remote control, like the Canon remote release and other similar alternatives.

If you shoot HDR, Time-lapse or do focus stacking (and more), I would definitely recommend buying one. You will use it a lot.

Special Offer (EXPIRES June 11, 2013)

Click this link to place your order directly from Promote Systems, and get $15 off the total price of your order. This offer WILL NOT WORK if you don’t click the link.

You can also order from Adorama or B&H and get free shipping.

Disclosure

This unit was loaned to Ron & Luc by a reader of this blog. I may get a commission if you make a purchase using the links in this article.

Tuesday, December 4, 2012

GUEST BLOG: Fisheye-Hemi by Clifford Pickett


Corrected with Fisheye-Hemi – read the article to learn more…

Fisheye-Hemi is a plugin created by Image trends that offers a unique solution to a “problem” caused by the massive distortion inherent in Fisheye lenses.  “Problem” being in quotes because in certain circumstances, this distortion can and is used for creative effect.  This quickly gets old however, much like the tilt-shift effect, and for many of us, you’ll go through your “fisheye phase” where you’ll shoot everything with this lens, and then you’ll move on, never to use it again.   

I guarantee you, once you realize what can be done with this program (and proper technique and basic Photoshop) your fisheye will stop collecting dust.  So, the case for the fisheye. The first reason, distortion, is a given.  If you want it, you got it.  If you don't have it, check the label, it’s not a fisheye.  The second reason, massive field of view (180 degrees in some cases), if you have a fisheye, you’ve got that too.  And you want to keep it. What if you want the field of view but don’t want the distortion?  This is the most common problem facing this quirky type of lens and this program solves it in a unique way. 

Do a quick search on Google for “defishing”, scroll past the activists, and you’ll find a few programs offering solutions.  All of which attempt to remap the distortion of the lens back to being rectilinear (read flat).  Sounds like a great idea?  Try it.  Most of these programs have a free trial.  You’ll quickly realize that at any size other than the smallest thumbnail for web, the image will be remarkably soft in the corners, the image size ratio will be changed and most importantly, things will look funny.  Especially know sizes and shapes, like say, peoples faces.  Not good. 

Fisheye-Hemi offers a unique solution to this.  It’s a simple, plugin that offers virtually no user input other than to choose which type of lens/sensor you have (circular, full frame, cropped sensor).  You click once and it spits out a corrected image.  Here’s why it’s unique, it only corrects for vertical distortion.  This means a lamp post, a door, a persons head, will look normal.  Horizontal distortion is kept in place however, preventing the entire remapping of the image and the loss of composition and sharpness that comes with it.  With one click, you ditch the bad distortion and keep the good/necessary distortion that makes this lens unique. Great, so what the hell does that mean? 

Examples

Here’s an example of people:

This alone is a significant reason to buy this program.  Now, a brief disclaimer, I do not recommend shooting people with a fisheye in general but in certain situations where you need to cover a large area and panoramic is not feasible, it’s nice to know you can use this program to get the shot you want and avoid people (women) hating you later. 

This works great for architectural/indoor shots too.  Here’s a few examples. 

Take a look at the scaffolding on the sides, they’re rendering perfectly straight while retaining the composition of the original photograph

These are from a series of pictures taken recently in the Rockaways and Breezy Point in the aftermath of Hurricane Sandy.  The fisheye works well here as the goal was to take an environmental portrait of sorts of an entire house in it’s surroundings.  I was using a Sigma 15mm 2.8 full frame fisheye on a Canon 5D mark III.  Pay attention to the lines along the edges.  All of the lines that we know are supposed to be straight, i.e. wood, steel,brick etc., are rendered straight. 

It works on verticals too. Take a look at the circle on the bottom.

This program also allows you to create super simple panoramic.  Most cameras these days have way more pictures than we need.  Most of the time.  Using a fisheye and cropping into a panoramic format allows us to take advantage of those pixels.

So there are a few tricks to keep in mind.  First, always keep your horizon in the middle.  Yes, everyone knows from day 1 we are taught NOT to do this but when shooting with an ultra wide angle lens, Keystoning (when a building looks like it’s leaning backward) is big problem.  This is exaggerated even more with a fisheye.  The trick is to compose loosely, keep the horizon in the middle and “compose” by cropping in post.  Yes it’s cheating, but it beats stitching panos and hoping people won’t move or the wind won’t blow from shot to shot.  High pixel DSLR allow us to do this without worrying about picture quality now and if it helps, know you’ll be cropping into the part of the picture that is the sharpest.  The second trick is to try and keep your key subjects closer to the middle of the lens, yes, similar to first, compose loosely, but this focuses on the idea that the distortion gets significantly worse as it approaches the edge of the frame, don’t put any heads there if you can avoid it.  Third trick, shot at 2.8.  Don’t bother bumping up your ISO and shooting at F16, you’ll get plenty of depth of field at 2.8 or F4, you won’t notice the difference.  The slight gain in sharpness from stopping down will be offset by the ISO increase if shooting at dusk. 

Just remember to use this lens with the end goal in mind, keep the distortion if you want it, lose it if you don’t.  Use these techniques along with this plugin to achieve truly dramatic images.  

A Word from Ron

Wow, I’d like to thank Cliff for putting together such a cool article. Cliff is like a brother to me, so he’s a guy I really trust. He’s has been telling me for a while that I’ve got to check this product out, but like we do with our brothers – I ignored him because I haven’t had time. He finally proved to me that he’s right (again) and that I should check this out – which I will in a future article.

Check out Cliff’s amazing work at http://www.cliffordpickett.com/

Special Offer

**** CLICK HERE FOR SPECIAL DISCOUNT OFFER ****

Fisheye Lens Links

Wanna buy a fisheye now? Me too! I was just looking at these links so I thought I’d share them in case you wanted to look too…

Other articles you may enjoy…

Disclosure

If you make a purchase from select links in this article, I may make a commission.

Monday, September 10, 2012

Guest Review: Google+ for Photographers by Colby Brown by Timothy Lusk

With the success of my blog, I have been flooded with books to review. Simply put, there aren’t enough hours in the day for me to review them all so when I was approached by my friend and previous guest blogger Timothy Lusk about Google+ for Photographers, I was happy to let him use my copy so he could offer his own thoughts on this book. Here’s Tim’s review in his own words:

Introduction

Over the last month I have read Google+ for Photographers by Colby Brown. While I have been on Twitter and Facebook for sometime, we all know that Google was sort of a “Johnny Come Lately” to the world of Social Media. I have had a Google+ account for some time, but didn’t really know where to start for using it.

You can find out more about Colby on his own Google+ page or at his web site below.

OVERVIEW

As the book describes, before Google+, photographers had to rely on visiting other social media sites like Twitter, Facebook, and Flickr, to display their work and interact with others that have the similar interests. In a way, Google came up with a social media that was tailored to photographers—Google+.

This book is a great resource for getting yourself up to speed with how to manage your account, build a brand, and interact with others. While I consider myself extremely tech-savvy, I did come away from reading this learning a few tricks myself and understanding how to better manage a Google+ profile.

CHAPTER SUMMARIES

Chapter 1 / Why Google+ Works for Photographers

I think the information I gained from this chapter really helped me understand why Google+ is here, and it will stick around. Unlike Facebook and other web sites that are considered social networks, Google has almost created a new class of online interaction—an “interest network”, as they refer to Google+.

Reading through it, you’ll move onto the next chapter with more clarity of why Google+ is great for the artistic community—whether you’re a photographer, artist, illustrator, or even a knitter.

Chapter 2 / Building an Online Presence

Colby goes through some important features within a profile here and how you should think about the information you include on your profile so that you’re properly “engaged” in Google+. In short, if you’re a photographer who has a business, this is where you’re going to understand why it is important to have a brand and how best to market your offerings and learned knowledge on Google+.

Chapter 3 / Getting Started with Google+

If you’re a first time user of Google+ (not even having an account, for example), this is where you will finally get help with creating an account, adding photos, understanding how to add friends, and making sure your profile is setup in such a way to ensure nothing is left out. I have to say, this is very detailed and Colby did a great job with the instructions and breaking down the sections of a Google+ profile to take advantage of the features.

However, one thing to note—like any internet-based instruction manual—Google+ has been refreshed since Colby’s book was published. While it’s been a little over a year since Google+ launched, I think this is the only frustrating part of Google+ for Photographers. Note though that all of the features are still active on the new look in some way, so beyond having to make some minor adjustments to the new profile. For example, today, you have a banner image next to your profile photo instead of five thumbnail images.

Chapter 4 / Working with Circles to Stay Organized

This is where I started to learn some new tricks. While I had a basic grasp of how Google’s “circles” worked being that you could categorize friends, family, school mates, etc., I learned how the circles actually help with filtering content to ensure that only certain people could not only receive the information, but others wouldn’t be privileged to see it unless they were in that circle.

Chapter 5 / Learning How to Interact on Google+

Throughout the chapters before this, you learn a couple things about what Google is doing. You learn that Google has their employees on Google+ for you to interact through Circles, etc. Yes, you can talk with a real live employee who either works on Google+ directly or another on of the Google projects.

Here, you will also learn how interacting on Google+ actually helps with pushing photographers and their work to a higher position on the search list that we see when we search on Google. What this chapter is offering is how to fine turn your interactions. Everything from what you do and don’t want posting on your stream and how to include a fellow Google+ user—can you guess?! Yes, just add a “+” in front of their name (+Timothy Lusk). You can also Twitter-fy it and used the @Timothy Lusk.

Chapter 6 / Publishing your Photographs and Other Content

This is sort of the “business of” chapter. I found that while it does instruct you on how to upload photos to your profile and share them out, it was going beyond that to help you understand how to start gaining recognition…

Chapter 7 / Photo Management on Google+

Like anything with a lot of information, it is best to keep it organized… This chapter goes into great detail on how to keep your photography organized in the way you share it, categorize it, and make sure that your fellow Google+er’s know where to find the photos that suit their interest. If you’re familiar with Google’s photo gallery, Picasa, you’ll be able to breeze through this chapter. If not, and you’re using Flickr or another sharing site, you shouldn’t have a problem becoming aware of the ways to date, organize, and share your galleries with your friends, family, and circles.

Chapter 8 / Using Hangouts to Interact with People Worldwide

While there is a lot that is like Facebook and Flickr on Google+, Hangouts are where Google has singled itself out and moved away from the social media pack… I would say this is a big draw to those you are heavily involved with online webinars and continuing education sites that support live or recorded video instruction. It’s using a Skype-like video playback to meet with others, but with Hangouts, you can have more than one video connection going at the same time. Colby has some great examples of using Hangouts for gear review, critiques, tutorials. In short, think of it like a “live” version of YouTube.

Chapter 9 / Google+ on the Go

To start, I want to say that I do have the Google+ app for my iPhone, and before I go into the chapter itself, I would like to mention (if you haven’t already uncovered it), the default features for the application automatically publish your images to Picasa and Google+, BUT they are not shared publicly until you approve to release them.

To best sum up this chapter, it is best to say he will “cover the ins and outs of the Google+ mobile app and explain the importance of keeping in touch while on the road.” And he does just that. He walks through the mobile app and breaks down what the features do and what you gain from an iPhone, Android, or Windows Phone.

CONCLUSION

Throughout the book, there are green boxes called “Colby’s Quick Tips”. Read them, read them all! I think I learned more tricks from those than I ever thought existed on Google+. Another great addition to this book are the Q&A sections with other photographers and how they take advantage of Google+ and what it offers to their business and gaining clients and recognition in the photography industry.

If you are new to Google+ and/or are looking to further expand your photography through a social media, I would recommend this book as a great starting point. I will say though that this book can be seen as VERY focused on the professional/business photographer who actually shoots as a career and that is their sole income. The reason I say this is due to the reality of asking yourself… Do you have time to glue yourself to yet another online media outlet?

In a way, if I hadn’t already committed myself to Facebook, Twitter, Flickr, etc. and I was looking to join onto a new outlet for my photography, I would have focused 100% on getting my Google+ account up and running to work for me. So, if you know of someone looking to move beyond the masses of Flickr or Facebook to share their photos, please introduce them to Google+ and this book… I don’t doubt they’ll thank you later.

Ordering Information

Support this blog by buying your copy of Google+ for Photographers on Amazon.com or get your Google+ for Photographers Kindle Edition on Amazon.com.

Disclosure

If you make a purchase using links found in this article, I may make a commission. I was provided a copy of this book by the publisher to review for you and loaned it to a co-work who graciously wrote the text here for use on this blog.

Monday, May 28, 2012

REVIEW: Wildlife Photography: From Snapshots to Great Shots

Wildlife Photography: From Snapshots to Great Shots is part of the series of “From Snapshots to Great Shots” books published by Peachpit Press. The series is geared toward the beginning photographer. Each book focuses on a specific topic or genre but includes foundational instruction on gear, exposure, and composition as it pertains to the given topic, which in this case is Wildlife Photography.

Like the other books in the series, this book progresses logically and it reads almost like a photography class or workshop. Exercises at the end of each chapter are intended to give the reader some practice with the material they just covered. The class-like nature of the book is further enhanced by giving readers a Flickr group to join where they can post samples of their work inspired by the book.

About the Author

Laurie Excell is a nature and wildlife photographer from Portland, OR. She’s co-author of another book in this series, “Composition: From Snapshots to Great Shots” and her galleries include some very impressive work, some of which I recognized within the book along with tips on how she got the shot. She leads various photo workshops throughout the year, so readers who really love the book have an option for hands-on instruction as well.

Chapter by Chapter Walkthrough

1. Equipment Essentials – Gear, gear, and more gear! This chapter discusses pretty much all the equipment an aspiring wildlife photographer might ever need. It provides a high-level overview of the features to evaluate when considering equipment purchases, and lists pros and cons of common options as they relate to wildlife photography. Experienced photographers won’t learn anything new here, but it will be a good “know your gear” starting point (although perhaps a little overwhelming) for someone just getting started with photography. One equipment-related point that I’d have liked to see mentioned - but wasn’t - is that gear rental is an option for those who occasionally want that 600 mm lens but can’t afford the high cost.

2. Camera Settings and Shooting Techniques – In this aptly-named chapter, the author briefly describes her typical camera mode settings for a wildlife shoot. This is a prescriptive list. The text doesn’t go into much detail as to why she chooses these settings; that information is covered a bit further in chapter 3. It also provides some tips on the most stable ways of operating the camera, whether handheld or tripod mounted.

3. Exposure Simplified – Readers of Bryan Peterson’s book Understanding Exposure will find this chapter to be a good refresher on the material covered in that book. For new photographers who just want to learn the rules (i.e.,” wide aperture = shallow depth of field”) this is a nice condensed version of the same exposure and lighting material. It offers some stunning sample photos to illustrate the author’s points. For those who really want to dive deep into the topic of exposure, I’d recommend that they pick up the Peterson book as well.

4. Get To Know Your Subject – This chapter’s title only partially describes its contents. It’s not just about getting to know your subject as a photographer, but also about compositional choices that allow your viewer to get to know your subject as well. The author lists some general websites and organizations that are useful for pre-outing research to help the reader improve his/her chances of being in the right place at the right time. It introduces some tips for creating more engaging compositions and showcasing the behaviors of your subject, which will be explored further in chapter 7.

5. Location, Location, Location – For most of us, true trips into the wilderness are infrequent and are of limited duration. This chapter gives readers ideas to help them make the most of their wildlife photo opportunities, both by identifying potential local areas for practice, and by providing seasonal suggestions for wildlife photography trips.

6. Close Encounters – This chapter addresses one of the most difficult aspects of wildlife photography – how to get the shot you want without spooking the subject. This is all pretty generic advice, as different species will have different tolerance for human presence which may vary by season and area. But it gives the reader several approaches to experiment with, from gear options to extend your camera’s reach, to using blinds, to less-threatening methods of physical approach. Toward the end of the chapter the author calls out the need to watch for signs of physical distress in the subject as a sign that you’re getting too close. To me, this is critical advice as spooking the subject can have poor consequences – either for it or for you! I wish this were called out in big bold print, but I’m glad to see it at least mentioned.

7. Creative Composition – In Chapter 4 the author illustrated some ways that composition could affect the overall impact of an image, and here she expands much further, with beautiful examples of using lines, shapes, patterns, shadow, and perspective to convey certain moods or to draw the viewer’s eyes into the photo. The title of this book mentions going “from snapshots to great shots” and the concepts presented in this chapter are probably the most relevant in the book for those who want to achieve those great shots with extra “wow” factor. These same compositional concepts apply towards any type of photography and should be familiar to experienced photographers, but they’ll be extremely helpful to beginners.

8. Beyond the Basics – This chapter explores some additional creative choices such as high-or low-key exposures and provides manual exposure advice for challenging high-contrast exposure situations. It revisits the “blur panning” technique that is mentioned a few times earlier in the book. (Personally, I’ve never been a fan of this…blurry images look like mistakes to me even if the effect was intentional. To each his/her own!)

9. Bear Tales,

AND

10. Birds of a Feather - The final two chapters are a departure from the rest of the book. Instead of advice and instruction, these chapters read more like an in-the-field diary. They’re intended to walk readers through the logistics and experience of a wildlife photography outing end-to-end. In Chapter 9 the reader follows along with the author on a trip to Alaska to photograph the coastal brown bears, and in Chapter 10 it’s an avian photography trip to South Texas. As a reader, the changed tone jarred me a bit initially (hey, what about helping me get better pictures!) – but once I got over the shift I think this is pretty usable information in that it gives you real-world example templates for planning and executing a wildlife photography trip.

Images Inspired By This Book

While I haven’t yet travelled to any exotic wildlife locations since reading this book, one thing the book did inspire me to do is to research wildlife I might see regardless of my destination, and to practice wherever/whenever I had a chance. So on a recent drive to California to see the solar eclipse, I found online mentions of a scenic stop off of highway 101 where elk could be observed in the evening hours. Without that little bit of beforehand research inspired by the book I’d have driven right by the turnoff not knowing these guys were grazing just a few hundred yards up the road:

clip_image002

The book also discusses approaching wildlife by boat as a way to get closer and better angled shots than you could on foot. I’d never tried shooting from a boat before, but I do have a waterproof camera bag and some friends with kayaks, so I brought the camera along on a kayaking trip on the Sammamish River. Sure enough, an eye-level perspective from the river worked nicely to capture this gray heron mid-takeoff:

clip_image004

Conclusion

Photographers are visually inspired, and perhaps the best aspect of this book is the wealth of amazing wildlife shots, along with the tips on how the author captured the shot. This is a great general purpose book for a beginner to intermediate photographer who could use some tips on gear, exposure, composition, or in-the-field operation. A more experienced photographer probably won’t learn anything new, but will at least be highly motivated to find more local opportunities to photograph wildlife and to start planning the next big wildlife photo expedition.

Order Today in Print or for Kindle

Click here to purchase this book (and support this blog). There’s also a Kindle version which is great for the Kindle Fire (my favorite eReader).

Disclosure

If you make a purchase using links in this article, I may make a commission.

Tuesday, May 1, 2012

GUEST REVIEW: Weddings: From Snapshots to Great Shots by Suzy Clement (Reviewed by Kaethe Richter)

About Kaethe Richter

Kaethe Richter of K. Mari Photography
Kaethe Richter

I’d like to introduce my readers to Kaethe Richter (K. Mari Photography) a wedding photographer based out of Albuquerque, New Mexico. Kaethe was both an assistant and model in my popular Photographing People at Night in New York City article. She’s a bright woman and an awesome wedding photographer, so I sent her my copy of this book and asked if she could review it on my behalf (since I don’t shoot weddings). She did a fantastic job, so I hope you enjoy her review.  - Ron

Introduction

Weddings are tough gig and as Suzy Clement points out, “not for the faint of heart”. Most growth and learning as a photographer takes place through experience. Experience, in this case, is shooting lots (and I mean LOTS) of weddings. As tradition has it, the course of most wedding days seem similar—but as LIFE tends to have it, lighting conditions, people, and the environments of these weddings are not. One weekend you are shooting in a beautiful open field and perfectly overcast sky, while the next you are faced with a dark window-less and aisle-less church. Weddings: From Snapshots to Great Shots is a great book that teaches start-up wedding photographers how to deal with and prepare for the many challenges of photographing a bride’s special day.

Chapter By Chapter

Here’s my thoughts on each chapter of this book:

1. Equipment

Although every chapter is geared toward both professionals and amateurs, this one specifically separates the different needs that come with increased experience. She overviews the pros and cons of full-frame vs. cropped sensors, and also which lenses are absolutely necessarily vs. beneficial to have as a wedding photographer. She does a exceptional job pointing out things an amateur might overlook on their first wedding day (i.e. backup batteries for flash, benefits of renting equipment, and proper carrying cases for equipment).

2. Shooting Basics

Most photographers who have worked in the industry can probably skip or skim this chapter. She overviews real basics like composition, shutter speed, aperture, ISO, and the different modes on cameras (aperture priority, manual, auto, etc.). The most useful part of this chapter for a professional are the pictures she’s provided in correlation to the lens and exposure choices. She exemplified how different settings and lenses can help a photographer create a story and describe the feeling of the day, rather than just using a hard flash on subjects to get the picture.

3. Prepping for the Shoot

If you are a seasoned professional, and you only read one chapter in this book, read this one. It’s one of the most overlooked parts of the wedding photography process that can help prevent a whole lot of frustration on the wedding day! Suzy encourages photographers to scout the location ahead of time. This is key. As I said earlier, your conditions are constantly changing with every wedding. Going ahead of time will allow you to not only find great locations to do different portraits (alleviating stress when stuff gets hectic!), but it also gives you time to rent/borrow equipment you may need to make the location work.

Another great point she makes is how important it is to understand your couple’s wants and needs. Similar to how locations can vary, so can your clients! Some of my brides in the past told me they could care less if they had formal portraits, while many of my brides said it was the ONLY thing that mattered to them.

Chapters 4 - 8

4. Getting Ready

5. The Ceremony

6. Post-Ceremony Portraits

7. Cocktails, Dinner, and Décor

8. Reception and Dancing

In chapters 4-8, Suzy walks you through the different parts of a wedding day, and certain aspects of each you should prepare for. This is a great opportunity for amateurs to prepare for the different elements that come into play at different parts of the day.

Being on your “a-game” for 6-12 hours is tiring. It’s easy to overlook certain important jobs as the wedding photographer (i.e. details in the reception hall, table shots of the guests, etc), especially when stuff gets hectic and when the people you are working with get tired. These 5 chapters are a good reminder of the things you really shouldn’t forget to capture, even in the midst of exhaustion and chaos.

9. Organizing and Presenting your Work

The biggest misconception of wedding photography is that once the big day is over your job is done. Clement perfectly both describes and PREPARES amateurs for the hard work ahead after the wedding. She offers advice on efficient ways to backup, cull and edit your bundle of . Unlike most wedding photography books I’ve read, she offers up-to-date online options for sharing, printing, and creating final albums for clientele.

Conclusion

For a start-up wedding photographer this book is an absolute must read. What I’m saying is: two years ago, it would’ve saved me a lot of unfortunate moments at weddings had I read this ahead of time. It does a great job preparing you for the unpredictable nature of weddings. Seasoned professional probably don’t need to read this, but it’s always nice hearing a fresh perspective (and see pretty pictures).

Disclosure

The publisher has provided ronmartblog.com with a complementary review copy of this book. Ron sent it to Kaethe for review due to her interest in the subject of wedding photography. Kaethe was not compensated in any way beyond getting a book to read for sharing her thoughts.

ronmartblog.com may get a commission if you make purchases using links found in this article.

Tuesday, June 7, 2011

Guest Review: Portrait Professional 10 by Dávid Koronthály (with CounterPoint by Ron Martinsen)

 Portrait Professional 10
Photo Copyright © Ron Martinsen

Dávid Koronthály is a co-worker of mine who was gracious enough to help me out with my back log of reviews by doing the much anticipated review of Portrait Professional. You’ve seen this software reviewed all over the Internet, so I thought it would be fun to finally get a review online.

I’ve used the product, but simply didn’t have time to do an in-depth review. However, I do offer my counter-point at the bottom of this article and we’ve created a gallery of images associated with this article here.

Introduction

Portrait Professional from Anthropics technology is software for quick and easy portrait retouching. It can be purchased directly from http://www.portraitprofessional.com/. It is available as Standard, Studio and Studio 64 versions. The primary benefits of the Studio version are support for RAW images, color profiles and the ability to launch it as a plug-in directly from Photoshop. The version used for this review is Portrait Professional 10.1 Studio 64 Edition.

You can follow along with images for the discussion below at http://ronmart.smugmug.com/Blog/Review/PortraitPro.

Preparing the images

Even though Portrait Professional can open RAW images directly, my workflow starts with Adobe Lightroom 3. The RAW image was adjusted by slightly increasing the exposure and recovery sliders, to ensure that the background remains pure white but no details gets lost in the portrait itself.

Next step is to send it from Lightroom to Photoshop CS5. It is possible to open it directly in Portrait Professional, but I prefer to use Photoshop, as it allows me to work on layers. Duplicate the background layer and name it “PortraitPro”. The plug-in can be found via Filter/Anthropics/Portrait Professional menu. It is important to duplicate the current layer, as it will be overwritten.

Selecting face features

Once Portrait Professional starts, it assumes you want to use face sculpting and guides you through few simple questions. Alternatively, you can decide to use only the skin enhancing. The first question is identifying the gender and age of the person to be retouched. If you have more than one person in the photo, don’t worry – you will have a change to process them all, one by one.

After selecting adult male, the next steps are to mark important points on the face, such as outer corners of the eyes, tip of the nose and both corners of mouth. You do not have to be very precise yet, as you will have a chance to fine-tune it later. You can also specify that the picture was taken from a profile.


Copyright © Dávid Koronthály

Then you select the outline of the eyes and eyelashes. The default selection is not always precise and you do want to correct at least the outline of the pupil and the eyeball – those areas will be darkened and whitened respectively in later steps. Use spacebar to move to the next step.


Copyright © Dávid Koronthály

One you have adjusted the eyes, you will adjust the outline of the mouth and nose. First, you must select whether the mouth is open or closed. Finally, you have a chance to fine-tune the outline of the whole face. This is the last step and now Portrait Professional has all the information to process the image.

Retouching

Portrait Professional is using statistical information on how ideal face looks like to adjust your image, typically my making it more symmetrical. After a short time the initial retouched image appears (capture 12). You can compare it to unretouched image by holding Enter (capture 13). You can use sliders on the right to adjust it to your taste.

Portrait Professional 10.2 Face Sculpt Controls
Face Sculpt Controls – Copyright © Ron Martinsen

The face sculpting sliders allows you to slim and straighten the face shape, prolong neck, widen eyes and more. You see the preview immediately as you are dragging the sliders; the complete image is adjusted after you release them. You can also remove distortion caused by dioptric glasses here.

Skin controls allow you to smooth the skin and remove all kinds of imperfections. The View/Edit Skin Area button allows you to paint the skin area, important when there is skin visible outside the face/neck that you want to adjust. The automatic selection does not always identify it precisely and the boundary between adjusted and not adjusted skin can be disruptive.

One trick that I am often using that is not demonstrated here is to process the sculpting separately from any other adjustment. That way I have layers in Photoshop where I can use additional techniques to fine tune the image to perfection. When the face sculpting was used, the original layer no longer matches the shape of the face and blending cannot be used.

Portrait Professional has sampled textures of human skin that are used to patch any imperfections without producing the porcelain look. Select the one that best matches your model. You can use the brush to pain in areas that require more retouching or erase areas that you want to retain unchanged.

You can zoom to 1:1 scale to see all changes precisely; use Spacebar to move around like in Photoshop.

The eye controls allows you to remove red eye, brighten and whiten the eye, sharpen the eye, eyelashes and brows, change the eye colors and more. If you are so inclined, you can add or remove reflections. You can control the changes separately for each eye. As you can see here, the red eye was not completely removed and darkening the pupil too much produces unnatural look. In this case, it is better to leave it uncorrected and fix it on a separate layer in Photoshop.

The mouth and nose controls are useful to whiten and brighten the teeth. You can use them to sharpen and change the color of the lips, but unless your selection was perfect, it is better to do that in Photoshop – otherwise the edges are unnatural and very obvious.

The hair controls allow you to adjust the color and brightness of the hair. You could edit the hair area the same way as you painted the skin area before. You could use the hair tidying mode to smooth the appearance, but beware that it will produce soft look – and it does not help with hair as in this image.

The skin lighting controls helps you adjust or correct light on just the skin area, which you can also edit here. The relight control is trying to fix incorrect lighting – it is quite useful for small stuff, but don’t expect miracles. I am skipping the general picture controls as both Lightroom and Photoshop provide much better tools.

When you are done, you can start from the beginning adjusting another face in the image or you can save and return to Photoshop. The current layer will be replaced with the adjusted version. The final step is adjusting the red eyes.

Conclusion

The portrait Professional is incredibly useful for quick retouching; you can produce good result in minutes where the equivalent work in Photoshop would take hours. At the same time, it cannot do miracles and it is not sufficient to perfect results alone – but it can be combined with Photoshop and other filters. As your skills grow, you can selectively mix and match the available tools to get the best of both worlds.


Before (Copyright © Dávid Koronthály)

After (Copyright © Dávid Koronthály)


CounterPoint by Ron Martinsen

I’ve got to hand it to Anthropics Technology for creating a brilliant product for a dirt cheap price. It does quite a bit for a fraction of what you’d spend using a collection of third party Photoshop plug-ins, and it offers more flexibility now to deviate from the default results than ever before.

Mouse over to see BEFORE image, mouse out to see Portrait Pro Version
Portrait Professional Version
Ron's Photoshop Workflow Version
Edit Time - 1 Hour

With that said, I think this product versus Photoshop is much like comparing Aperture Priority versus Program Mode on our DSLR’s. Like Program Mode on your camera you do get results, but they are rarely the results we really want. In addition it can be kinda obvious that we really weren’t in complete control of everything too.

Mouse over to see BEFORE image, mouse out to see Portrait Pro Version
Portrait Professional Version
Ron's Photoshop Workflow Version

To me its worth the effort to learn and master the techniques found in Scott Kelby’s Portrait Retouching Techniques book as a solid understanding of those skills can help you pickup where Portrait Professional leaves off (or fails) to get better results.  However, I find my workflow which includes Portraiture, and Nik Software Complete Collection gives me results that I am overall  much happier with. David is right, it does take hours, but I think some things are worth the extra effort.

While I can recommend this software for amateurs who are looking for a way to improve their portraits without spending much time or money, I don’t recommend it for professional or advanced photographers whose name depends on the quality of their work. This is a brilliant product and it is very good, but it’s still not a Photoshop replacement in my opinion yet.

Disclosure

I was provided a review copy of Portrait Professional by Anthropics Technology for the purpose of this review, but David actually purchased his directly. I may get a commission if you purchase links in this article.