I read a lot of email on a photography group that I belong to where If you study the behavior of newbies you see the following pattern over and over again:
How do I edit my photos?
Now if the person has done any research then they will learn that nearly everyone is using Adobe Photoshop CS3 or CS4 for Windows or the Mac, but then they see the price tag and their eyes bug out of their head. Now if they are lucky, then they can qualify for an upgrade which makes the price a little more palatable. These folks usually get it, and then realize Photoshop wasn't written for normal human beings so they have to start reading a bunch of books. After a lot of effort they eventually learn that they can make beautiful enhancements with layer masks and filters, in only a few hours! Then they look at their 500 pictures they took thanks to their new camera with its great burst mode performance and realize they are totally screwed! This is when they start asking questions again about how to make this painful process better because they can't afford to spend that much time on a single photo. In response to this inquiry they learn about the latest buzzword - digital workflow.
Managing your Digital Workflow
I'm going to let you in on a secret. There's a way to process that big stack of photos you have, and do lots of cool things with it without opening up Photoshop. In fact, you can process each photo in less than 5 minutes (or even as little as a 30 seconds depending on how good your original shot was). In fact, not only can you do that you can also:
- Have an easy way to triage photos to delete bad ones and filter out your 1 star photos from your 5 star photos
- Find pictures quickly based on keywords, categories, date taken, lens used, camera used, etc...
- Crop, rotate, spot fix, heal, red-eye correct, etc...
- Generate a web gallery
- Print with advanced features
- Apply presets to make the photos look much better in an instant
- Have a history of all of your changes so you can always rollback or create snapshots PLUS you never touch the original!
- Modify the metadata associated with your pictures for use in other programs, the web, or even for use with media agencies
- Export a variety of different types of photos from your original with different sizes, dpi, file formats etc... in the single click of a button
- plus MUCH, MUCH, more
The answer is Adobe Lightroom 2.0.
Adobe Lightroom - The GREATEST thing since sliced bread for Photographers
There are numerous inventions recently that have made photography much easier and enjoyable:
However, none of these enhancements helped avid photographers manage the mounds of photos they would collect either in boxes or on hard disks. While there were cumbersome products to use for professionals like Microsoft Expression Media, they flat out sucked for the average Joe. Lightroom did something different, it took some of the power of Photoshop and combined it with the feedback of REAL WORLD photographers into something that could ingest those hundreds or thousands of photos you had sitting on your hard disk and allow you to manage them quickly and easily. More importantly, they developed a user interface that was not intimidating like Photoshop and allowed one click access to most of its powerful features. In fact, they even went so far as to provide hover support for certain features where you simply hover your mouse over the feature (say B&W conversion) and you could actually see an instant result of what that effect would do WITHOUT actually applying it. What's more they applied this concept to your history list so you could actually see how your picture changed over the history of your edits by simply hovering over each change step.
I could go on and on about Lightroom because I'm a big fan and have managed 29,000 photos in my 2007 collection and currently (as of 5/8/08) nearly 4000 photos in my 2008 collection (which I broke into years for my personal benefit - I could have kept them all together). However, I'm going to just give you a step by step list of what I do after I shoot a batch of photos and show you how I spend about 15 - 45 seconds "editing" my best photos and deleting the garbage before I upload my shots to my web site:
1. Use the Microsoft Live Photo Gallery's Import Photos and Video Wizard to dump the files into a new directory and rename them plus add a default tag. Photo Gallery sucks beyond this purpose, but it is a nice way to get your photos organized in multiple directories with human readable names. Alternatively you can use Adobe Lightroom's Import Photos from Device and then skip to step 3. I go back and forth as to which method I like better.
2. Import the pictures into Lightroom (which Lightroom supports directly without step 1, but I prefer my way). Lightroom requires you to import so it can create a database of your photos for searching and history tracking, and so it can avoid modifying your originals. This is a GOOD THING!
3. Select All photos OR choose Choose Selected for one or more directories, then create a new Collection for the shoot and now I can always get to this batch of pictures quickly. In some cases I’ll just move the imported photos to an existing Collection (i.e., new pictures of model X will go into model X’s existing category)
4. View the pictures in the Library and reject (aka black flag) the bad ones for deletion and delete them in one shot (assuming they are on the same drive – Lightroom 1.x is dumb only removes them from the disk if you do this from the Previous Import or All Photos section, otherwise it will just remove them from the database and leave them on the disk - be warned!)
5. While viewing in step 4, I’ll generally mark the shots I like with stars (from 1 - 5) and in some sets I’ll also mark them with color categories to represent Macro shots, Landscapes, Portraits, etc… for quick filtering in huge sets.
6. Given the rapid growth of my picture collection, I also try to multi-select and batch tag photos for quick filtered retrieval. This is super helpful when your collection grows huge and you want to find all your shots of X without having to have a separate collection just for X.
7. While marking pictures with stars, I generally like to side-by-side compare similar pictures (I usually shoot 5 of the same shot) to see which is the best. Lightroom Library’s XY compare rules for this, and I use this to delete most dupes (still leave some if the decision isn’t easy)
8. After rating the pics, I’ll filter down to my 3 star or better shots and then go to the Develop tab to enhance those pictures.
9. I start by cropping and rotating, and Lightroom does this better than anything I’ve ever seen
10. I then do AutoExposure and adjust as necessary, followed by Custom white balance with the eye drop tool. I then hover over the history in Lightroom and look at the thumbnail to see what white balance I like better (as Lightroom has real-time preview of history elements in the thumbnail). I usually prefer the As Shot or Auto white balance, but Custom is the most accurate. During this phase I will usually adjust the exposure and black levels as Auto Exposure is usually needs a little tweaking for my taste. I usually end up with High Contrast for the point curve too.
11. Next I’ll apply some of the built-in presets like Punch, Sharpen - Landscape (which is like Unsharpen Mask in Photoshop) and use hover over history technique to examine the changes in the thumbnail to see which I like best. Once I’m happy with the result, frequently I’ll copy the changes I make to one picture and apply them to others (very common for studio shots where the conditions are fixed but only the poses change). During this phase I may tweak step 10 again.
12. When necessary I’ll remove spots, use the spot-healing tool or red eye fix (rare) parts of the image
13. When I’m done, I’ll compare the original to the current (rotate and cropping is always applied to the original)
14. Sometimes I want to try multiple effects on the same shot, so I’ll create a a snapshot or duplicate "virtual image" and do something entirely different (different crop, B&W, etc...)
15. When I’m done, I go back to the library and select all of my top rated pictures (usually 3 stars or better, but if there are too many 3’s then I go to 4’s) and go File Export Presets Export to Smugmug (a plug in that uploads my photos directly to my favorite web photo site). I usually do 1920x1200 240dpi output images that are between 115kb and 355kb depending on orientation and complexity of the content of the photo, but they only take seconds to upload to smugmug via Cable modem on a wireless network I use at home.
From start to finish, it may take me a few hours for a batch of several hundred pictures, but that's about how long it used to take me to edit one picture in Photoshop. Now, if I have a REALLY good shot that needs more work than Lightroom can do, then I'll certainly take it into Photoshop and spend some time with it, but Lightroom helps me to quickly identify which one or two shots might fall into that category.
What about Apple Aperture?
For those of you on a Mac, you may find that Apple Aperture is what all of your friends are saying you should use. From my casual observations of Aperture, I feel like it is a good product with some advantages over Lightroom, but that Lightroom is still the superior product on the Mac.
What about Adobe Bridge and Adobe Camera Raw?
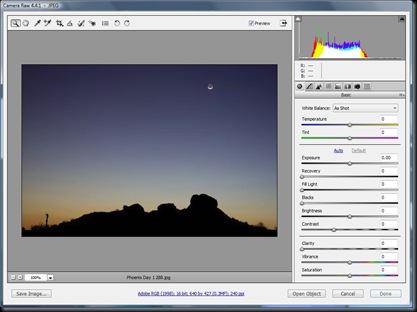
Lightroom's life really began as Adobe Bridge which was Photoshop's way of providing a visual picture explorer. To modify RAW photos that come from most digital SLR cameras, Adobe invented Adobe Camera Raw (ACR) to give photographers a simple way to provide edits to these digital negative images using this user interface:

If you look carefully between Lightroom and ACR you'll notice that Lightroom's Develop Tab is just a pretty user-interface for ACR. Everything that you see in Lightroom exists in ACR, but Lightroom has some really great presets which don't exist in ACR so that makes it much more powerful. In addition, the history and file management features don't exist in ACR so Lightroom is still worth your money even if you already use ACR.
Adobe Bridge tries to offer much of the functionality of Lightroom, and in some cases it offers even more. However, Adobe isn't stupid. Most people get Bridge for free with Photoshop or Photoshop Elements (which ships with many PC's) so they save their good stuff for Lightroom. If you've already invested in Photoshop and have bridge, and can't afford Lightroom you can make due using Bridge and ACR, but as soon as you have the money it is worth upgrading to Lightroom. You'll find that you rarely use Photoshop, Bridge and ACR after that and the time you spend working on your photos will drop dramatically, and the results will improve drastically (for the non-Photoshop God's).
I hate buying software only to discover it sucks
Me too, which is why I would have never bought Lightroom had it not been for the free fully-functional 30 day demo. After trying it out and seeing what it could do, I feel in love and had to buy it.
I downloaded Lightroom and the UI sucks
At first I HATED much of the UI in Lightroom, and in fact there are still some things that drive me insane. However, after you get the hang of it then you'll discover quickly that it really is a great product that is very easy to use.
I work between my laptop and desktop frequently, but I don't see how to do that in Lightroom
Me too, and while it isn't explained very well there's a really cool trick you can do. Store your pictures and Lightroom catalog on a compact external hard drive and install Lightroom on both your desktop and laptop. Now when you use Lightroom just open the lrcat file from your external drive and it can find all of your pictures on that drive. The only trick is that you have to make sure you use the same drive letter on the desktop and laptop (I call mine drive H:). While I haven't tried this on a Mac, the same concept should work on that platform too. If you have more than one disk drives worth of data, then simply add external drives and make sure they have the same drive letter between the two machines.
What if my external drive with the pictures isn't available?
A REALLY great feature of Lightroom is that it cache's your images (in DNG format for the geeks out there), so if you don't have access to your drive that has the pictures you can still work in Lightroom's library to find, rate and categorize photos. I use this as a way to work on my photos while on a plane to determine what stars I give my photos and which ones I want to delete (using reject) when I have my hard drive attached.
Okay you convinced me I'm going to get it!
GREAT, I know you'll love it. If you could do me a favor and use this link it would help me to support this blog so I have an incentive to spend my time writing more cool posts like this.
Happy Shooting!
NOTE: This site requires cookies and uses affiliate linking to sites that use cookies.
. Either way, your support is greatly appreciated!
This blog is intended for freelance writing and sharing of opinions and is not a representative of any of the companies whose links are provided on this site.
The opinions provided are of Ron Martinsen alone and do not reflect the view of any other entity

