Congratulations to Jason Nash for this appropriate photo of the week with all of the snow we’ve been seeing in the Seattle area. This cool shot was taken with his Canon 7D and his 70-200mm f/4L IS USM at f/4.0 for 1/1000 sec at a focal length of 121mm at ISO 200.
Jason did the right thing here and bumped up his exposure compensation to + 1/3 EV so that the snow looks white instead of grey (although I suspect he boosted it a bit more in Lightroom 3.3. The colors and exposure look fantastic in this shot and the white balance is spot on. My only recommendation for improvement on this shot is the cropping. There’s a little more dead space behind the subject than we need for this shot, and having the boy’s head at a rule of thirds point would be a stronger shot. Much of this needs to happen in-camera for the best result on one like this, so I’ll quote my friend Rick Sammon when I say that “dead center is dead wrong” (although I’m guilty of it too <g>).
That said it’s a brilliant shot and I love it. Congrats Jason!
Be sure to click this photo above and leave some feedback on Flickr so this reader can get your feedback both good and bad (be gentle) and feel the love from our readers here!
Learn more about how you can participate in the Photo of the Week contest by clicking here.
NOTE: This site requires cookies and uses affiliate linking to sites that use cookies.
If you enjoyed this article, please support future articles like this by making a donation or saving money by using my discount coupon codes. Either way, your support is greatly appreciated!
This blog is intended for freelance writing and sharing of opinions and is not a representative of any of the companies whose links are provided on this site.
The opinions provided are of Ron Martinsen alone and do not reflect the view of any other entity
I’m a big fan of the Canon Rebel series as they are power cameras that are easy to use. I’m pleased to announce that they are now in stock at B&H so you can order yours today.
To learn more about this new body, check out this article.
To get my advice on purchasing a DSLR, check out this article. You can now substitute my recommendation for the T2i for the T3i in that article.
NOTE: This site requires cookies and uses affiliate linking to sites that use cookies.
If you enjoyed this article, please support future articles like this by making a donation or saving money by using my discount coupon codes. Either way, your support is greatly appreciated!
This blog is intended for freelance writing and sharing of opinions and is not a representative of any of the companies whose links are provided on this site.
The opinions provided are of Ron Martinsen alone and do not reflect the view of any other entity
When the Think Tank Photo (TTP) Retrospective bags first came out I asked TTP why didn’t they just call these Urban Disguise (UD) bags with colors? From the web site I couldn’t see much difference so it didn’t make a lot of sense to me at first. After reviewing these bags I understand the subtle differences and more importantly I’ve come to appreciate both the Urban Disguise Series as well as the Retrospective Series much more. I still wish they’d make a UD bag in the Retrospective material, but hey that’s just my 2 cents.
You can see my review of the Urban Disguise Series and the Urban Disguise 40 v2.0 for a closer look at them, but the one thing I noticed right away about this series is the material. It’s much more flexible and doesn’t seem anything like a camera bag on the outside. TTP bags are known for being stealth, so this takes it to the next level.
One complaint I had about the front flap shown above is that it doesn’t have an external pocket like you see on the Urban Disguise series bags like the UD 40 v2.0 shown below:
On the inside the Retrospective 20 is going to feel familiar to Urban Disguise bag owners. I can say that compared to my 40 that it felt taller as shown below where it swallows the 70-200mm pretty easily:
Inside View – Copyright ® Ron Martinsen
Since this bag doesn’t use the buckle system found in the UD series you end up with massive pieces of Velcro. This results in a loud noise when you lift the flap, so you can release the flaps shown below called Sound Silencers to cover the big Velcro strips to quiet the bag.
While I appreciate the thought, I actually don’t like this feature because I think you are taking a greater risk of spilling your gear. I do wish this bag had the UD series style buckles instead of big Velcro.
Video
Here's a video tour of the bag that I have. My apologies for the poor quality video and sound, but hopefully you’ll still get the idea. I must also point out that I incorrectly describe the sound silencers in the video due to my review of a separate back intended for HDSLR’s.
Please note that an HD version is available in the link below:
As you can see it can hold a lot of gear, but honestly I’d recommend something smaller than a pro body. It fits, but not comfortably. My 5D Mark II (or the Nikon D7000 I reviewed) is actually a better fit. In real life, usually use it to hold my 24-105mm on camera as shown along with a 580 EX II flash and an one other lens like a 16-35mm.
Conclusion
Before I got this bag I wasn’t very interested in reviewing it as I didn’t see any value in having it. I have Urban Disguise bags which I love and use often, so I just didn’t see any value in having a different color bag that seemed the same.In may ways I still think the Urban Disguise Series additional features make them the better choice, but when I had both bags available and sitting next to each other I kept find myself wanting to use this one.
Ultimately I learned that they aren’t the same and came to appreciate the nice look and flexibility of this bag. I also appreciated the fact that it looked less like a camera bag when I had to leave it in the back of the SUV when parked. Camera theft is going way up in my state, so stealth mode is super important these days. Of course, I don’t recommend you leave your bag in plain site and camera insurance is a must, but sometimes you’ve just gotta leave the bag in the car for a bit so I appreciated this feature.
I recommend this bag for those who are looking for something more stylish or softer. I find myself using mine and enjoying it quite a bit when I need to take a camera bag to a friends house and I don’t want to look like the photography geek.
A note to Canon owners: The photos (not video) in this article were shot with Canon’s new 70-300mm f/4-5.6L IS USM lens that I reviewed here.
Special Offer
Visit my Think Tank Photo to learn about a special offer on how you can get a free bag when you place your order, plus links to other TTP reviews. You can also visit my discount coupon code page for other discounts and offers.
Disclosure
I was given a bag to review for this article and I may get a commission if you make a purchase using the links in this article. Please support this blog by using the links.
NOTE: This site requires cookies and uses affiliate linking to sites that use cookies.
If you enjoyed this article, please support future articles like this by making a donation or saving money by using my discount coupon codes. Either way, your support is greatly appreciated!
This blog is intended for freelance writing and sharing of opinions and is not a representative of any of the companies whose links are provided on this site.
The opinions provided are of Ron Martinsen alone and do not reflect the view of any other entity
I’m kicking myself in the foot because it was just late last year when I picked up a new 17” Macbook Pro for myself and a 13” for my wife, and now these lovely beasts come out – arrgggh!!!!
While you can certainly get yours from the Apple store, the cool thing about buying from B&H is that they have a better return policy (ever tried returning an iPad like me – OUCH – $60+), they have free shipping and most importantly – no sales tax for most people. This can add up to several hundred dollars in savings, and with the pre-configured versions with the most common options it can be delivered quickly once they start shipping.
Click here to see a complete listing of new MacBook Pro’s offered by B&H.
B&H has updated their cool HDSLR web site with some great new videos by Shane Hurlburt, ASC coming soon. I’ve had the pleasure of talking to Shane and listen to him talk about his experiences shooting with the Canon 5D Mark II and I can tell you these videos are going to be awesome. He’s a great enthusiastic speaker with tons of knowledge, so if you are into video you won’t want to miss these FREE videos!
Disclosure
I may get a commission if you purchase using the links on this blog. It doesn’t cost you a penny and it helps me and my family a lot – thanks for your support by using my links!
NOTE: This site requires cookies and uses affiliate linking to sites that use cookies.
If you enjoyed this article, please support future articles like this by making a donation or saving money by using my discount coupon codes. Either way, your support is greatly appreciated!
This blog is intended for freelance writing and sharing of opinions and is not a representative of any of the companies whose links are provided on this site.
The opinions provided are of Ron Martinsen alone and do not reflect the view of any other entity
If you hover over the image above you’ll see the before image that I started with. I was quite happy with that image, but I’m thrilled with the final edited version. Here’s what I did:
I used Lightroom 3 to export the raw file to Photoshop CS4 using a decent starting point and some cropping.
I used ImagenomicPortraiture and I downloaded one of their free actions from here so I could use the PTBlackSkinAverage1 action to get a pleasing skin enhancement for this young mans skin.
Next, I used the healing brush to remove skin blemishes.
I used Viveza 2 to bleach out the background so I could get a quick and easy selection of just the background using the quick selection tool. I did the selection on the blue channel using a technique I learned in The Photoshop Channels Book (my favorite book on selection). I also used an overlay brush to paint around the edges of the hair (a technique described in the book) to quickly get the edges of the hair perfect in the mask. In this Viveza enhancement I also brightened up the gold chain.
The image was looking good at this point but I wanted it to be a “wow” image, so I used a trick I just learned in some training I’ll discuss here soon. I selected the red channel from the channels pallete, pasted it into a new layer and then set the blending mode to soft light. This trick was like magic and really gave this image the look I wanted. I used a layer mask to keep only the portions I wanted.
With a good selection of just the background I used Photoframe to add this really cool background. I used the refine edge masking feature to get my mask perfect so there weren’t any halos along the hair or torso.
I used Nik Software’s Tonal Contrast filter found in Color Efex to give the shirt a little more texture.
I used the liquefy tool to deal with some problems in the shirt on the left side and by the bicep to that the shirt looked a little cleaner along that edge.
I did a LAB Color enhancement at 25% opacity on the b channel per the instructions in Scott Kelby’s fantastic 7 Point System book.
I finished off with some sharpening (but only on the subject, not the background) using Sharpener Pro to give it a final touch.
Total time spent – about 4 hours, most of which was experimenting and doing the cloning and healing work.
Lot’s of cool tricks were used on this one, so my advice here is to read the books mentioned and get the add-ins I used if you like this look. All my tools were super helpful on this one!
NOTE: This site requires cookies and uses affiliate linking to sites that use cookies.
If you enjoyed this article, please support future articles like this by making a donation or saving money by using my discount coupon codes. Either way, your support is greatly appreciated!
This blog is intended for freelance writing and sharing of opinions and is not a representative of any of the companies whose links are provided on this site.
The opinions provided are of Ron Martinsen alone and do not reflect the view of any other entity
Congratulations once again to week 10 winner Don Turriaga who captured this creative shot he calls Cyber Terrorism. It was taken using a 5D Mark II and obvious a spot light source of some type (an off camera flash perhaps). He has others like this in his photostream so be sure to check them out.
I like the exposure and color of this photo, but more important I just laugh every time I see this shot. One of my mentors once told me that if you can get someone to laugh from a photo, nothing else really matters as that’s one of the toughest things to accomplish in photography.
My suggestions for improvement might be darkening the gray block in the back left a bit more as my eye keeps getting attracted to it, despite the fact that it isn’t an important part of the shot.
Be sure to click this photo above and leave some feedback on Flickr so this reader can get your feedback both good and bad (be gentle) and feel the love from our readers here!
Learn more about how you can participate in the Photo of the Week contest by clicking here.
NOTE: This site requires cookies and uses affiliate linking to sites that use cookies.
If you enjoyed this article, please support future articles like this by making a donation or saving money by using my discount coupon codes. Either way, your support is greatly appreciated!
This blog is intended for freelance writing and sharing of opinions and is not a representative of any of the companies whose links are provided on this site.
The opinions provided are of Ron Martinsen alone and do not reflect the view of any other entity
Congrats to Karl Whittman, this week’s Photo of the Week Winner. This shot is a sunrise shot from Worth Avenue in Palm Beach, Florida, but my mind wants to think it is Santorini, Greece.
To me a good photo is one that grabs my attention and keeps it there for a while. It’s even better when it causes me to daydream as this photo does because I think wow, I wish I was standing there feeling the nice warm sun on my skin.
This shot was taken with my favorite xxD series camera from Canon – the Canon 40D (a great used camera buy). Given the focal length of 17mm I’m going to guess it was taken with the 17-40mm and according to the EXIF it was enhanced using Lightroom 3.3.
My suggestions for improvement are to lose the white border and to crop it so that the sides are balanced evenly. If I was using photoshop I’d probably stamp out the black box on the camera right wall as well.
Be sure to click this photo above and leave some feedback on Flickr so this reader can get your feedback both good and bad (be gentle) and feel the love from our readers here!
Learn more about how you can participate in the Photo of the Week contest by clicking here.
NOTE: This site requires cookies and uses affiliate linking to sites that use cookies.
If you enjoyed this article, please support future articles like this by making a donation or saving money by using my discount coupon codes. Either way, your support is greatly appreciated!
This blog is intended for freelance writing and sharing of opinions and is not a representative of any of the companies whose links are provided on this site.
The opinions provided are of Ron Martinsen alone and do not reflect the view of any other entity
I’ve never been super impressed with most of Canon’s 70-300mm lens offerings, but when I was at Canon’s Expo in New York in September 2010, I had a chance to see there was some hope for such a versatile lens. As I reported from the Expo (here), the new EF 70-300mm f/4-5.6L IS USM seemed to show signs of something special, but it was pre-release so I couldn’t be sure.
Comparing Form Factors
This article is filled with 5 different side-by-side comparison shots that I took of my test lenses on loan from B&H, but the ones I think people will be most interested can be found below. When you hover over the text of each label it will show that version (you may need to wait a few seconds the first time for the image to download). The EF 70-300mm f/4.5-5.6 DO IS USM is on the left and the new EF 70-300mm f/4-5.6L IS USM is on the right:
Extended to 300mm
Retracted to 70mm
70mm no hood
Naturally what you find in these images is that the L lens is a bit larger, but not as much as I thought it would be. Diffractive Optics (DO) lenses are supposed to more lightweight and compact than their non-DO counterparts so I didn’t expect them to be so close in size. Here’s another shot with the lens caps on which shows another major difference. The L is 67mm but the DO is only 58mm, both of which introduce a problem for me as I don’t have any polarizers in that size! :-p
As of the time of this writing, the L lens sells for $1599 and the DO lens sells for $1329. The question becomes is the $270’s more you’ll pay for the L worth it? Well, before we have that discussion another factor comes in – the cost of filters which you may already own for the DO as it is the same filter size as the popular 50mm f/1.4 which means that if you go up to the L you may find yourself having to buy more than just the lens.
The next issue is weight where the L comes in at 2.31 lbs (1050g) versus 1.6 lbs (720g) for the DO – that’s a pretty big difference, but honestly if you are having troubles handling a 2 lbs lens, then you probably should go back to a point and shoot or skip both of these lenses as they are both not very heavy in my book. Weight-wise the L definitely feels more substantial, but I wouldn’t call either lens heavy or light. They both feel like what you’d expect a lens costing over $1000 USD to feel like – substantial.
The only other numbers that are super important for me are the previously mentioned filter thread sizes, and the IS stop performance. Now Canon officially says that the DO has 3 stop IS and the L has 4 stops, as was the case with the 70-200mm f/2.8L IS II USM, those 4 stops are a hell of a lot more than 4 in real world scenarios (especially when compared to older “4” stop lenses). Speaking of IS, here’s a great web site to learn more about Canon’s Image Stabilization.
While some may be quick to note that the DO lens can only do f/4.5 whereas the L can do f/4, honestly I don’t find that to be a significant issue in my real world testing.
Using in the Real World
Another missed shot due to AF troubles The DO’s MFD will make bad words come out of your mouth
Right off the bat I noticed a significant difference between the two lenses – minimal focus distance (MFD). The DO lens has a MFD of 55.1” and the L has a MFD of 47.2”, which makes a HUGE difference indoors. In fact, I found the DO to be very annoying to use indoors with people because of this issue. (NOTE: For those who are new to DSLR’s and don’t understand what I’m saying, this means that if you are closer than the MFD when you push the button to take a picture the camera won’t focus so you can’t take the shot – 8 inches is a lot to have to step back before the DO will work). The net result of this is I found myself having to go to manual focus sometimes (as in the shot above) when the lens couldn’t acquire a focus but seemed “close enough” (guess it wasn’t).
The other major difference I noticed is that the new L lens has the amazing glass and wonderful IS system that I raved about in the new 70-200mm at the Olympics (here). This IS system gives you a lot of flexibility and couldn’t be more useful on a lens that can do 300mm. I intentionally stayed in manual and kept my shutter speeds low (most often between 1/60 sec to 1/200 sec) while testing these lenses just to see in practical use how many hits versus misses I’d get. As expected, the L lens with the new IS had 3 times as many sharp and in-focus shots as the DO, despite the fact that I took 25% more shots with the DO during my testing.
My overall impression after testing is that the L lens definitely has a better AF system, much more useful IS system (especially useful given its extra weight), and resulted in more sharp clear shots that I’d call keepers for personal use (i.e., showing to mom).
Sample Image Galleries
I’ve created two galleries of sample images that I took while reviewing these lenses. These are real-world images that are unedited in-camera JPEG files which you may download for review purposes only. My apologies for the abundance of family images as I want to puke when I see people do that, but the kids were good targets.
Images were mostly taken with the Canon 5D Mark II but some were also taken with the 1D Mark IV (mostly the outdoor park shots with the kids).
Feel free to look at the gallery shots to see 70 vs 300mm comparisons of the same object as well as low and high ISO tests.
Conclusion
For me the clear winner is the EF 70-300mm f/4-5.6L IS USM lens (more info on Canon’s website), but I won’t be selling my 70-200mm f.2.8L IS II USM to get one. As great and as sharp as it is, I can’t live without f/2.8 for the work that I do, and I can’t justify having the 70-300mm in my bag at the same time. Now I would purchase it before I’d get the 70-200mm f/4L IS USM as I think it is every bit as good as that lens and the only significant trade-off of not being fixed f/4 minimum aperture is easily overcome by the extra 100mm’s of reach.
If money were no object then I’d get the new 70-300mm L in heartbeat. I really loved it and it’s awesome to be able to go to 300mm. The confidence of knowing you’ll most likely get a nice sharp shot thanks to the great IS, yet still be able to zoom back down to 70mm an instant later is very compelling. If my son was playing football, I’d seriously consider this lens instead of the 100-400mm for its improved AF, IS and sharpness.
The EF 70-300mm f/4.5-5.6 DO IS USM lens (more info on Canon’s website) wasn’t a bad lens, and its small size made me unconsciously favor it over the L which is why I ended up with more shots taken with this lens. I just think the bar has been raised significantly with the new lenses that Canon is releasing, so what would have been considered great a year ago is now just so, so. $1300+ is a lot to pay for a so, so lens, so I don’t see any compelling reason to get this lens over the newer L. Sure the L costs more money and weighs more, but the image quality improvement makes it worth every penny.
NOTE: B&H has a really cool feature to view the DO lens in 3D here and the L lens in an advanced interactive mode here.It’s pretty slick so check it out!
Disclaimer
Thank you to B&H for sending me brand new copies of these lenses to review. I have returned them, but I’ll miss the L for sure!
I may get a commission if you purchase using the links in this article, so thanks for supporting the blog by using my links!
NOTE: This site requires cookies and uses affiliate linking to sites that use cookies.
If you enjoyed this article, please support future articles like this by making a donation or saving money by using my discount coupon codes. Either way, your support is greatly appreciated!
This blog is intended for freelance writing and sharing of opinions and is not a representative of any of the companies whose links are provided on this site.
The opinions provided are of Ron Martinsen alone and do not reflect the view of any other entity
Topaz Labs was so jazzed by my real-world examples used in my blog review of InFocus that they have included them (by permission) in their examples page as show below:
I am an affiliate partner with Topaz Labs which means I may get a commission if you purchase using my links. While they do provide free demo software, they do not influence my reviews or see it in any way until it is published on the web.
NOTE: This site requires cookies and uses affiliate linking to sites that use cookies.
If you enjoyed this article, please support future articles like this by making a donation or saving money by using my discount coupon codes. Either way, your support is greatly appreciated!
This blog is intended for freelance writing and sharing of opinions and is not a representative of any of the companies whose links are provided on this site.
The opinions provided are of Ron Martinsen alone and do not reflect the view of any other entity
If you’ve been following my printing series then you’ve seen the name Dan (a.k.a., Dano) Steinhardt come up a few times. Dano is the guy who gave me the content for Dano’s Dictionary and is a great scholar of fine art printing and papers.
Dan has released his new portfolio web site at http://www.dansteinhardt.com/ and there’s some really great stuff in there. I enjoyed it quite a bit and thought you might enjoy it too.
Check it out!
Happy Friday!
NOTE: This site requires cookies and uses affiliate linking to sites that use cookies.
If you enjoyed this article, please support future articles like this by making a donation or saving money by using my discount coupon codes. Either way, your support is greatly appreciated!
This blog is intended for freelance writing and sharing of opinions and is not a representative of any of the companies whose links are provided on this site.
The opinions provided are of Ron Martinsen alone and do not reflect the view of any other entity
I have been a hard core Smugmug fan every since I did my web hosting series against some well respected photo hosting services and it turned out to be the clear winner for my needs. In May 2009 when that series ended Zenfolio was a nice service that had some basic offerings, but it simply wasn’t in the same league as the services featured in my reviews.
Fast-forward to 2011 and my how times have changed! My big complaint about Zenfolio that ultimately had it dropped from the web hosting series was its lack of support for customization. liveBooks had a wonderful editSuite solution, folioSnap and SiteWelder offered great templates to get you going quick, and Smugmug was the king of advanced customization. However, at that time Zenfolio allowed little more than some basic color and layout changes, so it wasn’t a solution for “real” photographers.
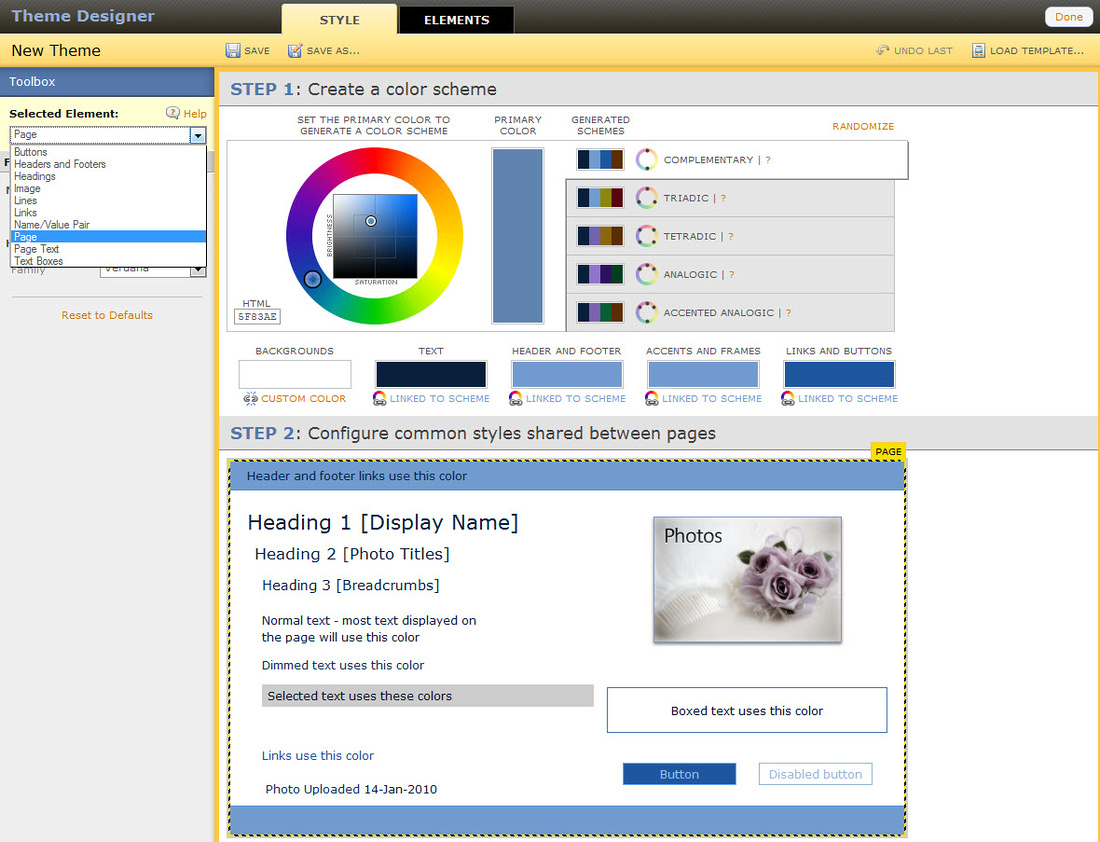
There’s so much goodness in this site after all of the customization I did, I decided to do a simple walkthrough video so you wouldn’t miss some of the goodies. It helps you to understand very quickly how powerful this product is, and web programmers will be amazed to see that it was done without writing a line of CSS or HTML!
Customization is the Name of the Game
Endless Customizations with No CSS or HTML Coding Required are Zenfolio’s Greatest Strength
I was blown away as to how much could be modified They literally have thought of everything!
I hold a patent in feature of Microsoft’s Internet Explorer and I have more patents pending. I know web technology and until now I’ve never found a visual system that has satisfied my desire to customize without having to resort to writing CSS or HTML code. I also have worked on user-interfaces for most of my last 20 years as a programmer, so I usually have a lot to complain about when I see a cutesy user-interface that tries to solve complex problems.
I’m please to report that Zenfolio has literally blown me away and left me with my jaw wide open. They have done something that I think every web hosting site in the industry should have done ages ago – they’ve encapsulated a lot of complex concepts into a simple to user interface that eliminates the need for custom code to get some wonder designs.
Layouts are okay, but customization here is what the hardcore web programmers will have on their wish list
All isn’t perfect as there are a variety of places where you are forced to choose a layout template as shown above for galleries or here for the home page. I found something I can use and am very happy overall, but the tinkerer in me wishes I could do more than the template offers. Given all of the customization available everywhere else I can’t help/hope but think that this feature will come one day.
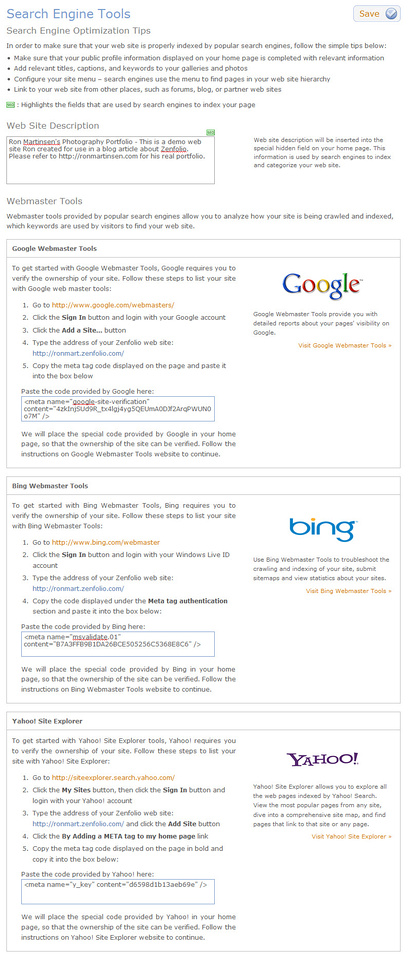
Search Engine Optimizations (SEO)
Built-in SEO Tools are very well done
Unless you are from another planet or a cave, you know that the key to success on the web is via search engine optimizations that help the major search engines find your site so your customers can too. There are some basic things you can do and Zenfolio does a nice job (much like SiteWelder did way back in 2008) of making it very easy to get started.
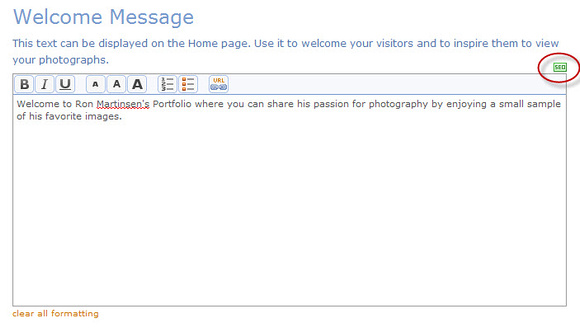
Text that will impact SEO is always highlighted with green SEO boxes This is a brilliant and very nice touch!
There’s also great support for helping your clients to find your site as well as your social network pages.
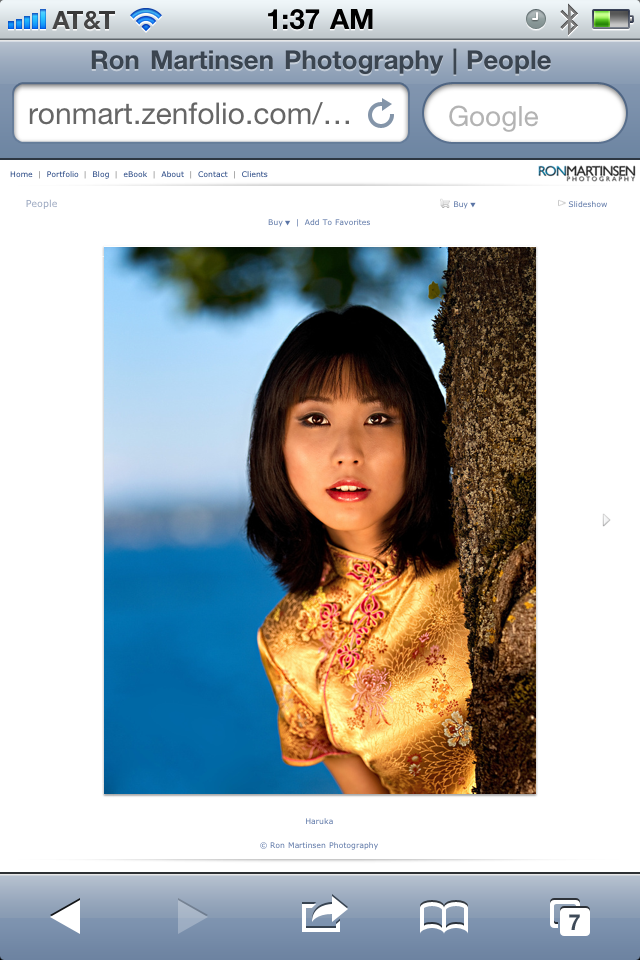
iPhone Support
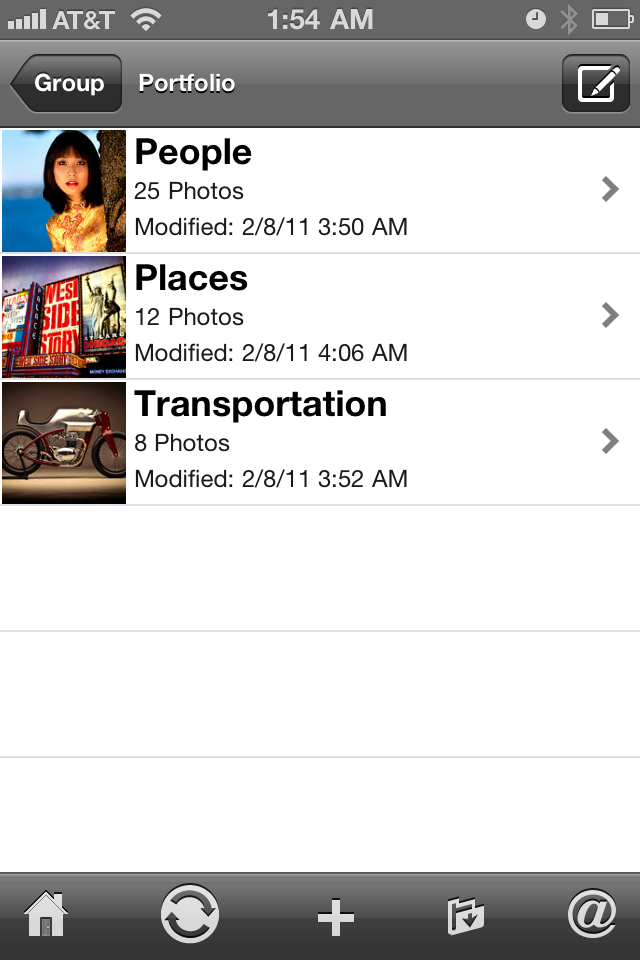
On my iPhone 4 there was no special “mobile” mode (which can be a blessing and a curse) for the normal views, but everything seemed to work well and the performance was good. As you can see from the screen shots above, it seemed to work quite nicely on the iPhone, but I did notice that the slideshows didn’t work very well. I presume the experience on the iPad would be as good as or better.
The iPhone App had a 4.5 star rating in the App Store and was smoking fast, so I loved it. It was pretty no frills, but it was just like viewing the photos in your camera roll. Here’s some screen shots:
The only gripe I had about the app was that I didn’t immediately see a way to let third parties view my site through this app without having an administrator user experience. Beyond that it was pretty cool because you can even take photos, upload pictures, set wallpaper and more.
Comparing Zenfolio to other Web Hosting Services for Photographers
folioSnap sample site is down (Last Reviewed May 2009) – Full Review – This service was decent and pure HTML which I liked, but of the four I reviewed for the series I felt it was the weakest of the bunch. Sadly the folioSnap team didn’t like hearing that too much so they shut the site down and bid me good riddance. From what I see today on their current sites it doesn’t appear that much has changed. It’s a decent service, but in a 1 to 5 stack ranking in this group it still would come in dead last. It’s also super expensive when you compare it to the value you get from Zenfolio.
BlueMelon sample site (Novemeber 2010) – Full Review – This site is like the Zenfolio of old where there are bits and pieces that suggest it will be great one day, but currently it is lagging behind the remainder of the sites in this section that I’ll discuss. There’s actually a pretty powerful shopping cart and Smugmug like customization support, so in the right hands it can be very powerful, but the non-programmer will struggle to get a look that they are happy with. However, of all the other sites mentioned in this article I think it is the only one that has the potential to be the next Zenfolio as the core pieces are in place.
SiteWelder sample site (May 2009) – Full Review – As far as template sites go, SiteWelder was a pretty solid performer so I liked it when I reviewed it. These days it has mostly the same back end look and feel with some improvements made for mobile and minor updates here and there. Overall I think my review is still accurate (bugs have been addressed though) so Zenfolio blows it away in terms of the control you have over the look and feel, and the ease of use of Zenfolio is as good as or better in every way.
liveBooks sample site (May 2009) – Full Review – It’s added support for vimeo video, it’s much less expensive now and apparently there’s much better template options available at a cheaper cost but behind the scenes it looks very similar to my review. I liked the editSuite tool which was quite good when it came out, but compared to Zenfolio it feels very ridged and lacks the flexibility that you get spoiled with in Zenfolio.
Smugmug sample site (My Current Portfolio Site) – Full Review – If you are a HTML/CSS guru there’s little you can’t do to this site, but once you go down that path the Easy Customizer feature becomes less useful. Easy Customizer is great, but it’s like comparing a Tonka toy to a Ferrari when discussing what Zenfolio has to offer now. Unless you are a web programmer, you won’t be able to get the level of customization out of smugmug that is possible with Zenfolio.
Conclusion
I was so excited doing this review that I ended up taking 56 screenshots all of which are posted at http://ronmart.zenfolio.com/screenshots for your enjoyment. I’d love to talk about every one of them in depth, but I simply don’t have the time. I do encourage you to scan through them (slideshow feature is great) to see some of the customizations I did (don’t forget to pause or use the arrow keys to go back if you missed something).
If you do your own order fulfillment (i.e., you are a print master or work directly with a print master) then honestly I can’t say that there is anything else out there that I have seen that can compete with Zenfolio. From great Coupon, PayPal, and custom product support to custom shipping delivery methods it really does have it all!
For those that will rely on the partner labs like MPix.com, you have a much better system for setting your own prices using the pricing formula feature, much needed custom packages, great control over product choices, and brilliant price list design. Really there is so much here for those who sell their work even if you use a third party service that Zenfolio really seems to be the working photographers best solution for ecommerce.
Smugmug, liveBooks and others still have the advantage of doing video which is very important today. Currently Zenfolio doesn’t support video (which actually surprises me quite a bit) so that is going to be a show stopper for some people. If you fall into that camp then Smugmug is back at the top of my recommendation list again. However, if you are just doing photography – especially if you intend to sell your work – Zenfolio is the way to go right now.
I’d like to commend Alex Peyzner, founder of Zenfolio, for hanging in there and giving the customers what they really wanted and need. I urge Zenfolio to get on the video bandwagon and hopefully add custom layout support as those are the only flaws I could find in the service right now. The premium service is a steal for what you get, and the Premium Business account is still a great bargain for the features offered – especially when you consider what you’d have to pay a web programmer to get this level of customization and ecommerce on most other services. Click here to learn more about pricing and be sure to visit my link below to save 10% (as of the time of this article).
Special Offer
Save 10% off when you follow the instructions in this article.
Disclosure
I’ve had a free account on Zenfolio since my original web hosting series in 2009. Alex Peyzner the founder was kind enough to keep it open the entire time so I could stay abreast of their improvements as well as do another comprehensive review now. I may get a commission if you sign up for an account with some of the services listed in this article (currently Smugmug and Zenfolio at the time this article was written).
NOTE: This site requires cookies and uses affiliate linking to sites that use cookies.
If you enjoyed this article, please support future articles like this by making a donation or saving money by using my discount coupon codes. Either way, your support is greatly appreciated!
This blog is intended for freelance writing and sharing of opinions and is not a representative of any of the companies whose links are provided on this site.
The opinions provided are of Ron Martinsen alone and do not reflect the view of any other entity
If you don’t have time to check out the blog everyday, but you want to be notified when something new shows up you can now do that with a simple registration. Just enter your email in the “Subscribe via email” box on the RIGHT hand side of this blog.
There’s also a Subscribe box for various feed readers.
NOTE: This site requires cookies and uses affiliate linking to sites that use cookies.
If you enjoyed this article, please support future articles like this by making a donation or saving money by using my discount coupon codes. Either way, your support is greatly appreciated!
This blog is intended for freelance writing and sharing of opinions and is not a representative of any of the companies whose links are provided on this site.
The opinions provided are of Ron Martinsen alone and do not reflect the view of any other entity
Using the discount coupon code page you can find the code for a $15 discount off Kelly Moore Camera Bags. I’m excited about these camera bags because they don’t look like camera bags! Instead, they look more like designer bags like you might find at Tumi or Michael Kors with high quality leather and great build quality.
A Sneak Peek Inside
Despite the great prices, these don’t feel like crappy bags you might get from name brand knock off stores online or overseas. They are very high quality leather (and I’m super picky about quality and leathers).
Shopping Cart Example – Code Location shown in Yellow NOTE: CODE WILL CHANGE!!!! Visit the discount coupon code page for the latest code
I can’t wait to do my full review of these very colorful and stylish camera bags, but you can start enjoying the discount now! Just enter in the code found on the discount coupon code page at http://www.kellymoorebag.com and save today!
NOTE: This site requires cookies and uses affiliate linking to sites that use cookies.
If you enjoyed this article, please support future articles like this by making a donation or saving money by using my discount coupon codes. Either way, your support is greatly appreciated!
This blog is intended for freelance writing and sharing of opinions and is not a representative of any of the companies whose links are provided on this site.
The opinions provided are of Ron Martinsen alone and do not reflect the view of any other entity


 & Hobo - Grassy Green (Right)")

