
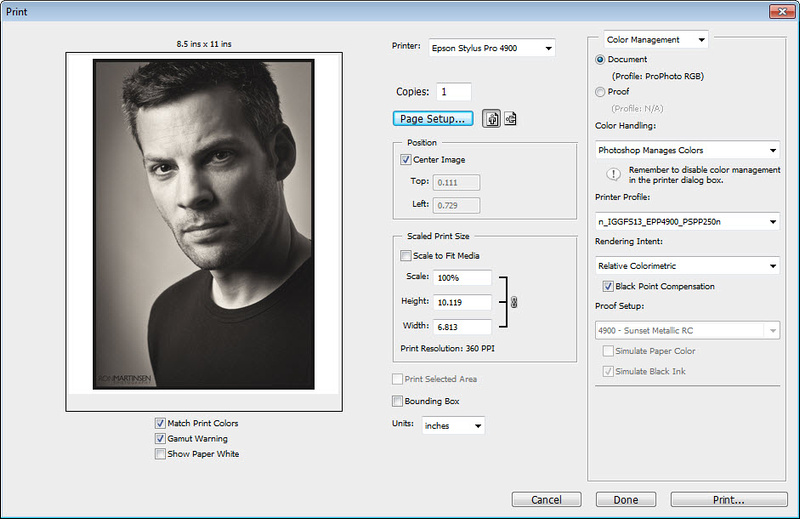
In my original review of the Epson Stylus® Pro 4900 I complained about a problem where the margins on my printed page were not even and despite choosing “center image” in Photoshop. Here’s a scan of a print that demonstrates this issue:

Scans from a V750 of Actual Prints from a 4900
Mouse over to see centered maximum printable area with even top and bottom margins
Mouse out to see standard printable area with the large bottom margin
The aspect ratio of the actual image file causes the wider side margins, and this is expected
Notice when you hover over the image you see a corrected version printed on the 4900, but when you mouse out you see the default behavior which is a large bottom margin. Based on my initial research the explanation I was given was that the cut sheet media margins are .12 inch (3mm) for the top, right, and left margins and .56 inch (15mm) for the bottom margin, and the workaround I found on several sites on the web said to create a custom paper size that .25 inch larger than the actual paper size and print as normal to trick the printer into doing the right thing.
This advice may have been a workaround in the past for older printers which were rumored to have a similar issue, but Epson has a built-in solution for this issue on the 4900. On the Mac it is just a paper size setting, but on Windows you need to use the Printable Area feature.
Mac versus Windows
I should point out that this issue is pretty easy to resolve on the Mac, but its quite a bit more complicated on Windows. I use the Windows 7 64-bit primarily for my printing so I hit a snag that you might hit as well.
Mac Solution
Here’s a video that shows how to solve this issue on a Mac:
For those who can’t view video, here’s some screen shots that show how to fix the problem:

Step 1 – Go to the Layout portion of the Print dialog

Choose just the paper name (US Letter here), or (Sheet – Maximum)
Notice how each option will show the margins
and you want options with even margins on all four sides

Step 3 – Verify your selection on the summary page

Photoshop’s preview can be misleading, but when you’ve done it right you should see big white margins on the top and bottom
On Windows things get more complicated
I don’t suspect many Mac users will face any issues with the margin, but Windows users have a completely different user-interface from Epson for printing and I found it to be a little bit more tricky than the Mac. As a result it is much easier to hit the problem where it seems there’s nothing you can do to get rid of the gap at the bottom of your page, but I’m happy to report that there is a solution.
Demystifying the Paper Settings Source List

In this dialog I want you to pay attention to the section that reads Paper Settings and notice the Source row. This is where you choose between Roll, Roll (Banner), Paper Cassette and Manual Feed.
If you change the source to Paper Cassette or Manual Feed you get a Printable Area … button.
If you change the source to Roll Paper or Roll Paper (Banner) then the button changes to Roll Paper Option... button. (Tip: you should always open this dialog and change Auto Cut to Normal Cut if you would like the printer to automatically cut the page after printing and use Auto Rotate to ensure that printer will rotate the document to economize the roll paper).
Mouse over the image above to see the Printable Area button change to “Roll Paper Option…” when the source changes to Roll Paper. Mouse out to see the button change to Printable Area… when the source is Manual Feed.
Using the Printable Area Feature
Now that you know how to find the Printable Area feature, let’s talk about how to use it and why it is so important.
Here’s the default settings for the Printable Area Button when you click on it:

This is what causes a 0.56 inch (15mm) bottom margin
What this means is that your printable area will have margins that are .12 inch (3mm) for the top, right, and left margins and .56 inch (15mm) for the bottom. Printing with these settings will cause the printing problem where the bottom margin has too much space. Photoshop won’t always make this issue obvious when showing its preview as you can see here:
Everything seems okay in Photoshop’s Print Dialog, but it is not
Print now and you’ll have a big bottom margin and your print won’t be centered
What you need to do is click the Centered check box as shown here:

This is one fix to the problem
Check the Centered Option
When you choose the centered option, your image will be centered to the page. If your image is like mine where its height was set where you don’t check Scale to Fit Media in Photoshop, then clipping will occur, so you’ll see this dialog when you try to print:

That is rarely a good thing when you see that dialog, so stop printing. Fortunately Photoshop seems to show the problem that will occur in its print preview as you can see here:
Photoshop is pretty good about showing clipping as you can see above
Notice how the black lines are clipped from the top and bottom of the image
But also noticed that at least the image is with correct margins shown
My Preferred Solution For Windows
The way I like to solve this problem is to use the Maximum Printable Area option with the Centered check box checked as shown here:

My Favorite Settings
Maximum and Centered
However, be aware that when you click OK you will get this warning:

Maximum Printable Area Warning
Use at your own risk
In my testing I haven’t had the smearing issue that this warns me about, but I’m quite certain this dialog is here for a good reason so your mileage may vary. If it turns out that you do have smearing issues then set your printable area to Standard and check centered, but in Photoshop make sure you check the “Scale to Fit Media” option (which most people do anyway).
If you continue then you’ll end up with a Print dialog in Photoshop that looks like this (print preview area is the same in CS4 & CS5):
When all is well you should see what seems like 0.12 inch (3mm) Margins
On the top and bottom of your print and your image is centered
Video for Windows Users
Believe me, I know this is terribly confusing so I’ve created a video for Windows users as well so they can see how to work around this problem:
WARNING: The Printable Area Settings reset when you switch sources…
When I review a printer I try very hard to read the manual and be very careful with my settings to make sure that everything is tested fairly and accurately. However, in this case I hit an unexpected snag that ended up being user error due to behavior in the dialog that I did not expect.
Based on my notes, screen shots, etc… it appears that my error was that I had a custom setting (the preset stuff at the top of the dialog) created which used manual feed as the source, yet when I was doing my testing I was switching that value to paper cassette which resets the values in the Printable Area dialog. My notes indicate that I was checking the Printable Area settings, but I was doing this BEFORE switching the source to paper cassette and therefore causing those values to reset. While this isn’t a very user friendly feature, and it would be handy to have this value displayed in the current settings window, I now understand my operator error and apologize to Epson for the error in my original review.
What about Position Center Image in Photoshop?
At first I thought this check box was useless because of the problem I was seeing, but once you have the 0.12 inch bottom margin then it works as expected, so generally speaking you’d want it checked.
Yes, this means that to have a centered image you need to check one seemingly hidden checkbox in the printer driver and another one in Photoshop. This is true both on the Mac and Windows.
What about Lightroom or Aperture?
I have not tested it, but the solution shown above should work for both Lightroom and Aperture since the workaround is contained in the operating system print driver and not in the application. If it doesn’t then I encourage you to use this information as the basis for a workaround, and if you do get one then create a document like this for others to learn from you.
Conclusion
Professional printing certainly requires a lot more attention to detail than printing out your email or plain text word document which is why I always capture screen shots and keep notes for EVERY print I make. It’s also why I am careful to take my time and check everything before hitting print to make sure I get the best results possible.
There are a lot of settings that need to be checked (and in this case re-checked) to ensure an accurate print, so sometimes mistakes happen. Keeping a checklist and working slowly and carefully is your best bet to uncovering why something went wrong and ensuring that your checklist is updated to avoid the same problem again in the future. Please visit my printing series page for more information on printing.
I hope this document helps to solve what can be a very frustrating problem, and that you’ll share this link with others. I apologize for the inaccuracy of my review on this subject initially, but as you can see in this huge document that on my Windows system it is kind of easy to make a mistake.
Disclaimer
This article contains links which may result in a commission if you make a purchase.
11 comments:
Okay, this helps a lot.
Thanks for the steps - however as a user I had to stumble on the workaround as well - not well-designed at all in my opinion. I still can not fathom why a true borderless print is not possible on sheet paper? Why we have to come up with ways to trick the printer driver.
Thanks much for this. I'm facing one challenge on my Mac.
When I choose 11x17 Sheet Maximum as my paper size in Page Setup for my 4880, the print driver prevents me for selecting all of the high quality papers. I can choose plain paper and tracing paper. But, all of the higher quality papers under Matte or Fine Art are greyed out.
Why do they work for you and not for me? Do you think it's a problem with the 4880?
BTW, this is new. We used to apply a custom page size with 0" margins and that worked perfectly to center items on a page. Now, the driver or the printer ignores it and shifts the design up ~1/4 inch.
I'm currently using version 6.73 of the 4900 driver and I don't see the behavior you describe with my 4900 so sadly I'm unable to help you out on this one.
I would suggest that you contact Epson support as it sounds like a bug to me.
I have a new Epson Stylus Photo R3000 and my prints are not centered with margins at the left and top of .12 inch. There is no option in the printer preferences settings of the R3000 to enable centered printing, no printable area setting like you suggested for the model you are discussing in this blog. The printer didn't even have output paper settings of 11 x 14, 12 x 18, 13 x 19, which I had to create. Any suggestions on how to make my prints centered would be helpful as 3 phone calls to Epson have gotten me nowwhere. They don't even know anything about it. Do I try to make print settings .25 bigger, i.e., 8.25 x 10.25, or 12.25 x 18.25? I am printing onto Letter size and 13 x 19 photo paper.
Thank you for your time.
Hi Ron,
I have an Epson 9900 that i'm having this same problem with when I use cut sheets. Do you have any advice??
Thanks in advance!
I'll chime in as well concerning the 9900's problems with margins AND the head-scratching issue of images not being centered (not in one dimension mind you but all four!). One of Epson's tech support even suggested I try saving my print job as a PDF and printing (haven't tried that yet).
Has anyone found that Qimage or ImagePrint solve margin and centering issues? I need to do double-sided printing on this machine and at the moment it's looking impossible to get alignment on both sides.
ck
Chris,
ImagePrint does the best job I've seen thus far of not having this issue because it bypasses the Epson driver.
Ron
One thing to keep in mind - (I know this comment comes late to the party) but ImagePrint V9.02.2 doesn't seem to acknowledge the 3mm bottom margin, which this article discusses. IP still imposes the 14mm bottom margin of the 4880, and to center margins, you lose another 14mm off the top as well. Yes everything is happily centered for double sided printing, but you are losing 28mm, which on an A4 is a lot of real estate.
Com Des PhotoTech,
Good to know - thanks!
Ron
Post a Comment