Showing posts with label SureColor. Show all posts

Friday, April 24, 2020

EPSON P700 & P900–No More Black Ink Switching!!!!


EPSON SureColor P900

While we all endure being locked up at home for the apocalypse, it seems hell has frozen over as Epson is FINALLY catching up with Canon to release two new SureColor printers that don’t require black ink switching!!!!

Yes, you read that right – the new SureColor P700 and P900 printers feature a new 10-channel MicroPiezo AMC printhead with dedicated channels for both Photo and Matte Black ink types so no ink switching necessary – hallelujah! This was something previously only the the 24-inch P7570 and 44-inch P9570 enjoyed, so I’m glad it has made its way down to these stalwarts.


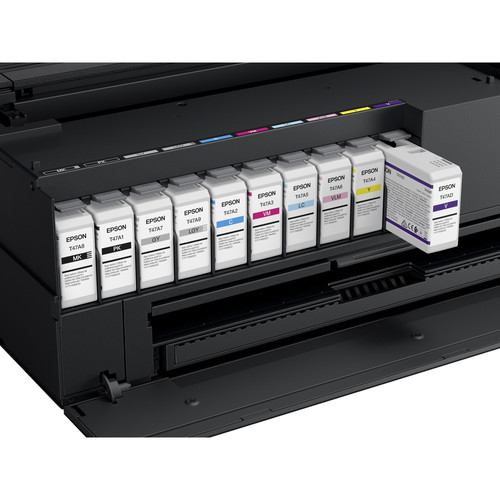
Introducing the new Violet ink too

Both printers feature new UltraChrome PRO10 pigment ink with Violet to deliver an extremely wide color gamut, support Advanced Black and White Mode, and offer a new “Carbon Black” printing mode to dramatically increase Dmax for best-in-class black density on glossy papers. I can’t wait to try out this new Carbon Black feature!!!

For those familiar with how the P5000 offered Violet, this is better because it’s not an either or thing – you actually get both a dedicated line for matte black and violet so its the best of all worlds! I’ve heard great things about the violet ink, but I made the choice with my P5000 to go with the Standard Edition (Light Light Black) instead of the Commercial Edition (Violet) so this is wonderful news!

I’ve also noticed that LLK seems to be replaced with a renamed Gray so I suspect that is part of the formula that makes the new Carbon Black feature possible. The P900 cartridges shown above appear to be the same design and capacity, but this is a new ink set so I’d plan on having to sell your existing inks with your outgoing printer.


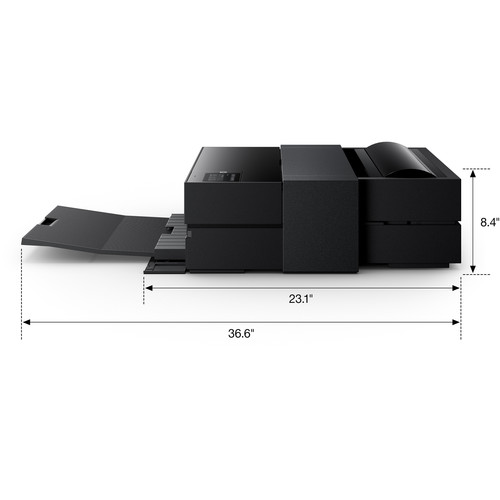
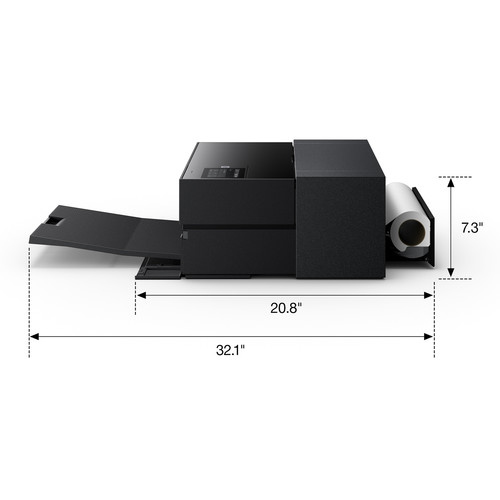
Compact P900 design — 30 percent smaller than the previous generation

P700 vs P900 (and their predecessors)


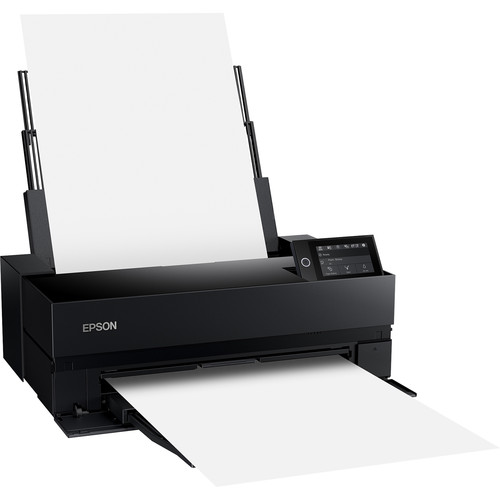
EPSON SureColor P700 with a new design for its built-in roll support

From that I know so far, the P700 has roll support in the same basic way that the P600 did but the P900 is just like P800 in that it requires a more substantial roll media adapter – however, I have no info yet if the P800 adapter will work on the P900 (let’s hope).

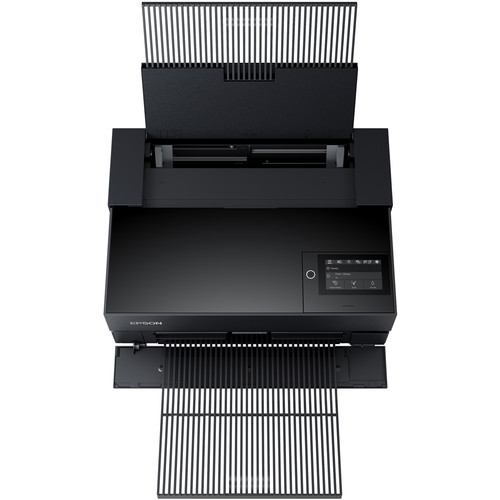
Both models appear to have a new waffle pattern for the paper trays which should result in both a weight savings and limit the surface area for dust build up (P700 shown)

Press Release

Epson Reinforces Commitment to Changing Needs of
Creative Professionals with New Photography Desktop Printers

13-inch SureColor P700 and 17-inch SureColor P900 Incorporate Breakthrough Advancements from Large Format Printers to Produce the Highest Quality Prints for the Desktop

LONG BEACH, Calif. – April 21, 2020 – Epson, an industry leader in the photography market, today announced a breakthrough in professional printing technology with the introduction of the 13-inch SureColor® P700 and 17-inch SureColor P900 desktop photo printers. Replacing the award-winning SureColor P600 and SureColor P800, these new printers draw from over 20 years of experience to incorporate the same large format printing technology used by the world’s leading photographers into a sleek, compact design, allowing for the creation of exhibition quality prints from the convenience of the desktop.

“Fifteen years ago, Epson stunned the industry with the Stylus Pro 3800 that provided unprecedented creative control for photographers, allowing them to print up to 17-inches wide without a darkroom,” said Reed Hecht, senior product manager, Professional Imaging, Epson America. “With the introduction of the SureColor P700 and SureColor P900, a new generation of photographers will experience another breakthrough in printing technology – truly redefining not only the photographic print but also the printing workflow.”

The new SureColor P700 and SureColor P900 are the smallest professional 13 and 17-inch printers in their class, with a 30 percent size reduction from Epson’s previous generation printers, and are designed for use in photography, graphic design, fine art, and illustration. The printers tout a new 10-channel MicroPiezo® AMCTM printhead to increase productivity, with dedicated channels for both Photo and Matte Black ink types – no ink switching necessary.

Featuring new UltraChrome® PRO10 pigment ink* with Violet, the SureColor P700 and

SureColor P900 deliver an extremely wide color gamut and support Advanced Black and White Mode to create unparalleled, professional black and white photographs.

According to Henry Wilhelm, director of research at Wilhelm Imaging Research, the world’s leading independent print permanence testing laboratory, Epson’s new printers and inks are currently undergoing comprehensive ten-factor testing with a range of papers and canvas, with both color prints and B&W prints made using Epson’s Advanced Black and White Mode. “Preliminary data for the Epson 10-color UltraChrome PRO10 pigment inks in the new SureColor P700 and SureColor P900 create stunning museum quality prints with WIR Display Permanence ratings that we believe will equal the ratings achieved by the current UltraChrome PRO12 inks of up to 200 years for color prints and up to 400 years for B&W prints.1 Prints framed with UV-absorbing acrylic – and those displayed under LED illumination – will achieve significantly higher ratings.”

For the first time, users can easily print directly from iOS® devices2 to the SureColor P700 and SureColor P900 in a color managed workflow. Using an updated mobile version of Epson Print Layout software, full support and color management tools are provided for iPhone and iPad printing. These printers also feature a new print driver mode – Carbon Black – which dramatically increases Dmax by up to 11 percent, for best-in-class black density and reduced bronzing and gloss differential on glossy papers.

The SureColor P700 can accommodate both roll and cut sheet media, and the SureColor P900 accommodates cut sheet media and an optional fully enclosed roll media adapter supports both 2-inch and 3-inch rolls and roll printing up to 10 feet long. Additional features include a 4.3-inch customizable touchscreen, upgraded wireless connectivity including 5GHz and an interior LED light to watch the progress of a print.

More About the SureColor P700 and SureColor P900 Desktop Photo Printers

Designed to help photographers reproduce every detail of their creative vision, the new SureColor P700 and SureColor P900 incorporate a range of features to produce exhibition quality prints from the convenience of a desktop:

  • Outstanding image quality and color — All-new UltraChrome PRO10 Ink with Violet produces a wide color gamut for vibrant and rich colors

  • No Photo and Matte Black ink switching — Dedicated channels for both black ink types – no switching needed

  • New 10-channel MicroPiezo AMC printhead — Consistently delivers prints with outstanding speed, consistency and accuracy; supports variable size droplet technology as small as 1.5-picoliters for remarkable output quality

  • Easy printing from smart devices — Print color-managed files directly from an iOS device2 with an easy-to-use interface

  • New Carbon Black Driver technology — All-new Carbon Black Driver mode dramatically increases Dmax for best-in-class black density on glossy papers

  • Professional media handling — Accommodates rolls3 and sheet media up to 1.5 mm thick of Epson Professional, Signature Worthy® and Legacy papers as well as third-party media

  • Easy to use — Features 4.3-inch customizable touchscreen, wireless connectivity and interior LED light

  • Compact design — 30 percent smaller than the previous generation

  • Industry-leading print permanence — UltraChrome PRO10 ink is expected to create prints that last up to 200 years for color and 400 years for black-and-white1

Pricing, Support and Availability

The SureColor P700 ($799 MSRP) and SureColor P900 ($1,295 MSRP) will be available through Epson Authorized Resellers starting in May. The printers offer a standard Epson Preferred Limited Warranty, a one-year program that includes toll-free advanced telephone access Monday through Friday and usually next business-day on-site service in the unlikely event of any hardware failure. For additional information, visit www.proimaging.epson.com.

About Epson

Epson is a global technology leader dedicated to becoming indispensable to society by connecting people, things and information with its original efficient, compact and precision technologies. The company is focused on driving innovations and exceeding customer expectations in inkjet, visual communications, wearables and robotics, and is underpinned by original microdevices. Epson is proud of its contributions to realizing a sustainable society and its ongoing efforts to realizing the United Nations’ Sustainable Development Goals.

Led by the Japan-based Seiko Epson Corporation, the worldwide Epson Group generates annual sales of more than U.S. $10 billion.

Epson America, Inc., based in Long Beach, Calif., is Epson’s regional headquarters for the U.S., Canada, and Latin America. To learn more about Epson, please visit: epson.com. You may also connect with Epson America on Facebook (facebook.com/Epson), Twitter (twitter.com/EpsonAmerica), YouTube (youtube.com/EpsonAmerica), and Instagram (instagram.com/EpsonAmerica).

# # #

* This product uses only genuine Epson-brand cartridges. Other brands of ink cartridges and ink supplies are not compatible and, even if described as compatible, may not function properly or at all.

1 Print Permanence in testing. Ink lightfastness rating based on accelerated testing of prints on specialty media, displayed indoors, under glass. Actual print stability will vary according to media, printed image, display conditions, light intensity, humidity and atmospheric conditions. Epson does not guarantee longevity of prints. For maximum print life, display all prints under glass or lamination or properly store them. Visit www.wilhelm- research.com for the latest information.

2 Most features require an Internet connection to the printer, as well as an Internet- and/or email-enabled device. For a list of Epson Connect enabled printers and compatible devices and apps, visit www.epson.com/connect

3 Roll media handling is standard on SureColor P700; optional on SureColor P900

EPSON, MicroPiezo, Signature Worthy, SureColor and UltraChrome are registered trademarks, EPSON Exceed Your Vision is a registered logomark Seiko Epson Corporation. AMC is a trademark of Epson America, Inc. Epson Preferred is a registered servicemark of Epson America, Inc. iPad and iPhone are trademarks of Apple Inc., registered in the U.S. and other countries. All other product and brand names are trademarks and/or registered trademarks of their respective companies. Epson disclaims any and all rights in these marks. Copyright 2020 Epson America, Inc.

Conclusion

I’m very excited about the addition of violet and the end of black ink switching. Hopefully I’ll get a chance to review one as my P800 and P5000 have been great additions to my studio. These improvements are definitely worth the upgrade. My P800 has been getting a workout in my office lately during the lockdown and P600 impressed me way more than I ever expected, so It will be fun to see how the new models perform.

Where to Buy?

CLICK HERE to learn more and get on the waiting list to buy once they become available in June 2020.

Other articles you may enjoy

If you enjoyed this article, you may also enjoy these:

Enjoy these and more on the Reviews tab as well as Ron's Recommendations.

Disclosure

If you make a purchase using links found in this article, I may make a commission. It doesn’t cost you a penny more, but it does help to support future articles like this.

NOTE: This site requires cookies and uses affiliate linking to sites that use cookies.

If you enjoyed this article, please support future articles like this by making a donation or saving money by using my discount coupon codes. Either way, your support is greatly appreciated!

This blog is intended for freelance writing and sharing of opinions and is not a representative of any of the companies whose links are provided on this site.

The opinions provided are of Ron Martinsen alone and do not reflect the view of any other entity

Tuesday, October 9, 2018

REVIEW: Epson SureColor P5000

Epson SureColor P5000Epson SureColor P5000 Standard Edition 17" Wide-Format Inkjet Printer

It's been two years since I first saw the P5000 in New York and since January 2017 when I write my first thoughts on this printer, but Epson USA and I finally got in sync to get one into my studio. I have had a chance put it through its paces with some of the best Epson Professional Imaging Media and I must say that I've been quite happy with it.

For long-time readers of my blog, you may recall, I reviewed the Stylus Pro 4900 in early 2011. I owned it for many years and made many great prints from it until it eventually died from a clogged print head. While time will only tell if this printer meets the same fate, it is claimed that improvements in the inks and a startup routine that clears the nozzles should hopefully reduce the likelihood of that happening again. If it does happen, I'll be sure to report it, but in the meantime I'm sure glad to have this work horse printer back in my studio again. Read on to learn why.

New UltraChrome HDX ink set

I found the UK UltraChrome HDX Ink Set Page to be a little more enjoyable to read than the official press release to learn about what's new ink that comes with this printer. Specifically, it illustrates how the new Photo Black ink has a pigment concentration that is 1.5 times higher, and the new Matte Black of the UltraChrome HDX ink technology has a raised pigment density.Bronzing has also been reduced in Cyan and Magenta.

Using the light light black (LLK) option means users can achieve 98% of Pantone. While choosing violet ink means the gamut increases to 99%, that's mostly important for graphics designers doing content that must match Pantone colors. For photography, you'll still want to stick with the LLK option for the best results with black and white photos as well as shadow details in color photographs.

For those with a Epson P800 that uses Epson UltraChrome® HD ink, the main difference is that the orange, green and yellows are slightly better. I don't think the average user will see the difference, but now that I have both I'd be inclined to use the P5000 over the P800 for prints that I deliver to my most demanding clients. 

Features & Setup

If you read my 4900 review, you pretty much can apply almost everything in it to this review. Nothing has really changed feature-wise other than a different color case and a new and improved ink set.

Sadly my areas of improvements back then remain and I've added a few more at the end of this article.

After downloading the software, setup was easy via USB or Network cable, but sadly wireless support still hasn't arrived.

You can still load the tray up with your favorite papers up to 17x22 as well as a roll of 17" wide paper, and print from either automatically.

And yes, sadly you must still wait for switching between photo black and matte inks so plan you print jobs carefully.

Photoshop CC 2018 (19.1.6)

Printing in Photoshop CC 2018 with the Epson SC-P5000

Printing from Photoshop is a challenge with all of the settings you need to make sure you set properly. Specifically, you must make sure that you set Color Handling in Photoshop's Print Settings to Photoshop Manages Colors (shown above) and your click Print Settings... to set the Media Settings Mode to Custom | Off (No Color Adjustment). If you fail to do this you'll get double color management which means your colors will be very off from what you see on the screen.

You also need to ensure that the Media Type in the driver matches the paper you are using as should the Printer Profile in Photoshop, and this can be rather tricky to figure out for the novice.

Printing in Windows with the Epson SC-P5000
This example shows printing to 13x19" Epson Premium Luster Photo (260) roll paper (not to be confused with Ultra Premium Photo Paper Luster). You must also click the Roll Paper Option... button to turn on Auto Cut each time you switch the paper source which is rather frustrating. Finally, for best results you'll want to set print quality to Max Quality.

Advanced Black & White

Epson is famous for great Black & White prints, so I've written a lot about its Advanced Black & White mode (aka ABW). If you aren't familiar with how to use it, the key thing to do is set the color media setting item to Advanced B&W Photo then click the Advanced Button for the custom mode color color controls as shown here:

2018-09-30_21-57-11

After clicking the Advanced button from Color Controls you can dial in the Color Toning (which I usually start with Neutral or Greg Gorman's Favorite - Warm)  then set Tone to Dark. I wrote about this topic in my Printing Series and interviews with Greg Gorman and Vincent Versace, so you can learn more about this dialog in those articles. Here's a quick look at my settings though:

2018-09-30_21-56-41

The important part to remember in Photoshop is to say "Printer Manages Colors" for Color Handling:

2018-09-30_21-57-27

Sounds too complicated? Well that's where the Epson Print Layout app below comes in - and it works exactly the same way on both Windows and Mac. With that said, my ABW article does explain how to use this feature on a Mac if you are interested.

Epson Print Layout 1.3.5

Printing Color in Windows Epson Print Layout with the Epson SC-P5000

Fortunately Epson makes printing much easier these days with Epson Print Layout whereby you simply choose the desired values in the Printer Settings section, make your desired adjustments (if any) in Layout settings and typically you can accept the defaults in Color Settings. Choose your copies and hit print, and everything just works. While you don't get the advantage of soft proofing and gamut warnings like you get in Photoshop, for most users this is the safe and easy way to get accurate color managed prints so I recommend using this software (on Mac and PC) unless you have a strong reason not to.

Sadly, despite choosing the Center "Centering" option, the image still printed on the left side of the page when using roll paper. What's more, there's no "Save Roll Paper" option like you see in the driver so more paper was wasted on the top and bottom.

See this article to learn how to workaround this issue which also occurred on the 4900, but sadly the workaround only applies to sheet paper.

Advanced Black & White Mode

Printing Advanced Black & White on Windows Epson Print Layout with the Epson SC-P5000

I think this is one of the big advantages of Epson Print Layout because Advanced Black & White mode is a little tricky to use, but this app makes it as simple as selecting "Advanced B&W Photo" from Type in the Color Settings section. From there just choose your desired color toning and tone and you are done - so easy!

Getting the Best Results

Yes, Epson ink is expensive but the ink its the secret sauce that makes the prints look so fantastic. It's also a required element for the ICC profiles that are fine tuned to get the best results out of your ink and paper combo. As a result, your best print results will always come from the use of genuine Epson inks made by Epson ONLY for the P5000 and ICC profiles generated on a P5000 (NOT a 4900) for the paper you wish to use. A failure to do this will result in poor quality prints, so my blanket advice is - don't print unless you are using the correct profile and genuine Epson ink!

Since getting the best ICC profiles from third parties can be difficult, the easiest and fastest way to get the highest quality prints is to use use genuine Epson paper. Your printer comes with perfect ICC profiles made specifically for Epson's papers found at https://epson.com/professional-imaging-media.

Click here to find deals on Epson papers at B&H or click here to find deals on Amazon.

I'm a big fan of sample packs to get a feel for what paper works best for me, so here are links to sample packs of my favorite Epson papers:

Also see the end of this article or my printing series for instructions and videos on how to use these papers for your Mac or PC.

Areas of Improvement for the Future

While the ink set has been improved, and the new black case looks great, there doesn't seem to be much else that has improved over its predecessor in 7 years since the release of the 4900. Specifically, I am disappointed the following wish list features didn't get added to the P5000:

  1. Support for wireless printing - including IPP printing (e.g., Mopria, AirPrint, etc...)
  2. 4x6 photo support - this pretty much forces you to get a P800 if you plan on giving 4x6 keep sake photos to friends or clients
  3. Dedicated lines for Photo Black & Matte Black Ink - Switching is a hassle and wastes a ton of ink. Canon has overcome this problem ages ago, so surely in 7 years Epson could have solved this problem. The lack of this feature is actually quite offensive.
  4. Still no "Center to Printable Area" feature for Roll Prints - really?!!! Again, this could have been a simple driver improvement or even a feature in Epson Print Layout, but no.
  5. Performance - Is it any faster? According to my contacts at Epson America, they say "No, it performs about like the 4900. 8" x 10" prints from 0:59 to 2:26  (normal is 1:28) and 11" x 14" prints from 1:42 to 4:04 (normal is 2:31)"
  6. No Driver Improvements - No meaningful driver changes from the 4900 means its far behind in terms of features and user friendliness when compared to the Canon PRO-1000 & PRO-2000 that I also use in my studio.

Click here to see my Q&A with Epson America when this printer was being launched for more details about what's changed.

Conclusion

It's been a while since I used my 4900 and sadly it died due to a clogged print head, so I was reluctant to decide if I should even bother reviewing this printer. Now that I have it, I forgot how fast and enjoyable this printer is to use. In fact, I looked back and saw how a majority of my printing was done on 4900 when it was in service. Since P5000 arrived I've found myself wanting to use it for its blazing speed and flexibility of doing roll and sheet paper without the hassle of any manual switching.

With that said, Canon's lack of roll support for 17" means this is really the only game in town for high quality 17" roll printing. While the P800 can do roll printing in a pinch, it's lack of a built-in cutter makes it less practical for those who enjoy doing banner printing.

In the end, I consider this a great printer for those doing large workloads on a weekly basis - not the occasional print. Professional event, wedding, school portrait, etc... photographers who do high volume printing on a weekly basis are going to appreciate its blazing speed and large capacity tray - even if you never print on roll paper. If this is you, then I highly recommend this printer.

Users making the occasional print are much better served with the P800 for its ease of use for everyday printing, and a head that is less likely to clog. If you are serious about roll printing then you'll want to move up to the 24" or larger model as 17" is pretty small in the world of "large format" printing - ESPECIALLY when doing canvas wraps.

Where to Buy?

CLICK HERE to learn more or buy today from B&H and consider one of these covers while you are at it to keep the dust away.

Other articles you may enjoy

If you enjoyed this article, you may also enjoy these:

For casual users, I also recommend you consider these reviews:

Enjoy these and more on the Reviews tab as well as Ron's Recommendations.

Disclosure

If you make a purchase using links found in this article, I may make a commission. It doesn’t cost you a penny more, but it does help to support future articles like this.

NOTE: This site requires cookies and uses affiliate linking to sites that use cookies.

If you enjoyed this article, please support future articles like this by making a donation or saving money by using my discount coupon codes. Either way, your support is greatly appreciated!

This blog is intended for freelance writing and sharing of opinions and is not a representative of any of the companies whose links are provided on this site.

The opinions provided are of Ron Martinsen alone and do not reflect the view of any other entity

Tuesday, September 18, 2018

REVIEW: Epson PictureMate PM-400 - A Great Whole Family Photo Printer


Epson PictureMate 400

Despite my history of printing my own images and even writing a book on the subject as part of my Printing Series, my beautiful wife has no desire to geek out on printing like me. As a result, she's been frustrated with the bottleneck (me) in getting prints made from her iPhone pics or from the photos I share with her from my DSLR and mirrorless cameras. To address this frustration, I decided to test the wildly popular Epson PictureMate PM-400 wireless compact color photo printer to see if it would meet her needs.

Setup

The nice thing about this printer is you don't need a computer, so you just turn it on - plug in the 4 color ink cartridge and you are in business. You can then quickly print to Epson 4x6 or 5x7 photo paper directly from your cell phone or SD card.

The wireless networking setup was easy and my Windows 10 PC had no problems discovering the printer. I also connected it via USB and saw no noticeable performance difference so I decided to take advantage of wireless printing so I could put the printer anywhere in the house where we were sitting when we wanted to crank out some pics while talking or watching TV.

AirPrint vs Windows

AirPrint is known for being easy and reliable, but it's also known for being very simplistic. With this in mind, I decided to print some photos off of my iPhone X and everything went pretty smooth. For large photos not taken on the phone it did seem to take nearly an extra 30 seconds to print a photo via AirPrint vs Windows, but if you aren't hovering over it like someone trying to watch water boil, the difference was tolerable.

Test Images & Performance

For comparison, I also pitted the inexpensive PM-400 against the excellent Epson SureColor P800 which costs nearly $1000 more just to see how wide the quality and performance gap was between the two - and the results surprised me!

Into the Light by Ron Martinsen on 500px.com

For my first image, I thought I'd start with an excellent photo with a wide range of tones to see what was the best this printer could do. The PM-400, which had been turned off for a couple weeks took  2 minutes 17 seconds for first print with 46.5 seconds for head prep before paper feed from cold start. This means roughly a minute and 30 seconds for this image to print for a roughly 36mb print job which was NOT specially prepared for this printer - I just threw an original JPEG at it.


PM-400 From Photoshop with Printer Manages Colors & Default Settings

The quality was average viewer good, but obviously with 4 colors you aren't going to get a match to the original. It actually looks quite a bit better in real life than the scan of the print here, so don't let the quality here scare you - in real life it seems "good enough" for most users and I think better than what you get from discount photo printing labs like Costco, Walgreens, Target, etc...

For my photography geek friends, here's the Photoshop and printer driver settings I used:

Epson PM-400 Photoshop Print Settings

Epson PM-400 Windows Print Driver Settings

Surprisingly the P800 took 2 minutes and 3 seconds with 11 seconds before the paper feed on a cold start. This means it took one minute and 52 seconds, but the tonal range was significantly better in the highlight areas on the cheeks.


Epson SureColor P800 from Photoshop with Printer Manages Color using the sRGB preset

Despite being printed on the same Epson 4 Stars Premium Glossy paper and not using any ICC profiles or complex print features, the P800 was pretty darn close the original photo. Had I used an ICC profile I could have got an identical match.

Again, for my printing geek friends here's the settings I used to get this print:

image

Epson Windows P800 V3 Driver Settings

Black & White Test

To the novice who has never done fine art printing, one would think that Black & White printing would be very easy and there's no difference between the two. However, the reality is that B&W printing is actually rather complicated and hard to get right simply because printers aren't using just black ink to print out a "black and white" image (which is really a grayscale image).

Here's the source image I used:

Sigma85ArtModel-531-Edit

When the PM-400 was warm it only took 10 seconds before the paper had been pulled into position and it started printing resulting in a total print time of 1 minute 37 seconds for a 57.4 mb job over a wireless network connection.  The P800 ABW did it in 2 minutes 2 seconds with 11 seconds which was the real kicker that I'd see consistently in my testing - the PM-400 was actually faster at cranking out a 4x6 photo!


Epson PM-400 Grayscale

No, your eyes aren't deceiving you - the black and white images often taken on a blue/purple tone depending on the ambient light that you view them under. It doesn't look quite as extreme as what you get from a scan in real life, but it's off - way off - from reality. Again, my wife thought it was fine but this one that was tough for me to accept.

I used the same Photoshop settings as above but here's the settings I used for the driver:

Epson PM-400 Windows Print Driver Settings

This time there was no contest in terms of tonal fidelity - the extra $1000 made a huge difference as you'd expect from a high end photo printer:


Epson P800 using Epson's Advanced Black & White (ABW) Mode

Epson P800 Windows V3 Driver using Advanced B&W Photo mode

For more information about Epson Advanced B&W Photo mode see my ABW article.

Casual Print Test

Here's a 100% unedited photo I took with my iPhone X:

IMG_3543

I printed directly from from my phone using AirPrint to the PM-400 and in 1 minute 30 seconds I had a nice borderless print.

Using my P800 via AirPrint on my phone was 1 minute 56 seconds which was surprising.

Windows Print Pictures Wizard

On Windows with Photoshop even when I told the driver to do borderless with max expansion, the aspect ratio of the photo caused me to get white bars on both the left and right side. To fix this problem I simply tried right-clicking on the photo in Explorer and choosing Print to use the Windows Print Pictures Wizard which resulted me in getting the same borderless results as AirPrint.  This is primarily due to the aspect ratio of iPhone prints vs digital camera prints which means that a true borderless print is going to crop more off the top and bottom of the print than one with white bars on the side. Keep this in mind when choosing borderless!

Quality-wise I saw the same differences in skin tones especially in the hot spots of the photos and in the cheeks as I saw with the model shot above, but it was less noticeable in a natural light photo.

Conclusion

In the end my wife loved the PM-400 so it was EXACTLY what she wanted and it works for her. I appreciated it for its ease of use and speed when the kids need a quick print of a photo that's on my iPhone for a school project where quality doesn't matter. It was also great for sending pics to the grandparents who don't really give a hoot about the quality as long as the pics are of their precious grandchildren!

For me, I obviously won't be giving up my P800 for the photos I care about. With that said, you don't need to spend a fortune as my P600 is almost as good for substantially less than the P800.

For the price, I loved the speed and ease of use I got out of the PM-400 so I can easily give it a strong recommendation for everyday non-color critical use. It's fast and certainly worth the great reviews it gets on Amazon for printer that cost less than a set of ink for my P800!

Where to Buy?

CLICK HERE to learn more or buy a Epson PictureMate PM-400 today.

Other articles you may enjoy

If you enjoyed this article, you may also enjoy my printing series. Also be sure to check out my Reviews tab as well as Ron's Recommendations.

Disclosure

If you make a purchase using links found in this article, I may make a commission. It doesn’t cost you a penny more, but it does help to support future articles like this.

NOTE: This site requires cookies and uses affiliate linking to sites that use cookies.

If you enjoyed this article, please support future articles like this by making a donation or saving money by using my discount coupon codes. Either way, your support is greatly appreciated!

This blog is intended for freelance writing and sharing of opinions and is not a representative of any of the companies whose links are provided on this site.

The opinions provided are of Ron Martinsen alone and do not reflect the view of any other entity

Thursday, August 24, 2017

Hahnemühle Matt Fine Art Photo Rag, German Etching and William Turner Review & Usage Tutorial for Mac & Windows

Hahnemühle FineArt Inkjet Paper - Matte FineArt

German paper maker Hahnemühle is well-known for making some of the best papers in the business since 1584 with the highest paper quality parameters for its Digital FineArt papers.

In this article, I share my thoughts on the three excellent Hahnemühle Matt Fine Art papers of which two are textured:

and one is smooth:

I also give some basic pointers on how to use these papers on Mac and Windows computers using my Epson SureColor P800 and Canon PRO-2000 printers.


ICC Profile / Color Gamut Analysis

In the following animation, what you see is that all three of these Matt Fine Art papers have roughly the same size color gamut using the ICC profiles from the Hahnemühle Download Center. The animation starts off with William Turner then Photo Rag and finally German Etching:

Hahnemühle William Turner, Photo Rag and German Etching ICC Gamut Size

While there are some subtle differences, in practice all three papers performed equally well. I did find that it is possible to get a lot more out of these papers with a finely tuned custom ICC profile so some users may look to building their own or leveraging ColorByte ImagePrint for the best results.

Despite the fact that matte papers traditionally have a smaller color gamut and a lower d-max (maximum density of blacks in a printed image) than glossy fine art papers, I found all three of these papers to be extremely good and delightful in use. In fact, for the prints I put on display I frequently found that viewers didn't realize it was a matte paper until I told them or they touched these papers.

In the hand

While some people swear off matte papers like the plague, I personally love them for one significant reason and that's how they feel in your hand. I'm a very tactile person so I love wood, leather, linen, cotton, etc... because of their textures and how it feels in my hands.

If you are this type of person then you are in for a sensory delight with these papers. Here's my thoughts on each:

  • Photo Rag - this is the paper you want if you want a hearty substantial feel, yet a smooth surface that draws the light in a positive way for a brighter natural white tone. I found it to have a light surface texture that when viewed at a harsh angle is visually delightful as it has the appearance of a centuries old handmade paper. This is the go to paper for portraits of models with smooth skin that you want to touch.
  • German Etching - this paper takes the texture that is visible in Photo Rag and brings it to the surface for a noticeable texture that feels like a very high quality hand made paper that is a joy to hold in the hand. It's almost orange peel like, but in a good and more aesthetically pleasing way. This is the perfect paper for images with leather, clothes, fruit, flowers, etc...
  • William Turner - this paper has a significant "tooth" to it and I love it! It's almost like 600+ grit sandpaper which might sound weird, but when you hold it you think "wow, this is good stuff". Surprisingly it prints beautifully too so the texture vanishes unless held at an angle in indirect soft light. I love this paper for landscapes and images that look so real that you want to touch them (I.e., rock, wood, bark, etc...).

Scans of Prints

WARNING: Scanning a print to a JPEG means you end up with details from one color space being lost in another color space and a much lower fidelity image than what you hold in your hand. As a result DO NOT JUDGE the print color based on these images.

Instead, the value of this section is so you can do relative comparisons against the other scans of the same image for different paper types (in this article only - not other articles on this blog). This can be useful to see how these papers compare against each other with identical images.

It should also be noted that if you look carefully at the intentional white border of these scans of each of these papers that you can get a hint of the texture pattern for that given paper.

Click any print to see a full-size JPEG scan, but remember it's color fidelity is MUCH lower in the photo than in real life. All images are copyright Ron Martinsen and may not be used for any other purpose but viewing while this article is open in your web browser.

The Outback Printer image is courtesy of the late but great Uwe Steinmueller and used by permission of Bettina Steinmueller. It should be noted that in real life all three papers show visible squares up to 6 in the blacks and 252 in the whites, even though that detail is lost in the scans. The color is virtually identical even under a light box for all three which means you can mix papers and get color matching for gallery exhibitions.

Photo Rag

Outback Print Printer Evaluation Image - Photo Rag

Treehouse - Photo Rag - Copyright Ron Martinsen - ALL RIGHTS RESERVED
Treehouse - Photo Rag

Gary - Photo Rag - Copyright Ron Martinsen - ALL RIGHTS RESERVED
Gary - Photo Rag

Gary Parker is a Pulitzer prize winning photographer who has done magazine covers for the who's who of high tech including Bill Gates and Steve Jobs as well as amazing commercial pet images. He's also my friend and mentor, so I have this photo I took of him in hanging by desk that is printed on ILFORD GALERIE Prestige Smooth Pearl Photo Paper.

In my experience a glossy will always beat a matte paper when compared side by side, but what struck me about this print (in real life - vs the washed out looking scan) was how close it was in quality to the glossy - on a matte paper!

As a result, this was my paper of choice for this image because it felt smooth with a very subtle texture - much like Gary's vest. It was a perfect match for this photo, so I sent a copy of this print to Hahnemühle for review.

German Etching

German Etching is a long-time favorite of mine as Canon had sent it to me at the start of my printing series when I reviewed the iPF6300. I never got around to reviewing this paper and I loved it so much that I ended up hoarding the rolls to save this paper for only very special images. Years later, I had the freedom to try it out again and I loved pretty much everything I printed on it.


Outback Print Printer Evaluation Image - German Etching

Treehouse - German Etching - Copyright Ron Martinsen - ALL RIGHTS RESERVED
Treehouse - German Etching

Gary - German Etching - Copyright Ron Martinsen - ALL RIGHTS RESERVED
Gary - German Etching

Korean Piano - German Etching - Copyright Ron Martinsen - ALL RIGHTS RESERVED

While the colors from the scan are very washed out from a source image that is intentionally aged (using Texture Effects), the combination of this paper and its texture reminded me of what my hand felt when I touched this chair. I immediately knew it was the perfect paper for this print and immediately printed a copy to send to Hahnemühle for review.

Ancient Staircase of Mystery - German Etching - Copyright Ron Martinsen - ALL RIGHTS RESERVED

Now this is a favorite image of mine done with Simplify that people either love or hate with every fiber of their being. I'm okay with that though because any image that evokes strong emotions is a successful image in my opinion.

With that said, I never imagined ever printing this image as it's obviously meant for the digital realm. However, the feel of German Etching reminded me of the feel and texture of these stones so I had to print it out. The net result is something that turned out better than expected and one that I actually enjoyed holding in my hand for the first time.

William Turner

Outback Print Printer Evaluation Image - William Turner

Treehouse - William Turner - Copyright Ron Martinsen - ALL RIGHTS RESERVED
Treehouse - William Turner

This was my paper of choice for the Treehouse print I sent to Hahnemühle for review. The texture of the paper just reminds me of the feel of the wood of the cabin, so it just felt so right to print this image on this paper.  It's ironic too because this photo was a huge commercial success for me, but I had never printed it. As soon as I touched this paper, that immediately changed and it immediately became a favorite test print for this series as the detail of the reds on the wall behind the light really showed the characteristics of the reds for a given ICC profile.

Gary - William Turner - Copyright Ron Martinsen - ALL RIGHTS RESERVED
Gary - William Turner

Usage Instructions / Tutorial

In this section, which is a bit redundant if you review the whole section, I try to get you pointed in the right direction about how to set your application (e.g., Photoshop) to use the correct ICC profile and media type so you can get the best results with these papers.

Canon PRO-2000 from Photoshop (Mac)

Printing using these papers from Photoshop is easy as long as you remember to set Color Handling to "Photoshop Manages Colors" and then set your Printer Profile to the appropriate paper as shown here (Photo Rag profile shown):

Screen Shot 2017-08-23 at 11.49.18 PM

The ICC profile you use will come from the Hahnemühle Download Center for your specific printer, but in this case for the Canon PRO-2000 I had the following choices:

  • German Etching paper uses HFA_CanPro2000_MK_GermEtching.icc
  • Photo Rag Matt Fine Art Smooth uses HFA_CanPro2000_MK_PhotoRag.icc
  • William Turner paper uses HFA_CanPro2000_MK_WTurner.icc

and I made sure to use my desired rendering intent and checked black point compensation.

If you click "Print Settings..." you'll see the printer settings dialog where you can specify the media type "under Quality & Media" which can be Heavyweight Fine Art Paper for all of these papers as shown here:Screen Shot 2017-08-23 at 11.47.42 PM

Epson SureColor P800 from Photoshop (Windows)

Printing using these papers from Photoshop is easy as long as you remember to set Color Handling to "Photoshop Manages Colors" and then set your Printer Profile to the appropriate paper as shown here (Photo Rag profile shown):

2017-08-24_0-00-56

The ICC profile you use will come from the Hahnemühle Download Center for your specific printer, but in this case for the Epson P800 I had the following choices:

  • German Etching paper uses HFA_EpsSC-P8000_MK_GermEtching.icc
  • Photo Rag Matt Fine Art Smooth uses HFA_EpsSC-P800_MK_PhotoRag.icc
  • William Turner paper uses HFA_EpsSC-P800_MK_WTurner.icc

and I made sure to use my desired rendering intent and checked black point compensation.

If you click "Print Settings..." you'll see the printer settings dialog where you can specify the media type which can be Velvet Fine Art Paper for all of these papers as shown here:

2017-08-24_0-00-08

Be sure that Print Quality is set to "Max Quality" and that Mode: is set to "Off (No Color Adjustment)" to ensure that you don't get an ugly double color managed print. Epson will also force you to use the Front - Fine Art paper settings source so if that's a problem then you should use the Epson Print Layout software as shown in the Mac section (works for Windows too).

Canon PRO-2000 from Photoshop (Windows)

Printing using these papers from Photoshop is easy as long as you remember to set Color Handling to "Photoshop Manages Colors" and then set your Printer Profile to the appropriate paper as shown here (William Turner profile shown):

2017-08-07_23-49-30

The ICC profile you use will come from the Hahnemühle Download Center for your specific printer, but in this case for the Canon PRO-2000 I had the following choices:

  • German Etching paper uses HFA_CanPro2000_MK_GermEtching.icc
  • Photo Rag Matt Fine Art Smooth uses HFA_CanPro2000_MK_PhotoRag.icc
  • William Turner paper uses HFA_CanPro2000_MK_WTurner.icc

and I made sure to use my desired rendering intent and checked black point compensation.

If you click "Print Settings..." you'll see the printer settings dialog where you can specify the media type which can be Heavyweight Fine Art Paper for all of these papers as shown here:

2017-08-07_22-36-33

Don't forget to set Print Quality to Highest and choose "Color Settings..." where you can go tot he Matching tab as shown below and set "Color Correction" to "Off" as shown here:

2017-08-03_23-15-40

This step makes sure you don't accidentally do double color matching which might sound good to the uninformed but looks horrible when you print.

Epson Print Layout Software (Mac & Windows)

Epson Print Layout Software is handy software that works on both Mac and Windows that helps you to get great prints without having to use Photoshop. While I won't give a tutorial on how to use this product, I will point out that you simply need to set the Media Type to "Velvet Fine Art Paper" and specify the correct ICC profile in the Color Settings section as shown below (for German Etching):

Screen Shot 2017-08-23 at 11.42.44 PM

The ICC profile you use will come from the Hahnemühle Download Center for your specific printer, but in this case for the Epson P800 I had the following choices:

  • German Etching paper uses HFA_EpsSC-P8000_MK_GermEtching.icc
  • Photo Rag Matt Fine Art Smooth uses HFA_EpsSC-P800_MK_PhotoRag.icc
  • William Turner paper uses HFA_EpsSC-P800_MK_WTurner.icc

and I made sure to use my desired rendering intent and checked black point compensation.

That's it - super simple and it works great, so this is an easy way to get great print results from your Epson SureColor printer.

Conclusion

Overall, I was extremely satisfied with these papers. You can see, and more importantly feel, the hundreds of years of experience Hahnemühle has in making truly special fine art paper.

These are papers for the print master who wishes to add the third dimension of a sensory experience to their prints and/or leverage papers that complement the texture of their image.

I highly recommend these Hahnemühle papers as the top premium papers on the market.

Where to Buy?

At B&H you can get these papers using these links:

At Amazon you use these:

Other articles you may enjoy

If you enjoyed this article, you may also enjoy these:

Disclosure

If you make a purchase using links found in this article, I may make a commission. It doesn’t cost you a penny more, but it does help to support future articles like this.

NOTE: This site requires cookies and uses affiliate linking to sites that use cookies.

If you enjoyed this article, please support future articles like this by making a donation or saving money by using my discount coupon codes. Either way, your support is greatly appreciated!

This blog is intended for freelance writing and sharing of opinions and is not a representative of any of the companies whose links are provided on this site.

The opinions provided are of Ron Martinsen alone and do not reflect the view of any other entity