Thursday, June 26, 2008

How to improve your Photoshop skills tenfold without spending a fortune in time or money

A while back I was playing with iTunes PodCast feature, even though my first generation Nano doesn't support them. While there I ran across the Photoshop User TV podcast so I started watching it.

It features Scott Kelby (one of my favorite authors), Dave Cross, and Matt Kloskowski all of whom are Photoshop gurus. Each episode features about 40% of non-sense which can be frustrating, but the useful nuggets you get from each episode will dramatically increase your Photoshop skills! Of course, you need to know the basics of Photoshop first, but if you do you'll get some GREAT tips that will have you doing great stuff in no time!

But I don't have time for that - I just want results - NOW

For those who want more directed and specific help to solve a problem, I highly recommend joining NAPP. The National Association of Photoshop Professionals (NAPP) is a real official sounding name, but it really boils down to people like you and me who want to learn how to do stuff in Photoshop. Their magazine is excellent and helps you solve real world problems, but even better is their web site. On their web site you can jump to short videos and tutorials to specific problems you are trying to deal with and quickly learn how to perform that task.

NAPP is kinda expensive, is a magazine and web site all that I get?

I felt this same way, but when I saw how much getting the equivalent training I got from NAPP by paying for third party training videos and books, the math just added up in NAPP’s favor. Having the newest tricks in the magazine helps a lot to stay current too. I haven't regretted it and the magazines have continued the tradition of the podcast by teaching me cool new things that I didn't even dream existed.

Are there any good books I can read on Photoshop?

I've tried to cover that topic based on my own experiences in my article entitled What Photoshop Books Should I Read?.

Disclosure

While I have been a member of NAPP for quite some time, I did let my membership lapse due to procrastination. As part of my review of KelbyTraining.com I was given a free membership renewal to NAPP. I also may get a commission if you join NAPP using my code.

NOTE: This site requires cookies and uses affiliate linking to sites that use cookies.

If you enjoyed this article, please support future articles like this by making a donation or saving money by using my discount coupon codes. Either way, your support is greatly appreciated!

This blog is intended for freelance writing and sharing of opinions and is not a representative of any of the companies whose links are provided on this site.

The opinions provided are of Ron Martinsen alone and do not reflect the view of any other entity

Monday, June 23, 2008

Nik Software Group Discount (UPDATED: 11/19/12)

This article has moved. Please visit here:

Nik Software 15% Discount NOW includes the Complete Collection!

NOTE: This site requires cookies and uses affiliate linking to sites that use cookies.

If you enjoyed this article, please support future articles like this by making a donation or saving money by using my discount coupon codes. Either way, your support is greatly appreciated!

This blog is intended for freelance writing and sharing of opinions and is not a representative of any of the companies whose links are provided on this site.

The opinions provided are of Ron Martinsen alone and do not reflect the view of any other entity

Saturday, June 21, 2008

REVIEW: Scott Kelby's 7 Point System for Photoshop CS3 (Updated: 11/25/2010)

When I got Scott Kelby's 7-Point System for Adobe Photoshop CS3, I hoped it would be the miracle book that would help rescue some of my blah pictures and turn them into masterpieces worthy of resale. Well the good news is that I do think this book helped to tie together some things I already knew into something that does indeed help me improve upon my pictures. Now I can take pictures that I would otherwise discard and rescue them from the recycle bin into something that is - uh, better!

See the thing that Scott Kelby, nor Bryan Peterson can do is give you artistic talent. I seem to be lacking that key element so I'm going to have to keep working on that one, and no amount of books is going to fix that one. What I can say is that this book REALLY helped me to rescue dull, blah photos so that I could make them look better (in my opinion, but perhaps not others). While I may be guilty of being a little to garish with my use of colors, I still feel like these shots are a big improvement over the blah originals.

Here's the shot after using Scott Kelby's 7 Point System and if you hover over it you will see the original of the Seattle skyline from Kerry Park as it came out of the camera:

Mouse over to see before, mouse out to see after

While the color might be an acquired taste for some, I thought it was a huge improvement. I definitely liked what I as able to do to improve the Space Needle itself and how the mood changed from a drab looking evening (which it wasn't) to a more bright image while still leaving the blue sky in tact.

Here's another example of a shot that was taken by my co-worker Yvonne Johnson while she was on a recent trip to Dubai:

Before

While she was proud of her capture of the neat look of the desert in Dubai, she was pretty frustrated by her lens fogging and dust in the air which ruined what she hoped would be a nice snap shot as a keepsake of her visit to the desert.

After seeing this shot I immediately wanted to try the 7 Point System on it and I got what I believe to be are significantly better results. While some may argue they are too "photoshopped", and fixing them brought out a vignetting problem with her lens, However, criticisms aside I think it is a significantly better improvement over the original.

Dubai Poster

What's the moral of the story here? While you may hate what I've done with these photos, I think if you have the artistic talent that I lack you can clearly see that you'll have to tools in your tool chest to do some exceptional photo recovery work. To see some additional examples, visit my colleague Mitchell Morris' blog entry on the same topic.

So What are the 7 Points?

Well Scott will drive you crazy trying to tell you what they are in the book, so I'm going to spare you. I'll just list them out at a high level and it is up to you to read the book to learn more:

  1. Adobe Camera Raw Processing - start by turning your raw into something worthy of working on in Photoshop.
  2. Curves Adjustments - A little demystification here, but this one is still a challenge for me.
  3. Shadow/Highlight - Not one of the biggies like the others, but still comes in handy
  4. Painting with Light - This is the magic bullet and it is basically the concept of a layer mask (see my revelation about the overlay mask in an early blog entry).
  5. Channels Adjustments (aka LAB Color / Apply Image) - Here's another useful nugget that makes you ask yourself - how on Earth did Adobe ever expect me to figure this one out? (It turns out Scott and others learned about it directly from Adobe too).
  6. Layer Blend Modes & Layer Masks - Similar to 4, but this takes it a step further and instead of using Smart Objects to lighten and darken the image he shows how to use cool tricks with layer blending (one of which is using gradients as a GND filter) to really do some cool things quickly.
  7. Sharpening Techniques - Scott's other book, The Adobe Photoshop CS5 for Digital Photographers (and later) does a MUCH better job of explaining his wide arsenal of sharpening techniques, but this does provide some good basics skills along with showing you how to create a macro with shortcut keys so you can do this as a quick and final step.

These techniques aren't always used on every photo, but the fact is that most are and they work when you put the time and effort into a photo.

Mouse over to see before, mouse out to see after

So how does it work?

Scott provides some unprocessed originals (most NEF raw images) that help show you he's a mere mortal and gets some really bad shots out of his camera too. He then gives you step by step lessons on what he does to fix them.

The first thing you notice about this book is that Lesson 1 has 30 steps. If you read Amazon's reviews or you talk to people like my girlfriend, you quickly see that turns them off to this book right away. However, this is where you have to be a language lawyer because Scott doesn't say seven STEPS, he says seven POINTS. A Point is a general rule / guideline, which can take several steps to accomplish.

By working on a wide variety of photos (some of which start off as JPEG) you are introduced to numerous challenges, so the lessons help to give you broad knowledge on how to deal with a wide variety of problems. The 20 lessons (plus the 1 refresher lesson) give you the repetition needed to do this on your own. As of this writing I'm on lesson 9, and I'm already applying a lot of these techniques to my photos by heart. In short, it really does work so I'm eager to finish he book! I've decided to write this review early because I want to share what I believe to be a great resource so that people can start taking advantage of it now. I hope you can join me by buying Scott Kelby's 7-Point System for Adobe Photoshop CS3 and sharing your results on flickr.

In the end, I think this is a good complement to his "recipe" book called The Adobe Photoshop CS5 for Digital Photographers (or later), but not necessarily a complete replacement. I think if you only had to have one, this might be more instructive but The Adobe Photoshop CS5 for Digital Photographers (or later) is more helpful long-term. Either way, you'll want to make sure you read this book at least once and I highly recommend owning it.

Conclusion

Skill Level: Intermediate to Advanced

Value:
Excellent

Recommendation:
Highly recommended. While this is probably not suitable for beginners, once you know Photoshop basics you'll get A LOT out of this book. The Adobe Photoshop CS5 for Digital Photographers (or the respective edition for your version of Photoshop) is a good complement to this book and should be considered as a useful companion book to purchase when ordering.

This book is part of my What Photoshop Books Should I Read? article and is considered a must read as of 11/25/2010 (and probably well beyond).

NOTE: This site requires cookies and uses affiliate linking to sites that use cookies.

If you enjoyed this article, please support future articles like this by making a donation or saving money by using my discount coupon codes. Either way, your support is greatly appreciated!

This blog is intended for freelance writing and sharing of opinions and is not a representative of any of the companies whose links are provided on this site.

The opinions provided are of Ron Martinsen alone and do not reflect the view of any other entity

Wednesday, June 18, 2008

REVIEW: Understanding Shutter Speed by Bryan Peterson


If you've followed my blog you know that I am a huge fan of Bryan Peterson books. To me he is both an awesome photographer and great teacher. His latest book called Understanding Shutter Speed: Creative Action and Low-Light Photography Beyond 1/125 Second concerned me at first because I was afraid that it was going to be one of those "no duh" books. After all, once you understand the concepts of shutter speed, there hardly seems to be enough to write a whole book! My fear was that this was Bryan's attempt to capitalize on his success and help to pay the bills by exploiting his faithful followers, but I'm pleased to say that doesn't seem to be the case.

Like all of Bryan's books, he mixes a little bit of the topic at hand with great stories and images from his successful pictures which serve to inspire you and ignite your creativity. He includes useful exercise tips that help to inspire you to think out of the box and really understand the concept he is presenting. Unfortunately does recycle some shots and stuff from previous books (probably more than any of his others). Having read all of these books back to back I would have preferred to have seen less shots of his wife and kids (which to be fair, I’m guilty of myself) and more different subjects. Gripes aside, this book still has the winning formula of his other books and is still well worth a read.

As I did in my Beyond Portraiture review, I'll now discuss the major sections of this book to help you understand my takeaways from each part of the book.

Shutter Speed: Facts & Myths

This is a pretty basic chapter that all but the most beginner photographers will generally say "no duh" too. This of course will turn some readers off causing them to tune out and stop reading this book. However, like all of Bryan's books, there are plenty of nuggets to be discovered by reading from cover to cover and this book is no different. Read this and you'll pick up a few little things, but continue on in this book and you'll learn much more.

Fast & Moderate Speeds

This chapter begins with a really cool picture that Bryan later admits is one of his few Photoshopped pictures. It then starts going into some good practical advice on what shutter speeds are best for various situations (i.e., motor sports, water sports, people, rain, etc...). To a large extent, this is one of the most useful chapters, because even if you are like me and have discovered much of this through trial and error, you'll pick up plenty of little tidbits to help you get better shots than you currently are getting today. It also helps to confirm the lessons you may have already learned in the school of hard knocks, so it frees you to focus on other things that might be lacking when shooting at these various key shutter speeds.

Slow Speeds

I'll be the first to admit that the only types of photos that Bryan takes that I don't like (and in fact, I hate) are his slow shutter speed shots. I'm still in that phase of being enamored with sharpness, so I hate his blurry out of focus shots which personally I'd delete if they were on my camera. As a result, I find a lot of his advice to be off by my standard especially when it comes to panning (which is one of my specialties). I think a panning shot should look something like this:

where you have a crisp, sharp image with a motion blur in the background. Bryan's shots are totally blurry with sometimes even camera shake being visible (oh, the horror :-). He of course explains that this is intentional and talks about how it goes against the mainstream (and in one instance even points out that his family wasn't too fond of him choosing this format for their family ski trip).

However, the good news is that he moves on to "painting with shutter speed" where he shows some outstanding things he's done with slower shutter speeds that make an abstract art hater like myself even pause and go "wow".

Things get even better when he starts demonstrating zooming techniques, and my favorite - attaching the camera using the Bogen Magic Arm or Super Clamp to get some really awesome shots! This is where I really started to love this book, and it finishes off with a really cool topic of photographing ghosts. I was jazzed after reading this chapter and finally felt that this book was really very cool.

Exposure Concerns

This chapter focuses on some of the challenges you face when using various shutter speeds - especially long exposures. It goes into things you can due with neutral density filters to overcome some of these exposure challenges. Lastly, this section goes into the benefit of shooting raw (i.e., +/- 2 stop exposure compensation) which isn't possible with other formats. This feature made Bryan a huge fan of the digital raw format, but it is something that most raw users already take for granted.

Composition

This chapter is a tried and true series of suggestions that are very similar to many of Bryan's other books, but this guy is a master so it is always enjoyable to read his suggestions. In fact, this stuff is updated a bit from his other books (as this is his newest book) so some of it will cover topics not discussed in other books (i.e., leaving room for action).

Other Reading

Here's some links to other great Bryan Peterson books on this blog:

Conclusion

Skill Level: Beginner to Intermediate
Value: Very good
Recommendation: Highly recommended. While this is probably not in the top 3 of Bryan's books that I'd mention when recommending his books, it is still a great book. For those just getting started, I still suggest that you start with Learning to See Creatively and then move on to Understanding Exposure before reading this one. However, this is still a great book and definitely a good resource for those shooting sports.

Support this blog by purchasing this book here.

NOTE: This site requires cookies and uses affiliate linking to sites that use cookies.

If you enjoyed this article, please support future articles like this by making a donation or saving money by using my discount coupon codes. Either way, your support is greatly appreciated!

This blog is intended for freelance writing and sharing of opinions and is not a representative of any of the companies whose links are provided on this site.

The opinions provided are of Ron Martinsen alone and do not reflect the view of any other entity

Tuesday, June 17, 2008

Camera Gear Insurance: Don't leave home without it

In 2004 when traveling with my two small children to San Francisco bag with my point and shoot camera and camcorder disappeared at the SeaTac airport security line. I had intentionally placed my shoes in the last bin and positioned my camera bag in the middle to avoid forgetting the bag, but in the hustle to catch a plane I didn't notice that one of our 11 security bins was missing. The net result is that I lost about $1000 worth of gear and found the airport Lost and Found system to be along the same lines of something you'd expect to find in a corrupt foreign city. As a result, I learned a lesson that insuring my gear might be a smart thing, so when I was heading to China last year with all of my DSLR gear I decided to break down and get insurance. My local State Farm agent informed me that only a small portion would be covered by my home owners policy, so a supplemental Personal Articles Policy would be needed for each item over $500 (including providing them with a bill of sale). Determined not to get burned again - especially in a foreign city - I insured all of my gear.

During my 2nd visit to China much later in the year while attending the Chinese Formula 1 Grand Prix in 2007 I had a zipper malfunction and the contents of my bag spilled out on the concrete. This led to some damage and subsequently a State Farm claim.

After careful inspection of my equipment, the most significant damage was my EF 70-200mm f/2.8L IS USM lens and the filter on my EF 24-105mm f/4L IS USM lens.

I contacted my State Farm agent Jim Larson, and he said “just fix it, and we’ll write you a check to make everything right”. I was very happy to hear this so I chose to use Canon Repair Center in Irvine, CA to repair my lens.

I shipped a letter about my mishap and my lens to Canon's Repair Center via Turtle Express, I mean UPS, and they got it on October 26th, 2007 (UPS tracking confirmed the delay was UPS' fault). I quickly got notice from Canon saying that it would cost $263.58 to fix my lens, which included overnight return shipping via FedEx (woohoo). As promised, I had my lens by Friday and I was very pleased with how smooth the process was thus far. The hood was not a serviceable part, so I had to purchase a replacement from B&H ($49.90) and just keep the receipt.

Unfortunately when I got my lens back I noticed that the cracked AF switch hadn’t been repaired (it worked, but had a hairline crack), despite that being included in my letter and mentioning that on the phone to Canon. I was also disappointed that Canon did nothing about my bag (original one returned to me with no apologies). Later, I also noticed that my lens had a lot of dust in, something it didn’t have prior to being sent to Canon.

I contacted Canon and spoke to a supervisor who apologized for the problems and asked that I send the lens back at their expense (shipping label provided). They fixed the AF switch, cleaned and calibrated the lens, and only charged parts ($68.06 + tax & shipping = $90.46 a discount of an additional $158 in labor charges). My lens came back in better than new condition, and the supervisor informed me that several dozen components had been replaced on the first repair so the second repair was just a proper cleaning that should have been done in the first place, plus the AF switch replacement). My lens looks brand new and functions better than new, so I’m super happy about it now.

When returning the lens the 2nd time I took off the tripod collar in a hurry and loosened the bolt. Unfortunately this caused the nut on the inside of the tripod ring to fall loose because it had been damaged in the accident, so my tripod collar was useless. I then spent the next several months trying to get the tripod collar replaced via the Internet with no luck. I also tried to fix it myself, but couldn’t do it. Ultimately I figured this was related to the fall the lens sustained and State Farm agreed, so I just ordered a replacement from Canon for $116 + $6 shipping.

Once I had all of my receipts (including shipping expenses to send the lens in), I submitted my claim to State Farm and I received a check for $619 in a week with no questions asked. The Hoya Filter was not insured so I didn’t submit a claim for it, but I was able to bend the edge of the ring back in place to accept a lens cap again and it was fine. My 70-200 did not have a filter on it, and the glass sustained zero damage. The lens cap came off during the fall as the end of the lens took the biggest hit and the filter mount ring was bent and had to be replaced. However, the glass never got so much as a micro scratch (and I LOOKED VERY CLOSELY).

I HIGHLY recommend the insurance I have, but it is only possible via an addendum to your home owners or renters policy. You must insure each part individually and provide exact cost receipts, but they will pay for replacement cost. I can’t find anything that shows exactly how much I pay for my annual personal articles policy (because I have other items that are insured) but I know it was less than I pay for shipping on my average B&H order.

Now I update my policy as soon as I order something, and if I return it, then I have it dropped from the policy after I get a notice from B&H that they’ve received it safely. I’ve added all of my new gear to my policy and so far I have not received a premium increase as a result of this accident. I am told that typically I would, but that generally it is minimal. If I had repeated claims, they may require a deductible or simply drop the policy all together, but it would have no impact on my homeowners policy.

I replaced my backpack with a ThinkTankPhoto bag and have been back to the Canadian Grand Prix this season without incident. I also recommend my State Farm agent Jim Larson if you are looking to switch or want to make sure your insurance premiums are worth something. Cheap insurance is a big waste if they never pay out when you need them, so I use Jim for all of my insurance needs.

NOTE: This site requires cookies and uses affiliate linking to sites that use cookies.

If you enjoyed this article, please support future articles like this by making a donation or saving money by using my discount coupon codes. Either way, your support is greatly appreciated!

This blog is intended for freelance writing and sharing of opinions and is not a representative of any of the companies whose links are provided on this site.

The opinions provided are of Ron Martinsen alone and do not reflect the view of any other entity

Monday, June 16, 2008

GUEST ARTICLE: Pelican Cases - A Traveling Photographer's Friend

by David

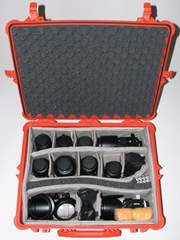
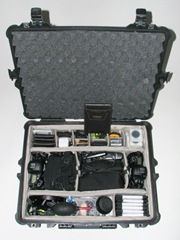
We all know that traveling by air can be difficult and a hassle when traveling with photography equipment. The exercise of determining which shooting conditions to target and the lenses to bring along in an attempt to pack as much as possible into a carry-on bag is not much fun. Another downside with a carry-on bag is that it may end up stuffed under the seat in front of me taking away the already cramped seating and leg room. What about traveling by vehicle over a multiple day photography excursion and dealing with concerns on how to secure my equipment in a hotel room or other areas while I am not out shooting. Then there are times when I need to travel to a location for a photo shoot that requires the use of strobes for lighting. I would prefer to get setup up and begin shooting quickly instead of spending many trips to and from my vehicle to unpack the lighting gear. My solution was to buy Pelican cases to protect my photography gear while traveling and for storage while at home.

Pelican1604_1Pelican1604_3

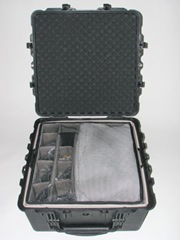
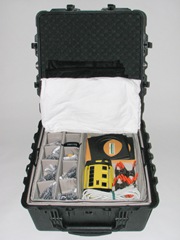
The Pelican cases are an incredible well built product that I can pack my gear into and feel comfortable having the cases checked as standard baggage and not worry how the airline treats them. The cases are watertight, float in salt water, and are virtually indestructible. I am able to pack all my camera gear into a black Pelican 1604 case, all my current lenses, excluding the Canon EF 300mm f/2.8L IS, into an orange Pelican 1604 case (see images above), and a complete AlienBees 4 strobe lighting setup with all accessories excluding backdrop and lighting stands into a black Pelican 1644 (see images below). Each case comes with stainless steal hardware reinforced padlock protectors that allow the case to be securely locked. I also decided to make use of the range of available colors when I purchased the nice bright orange Pelican 1604, which stands out in anywhere it may be. Another great optional feature is you can choose to have a personalized nameplate made for your cases.

Pelican1644_5 Pelican1644_6

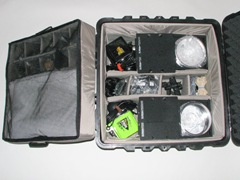
The cases have two types of padding to choose from, either pluck apart foam or a padded divider set. For my first case I went with the pluck apart foam and it was easy to pull apart sections of the foam to form the shapes of lenses and camera bodies. The only downside was that as my gear collection grew and I wanted to change the layout, I needed to buy replacement foam inserts. I later decided to spend the extra money and go with padded divider sets so that I could customize the spaces to hold my gear and be able to redesign the layout whenever my needs change. The padded dividers work the same way the dividers work in most of today's camera bags and backpacks. Here's an example of a 1644 with padded dividers with AlienBees lights:

Pelican1644_7

Overall, I am extremely happy with the performance and quality of all three cases and would highly recommend them to anyone looking for a convenient, safe, and reliable way to store and travel with their photography equipment.

NOTE: This site requires cookies and uses affiliate linking to sites that use cookies.

If you enjoyed this article, please support future articles like this by making a donation or saving money by using my discount coupon codes. Either way, your support is greatly appreciated!

This blog is intended for freelance writing and sharing of opinions and is not a representative of any of the companies whose links are provided on this site.

The opinions provided are of Ron Martinsen alone and do not reflect the view of any other entity

Friday, June 6, 2008

Introducing a new guest blogger - David

To help keep new information flowing onto this blog when I'm too busy to write anything, I've decided to invite other experts that I trust to occasionally write an article about a topic where they can share their real world lessons. To that end, I begin by introducing you to the first such author - my friend David. David prefers that I not mention his last name for privacy reasons, but you can see from the list below of what is in his bag that he's got some great gear! If you think you've got some great gear, check out what is in his awesome bag:

Cameras

Canon EOS 1Ds Mark II Canon EOS 1D Mark III Canon EOS 1Ds Mark III

Lenses

Canon EF 14mm F/2.8 L Canon Tilt Shift TS-E 24mm F/3.5 L Canon EF 35mm F/1.4 L USM Canon EF 50mm F/1.4 L USM Canon EF 85mm F/1.2 L USM Canon Tilt Shift TS-E 90mm F/2.8 Canon EF 180mm F/3.5 L Macro USM Canon EF 300mm F/2.8 L IS USM Canon EF 16-35mm F/2.8 L USM Canon EF 24-105mm F/4.0 L IS USM Canon EF 70-200mm F/2.8 L IS USM Canon EF 100-400mm F/4.5 - 5.6 L IS USM Canon EF 1.4x II Extender Canon EF 25 II Extension Tube Lensbaby 3G

Filters

B+W 77mm UV Haze MRC (x3) B+W 77mm UV Haze MRC Slim B+W 77mm ND 3.0 Neutral Density Filter B+W 77mm Circular Polarizer MRC B+W 72mm UV Haze MRC (x3) B+W 72mm Circular Polarizer MRC B+W 58mm UV Haze MRC B+W 37mm ND 3.0 Neutral Density Filter (x2) B+W 37mm ND 1.8 Neutral Density Filter Cokin Z-Pro Filter Holder Cokin 77mm Z-Pro Adapter Ring Cokin 72mm Z-Pro Adapter Ring Tiffen 4x4 .3 ND Filter Tiffen 4x4 .6 ND Filter Tiffen 4x4 .9 ND Filter Tiffen 4x4 .6 Graduated Soft ND Filter Tiffen 4x4 .9 Graduated Soft ND Filter Singh-Ray 77mm Thin Mount Vari-ND Filter Singh-Ray 77mm Vari-ND Filter Singh-Ray 77mm Thin Mount Mor-Slo ND 5 Stop Filter Singh-Ray 77mm Gold-n-Blue Polarizer Singh-Ray 4x6 ND-3 Reverse Grad Filter

Support

Gitzo Carbon Fiber GM2540 Monopod Bogen/Manfrotto 3232 Swivel Head Gitzo GT3530LSV 6x CF Systematic Tripod RRS BH-55 Ballhead RRS B2 LR II Level Release Clamp RRS B2-Pro Knob Clamo RRS B57L Camera Mount L Plate RRS B1DMkIII-L Camera Mount Plate (x2) RRS L84 Lens Mount Plate (x3) RRS B61 Lens Mount Plate RRS MPR-1 Multi-Purpose Rail RRS MPR-CL Multi-Purpose Rail with Clamp RRS MPR-CL II Multi-Purpose Rail with Clamp RRS B87-B Flash Bracket RRS B87-FM Spare Flash Mount RRS PCL-1 Panning Clamp RRS PCL-DVTL Dovetail Adapter for PCL-1 RRS B150-B Macro Focusing Rail (x2)

Bags

Lowepro Pro Trekker AW II Lowepro Magnum AW Lowepro Stealth Reporter 300 AW Lowerpro Transporter Camera Strap (x2) Lowerpro Shoulder Harness Lowerpro Deluxe Waistbelt #13 Lowepro Lens Case 5 Lowepro Lens Case 3 Lowepro Lens Case 1 (x3) Lowepro Lens Case 1W Lowepro Bottle Bag Lowepro Stealth Reporter 500 AW Pelican 1604 Watertight Hard Case with Padded Dividers (Orange) Pelican 1604 Watertight Hard Case with Padded Dividers (Black) Pelican 1609 Photo Lid Organizer Pelican 1644 Wheeled Hard Transport Case with Padded Dividers (Black)

Flashes

Canon Speedlite ST-E2 Canon Off-Camera Shoe Cord OC-E3 Canon Speedlite 580EX II Canon Macro Twin Lite MT-24EX Canon Speedlite 550EX Canon Off Camera Shoe Cord OC-E2

Studio

Pocket-Wizard Plus II Transceiver (x4) Pocket-Wizard CM-T3-P Pre-Trigger Motor Sekonic L-758DR Flash Meter Sekonic Exposure Profile Target Bogen/Manfrotto Complete AutoPole Expan Kit Bogen/Manfrotto Stand Bases for Auto Poles Bogen/Manfrotto 420B Convertible Boom Stand Impact Multiboom Light Stand & Reflector Holder (x2) Impact 5-in-1 Collapsible 42" Circular Reflector Disc Impact 5-in-1 Collapsible 42x72" Oval Reflector Disc Bogen/Manfrotto 3086 Aluminum Light Stand AlienBees AB800 Strobe AlienBees AB800 Strobe AlienBees AB800 Strobe AlienBees AB1600 Strobe AlienBees Vagabond I Portable Power System AlienBees Vagabond II Portable Power System AlienBees SB2436 Medium Softbox AlienBees SB3060 Giant Softbox AlienBees OB35 Medium Octabox AlienBees LMBD4 Barndoors (x2) AlienBees UMF (x2) LiteMod Unit Mainframe AlienBees HG4X Honeycomb Grids(10, 20, 30, 40) AlienBees GELH 6 Gel Holders AlienBees CF20 Set of 20 Gels AlienBees ND6 Set of 6 Neutral Density Filters AlienBees LS1100 Backlight Stand (x2) AlienBees LS3900 13' Heavy Duty Light Stand (x2)

Other

AquaTech SS-Zoom Sport Shield AquaTech SS-200 Sport Shield AquaTech Lens Cap Shield (x2) Canon Angle Finder C Canon RS-80N3 Remote Switch Canon TC-80N3 Timerr Remote Controller Canon NP-E3 NiMH Battery Canon LP-E4 Lithium-Ion Batter (x2) Pelican Recoil 2410 LED Submersible Flashlight Pelican 2630 1W LED HeadsUp Flashlight Surefire L4 Digital Lumamax LED Flashlight Domke PhoTOGS Vest AquaTech Waterproof Jacket Marmot Waterproof Rainpants REI Expoler Hat Korkers Streamborn Wading Boots Korkers Studded Felt Soles Caddis Breathable Chest Waders

Whew, after that it makes my bag seem a bit inferior!

NOTE: This site requires cookies and uses affiliate linking to sites that use cookies.

If you enjoyed this article, please support future articles like this by making a donation or saving money by using my discount coupon codes. Either way, your support is greatly appreciated!

This blog is intended for freelance writing and sharing of opinions and is not a representative of any of the companies whose links are provided on this site.

The opinions provided are of Ron Martinsen alone and do not reflect the view of any other entity