Tuesday, June 28, 2016

Switch to Aurora HDR for only $79 (with bonus items included)

image

The folks at MacPhun are so serious about getting you to switch to Aurora HDR that they are almost giving it away! With this latest special offer, you can get Aurora HDR along with a bunch of bonus offerings for only $79 when you simply send a screen shot of the HDR software you are using today.

But what if I don't have any HDR software already?

Well guess what, you can download free HDR software from Google here, and odds are you are using a version of Photoshop or Lightroom which also features HDR support - so you have lots of products to choose from.

Ron’s Aurora Review & Tutorial

I’m no Trey Ratcliff, but I’ll give you my 2 cents in this 30 minute tutorial where I demonstrate how I use Aurora and my thoughts about it along the way:

The cool thing about this video is that there’s no smoke and mirrors and it’s done on a 2010 MacBook Pro with 8GB of RAM and 512KB video, but it performs very well.

Where to learn more or order?

CLICK HERE to learn more about Aurora HDR and this special offer.

Want to know more about this product? Check out my full review and video tutorial.

Disclosure

If you make a purchase using links found in this article, I may make a commission. It doesn’t cost you a penny more, but it does help to support future articles like this.

NOTE: This site requires cookies and uses affiliate linking to sites that use cookies.

If you enjoyed this article, please support future articles like this by making a donation or saving money by using my discount coupon codes. Either way, your support is greatly appreciated!

This blog is intended for freelance writing and sharing of opinions and is not a representative of any of the companies whose links are provided on this site.

The opinions provided are of Ron Martinsen alone and do not reflect the view of any other entity

Thursday, June 23, 2016

Topaz Labs Impression 2.0 - Faster & Better (Special Offer)


This page has moved

please visit http://www.ronmartblog.com/2016/11/review-topaz-impression-2-discount-offer.html.

NOTE: This site requires cookies and uses affiliate linking to sites that use cookies.

If you enjoyed this article, please support future articles like this by making a donation or saving money by using my discount coupon codes. Either way, your support is greatly appreciated!

This blog is intended for freelance writing and sharing of opinions and is not a representative of any of the companies whose links are provided on this site.

The opinions provided are of Ron Martinsen alone and do not reflect the view of any other entity

Monday, June 20, 2016

REVIEW: Athentech Perfectly Clear 2.0 (DISCOUNT OFFER)

*** NEW version 3.5 Review ***

Athentech Perfectly Clear Special Offer
Save 10% off Athentech Perfectly Clear by Clicking Here

While I enjoy editing photos, the sad reality is that it just takes too long to put my loving touch on every photo. As a result I have hundreds of thousands of photos that have never seen the light of day (much to my wife's chagrin) due to lack of time needed to make them look the way I want them to look before anyone else sees them. This self defeating practice of image hording is common amongst photographers, and despite great products like Lightroom and Topaz ReStyle which can greatly decrease the time required to make your images look great – the reality is that it always take longer than we admit to others.

Wouldn’t it be great if there was a product that could do a very good job for a majority of our photos with as little as one click?

The promise of one click greatness has been promised for a long time but I’ve never seen any product deliver on it. What’s more, my images are my art so I want my finishing touches so how could any respectable photographer trust software to do this critical part of the creative process for them?

I’m here to tell you that the day has arrive where you have a new tool to add to your editing arsenal that will make your unedited images look great while still giving your edited images that extra oomph to make them look better. That product is Perfectly Clear and it rocks!

Here’s a common example of a shot that looks good straight out of the camera but it jumps off the screen (or print) when you do a one click edit with the details preset:


One click fix in seconds with the Details Preset

This preset works well for most images which allows you plow trough tons of old images quickly to make them look great. In fact, Photoshop’s Ctrl+F / Cmd+F features lets you replay back the last filter you ran for zero click editing of images that can use your last preset settings.

Simply put, this is a game changer folks so I encourage you to check out my video and try it out. A free trial is available so if you don’t like it then you’ve lost nothing, but I suspect people who take the time to learn it will find they love it – a lot.

Have you tried it before and hated it? Me too! If so, try it again as this latest version is the one that finally got it right – and it is very good!

Video Demonstration on 8 Images

This product works so well so quickly that it is easier to just show you than to write a lot about what it does. If you have a minute at least watch the first couple minutes of this video to see Perfectly Clear in action:


As the demo shows, this is the fastest and easiest way to make your images look great in seconds. I highly recommend you try it out (at least via the Free Trial version).

User Interface

Athentech Imaging Perfectly Clear User Interface

This product is about as simple as it gets. You simply load it from Photoshop or Lightroom and choose a preset. The big squares are the ones provided with the product and the dropdown list below are these plus ones that you have optionally created by making changes on the Adjustment panel shown below:

Athentech Imaging Perfectly Clear Adjust Panel
Adjust Panel

Often times it is one click and you are done as you’ll see in the samples in the next section, but sometimes (as shown in my video) you need to make a few adjustments. You can make your adjustments and be done or you can take a moment to create a new preset with them, but either way you don’t spend much time in this UI.

Simply put, it just works!

More Before and After Samples


One click fix in seconds with the Landscape Preset


Landscape preset with minor adjustments


One click fix in seconds with the Landscape Preset


Beautify+ Preset with minor adjustments


Beautify+ Preset with minor adjustments

NOTE: Effects exaggerated to show possibilities – less garish looks possible with simple adjustments

image12
Landscape preset is great for sunset shots

image_thumb16
Raccoon Eyes Preset

image_thumb17
Dehaze preset gives images that "wow" look in one click

Animated Gif / Before & After Beautify Preset (no sharpening) - COPYRIGHT Ron Martinsen - ALL RIGHTS RESERVED
Edited Image enhanced by Perfectly Clear
Animated GIF Before & After
Beautify Preset (no sharpening)
NOTE: Some artifacts caused by 256 color GIF downrez

Conclusion

When I first heard about this product a few years back and tried to play around with it, I thought it was garbage. Its algorithms weren’t as mature as they are today so I felt like I needed more control over what it was doing. The product I’ve been using for the last month has worked on a large number of images I’ve thrown at it so I’ve began to trust it. In some cases it does make a mistake so I’ve learned to turn off settings which appear to have no effect as sometimes they can do something very unexpected (like red eye removal removing red from an area that isn’t an eye). It’s rare, but it does happen.

Aside from this one quirk, I’ve really become addicted to this product for those hundreds of thousands of images that I need to edit but will never get around to with my commercial photography workflow. I still need professional results as the edits represent my work to friends and family, but the ability to get great results quickly is pushing me harder than ever to get more things right in camera to speed up my workflow.

I HIGHLY RECOMMEND this product as it really has changed my life. I find that I even try it out as a last step on images that I’ve painstakingly edited because it does such a great job at final highlight and shadow detail adjustments. I do often skip the sharpening unless its for a private family photo, but other than that I trust it.

Where to order at a discount

Click here to learn more about Perfectly Clear, try the free demo or purchase your copy today. The Photoshop and Lightroom versions are sold separately so either pick the product you use the most or take advantage of the special bundle pricing for both versions.

Upgrades are also available for users of previous versions.

SPECIAL OFFER

YOU MUST CLICK HERE to save 10% to get on the special landing page shown below:

image

Please note that coupon codes can change so visit my discount coupon code page or contact me if you have any problems with my code.

iOS Versions

While the best experience is on the desktop, while you are at for a few bucks more you can enjoy one click editing on your iOS Devices:

Other articles you may enjoy

If you enjoyed this article, you may also enjoy these:

Disclosure

If you make a purchase using links found in this article, I may make a commission. It doesn’t cost you a penny more, but it does help to support future articles like this.

NOTE: This site requires cookies and uses affiliate linking to sites that use cookies.

If you enjoyed this article, please support future articles like this by making a donation or saving money by using my discount coupon codes. Either way, your support is greatly appreciated!

This blog is intended for freelance writing and sharing of opinions and is not a representative of any of the companies whose links are provided on this site.

The opinions provided are of Ron Martinsen alone and do not reflect the view of any other entity

Sunday, June 19, 2016

REVIEW: Athentech LUCiD 1.0 vs Perfectly Clear (Discount Offer)

image
LUCiD’s user interface is smooth and responsive, yet familiar to Perfectly Clear users

LUCiD is a stand-alone product designed for users who want simple one click photo editing with great results. At first that may seem like a snake oil salesman promise, but it’s true! Check out this video where I show how it does exactly that:

Beyond One Click

SNAGHTML349478dc
Simplified Adjustments, Crop and Save options are still possible

What if the one click enhancement isn’t exactly what you want? Well the good news is that there’s an Adjust panel that allows you to make some basic changes from what you get with the presets. If you find those still a little too limiting then you’ll want to check out the more advanced version called Perfectly Clear.

How is LUCiD different from Perfectly Clear?

Perfectly Clear is NOT a stand alone product as it’s is designed for integration with Lightroom and Photoshop where you’ll have things like RAW support, layers, healing brushes, etc…

Perfectly clear offers the same presets as LUCiD but it allows you to much more flexibly in the Adjust panel. Here’s a comparison of the two side by side:

Lucid (left) vs Perfectly Clear (right)
Lucid Adjustments Panel (left) vs Perfectly Clear (right)

LUCiD will not run as a plug-in to Photoshop or Lightroom  so if you want that functionality then you are going to need to get Perfectly Clear.  or just edit your photo in LUCiD’s stand alone UI (which supports JPG, TIF, PNG and BMP file formats – sorry, no RAW).

Perfectly Clear is for the geek who really wants more sliders to fiddle with for the ultimate in fine grain control AND the ability to create your own presets. For more info on how it works check out my Perfectly Clear review which includes a video tutorial as well.

Before and After Examples

If you didn’t watch the video then you missed out on some good before and after examples. Here’s a few:


One click fix in seconds with the Details Preset
+ Crop


One click fix in seconds with the Landscape Preset

Beautify+ Preset
Beautify+ Preset

Conclusion

This is a great product for beginners, but I think anyone with Lightroom and/or Photoshop would probably be better served to spend a little more to get Perfectly Clear. While the simplicity and batch processing support are nice, the limitations on the Adjust panel were just too limiting for me. Then again, I’m not the target demographic for this product either, so if you just want to focus on photography and want simple one click “auto” editing of your photos, then you will be quite happy.

Where to order

image
CLICK HERE to get a 10% discount applied – your cart should look like this

Click here to get my 10% discount and/or  learn more or order on the Athentech web site. See my Perfectly Clear review for a discount on it as well. Visit my discount coupon code page if you have any troubles with the discount in this article and to learn about other great deals.

iOS Versions

While the best experience is on the desktop, while you are at for a few bucks more you can enjoy one click editing on your iOS Devices:

Other articles you may enjoy

If you enjoyed this article, you may also enjoy these:

  • Perfectly Clear Review
  • Aurora HDR – NEW (and awesome)
  • Ron’s Recommendations 
  • Topaz Labs Glow 1.0
  • Topaz Labs Texture Effects
  • Topaz Labs ReMask 5.0
  • Topaz Labs Restyle 1.0
  • Topaz Labs Simplify 4
  • Topaz Impression (Review coming soon, see discount page for Topaz coupon code)

    250x250Orange

    Disclosure

    If you make a purchase using links found in this article, I may make a commission. It doesn’t cost you a penny more, but it does help to support future articles like this.

  • NOTE: This site requires cookies and uses affiliate linking to sites that use cookies.

    If you enjoyed this article, please support future articles like this by making a donation or saving money by using my discount coupon codes. Either way, your support is greatly appreciated!

    This blog is intended for freelance writing and sharing of opinions and is not a representative of any of the companies whose links are provided on this site.

    The opinions provided are of Ron Martinsen alone and do not reflect the view of any other entity

    Monday, June 13, 2016

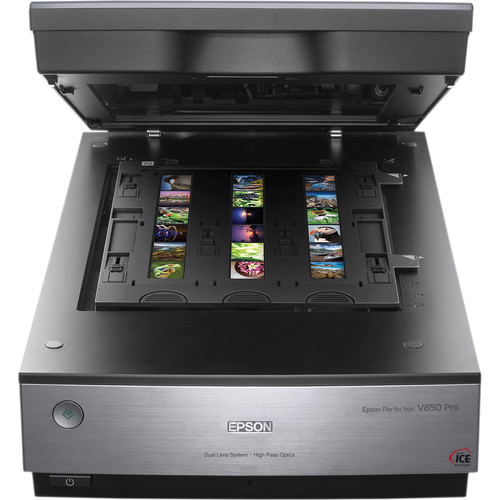
    REVIEW: Epson Perfection V850 Pro Scanner (Part I–35mm Slides)

    Epson Perfection V850 Pro Scanner
    Epson Perfection V850 Pro Scanner

    I’ve been enjoying scanning since the early 90’s back when I had my HP ScanJet IIc, but when that scanner was retired due to interfacing and software problems with more modern computers, I had a long search trying to find something that was good enough for my quality bar. Years later, I’d find the Epson Perfection V750 Pro scanner, and it was all that I hoped and more. I used it for years and it never let me down.

    Fast forward to 2016, and I got the opportunity to upgrade my v750 to a v850 and see what was new. In addition to the obvious faster scanning speed, here were a few of the big improvements:

    • New Light Source: The V750-M Pro features a cold cathode fluorescent lamp (CCFL), while the V850 Pro features ReadyScan® LED for fast scans with no warm up time required and uses less power.
    • Improved Film Holders: The film holders that come with the V850 Pro are stiffer for more consistent results. The V850 Pro ships with eight film holders: 35 mm slides, 35 mm film strips, medium format 6 x 20 cm and 4” x 5” (two each). Among the holders includes, two sets of anti-Newton ring film holders and features five-step multi-point height adjustment. The V750-M Pro ships with four film holders: 35 mm negatives, 35 mm slides, medium format and 4” x 5”.

    35mm Slide Scans via Epson Scan 5.11

    While for my personal use, most of my scanning ends up being reflective scanning of prints and documents, I thought it would be fun to do some testing with slides this time. I was never a big slide shooter as I preferred prints in the film days, so I didn’t have any of my own to use.

    For the 35mm slides featured here, Adrian E. Stepan was kind enough to share some of his slides I could scan. These images were taken with a Fed-3 rangefinder with Voigtlander snapshot skopar (25mm f/4) shot on Fuji Velvia 100.

    No post-processing was done on these photos beyond what the scanner software does at scan time. Click the pictures to see the full-size tiff that the scanner software generated. With typical modern post-processing techniques, these images could be significantly improved.

    You may view these images, but you may not print, save, edit, redistribute or use them for any purposes other than viewing while your browser window is open reading this article. After leaving this article, please delete all downloaded images.

    Here were the Epson Scan Settings:

    Epson Scan Settings for these 35mm slides
    Epson Scan Settings for these 35mm slides

    Here’s a video that shows how the following slides were scanned:


    Epson Scan USM Med Dig Ice Qual 3200 24-bit #004

    Copyright Adrian E. Stepan - ALL RIGHTS RESERVED


    Epson Scan USM Med Dig Ice Qual 3200 24-bit #022

    Copyright Adrian E. Stepan - ALL RIGHTS RESERVED


    Epson Scan USM Med Dig Ice Qual 3200 24-bit #013

    Copyright Adrian E. Stepan - ALL RIGHTS RESERVED


    Epson Scan USM Med Dig Ice Qual 3200 24-bit #017

    Copyright Adrian E. Stepan - ALL RIGHTS RESERVED


    Epson Scan USM Med Dig Ice Qual 3200 24-bit #009

    Copyright Adrian E. Stepan - ALL RIGHTS RESERVED

    Click here to see a full gallery of these slides and more.

    35mm Slide Scans via SilverFast SE 8.8

    In addition to Epson Scan, the v850 includes the SE version of the most highly regarded scanning software in the industry – SilverFast SE. Click here to learn more about SilverFast upgraded versions, and contact me if you would like a special discount to purchase a SilverFast upgrade.

    Using the same slides as above (with the same restrictions previously mentioned), I performed scans using the more labor intensive but higher quality SilverFast SE software. Here’s a screenshot of what this software looks like, but view the video to see my exact workflow:


    SilverFast SE 8.8.0r3

    Here’s a video that shows how I scanned these slides:


    SF880r3_USM_iSRD_AutoCCR_3200ppi_48-24_MEOff_10

    Copyright Adrian E. Stepan - ALL RIGHTS RESERVED


    SF880r3_USM_iSRD_AutoCCR_3200ppi_48-24_MEOn_22

    Copyright Adrian E. Stepan - ALL RIGHTS RESERVED


    SF880r3_USM_iSRD_AutoCCR_3200ppi_48-24_MEOn_13

    Copyright Adrian E. Stepan - ALL RIGHTS RESERVED


    SF880r3_USM_iSRD_AutoCCR_3200ppi_48-24_MEOn_17

    Copyright Adrian E. Stepan - ALL RIGHTS RESERVED


    SF880r3_USM_iSRD_AutoCCR_3200ppi_48-24_MEOff_03

    Copyright Adrian E. Stepan - ALL RIGHTS RESERVED

    Clearly the extra effort is rewarded with significantly better results as you can see from the images above. The fact that this excellent software is included, certainly helps you to make the most of this scanner if you are willing to invest the time into learning how to use this software properly.

    See my videos here and in the future to learn more about how to use SilverFast AI.

    Click here to see a full gallery of these slides and more.

    Conclusion

    Check back for my next installment where I’ll have a lot more video footage of these scanners in action, additional media type scanned, and so much more.

    Where to order

    Click here to learn more or order at the B&H web site. My friends at Amazon have it available here.

    Other articles you may enjoy

    If you enjoyed this article, you may also enjoy these:

    Disclosure

    If you make a purchase using links found in this article, I may make a commission. It doesn’t cost you a penny more, but it does help to support future articles like this.

    NOTE: This site requires cookies and uses affiliate linking to sites that use cookies.

    If you enjoyed this article, please support future articles like this by making a donation or saving money by using my discount coupon codes. Either way, your support is greatly appreciated!

    This blog is intended for freelance writing and sharing of opinions and is not a representative of any of the companies whose links are provided on this site.

    The opinions provided are of Ron Martinsen alone and do not reflect the view of any other entity

    Thursday, June 9, 2016

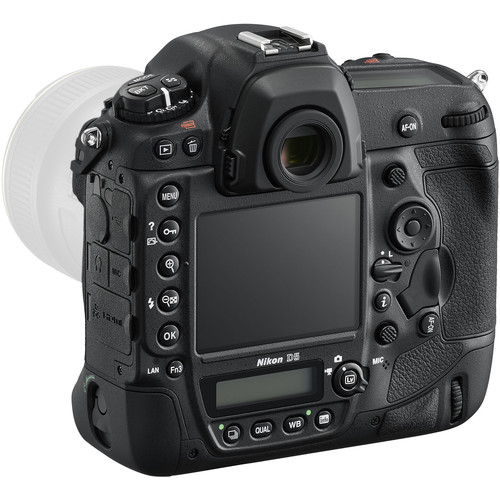
    REVIEW: Nikon D5 – Great, but … (Part II of II)

    Nikon D5 DSLR Camera (Body Only, Dual XQD Slots)
    Nikon D5 DSLR Camera (Body Only, Dual XQD Slots)

    After a month and 5000 shots with the Nikon D5, my opinions have changed quite a bit since my first look article. Yes, I still love it, but I’ve had enough time to experience both its greatness, as well as its flaws.

    If you haven’t already, be sure to read part 1 of this article where I dive a lot into features and even offer some videos that show this camera in action. What follows here are my final observations and conclusion.

    Bookshelf Tests

    For my bookshelf tests, I reset the camera back to factory defaults and then chose RAW+JPEG Fine* and took 19 separate shots using mirror lockup.starting here. Click the shots below to view a full-size original in-camera JPEG that has not been edited in any way.


    f/2.8 @ 100mm for 2 sec at ISO 100

    As expected ISO 100 was great as were the images taken at f/2.8 all the way to f/10 where  I  stopped due to the 30 second exposure limit for aperture priority. Sharpness was very good and no visible signs of diffraction were present.


    f/5.6 @ 100mm for 1/100 sec at ISO 102,400

    As the ISO’s started to rise, things looked pretty good up to 25,600 where I started to notice a drop off in quality that gradually gets worse. By 102,400, shown above, I find that anything larger than 4k screen resolution is too big for using these files.


    f/5.6 @ 100mm for 1/200 sec at ISO 204,800 (H1)

    In an extreme pinch, some might find 204,800 (H1) usable, which if you keep the file small as shown above it can be useful.


    f/5.6 @ 100mm for 1/400 sec at ISO 409,600 (H2)

    By the time you get to 409,600 (H2) as shown above, things start getting pretty smeared so anything larger than a thumbnail will likely disappoint.


    f/5.6 @ 100mm for 1/3200 sec at ISO 3,276,800 (H5)

    Everything after H2 is horrible with the worst being H5. Sure, it’s cool to say that you have a camera that can do three million ISO, but this is the worst image I’ve ever seen out of a camera in my lifetime. This was a pure marketing play as I can’t see anyone using an image like this for anything – yuck!

    Of course, I had to try shooting the sky handheld at night when I was pretty dark and cloudy. I got an interesting shot:


    f/5.6 @ 200mm for 1/125 sec at ISO 144,815

    but nothing I’d use beyond a talking point like this. This is however, the first time I’ve handheld a shot in the dark of night and got something that is better than what my eyes could see. Yes, my eyes had a better overall balanced exposure and no noise, but the backlit effect on the clouds was cool, and not visible to the naked eye without a seriously long exposure.

    Long-Term AF Findings


    f/4 @ 200mm for 1/2000 sec at ISO 180

    Yes, this AF system is excellent, but like all systems I’ve used, I still get the best result when I use a single AF point in continuous mode and do a good job manually tracking my subject. Full auto (Auto Area AF), is still flawed and various group / multi point methods all resulted in a fair number of misses in real world use – even in sunny conditions that warranted 1/000 sec or greater shutter speeds.

    Here’s an example when using the dynamic area AF 25 mode where the system just failed (it focuses on the grass behind the runner):


    f/2.8 @ 200mm for 1/1000 sec at ISO 100

    However, the next two frames got more in focus and the remainder afterwards were focused. This tells me that the system is good at self correcting and just a little more R&D is required to get more perfect shots from the time you first press the shutter button.

    While I was out shooting my model noticed an eagle, so without changing any settings I just pointed my camera up and sprayed and prayed to get a shot. Out of 16 frames, I got one shot which is somewhat understandable – especially given the dandelions flying in the air:


    f/2.8 @ 200mm for 1/1000 sec at ISO 100

    I hoped and expected for more in focus shots since I did an ok job tracking the subject, but I’ve done better using other cameras – including the D4s.

    There were plenty of in focus shots taken over the month that I had this camera where this camera performed flawlessly, but it really was about tried and true methods that work with most sports cameras to get the best results. You an see some in the first look and part one of this article, or here in the gallery.

    Yes, it’s an improvement over the phenomenal D4s, and it’s definitely better than any Canon I’ve shot with, but it impressed me so much up front I had a false sense of hope that this would be the camera that nailed every shot that was outside the minimum focus distance.

    4k Videos

    I hate doing video, but the 4k video on this camera combined with a touch screen intrigued me. I was hoping it would act like a cell phone or a lower end DSLR that allows tap to focus, but as you can see from this video that tap to focus (done on a monopod here) is a total disaster:

    Instead, pre-focusing the scene as I’d do with most DSLR’s without touch screens is going to give you the best results (unless you have additional video hardware to assist):

    The 4k quality was good and recorded flawlessly with compact flash cards as slow as 90 mbps. My only gripe was that it would stop after three minutes instead of just spilling over to a new file.

    Conclusion


    f/7.1 @ 125mm for 1/400 sec at ISO 36,000

    Yes, this  a great camera. Is it the best Nikon sports camera ever made, it’s hard to say but if history repeats itself I think the inevitable D5s will be the one to earn that title. For now, I’m impressed but also reminded at how good the D4s was, so I’d be hard pressed to just stick with it if I were a Nikon shooter.

    The focus was excellent, but not foolproof – I learned how to cause it fail – a lot. The ISO performance was good, but I’ve seen better from Nikon. The metering mode, was typical Nikon – which is to say maddening for Canon shooters who can just use evaluate all the time and not think about metering. These realities, along with the interesting but flawed AF Fine Tune feature (learn more) tell me there will be some much needed firmware updates, and that D5s will be the one that meets the expectations that this camera sets.

    If you are a commercial Nikon shooter doing sports or events, then I’d say yes this is worth the upgrade because this camera will easily pay for itself. However, if you area prosumer who shoots for fun, I’d consider getting a great deal on a D4s or waiting for the D5s before parting with your hard earned money .

    As for me, I’m going to hold out and test the Nikon D500 and Canon 1DX Mark II to see if either motivates me to part with my 1DX or if I’m going to sit this round out.

    Where to order

    Click here to learn more or order on the B&H web site. I opted for the dual CF version, but an XQD version is available at no extra charge.

    Other articles you may enjoy

    If you enjoyed this article, you may also enjoy these:

    Disclosure

    If you make a purchase using links found in this article, I may make a commission. It doesn’t cost you a penny more, but it does help to support future articles like this.

    NOTE: This site requires cookies and uses affiliate linking to sites that use cookies.

    If you enjoyed this article, please support future articles like this by making a donation or saving money by using my discount coupon codes. Either way, your support is greatly appreciated!

    This blog is intended for freelance writing and sharing of opinions and is not a representative of any of the companies whose links are provided on this site.

    The opinions provided are of Ron Martinsen alone and do not reflect the view of any other entity