Monday, August 31, 2015

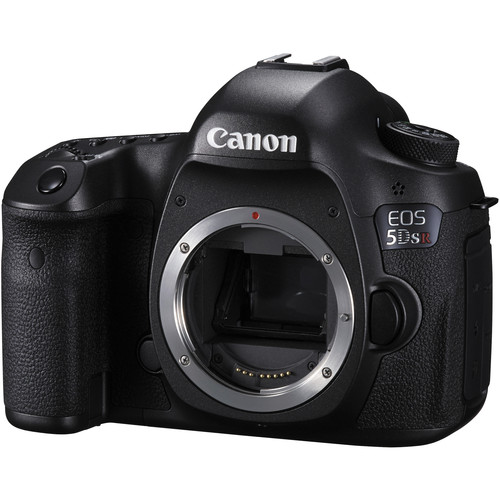
COMPARISON: Canon 5DsR vs 5Ds, Is the 5DsR worth $200 more? (Review Part II of II)

Canon EOS 5DS R DSLR Camera

In the first part of my review entitled, REVIEW: Canon 5DsR–The Value of 50 Megapixels (Part I of II), I showed lots of real world shots but what I think you really want to know is “should you buy the 5Ds or 5DsR?”. In this article I offer a comparison of the image quality of the two and submit my final conclusion on this camera.

Bookshelf Test


f/5.6 @ 24mm for 10 sec at ISO 100
using Canon 11-24mm f/4L

Using one of Canon’s sharpest lenses, the 11-24mm at 24mm, I shot at 4 apertures from f/4 to f/11 (where diffraction begins) as well as 6 shots at f/5.6 from ISO 100 to 6400 using both the Canon 5DsR and 5Ds. The complete gallery of images can be found here where you can download the full resolution in-camera JPEG images for your review. These images are copyright © Ron Martinsen – ALL RIGHTS reserved, so please delete them when you are done pixel peeping.

With both cameras, f/5.6 gave me my sharpest overall results so that was what I used to do my comparison. If your lens isn’t this sharp (and few are), you won’t get results that are this crisp so don’t waste your money using these cameras with cheap lenses.

If you read part II of my 5Ds review then you saw the comparison I did between the shoes portion of the bookshelf shot for the 5Ds vs 5D Mark III. There was no comparison as the 5Ds destroyed it, so when I did the same test with the 5DsR vs the 5Ds you really see the cost of a the optical low pass filter found on the 5Ds:

5DsR 100% Crop (Actual Pixels from JPEG)
Click image for full size original

5Ds 100% Crop (Actual Pixels from JPEG)
Click image for full size original

So yes, as expected the 5DsR is sharper – when every possible variable is identical on a side by side comparison. In real life that doesn’t happen so I had to run this test multiple times before I got a 5DsR image that was sharper than the 5Ds. A millimeter difference will favor one model over another, so if your are out shooting with your buddy using these two cameras the person with the sharpest image is probably going to be the person with the better combo of eye sight / manual focusing ability.  Yes, the 5DsR is clearly sharper, but a lot can go wrong by the photographer that could prevent you from seeing that advantage – especially if you aren’t using the best lenses on the market.

High ISO Performance


f/5.6 @ 24mm for 1/6 sec at ISO 6400

I’ve never been overly impressed with the high ISO performance of super megapixel cameras and these are no different. Sure due to all of the detail in the image you can get a decent web site image with them as shown above at ISO 6400. However, if you click on the image you’ll see that the noise level is what I would consider unacceptable. Even ISO 3200 isn’t that great as you can see below:

5DsR 100% Crop at ISO 3200

5Ds 100% Crop at ISO 3200 - Click for full size original
5Ds 100% Crop at ISO 3200

The sharpness advantage of the 5DsR shines here when details are being smeared, so if there’s really a great case for the 5DsR it’s actually the detail preservation at higher ISO’s. These are going to require a lot less pixel peeping than ISO 100 comparisons.

More Sample Images

Check out the galleries below for more sample images from both the 5DsR and 5Ds:

Copyright Ron Martinsen - ALL RIGHTS RESERVED - Click to open 5DsR Gallery
5DsR Real World Sample Images Gallery by Ron Martinsen

Copyright Ron Martinsen - ALL RIGHTS RESERVED - Click to open 5Ds Gallery
5Ds Real World Sample Images Gallery by Ron Martinsen

5Ds vs 5DsR Bookshelf Comparison Gallery by Ron Martinsen

In addition to my images, you can see what others are getting with these two cameras at these popular photo upload sites:

You can submit your own images to the blog Facebook page or to https://www.facebook.com/Canon5DSR.

Conclusion

If you haven’t done so already, please read my 5Ds review.  You can also read the first part of this article here.

These two cameras are identical except in sharpness with the 5Ds having an advantage in limiting moirĂ© pattern problems, but at the expense of sharpness. In the real world it’s rare that you’ll see this problem, but even if you do just use the adjustment brush in Lightroom and adjust the moirĂ© slider to remove the problem.

For many, the extra sharpness is probably worth the extra $200 but only if you’ll be printing at full resolution (16 x 24” @ 360 ppi) or larger – regularly. Most of downsize our images for the web or smaller prints, so the advantage will be lost between these two models. However, there is still an advantage to these cameras when downsizing versus the 5d Mark III as I showed in my 5Ds review conclusion.

Here’s the real deal though – this camera IS NOT, I repeat, IS NOT a good primary camera so I ONLY recommend it as a SECONDARY camera. The reason for this is that a 5D Mark III, 6D, or 1D X will offer much more flexibility thanks to better high ISO performance AND slower shutter speeds (only 1/<focal length> * 1 vs * 3) which is what you need if you shoot handheld. Yes, these cameras will reward you when everything goes right and you have great light or a tripod, but amateur photographers will not make the most of these cameras – especially if they aren’t using the sharpest (which are often the most expensive) lenses on the market.

While I do highly recommend the 5DsR for advanced Canon shooters who need the sharpest image possible for large print work, I advise against both the 5Ds/5DsR for people who aren’t comfortable manual focusing and/or doing micro AF adjustments on their cameras to make the most of them. What’s more even a lens like the 70-200mm f/2.8L IS II USM isn’t sharp enough to fully take advantage of this lens, so plan to marry it with new L glass released in the past few years if you want the best results (or SIGMA Art Series or Zeiss Otus prime lenses). You’ll also want a 4k UHD display like the NEC PA322UHD to see the true sharpness of your images when you aren’t zoomed in to 100%.

Personally I’m going to just rent a 5DsR when I need one because I don’t print at 16 x 24 or larger enough nor do I shoot in perfect light using a tripod enough to warrant owning one. Sure, if money were no object I’d probably pick one up as a 3rd camera but for now my advice remains the same as I’ve told Nikon users looking at the D800/D810 – in the average users hands you are more likely to get a blurry, noisy image that disappoints with one of these than you are that super sharp image that you see in reviews. That’s the advice I’d give a friend, but if you’ve gotta get one then I’d probably spend the extra money (and wait) for the 5DsR.

Angry about my conclusion and want to prove how you can get amazing images at insane slow shutter speeds – handheld? Feel free to submit your images to the blog Facebook page or to https://www.facebook.com/Canon5DSR.

Where to order

Click here to learn more or order on the 5Ds or 5Ds R on the B&H web site.

Other articles you may enjoy

If you enjoyed this article, you may also enjoy these articles about other Canon products:

Here’s also some other articles on this blog that you might enjoy:


Disclosure

If you make a purchase using links found in this article, I may make a commission. It doesn’t cost you a penny more, but it does help to support future articles like this.

NOTE: This site requires cookies and uses affiliate linking to sites that use cookies.

If you enjoyed this article, please support future articles like this by making a donation or saving money by using my discount coupon codes. Either way, your support is greatly appreciated!

This blog is intended for freelance writing and sharing of opinions and is not a representative of any of the companies whose links are provided on this site.

The opinions provided are of Ron Martinsen alone and do not reflect the view of any other entity

Tuesday, August 25, 2015

REVIEW: Topaz Labs Remask 5 Tutorial & Discount Coupon Code

APPROVED EARLY ANNOUNCEMENT
Downloads of version 5 available after NOON Central Time on 8/25/15

ReMask5_300x600_wedding

Masking is a pain in the butt – period. While Refine Mask has improved a lot, the reality is that it still is tough to do complex refinements and get good results. In my opinion, no masking product has been easier to use than Remask so I was excited to get the chance to try out the latest version this past weekend when I was writing this review.

What’s New

Background Replacement Feature

Remask now runs stand alone which allows it to integrate with other products like Lightroom and more. To support this background replacement is necessary directly in the app so this new panel gets added so you can tweak your new background directly in Remask without having to use Photoshop.

Here’s a look at the responsive user-interface first introduced in version 4 now with stand-alone support:

New Stand Alone User Interface
Notice how the background replacement was done directly in the app with before on the bottom left, after on the bottom right and the mask shown above

Here’s a video tutorial where I do a sky replacement on the scene shown above using Photoshop to demonstrate reuse of the mask on multiple layers:


Here’s the before and after where I chose to use a cloudless sky to avoid taking away attention from the umbrella scene, but if I wanted a more exciting sky with better clouds I can easily do experiments in either the stand alone version or in Photoshop:


Sky replaced with whatever you choose with ease

The After version also features Autumn preset from Adjust with “process details independently” checked and it reuses the sky replacement mask to avoid applying the effect on the sky. I could have also chosen to create a mask to avoid applying it on the water or to isolate the water to give it a different color as well. The net result is an intentionally vibrant sunset postcard.

Even with 50 megapixel images from a Canon 5DsR, the plugin in Photoshop CC 2015 worked extremely fast.

Magic Brush

Transparency Brush and Magic Brush

Remask’s strength over the competition has always been the Transparency Brush which allows you to click on a color you want to keep then click on a color you want to remove then paint over the area to quickly remove one color while keeping the other (which is how you do complex things like hair, wedding veils, etc…). This feature still works great and now has the option to turn the intelligent Magic Brush (think Auto Mask) feature on and off as shown above.

Conclusion

This is by far the fastest and easiest to use version of ReMask yet. I really love what they’ve done to improve the UI performance and ease of use that gives it a world class polished looked. Existing users will enjoy the upgrade whereas people who have passed on it in the past should give it another try to see how much it has improved! Yes, masking sucks but it doesn’t get any easier than this!

Where to order

Click here and use the coupon code RONMART to save 15% off ANY Topaz Labs product or the entire collection, and for a limited time until September 11 2015 you can use the coupon code GETREMASKS to to get $20 off Remask 5. Here’s how you enter the code in the shopping cart (prices and codes may changes so check my discount coupon code page if the code doesn’t work):

Enter the code and click Apply Coupon

Other articles you may enjoy

If you enjoyed this article, you may also enjoy these:

Disclosure

If you make a purchase using links found in this article, I may make a commission. It doesn’t cost you a penny more, but it does help to support future articles like this.

NOTE: This site requires cookies and uses affiliate linking to sites that use cookies.

If you enjoyed this article, please support future articles like this by making a donation or saving money by using my discount coupon codes. Either way, your support is greatly appreciated!

This blog is intended for freelance writing and sharing of opinions and is not a representative of any of the companies whose links are provided on this site.

The opinions provided are of Ron Martinsen alone and do not reflect the view of any other entity

Friday, August 7, 2015

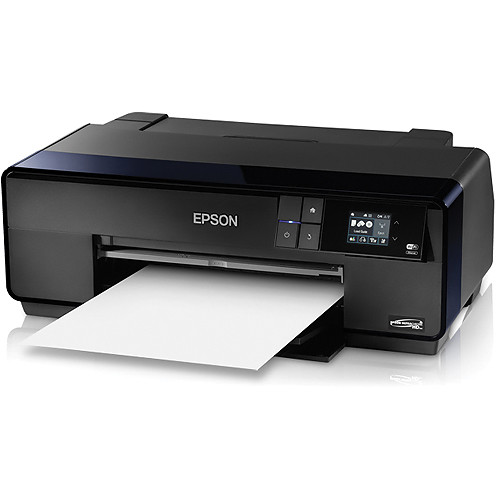
REVIEW: Epson SureColor P600 (Part II of II)–Excellent Value with Pro Results

Epson SureColor P600 Inkjet Printer

I like to use a printer for a while before rendering an opinion because most photo printers can shine with just basic testing, but it is the test of time that surfaces issues with print heads clogging and network communication problems. Fortunately this printer has passed with flying colors as I’ve never once had any networking problems nor have I had a single print head issue even after not using it for seven weeks in very dry weather.

In part one of my review I sang the praises of the ease of setup, but over time I really fell in love with it even more. I loved using the P600 as my everyday printer with plain paper jobs, as well as doing simple 4x6 prints for my wife. However, when I needed a high quality print I found myself not even bothering to fire up my 3880 and trusting the P600 for the job instead. What’s more, it handled roll prints very well, so I even found myself doing small Exhibition Canvas and banner jobs with it.

Not only did this printer work flawlessly the entire 8+ months that I’ve been testing it, but it kept itself up to date with the latest software via its handy Software Updater app:

Software Updater keeps you up to date with no hassle

My contact at Epson tells me this printer is very similar to the Epson Stylus® Pro 3880 replacement, the Epson SureColor P800, except it has 25.9ml cartridges instead of 80ml. Those are tall words as the P800 is replacing a legendary model, but everything I’ve seen from the P600 except for the quality of some of its ICC profiles (which is fixable) indicates that this printer is certainly in the same league. Yes, my 3880 had better ICC profiles which helped it to outperform the P600, but the prints I got were all excellent and very close. As a result, I didn’t bother to compare the prints to the R3000 and instead put it up against the 3880 instead. Read more to see how it did!

Printing via Epson iPrint 5.1.1 from Apple iPhone 6

Epson iPrint 5.1.1 on iOS 8.4

I did print a 22mb full-size JPEG taken from a Canon 5Ds from the app and it worked great. While the source image could have used a bit more sharpening for printing via this mechanism, the color and quality was great. I was also happy that the app offered a decent selection of Epson media types, paper sizes, and even maintenance settings:

Check remaining ink directly from your phone

Apple AirPrint on iOS 8.4 worked without any hassle but the results were unimpressive due to lack of options, and the color wasn’t as accurate and vibrant as the Epson iPrint app.

Apple AirPrint on iOS 8.4 works, but use the app for best results

You must preconfigure your printer via the touch LCD with the correct paper type and size but AirPrint loved to send print jobs as 4x6 on letter paper in my limited testing.

Fine Art Printing using Matte Black vs 3880

Lightroom 2015 Matte Black Ink Printing

When I printed on Velvet Fine Art matte paper, the printer driver forced me to use the manual front loading tray. Fortunately, printing via the front manual load tray was very easy and worked brilliantly. I did have to wait 1 minute, 34 seconds to change to matte black ink but that was over 30 seconds faster than the time it takes my 3880 so this wasn’t a problem either.

The print result was darker with less tonal range than the equivalent job sent to my 3880 and printed on the same paper. I suspect this is due to the 3880 having a more finely tuned ICC profile which mirrors results I’ve seen from other papers as well.

Advanced Black & White on Epson Metallic Photo Paper Glossy vs 3880

Lightroom 2015 with Advanced Black and White on Metallic

Advanced Black and White Mode

In the case of ABW the printer manages color instead of relying on an ICC Profile so the results that I got from the P600 seemed identical to what I got from the 3880. This was an absolutely stunning print with phenomenal tonal range and delicious blacks. In fact, its one of those prints that makes me wish there was a way I could show you but no electronic mechanism can do it justice compared to the results I got in real life. Simply put, if you do black and white printing, I can’t fathom how the results I got could disappoint even the most picky of print masters.

Conclusion

The Epson SureColor P600 takes everything I loved from the R3000 and makes it better. It’s a very reliable printer that makes excellent prints without any hassle – even when it sits idle for weeks on end. If you want a great photo printer for occasional fine art printing and daily print jobs, then the P600 will serve you well. If you want to do more fine art printing then it will be more cost effective to upgrade to the Epson SureColor P800 for its larger ink cartridge capacity.

Overall, I loved the Epson SureColor P600 and highly recommend it.

See part I of my review for more info.

Where to order

Click here to learn more, check for rebates/sales or order on the B&H web site. My friends at Amazon have it available here.

Due to minimum advertised pricing restrictions, it is best to add it to your cart to get the latest price and deduct any mail-in rebates on top of that.

Other articles you may enjoy

If you enjoyed this article, you may also enjoy these:

Disclosure

If you make a purchase using links found in this article, I may make a commission. It doesn’t cost you a penny more, but it does help to support future articles like this.

NOTE: This site requires cookies and uses affiliate linking to sites that use cookies.

If you enjoyed this article, please support future articles like this by making a donation or saving money by using my discount coupon codes. Either way, your support is greatly appreciated!

This blog is intended for freelance writing and sharing of opinions and is not a representative of any of the companies whose links are provided on this site.

The opinions provided are of Ron Martinsen alone and do not reflect the view of any other entity