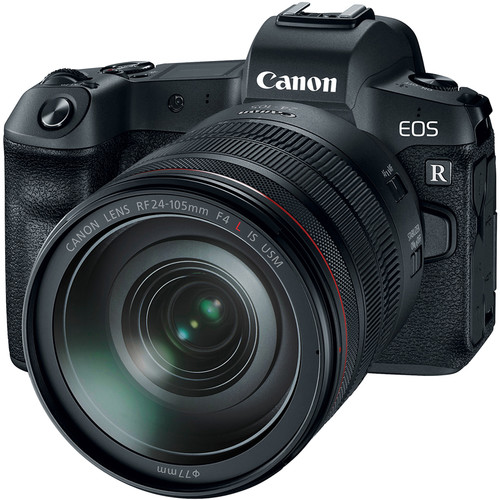
Canon EOS R Mirrorless Digital Camera
When I did my first thoughts on the Canon EOS R, I hadn't used this camera or done my review of the Nikon Z7. Since the Z7 was way better than I expected, I tried to go into this review with a more open mind. I was hoping for a great surprise from Canon like I got from Nikon.
There were definitely some surprises, so read on to find out how this camera would fair in every day life, a NFL game and a trip to the Arizona desert. At the same time I also picked up a new iPhone XS and my wife got a new iPhone 8 Plus, so doing a comparison of the phones vs the EOS R was inevitable for my own personal curiosity.
Settings used during testing
I don't typically include a section like this in my reviews but my inclusion of comments about iPhone vs EOS R makes it necessary for me to comment on what settings I've used to get what I felt were the best in-camera JPEG results when comparing Canon and Apple's in-camera image processing. I always shoot raw so I can change my mind later, but here's what I set for the in-camera JPEG's included in this article:
- Peripheral Illumination Correction ON
- Distortion Correction ON
- Digital Lens Optimizer ON
- Dual Pixel RAW Disable
- Image Quality RAW+L (fine)
- Highlight Tone Priority D+2 (Enhanced) - sets ISO to a minimum of 200
- Picture Style Auto
- Color Space Adobe RGB
- White Balance AWB or Cloudy most often
- High ISO Speed Noise Reduction Low
- ISO Speed Settings Auto with Min Shutter Speed set to Auto Fast (+1)
Obviously the best results for any given photo requires changing one or more of these values to the best choice for the conditions at a time a photo is taken, but average camera users rarely change this many settings per photo. As a result, I intentionally excluded any photos from this article where I deviated from these or the camera default settings.
All shots were hand-held for this review with no special devices to assist with stabilization.
Things I Loved about the EOS R

f/9 @ 58mm for 1/500 sec at ISO 200
The kit lens can definitely make a nice sharp image as seen above, especially in the ideal conditions I enjoyed in Phoenix, Arizona
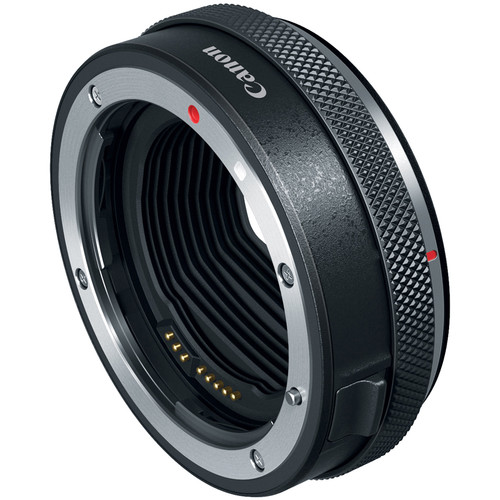
I'm glad that Canon is investing in a new R lens system for the future that addresses the limitations of the EF system which was optimized for film based cameras. In the long run I think this will allow for improved performance for future advancements in lens and sensor technology. I was also pleased that all of my Canon L lenses performed flawlessly with the Control Ring Mount Adapter - even my super wide and razor sharp 11-24mm. This preserves my past investment in lenses while still moving forward to a better future ahead, so this was the right thing to do.

Canon Control Ring Mount Adapter EF-EOS R
I'm a bit confused as to why Canon didn't just have one adapter to rule them all that included a control ring and drop-in filter. It seems odd that you have to settle on just an adapter (the value option) or an adapter with a drop-in filter for a $100 premium (which is great for my 11-24mm), but you can't get a control ring adapter with the drop-in filter feature too.
The OLED view finder was very good and I really liked the new white on black dot-matrix LCD panel on top over what I have on my other Canon DSLR's. It was much easier to read.
While I didn't use it in the real world due to old habits being hard to break, I found the new Fv (aka Flexible-Priority) auto exposure mode to be a great idea. Personally, I find having Manual mode with exposure compensation for the Auto ISO to be enough for my needs, but I could see myself using Fv mode if I was just getting started in digital photography.
The new RAW (CR3) file format was also handy when using C-RAW (Compact Raw) Dual Pixel RAW mode to keep the RAW files down to 40MB on average and roughly 15MB - 20MB on average with Dual Pixel RAW turned off. It worked fine with Lightroom Classic and I didn't observe any measurable real world differences with it. I did notice that uncompressed RAW mode that files ballooned up to 70MB . That said, it is technically a lossy-compression so purist will likely still prefer the uncompressed RAW format - especially if you think you'll be doing +3EV or more adjustments regularly as demonstrated in Bryan Carnathan's excellent article on this new format.
The battery did a great job with an all day outing in Arizona as well as a very cold day shooting the Seahawks - both with plenty of chimping resulting in only about half of the battery life being used. This was way better than the Nikon Z7 or Sony A7R III, so I was pleased with the battery performance in real-world use case scenarios.
Lastly, I did put the weather sealing to the test with both rainy conditions in Seattle and dust conditions in Arizona and never observed any sensor dust issues or otherwise.
Areas for Improvement
My biggest complaint of this camera was that it seems to use the same technology that makes the images in the 80D look like pixels that have been smeared and lacking for crisp and sharp details even in the RAW files. This results in images that are closer small sensor cell phone quality than what I see in other mirrorless and higher end DSLR cameras. As a result, even when this camera does everything right I end up with an image that makes me just shake my head when I'm used to seeing what is possible from the best of Sony, Nikon and even Canon.
If you've been pleased with the Canon 7D series or XXD series cameras (e.g., 70D, 80D, etc...), then you'll love this camera. If you've found them to be lacking in quality, then it's pretty clear that Canon isn't out to win you over with this camera. The 30.3 MP sensor sucks in my personal opinion, so until Canon comes out with something better I see no reason to downgrade to this camera from something like a 5D Mark IV, 5Ds, 5Ds R, 6D Mark II or 1D X Mark II. However, if you've invested in Canon gear and are looking to move up from the Rebel series, XXD series or even the 7D series (if you can live with a 2 fps drop in burst mode performance) then the EOS R should be high on your list of cameras to consider.

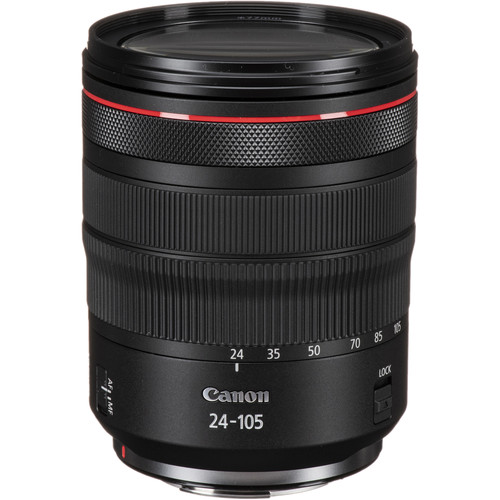
Canon RF 24-105mm f/4L IS USM Lens
As for the RF 24-105 f/4L IS lens, it seemed soft and didn't perform as well as my Canon 24-105mm f/4L IS II. In fact, I'd say it performed closer to my very old 24-105mm f/4L IS with terrible diffraction after f/11. As a result, I was wishing I would have reviewed the RF 28-70mm f/2L lens instead as I can't recommend this lens. I you have existing Canon lenses then I'd recommend forgoing the kit lens and using your existing lenses with the adapter.
Just like Nikon, Canon went cheap on the slots and only offered one. I really wished this camera would have had a slot for my CF cards (or even CFAST 2.0) to go along with the single SD card, but I got over it as the price point suggests that this camera is targeted as consumers who are coming from cameras with only one memory card slot.
Diffraction Compensation Needs Work
When shooting landscapes, I like a lot depth of field, so when testing cameras and lenses I always start out at f/22 and do a series of shots more opened up (smaller f-stop #'s) to see how much depth I can get before diffraction kicks in. In the field you usually only have the in-camera JPEG and the rear LCD to make a judgement call so when I got back to my Windows system and closely analyzed it on my NEC PA271Q display I noticed that anything beyond f/11 was very soft. Here's an example that illustrates the level of diffraction when viewing the three versions at full size:

f/11 @ 50mm for 1/250 sec at ISO 200
This f/11 shot was much sharper than the f/16 and f/22 versions which lost any advantage in depth of field due to massive diffraction which soften the entire image
Canon once again is light years behind Fujifilm, Sony and Nikon in their diffraction compensation technology that is present in both the in-camera JPEG processing as well as the raw files. The Nikon Z7 did way better even in poor weather conditions, and the Sony a7R III and Fujifilm X-Pro 2 were both excellent by comparison.
Focus Performance Observations

f/2.8 @ 200mm for 1/2000 sec at ISO 3200
The lack of eye auto focus that Sony and Fujifilm mastered years ago is quite frustrating, but the Face+Tracking auto focus mode in this camera is the worst I've seen any camera on the market - in years. In fact, it was so bad that I expected to see a firmware update to be available for this camera but that never happened during the entire time I was reviewing the EOS R.
I found myself having to rely on manually setting my AF point which was cumbersome due to the lack of a dedicated joystick for this function, and frustratingly slow speed at which the focus points could be moved using the arrow keys. Like other touch screens, I found my nose accidentally changing the AF point on the touch screen, but it seemed to happen more often in this camera for reasons I can't explain. Overall the whole experience setting the focus points was worst in class of any camera I've used in the last few years.
Yes, if I did my job right with manual AF point positioning then I could get my subject in focus even in nose bleed stadium seats even while using the Canon Control Ring Mount Adapter and my 70-200mm f/2.8L IS II USM lens as shown here:

Zoomed in, click for the original full-size image
It wasn't all bad though. I love the improved AF point coverage and the performance seems to be fairly fast, but its low-light performance was abysmal in my testing. Yes, it didn't focus hunt like a typical Canon DSLR, but it did quickly find a wrong subject and/or simply stop searching and take a blurry shot more often than I've seen on a camera since the Canon 1D Mark III.
While I was glad to see that this camera offered focus peaking, once again it was a worst in class implementation that didn't come close to the easy to see and use implementation I've seen with Sony, Fujifilm or and Nikon. In fact, it was so bad that I simply stopped using it after a week of poor results. Of course this partially had to do with the terrible 1.48' / 45 cm minimum focus distance of the RF 24-105mm f/4L IS.
Compared with the iPhone 8 Plus / XS
Each release of the iPhone seems to make great progress with its "in-camera" default processing of images, so I find myself taking some shots with my phone and simply calling it a day. For social media and casual printing it offers a file that is good enough that the average person won't see the need for something better.
With this in mind, I found myself very impressed with the metering and performance of my iPhone XS and my wife's 8 Plus during our trip to Arizona - so much so, I found myself taking the iPhone shot first and then trying hard to dial in settings that gave me a better result with the EOS R.
In terms of speed and overall satisfaction, the iPhone was the hands down winner. However, with pixel peeping and the advantage of the EOS R larger sensor still won in my comparisons - but I did find myself taking a lot of shots on this trip only with the iPhone and determining that they were "good enough" to not bother to shoot it again with the EOS R.
Here's some examples of shots taking with the EOS R and links to iPhone shots of the same scene. All shots are 100% unedited from both devices and are exactly as they came out. While you are viewing this article you may download and compare the images side by side, but you must delete them from your machine after you close this article.
All images are copyright Ron Martinsen with all rights reserved. You may not edit, print, post, link to, redistribute or use any of the images featured in this article without a hand signed contract on printed paper.

f/16 @ 105mm for 1/320 sec at ISO 400
A shot like this benefits from a longer focal length lens vs the wide angle of the iPhone, so I was much happier with the EOS R result
Compare with iPhone XS in-camera HDR which isn't bad but needs a serious crop

f/22 @ 24mm for 1/160 sec at ISO 400
My wife did a better job composing her iPhone shot but I included this one as it shows off the distortion you get by default with the EOS R kit lens at 24mm vs the auto perspective correction with iPhone 8 Plus in-camera HDR. This problem can be easily fixed in Lightroom.
The iPhone 8 Plus shot was the more impressive shot but the highlights were better preserved with the EOS R in Enhanced (D+2) Highlight Tone Priority mode

f/11 @ 70mm for 1/1250 sec at ISO 800
Single exposure with camera defaults and Cloudy White Balance
Lots of shadow detail is lost with the default settings so I took it again (below) using the HDR features of both the EOS R and iPhone XS

f/11 @ 70mm for 1/1250 sec at ISO 800
In-Camera HDR +/- 3EV Natural
Shadow details come back but the image overall feels washed out
Compare with iPhone XS in-camera HDR which lacks the saturation but has a more natural color and feels more upright

f/8 @ 63mm for 1/1250 sec at ISO 2500
In-Camera HDR +/- 3EV Natural
iPhone handles extreme mixed lighting scenarios like this very well.
It manages to avoid the bleached out looking sky, tree top and saguaros (in the background)
Compare with iPhone XS in-camera HDR

f/16 @ 45mm for 1/160 sec at ISO 200
The OLED viewfinder helped me eliminate the distracting yellow box at the bottom left corner of the iPhone XS version, but I did prefer the camera default processing from my phone

f/9 @ 70mm for 1/1600 sec at ISO 200
This shot made me hate the EOS R swivel out LCD (which is great for selfies) versus how Sony only tilts up and down which makes it easier to get better composed shots like I did with the iPhone XS for objects that are close to the ground

f/5.6 @ 25mm for 1/160 sec at ISO 400
Having a hood paid off for this mugshot as there was some intense sunlight that was blocked by the hood, but it wreaked havoc on the iPhone XS version

f/5.6 @ 43mm for 1/500 sec at ISO 200
This EOS R shot above turned out so bad compared to the incredible iPhone XS version that I seriously considered not using the EOS R for the rest of the day. If it wasn't for this review, I probably would have too.
Unedited JPEG's
The images you see below are just like my "real world pics" (except these aren't so real world -- it's cool places in Arizona and an NFL game) where I'm showing the 100% unedited in-camera JPEG. You can click the photo to see the full size original, but I don't provide the raw files due to storage cost and file permissions issues.
You may view the images at full-size, but you may not save, print, edit, link to or otherwise use any of the images in this article or in the gallery. All photos are copyright Ron Martinsen - ALL RIGHTS RESERVED. I do ask that you also leave the article open in your browser while you view the images.

f/5.6 @ 180mm for 1/2000 sec at ISO 10000
Even with nose bleed level seats, I was able to catch all of the action on the field with the EOS R using the Canon Control Ring Mount Adapter and my 70-200mm f/2.8L IS II USM lens.
Unlike my 1D series cameras, I wasn't left with an image that I could heavily crop and use as I did the last time I shot the Seahawks vs the 49ers from the sidelines.
The adapter performed well, but the camera sensor and in-camera JPEG processing left me wanting for for better results, but it wasn't bad for a ~$2300 camera (at the time this was written).

f/4 @ 105mm for 1/1000 sec at ISO 3200
At the end of the game I got a better seat and shot with the RF 24-105mm, but the images weren't any sharper when zoomed to 100% when compared to my 2012 70-200mm f/2.8L IS II lens.
Click here to see one of many examples in the gallery taken at the same ISO and the same elevation

f/9 @ 24mm for 1/1000 sec at ISO 1250
This was the first time I tried the in-camera Auto HDR (Natural) processing to see if I could make this back-lit rusted piece of rusty iron look like more than just a black silhouette. It did ok, but I immediately went to my iPhone XS when I wanted perfectly exposed in-camera shots

f/7.1 @ 50mm for 1/1000 sec at ISO 250
In-camera HDR saved this from looking like a hand flipping the bird, but the results are so gross that I still wanted to toss it. With that said, this is probably the best I've seen a camera from Canon for HDR processing of the sun as typically a shot like this would have nasty banding around the sun

f/22 @ 101mm for 1/250 sec at ISO 1000
This was one of my first f/22 shots with this camera and the first impression was "not bad", so I mistakenly used it a lot more often than I should have after this. Don't be like me - stick with f/11 or smaller f-stop numbers if you care about depth of field and sharpness at the same time

f/5.6 @ 105mm for 1/250 sec at ISO 400
This shot helps illustrate what I mean by soft when you view the details in the cut area where the focus point was set. To see what I consider sharp, consider this shot taken with the Sony a7R III at only 1/60 sec and ISO 2500 albeit with a very sharp 90mm prime lens

f/5 @ 105mm for 1/500 sec at ISO 25600
I was pleased to see that color fidelity was good even at the highest ISO's, so that's a huge improvement from what we saw from Canon in its last generation of cameras a few years back

f/22 @ 53mm for 1/1250 sec at ISO 8000
This shot was ruined with the in-camera HDR version, but thankfully the "save source images" option in the HDR settings allows you to keep both the RAW and JPEG version of each of the exposures (3 here but up to 7 possible) so I went with the +0 EV version for the keeper frame shown above

f/11 @ 53mm for 1/125 sec at ISO 200
If you have mixed lighting conditions in a frame, Evaluate Metering isn't going to save you so you better pray - or just use your phone instead as my wife did with her iPhone 8 Plus shot here

f/9 @ 61mm for 1/400 sec at ISO 200
The old saying that f/8 is great rings true, but I'd add stick with f/9 and you'll be fine for landscapes as seen here in this incredibly sharp and detailed shot

f/14 @ 70mm for 1/200 sec at ISO 320
I did +2/3 EV to brighten up the dark shadows here, but I was surprised to discover that I didn't need it when I got back to the computer. I think this was user error due to the sun playing games with my eyes, but luckily it was easy to bring this one back with a quick adjustment in Lightroom using the CR3 C-RAW file (see here for the full-size RAW processed version)

f/5.6 @ 105mm for 1/1600 sec at ISO 8000
While traveling home at desert freeway speeds, I couldn't help but open the car window and try to get a snapshot of the sunset. I was pleased to see that even at a high ISO and shutter speed that the gradients turned out ok and there weren't any huge color splotches in the noise as I would have seen with previous generation Canon cameras. I wouldn't say this is a great high ISO camera, but I've definitely seen worse - and this is an easy one to clean with Noiseware

f/5 @ 67mm for 1/500 sec at ISO 25600
4 out of 8 frames taken in these conditions resulted in a completely out of focus image. It didn't focus hunt like a Canon normally would, it simply took a blurry shot
NOTE: Continue Focus Search was set to ON for all frames and burst mode was not used - I took each shot separately
Click here to see a gallery of 145 images taken with the EOS R and click here for a few redundant shots taken with the iPhone 8 Plus or XS while I was in Arizona. All images are copyright Ron Martinsen with all rights reserved. You may not edit, print, post, link to, redistribute or use any of the images featured in this article without a hand signed contract on printed paper.
Conclusion
If you are a loyal entry level (Rebel) to mid-level (XXD series / 7D series) Canon shooter with an investment in Canon lenses and/or flashes, then the EOS R is a camera worth considering. For everyone else, I still go back to saying that my 2017 Camera of the Year winner the Sony Alpha a7R III or even the cheaper a7 II is the better choice. The Nikon faithful have a much better alternative with the Z7 as it impressed me a lot more than the EOS R did.
Simply put, the EOS R isn't a bad camera - it's just hard to recommend in this era where there are so many better offerings from Sony, Fujifilm, Nikon, Olympus and Panasonic. I'd also strongly advise against the RF 24-105 kit as that lens simply isn't sharp enough in 2019 to justify its $1100 price tag.
Where to Buy?
CLICK HERE to learn more or buy today.
Other articles you may enjoy
If you enjoyed this article, you may also enjoy these reviews:
Enjoy these and more on the Reviews tab as well as Ron's Recommendations.
Disclosure
If you make a purchase using links found in this article, I may make a commission. It doesn’t cost you a penny more, but it does help to support future articles like this..


 2015 RX100 IV Photo with Portrait Enhancements & Sky Replacements

 Auto detection of the sky and face make this difficult edit easy

