Sunday, February 21, 2016

REVIEW: Epson Legacy Platine & Video Tutorial (Legacy Series 4 of 5)

Epson Legacy Platine Paper

Epson Legacy Platine paper is a cotton fiber substrate that uses photo black ink to create archival quality fine art prints. Here are a few important facts about this paper:

  • 100% cotton fiber
  • Image Permanence: 200 years color / 400 years B&W (when used with Epson HD and Epson HDX Ink)
  • 17 mil / 432 Mu caliper
  • Acid and lignin free / pH buffered
  • No Optical Brightening Agents
  • Smooth surface / Satin finish

Check out the Print Your Legacy landing page with videos here to see what some well respected photographers think of this and all of the Legacy papers.

For more on my thoughts, continue reading.

Geeky Comparison

If you aren’t a geek you might want to skip this section.

When comparing Platine next to a variety of other Epson papers you’ll see that its color gamut is outstanding even against Exhibition Fiber Paper which was my previous favorite:


Epson Legacy Platine vs Baryta, Exhibition Fibre Paper (EFP) and Metallics

Click  for a larger view

compare the color gamut as a 2d chart (from ColorThink Pro) against Exhibition Fiber  Paper  then you’ll see they are fairly similar:

Epson Legacy Platine vs Cold Press Natural Color Gamut
Epson Legacy Platine vs Exhibition Fiber vs Legacy Etching Color Gamut
on a Epson SureColor P800

In The Hands Analysis

This paper is rigid enough not to flex when you hold the edge, but it is less thick and rigid as Exhibition Fiber (EFP) yet thicker than Luster. The texture is closer to Luster, but a lot less busy. It does have more visible light gathering texture than EFP, but that has the advantage in that I didn’t see the scuffing issues that seem so prevalent with EFP.

The colors are simply jaw dropping, and better than any paper I’ve seen before it. The blacks are incredibly deep with its nearly 2.7 Dmax and the colors just pop off the page better than most displays can render the color. I was so thrilled when I saw the results that I wanted to stop everything and start reprinting all of my favorite prints over again on this paper – it’s that good!

The flexibility of this paper means it should be a lot more roll paper friendly than Exhibition Fiber or even Legacy Baryta which would be a big plus for pano and super large prints.

Real World Print Analysis


Epson V850 scan of Legacy Platine on a Mac (16-bit)

(Click for Original Mac Version above or Windows Version Here)

The photo below is a scan of a print made using this paper, but even the scan is so vivid that it looks like the original photo! This is a great example of just how wide the color gamut is for this paper (included by permission of Vincent Versace author of Welcome to Oz 2 and Oz to Kansas: Black & White Conversion Techniques):


Actual Epson V850 Scan of a Print from SureColor P9000 on Legacy Platine

as well as this one which is available as a full resolution 24MB TIFF scan:


Full Resolution Tiff V850 Scan of a SureColor P800 Legacy Platine Print

On a scale of 1 (worse) to 10 (the best I’ve ever seen), I’d give it a 9.5 whereas I’d give the Exhibition Fiber Signature Worthy papers a 9.4. It’s outstanding and extremely pleasing to the eye, but a bit it isn’t quite as rigid as Exhibition Fiber.

Tutorial Video

This video teaches you how to print on this paper in both Photoshop CC 2015 and Lightroom CC 2015 on Windows 10 , but past reviews were done on OS X El Capitan:

If you’d like visual instructions, including Advanced Black & White, then be sure to check out the visual tutorial in the Epson Legacy Papers Reviews & Tutorials video which covers both Windows and Mac.

The printer paper profile you use will be in the format <printer> LegacyPlatine_PK_<version>.icc (or sometimes icm) so for the Epson SureColor P800 you’d choose SC-P800_Series LegacyPlatine_PK_v1.icc

Conclusion

I didn’t know what to make of this paper when I first heard about it. I had high hopes that were exceeded for the Baryta, so I wondered why this was even necessary. Now that I’ve used it, I think if I were going to get print via roll paper I’d choose the Platine over the Baryta or Exhibition Fiber as the lighter weight would resist curling much better than its thicker counterparts. What’s more, this is so much richer and darker than Exhibition Fiber, that I don’t see the point in even using EFP anymore.

Of the four papers in the new Legacy series, this is the sleeper hit that I think roll users are going to love the most in the long run. My only gripe is that its pleasing texture is more reflective than Baryta or EFP, so that could be a turn off if a print was placed in a location where side light would make it hard to view the print while hanging on the wall. With that said, it’s less distracting than what you get from Luster, so images with lots of texture (especially abstracts) could actually use this characteristic to an advantage.

To say that I highly recommend this paper is an understatement – it’s simply incredible, so YES – I HIGHLY, HIGHLY, HIGHLY recommend it for people looking for incredible color and black depth in a paper that isn’t going to curl like heck when you are done printing.

Where to order

Click here to learn more or order at Adorama or order at B&H here.

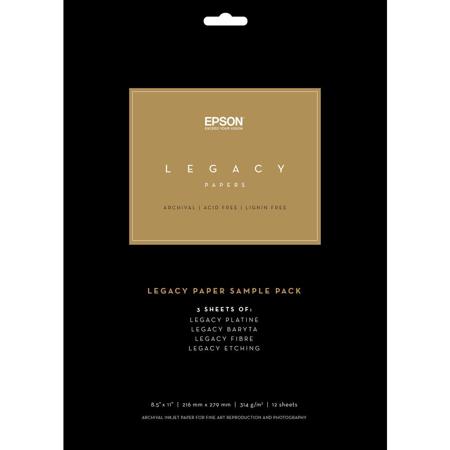
Just want to try it out first? Try picking up the Legacy sample pack (also at Adorama) that I used for testing!

Other articles you may enjoy

If you enjoyed this article, you may also enjoy these:

Disclosure

If you make a purchase using links found in this article, I may make a commission. It doesn’t cost you a penny more, but it does help to support future articles like this.

NOTE: This site requires cookies and uses affiliate linking to sites that use cookies.

If you enjoyed this article, please support future articles like this by making a donation or saving money by using my discount coupon codes. Either way, your support is greatly appreciated!

This blog is intended for freelance writing and sharing of opinions and is not a representative of any of the companies whose links are provided on this site.

The opinions provided are of Ron Martinsen alone and do not reflect the view of any other entity

Wednesday, February 17, 2016

REVIEW: Epson Legacy Etching & Video Tutorial (Legacy Series 3 of 5)

Epson Legacy Etching Paper

Epson Legacy Etching paper is a cotton fiber substrate that uses matte black ink to create archival quality fine art prints. Here are a few important facts about this paper:

  • 100% cotton fiber
  • Image Permanence: 200 years color / 400 years B&W (when used with Epson HD and Epson HDX Ink)
  • 20 mil / 508 Mu caliper
  • Acid and lignin free / pH buffered
  • No Optical Brightening Agents (OBAs)
  • Smooth surface / Matte finish

Check out the Print Your Legacy landing page with videos here to see what some well respected photographers think of this and all of the Legacy papers.

For more on my thoughts, continue reading.

Geeky Comparison

If you aren’t a geek you might want to skip this section.

When comparing Etching next to a variety of other Epson papers you’ll see that its color gamut isn’t quite as large as some of the others:


Epson Legacy Etching vs Legacy Fibre,
Cold Press Bright & Natural, and Hot Press Bright and Natural

Click  for a larger view

However, in practice the differences don’t feel that large. In fact, if you compare the color gamut as a 2d chart (from ColorThink Pro) against Cold Press Natural then you’ll see they are fairly similar:


Epson Legacy Etching vs Cold Press Natural Color Gamut
on a Epson SureColor P800

In The Hands Analysis

When holding the paper in my hand I observed that it is slightly darker than Epson Velvet and much brighter than Hot Press Natural, despite the absence of OBA’s. This makes it more aesthetically pleasing paper with whites, yet it still retains the archival longevity of papers that do not have OBA’s.

The texture and thickness of my sample paper felt much like the Hot and Cold Press papers which is a good thing, as I love a hearty matte paper that doesn’t flex when you hold it. This coupled with a noticeable texture when viewed at an angle that feels good in the hand, but doesn’t stand out on the print means that you get all of the advantages of a textured matte paper without it distracting from your photo. I like that – a lot!

In terms of durability, it’s like all matte papers with matte ink – you have to be careful as it’s easy to scratch or smudge so using gloves is recommended and protect as soon as possible. However, it seemed less fragile than the Fibre in real world testing use and abuse.

If you are someone who appreciates things that feel good in your hands, you will definitely love this paper!

Real World Print Analysis


Epson V850 scan of Legacy Etching on a Mac (16-bit)

(Click for Original Mac Version above or Windows Version Here)

While the colors look a bit washed out in the scan, in real life it isn’t quite so faded looking. In fact the prints vibrant and the blacks look deep, but it’s not like Baryta bright and deep. As a matte paper, I found it to be very good. In fact, unless you have it next to better color gamut papers you’ll most likely find that feels exceptionally vibrant for a matte paper. This is definitely true of this photo (image provided by Epson for this review):


Actual Epson V850 Scan of a Print from SureColor P9000 on Legacy Etching

as well as this one which is available as a full resolution 24MB TIFF scan printing using Epson Advanced Black & White mode:


Full Resolution Tiff V850 Scan of a SureColor P800 Legacy Etching Print

Advanced Black & White Mode Used (Warm / Dark presets)
Faded old photo look created using Texture Effects

The ABW print has excellent grayscale tonal range, but it comes at the cost of not faithfully reproducing the color. Just for completeness sake I’ve included this one which is available as a full resolution 24MB TIFF scan printing in color using the icc paper profile for the P800:


Full Resolution Tiff V850 Scan of a SureColor P800 Legacy Etching Print

For reference, I’ve also done a print and scan using Epson Hot Press Natural:


Full Resolution Tiff V850 Scan of a SureColor P800 Hot Press Natural Print

and one using Velvet Fine Art:


Full Resolution Tiff V850 Scan of a SureColor P800 Velvet Fine Art Print

During my testing I observed that the Legacy Etching had the best overall result when printing as a color image when compared to the Hot Press Natural and Velvet Fine Art papers. In theory the Hot Press should have better blacks, but the Etching print just had a richer feel to it thanks to the most accurate reproduction of the original colors – presumably due to a great paper profile. The Hot Press Natural was the warmest toned paper of the trio with the Etching landing right in the middle as the Velvet was the brightest.

The Velvet was also the worst print with more muddled blacks, so I really appreciated the Legacy Etching even more after this test – especially using Advanced Black and White mode where the grayscale range was excellent.

On a scale of 1 (worse) to 10 (the best I’ve ever seen), I’d give it a 8.8 whereas I’d give the Hot Press Signature Worthy papers a 8.5, and Velvet a 6. This is an excellent paper that feels wonderful in the hand and its great paper profile means fantastic color and black and white prints that are faithful to the original image (assuming you have a properly calibrated display – which most don’t).

Tutorial Video with ABW

This video teaches you how to print on this paper in both Photoshop CC 2015 and Lightroom CC 2015 on OS X El Capitan with an emphasis on Advanced Black & White mode, but future reviews will also cover Windows 10:

If you’d like visual instructions, including Advanced Black & White, then be sure to check out the visual tutorial in the Epson Legacy Papers Reviews & Tutorials video which covers both Windows and Mac.

The printer paper profile you use will be in the format <printer> LegacyEtching_MK_<version>.icc (or sometimes icm) so for the Epson SureColor P800 you’d choose SC-P800_Series LegacyEtching_MK_v1.icc

Conclusion

I had such a high regard for the Epson Hot Press papers for their incredible dmax and color gamut (for a matte paper) that I went in wanting to declare them the winner. When I saw the “data” that confirmed my gut instincts, I was even more ready to say this wasn’t as good. However, when I held prints in my hand and compared them under my GTI lightbox it became clear that Epson has generated an excellent icc paper profile which creates great prints that rival the statistically better Hot Press papers.

I was also a huge fan of the cold press papers for their wonderful texture, so again I expected that etching would disappoint me. However, I found the texture on this paper to be substantial enough to see and feel but subtle enough so as not to distract. In fact, I wish it was a little more aggressive with the texture, but then again I’m a huge fan of the heavily textured Hahnemühle German Etching.

As matte papers go, this is one of the finest I’ve tested. I’d have to toss a coin when comparing the Legacy Etching to the Hot Press Natural as to which is better, so I’d probably purchase the cheaper of the two if there was a deal. All things equal, I’d probably go for the Legacy Etching. With that said, I enjoy bright papers so I’d probably do Cold Press Bright or Hot Press Bright for my fine art matte paper needs, but they are all so good I can’t see a customer who appreciates matte prints being disappointed with any of them.

I highly recommend Legacy Etching for its bright OBA free color, its wonderful but not over done texture and its wide color gamut that allows for faithful reproduction of my fine art prints.

Where to order

Click here to learn more or order at Adorama and click here to learn more or order from B&H.

Other articles you may enjoy

If you enjoyed this article, you may also enjoy these:

Disclosure

If you make a purchase using links found in this article, I may make a commission. It doesn’t cost you a penny more, but it does help to support future articles like this.

NOTE: This site requires cookies and uses affiliate linking to sites that use cookies.

If you enjoyed this article, please support future articles like this by making a donation or saving money by using my discount coupon codes. Either way, your support is greatly appreciated!

This blog is intended for freelance writing and sharing of opinions and is not a representative of any of the companies whose links are provided on this site.

The opinions provided are of Ron Martinsen alone and do not reflect the view of any other entity

REVIEW: Epson Legacy Fibre & Video Tutorial (Legacy Series 2 of 5)

Epson Legacy Fibre Paper

Epson Legacy Fibre paper is a cotton fiber substrate that uses matte black ink to create archival quality fine art prints. Here are a few important facts about this paper:

  • 100% cotton fiber
  • Image Permanence: 200 years color / 400 years B&W (when used with Epson HD and Epson HDX Ink)
  • 19 mil / 483 Mu caliper
  • Acid and lignin free / pH buffered
  • No Optical Brightening Agents (OBAs)
  • Smooth surface / Matte finish

Check out the Print Your Legacy landing page with videos here to see what some well respected photographers think of this and all of the Legacy papers.

For more on my thoughts, continue reading.

Geeky Comparison

If you aren’t a geek you might want to skip this section.

When comparing Fibre next to a variety of other Epson papers you’ll see that its color gamut isn’t quite as large as some of the others:


Epson Legacy Fibre vs Legacy Etching,
Cold Press Bright & Natural, and Hot Press Bright and Natural

Click  for a larger view

However, in practice the differences don’t feel that large. In fact, if you compare the color gamut as a 2d chart (from ColorThink Pro) against Cold Press Natural then you’ll see they are fairly similar:

Epson Legacy Fibre vs Cold Press Natural Color Gamut
on a Epson SureColor P800

In The Hands Analysis

When holding the paper in my hand I observed that it is slightly brighter than Epson Velvet and much brighter than Hot Press Natural, despite the absence of OBA’s. This makes it more aesthetically pleasing paper with whites, yet it still retains the archival longevity of papers that do not have OBA’s.

The texture and thickness of my sample paper felt much like Ultra Premium Presentation Paper Matte in that it is very flexible. If you hold it at the edge it will flex down unlike Hot or Cold Press papers that stay rigid. However, the sample provided by Epson using Vincent Versace’s print felt more solid like a 19 mil paper should. As a result, I think might have received a sample that was closer to 10 mil vs the final paper that is 19 mil.

UPDATE: I did confirm that two of the three sample packs I had contained 10 mil Fibre Etching whereas the third contained 19 mil – which fills like the hot and cold press papers. I confirmed that the print results didn’t change, but the feel in the hand was significantly better without the flexing.

The texture is extremely smooth with no hint of any texture, so I really liked that. While there are times that I like texture, and appreciate papers like Etching, there’s also certain subjects that can be ruined if the paper has too much texture (i.e., a smooth vegetable or fruit). As a result those who are looking for a super smooth paper that isn’t going to have annoying reflections like RC papers, will find this to be an excellent choice.

In terms of durability, it’s like all matte papers with matte ink – you have to be careful as it’s easy to scratch or smudge so using gloves is recommended and protect as soon as possible.

Real World Print Analysis


Epson V850 scan of Legacy Fibre on a Mac (16-bit)

(Click for Original Mac Version above or Windows Version Here)

While the colors look a bit washed out in the scan, in real life it isn’t quite so faded looking. In fact the prints vibrant and the blacks look deep, but it’s not like Baryta bright and deep. As a matte paper, I found it to be very good. In fact, unless you have it next to better color gamut papers you’ll most likely find that feels exceptionally vibrant for a matte paper. This is definitely true of this photo (included by permission of Vincent Versace author of Welcome to Oz 2 and Oz to Kansas: Black & White Conversion Techniques):


Actual Epson V850 Scan of a Print from SureColor P9000 on Legacy Fibre

as well as this one which is available as a full resolution 24MB TIFF scan:


Full Resolution Tiff V850 Scan of a SureColor P800 Legacy Fibre Print

On a scale of 1 (worse) to 10 (the best I’ve ever seen), I’d give it a 7 whereas I’d give the Hot Press Signature Worthy papers a 8.5. It’s very good and pleasing to both the eye and hand.

Tutorial Video

This video teaches you how to print on this paper in both Photoshop CC 2015 and Lightroom CC 2015 on OS X El Capitan, but future reviews will also cover Windows 10:

If you’d like visual instructions, including Advanced Black & White, then be sure to check out the visual tutorial in the Epson Legacy Papers Reviews & Tutorials video which covers both Windows and Mac.

The printer paper profile you use will be in the format <printer> LegacyFibre_MK_<version>.icc (or sometimes icm) so for the Epson SureColor P800 you’d choose SC-P800_Series LegacyFibre_MK_v1.icc

Conclusion

Of the four Legacy papers I tested, this was my least favorite. While I did like it and found it to be very good, I honestly would go for Hot Press Bright (despite the OBA’s) if I wanted a bright smooth paper and if I wanted no OBA’s I’d reach for Hot Press Natural. If I wanted texture, I’d go for Legacy Etching, so this paper is left in a category where I’d use it if I had it but I probably wouldn’t buy it or chose it over the others for an important fine art print. 

Where to order

Click here to learn more or order at Adorama

Other articles you may enjoy

If you enjoyed this article, you may also enjoy these:

Disclosure

If you make a purchase using links found in this article, I may make a commission. It doesn’t cost you a penny more, but it does help to support future articles like this.

NOTE: This site requires cookies and uses affiliate linking to sites that use cookies.

If you enjoyed this article, please support future articles like this by making a donation or saving money by using my discount coupon codes. Either way, your support is greatly appreciated!

This blog is intended for freelance writing and sharing of opinions and is not a representative of any of the companies whose links are provided on this site.

The opinions provided are of Ron Martinsen alone and do not reflect the view of any other entity

Monday, February 15, 2016

Epson Legacy Papers Reviews & Tutorials

Epson Legacy Paper Sample Pack, 8.5x11", 16 Sheets (4 of Each)

It’s been a while since I’ve done a “series” of articles, but when I set out to do my review of the four new Epson Legacy Papers I quickly realized I had too much content for one blog article! As a result, I’ll kick off this 5 part series with this overview article that talks about the papers as a group and follow up with an article on each paper individually. As I do, I’ll continuously update this article with links to the latest articles, so bookmark this page as the landing page to my Legacy papers reviews.

Introduction

About a month or so ago, I started working with Epson to do a review of their Legacy papers, so this review is the result of a lot of behind the scenes effort in my personal free time (usually on the weekends these days). I had already been deep into my reviews of the P600 and P800 as well as my upcoming scanner review of the Epson V850 Pro scanner (Adorama / Amazon), so doing these paper reviews to test out all this new Epson gear made sense.

The first question you may be asking is what’s the difference between these Legacy papers and the Signature Worthy papers? Well the answer there is simple in the case of the Etching, Platine and Fibre papers – these are guaranteed to be completely OBA free and of the highest quality. The Baryta does have a trace amount of OBA’s, but it’s an incredibly good paper! During my testing I compare the papers head to head and draw my own conclusions to that claim, but I’ll state right up front that the two new photo black papers here (Baryta and Platine) will be my new go to papers for my fine art printing needs.

Geeky Details

If you aren’t a geek, then skip this section as only geeks and nerds will appreciate the following gory details.

I’ve tested and examined the profiles in ColorThink Pro and these are all excellent profiles, so most people will never have a need to generate their own custom profile unless their printer isn’t supported.

Legacy Baryta has one of the widest color gamuts I've ever tested
Legacy Baryta has one of the widest color gamut I've ever tested

Legacy Baryta has blown me away as it’s even outperformed the legendary Exhibition Fiber (my previous favorite paper). The table of results below provided by Epson were made using using reflective measurement and measured using Chromix ColorThink Pro for gamut calculations:

Legacy Papers Compared

As you can see from the table above, the dmax (black ink darkness) of the Baryta is off the chart, and the Platine isn’t terribly far behind. Both Baryta and Platine outperformed Exhibition Fiber and look amazing in real life. The Etching and Fibre did well for matte papers, but fell just below the Hot Press papers for total gamut size.


Other Epson Papers Compared

Click for a larger view

Doing profile analysis, it does appear the better ink sets found on the 4900 up and new P7000 & P9000 do outperform my beloved P800, but my 45 year old eyes weren’t able to visibly detect any significant differences in real life.

Legacy Paper Reviews

The Legacy papers come in the following two photo black resin coated choices (click names to see in-depth reviews):

  • Epson Legacy Baryta – This paper feels and looks a lot like Exhibition Fiber, but with significantly better dmax and seemingly less issues with scratching based on my limited testing. Simply put, I LOVE this paper so much that I want to reprint all of my EFP prints on it! Legacy Baryta has two coatings and one of those coatings has a small amount of an OBA.
  • Epson Legacy PlatineOBA free and way better than Exhibition Fiber in a format that doesn’t curl as bad either. The dmax and color are simply jaw dropping, so if you are a big fan of photo black printing I urge you to check out this review!

and two matte black OBA free choices:

I’ve reviewed each of these papers in depth and discuss them in detail in their respective articles. Each of my reviews assumes you’ve read this article and will focus on the specific paper reviewed, so be sure to check out the rest of this article before you move on.

As a collective, I’ve found them all to be of the highest quality and a great choice for anyone who wants to show their work on premium gallery worthy papers. Pricewise, early indications are that they are inline with the signature worthy papers and others of this level of quality. They are premium papers, and priced as such, but if you are reselling your work they are an investment that will easily pay for itself when customers see how incredible your images look on this paper (especially Baryta & Platine).

For more of my overall thoughts, see the conclusion. However, my detailed thoughts on each paper can be found in the reviews above.

How to Print on Legacy Papers in Photoshop & Lightroom

I’ve done Tutorials and Walkthroughs on papers before on my printing series pages, but since we are in a world now with Windows 10, OS X El Capitan and Lightroom and Photoshop CC I thought I’d go ahead and do some new screen shots to help those who are tripped up by the older visuals. There’s a lot to digest here, so if you are new to printing you might want to pick up my Printing 101 book. 

ICC / ICM Profile Choices for Legacy Papers

For this review, I primarily used my Epson P800 printer and the v1 version of the printer profiles as shown below (found here):

  • SC-P800_Series LegacyBaryta_PK_v1.icc
  • SC-P800_Series LegacyPlatine_PK_v1.icc
  • SC-P800_Series LegacyEtching_MK_v1.icc
  • SC-P800_Series LegacyFibre_MK_v1.icc

The PK stands for photo black ink, and MK stands for matte black ink so make sure you are using the correct black ink with these papers or you will get unpredictable and lesser quality results.

Naturally if you were using a 3880 would show Epson_SP3880, 4900 would show  Epson_SP4900, etc… As of the time I wrote this article, I could not locate the P600 profiles but when they become available you’d see SC-P600 for the prefix. 

Photoshop Color Handling

To get the best results from Photoshop, you will have to set the Color Handling choice in the color management section to “Photoshop Manages Colors” then choose the appropriate printer paper profile listed above. The following sections show what this looks like on the Mac and Windows.

Photoshop for Mac Profile Selection


P800 Mac Photoshop Manages Colors Settings

For Photoshop on the Mac (all versions, although the dialogs may look different depending on your version of Photoshop and OS X), the key changes you need to make are:

  • Make sure Color Handling reads Photoshop Manages Colors
  • Choose the Printer Profile that matches the paper you will (Legacy Baryta for P800  Photo Black shown)
  • Be sure Send 16-bit data is checked*
  • Rendering Intent can be your choice, but I almost always use Relative Colormetric
  • Be sure Black Point Compensation is checked (very important)

* NOTE: Windows doesn’t offer a 16-bit data checkbox, but it’s architecturally capable of printing up to 32-bit. In Windows, it’s up to the printer driver author as to control what color depth will be sent, and user options to change that value. I haven’t observed any visible difference between 8 and 16-bit data being sent, but that could change in the future so I always check this option.

See the table earlier in this section for instructions on which paper profile and ink to use for each legacy paper profile for your printer.

After you’ve done this, it is VERY important to click the PRINT SETTINGS… button to set your printer to turn OFF color management, otherwise you’ll get double color management and very poor results.

You should also use the preview as a guide as sometimes you’ll need to change the layout to make your print fit (which must match the printer settings choice too) as well as the position and size (use scale to fit media to shrink/grow to fit). Borderless typically isn’t represented accurately in this dialog, so only be sure that your print is oriented and not clipped or too small when using this dialog.

In the screenshot I’ve used all of the checkboxes under the preview, but these are not required and have no impact on your print. They are just tools to help you to some crude soft proofing to help you understand what to expect from your print. For most beginners I urge people to leave them all UNCHECKED as often they confuse more than they help.

Please consult the Mac Printer Dialog settings for Photo Black and Matte Black inks sections below for more important information.

Photoshop for Windows Profile Selection

For Windows 7 and up and most versions of Photoshop that are available today, the instructions for Photoshop are identical to the Mac above. here’s a screenshot:


P800 Windows 10 Photoshop Manages Colors Settings

Again, Photoshop on Windows and Mac are identical in this respect, so please read the previous section on the Mac for more details. After that, please consult the Windows Printer Dialog settings for Photo Black and Matte Black inks sections below for more important information.

Lightroom Color Management Profile Setting

To print in Lightroom’s print module, you need to either let the printer manage colors (as discussed later in Advanced Black and White mode) or choose an ICC/ICM color profile as shown here:


Using an ICC Profile in Lightroom (Mac Shown)

If you don’t see your profile listed, then choose OTHER from the list and locate the desired profile in the list and check it. When you return to Lightroom that choice should now be one of the menu options.

See the section entitled ICC / ICM Profile Choices for Legacy Papers at the top of this article to see which choice you should make for your desired paper.

Printer Dialog Settings

Once you’ve got Photoshop or Lightroom set up properly to print, you’ll need to set up the printer (using Print Settings via Photoshop and via Lightroom) to use the correct paper and ink type. The following sections discuss the correct settings for Windows and Mac.

Mac Photo Black Ink Printer Dialog Settings

When using Legacy Baryta and Platine papers, you should use Photo Black ink by choosing one of the media type Ultra Premium Photo Paper Luster (also referred to as Premium Luster Photo Paper (260) in some printer drivers) as shown here:

Baryta & Platine Photo Black Settings - Epson Printer Driver for Mac

When you do this AND you choose Photoshop Manages Color for your Color Handling setting (or Managed by Printer for your Color Management Profile choice in Lightroom) then you should see Print Mode and Color Mode disabled. If not, please make sure Color Mode is set to Off (No Color Management).

Please make sure Ink reads Photo Black.

Mac Matte Black Ink Printer Dialog Settings

When using Legacy Etching and Fibre papers, you must use matte black ink which means choosing a Fine Art Paper media type.

IF you’ve chose your paper size correctly (see the next section entitled Printing using Matte Black Ink – Mac if you haven’t), then you simply need to choose the Watercolor Paper – Radiant White media type from the Fine Art Paper menu group in the Media Type list. If you’ve done everything properly, your print dialog should look something like this:


Etching & Fibre Matte Black Settings - Epson Printer Driver for Mac

If your seeing Ink: Photo Black like in the previous section and the Fine Art Paper menu choices are disabled, please read the next section to fix this problem.

When you do this AND you choose Photoshop Manages Color for your Color Handling setting (or Managed by Printer for your Color Management Profile choice in Lightroom) then you should see Print Mode and Color Mode disabled. If not, please make sure Color Mode is set to Off (No Color Management).

Please make sure Ink reads Matte Black.

Printing using Matte Black Ink – Mac

Apple’s universal printer dialog architecture makes it very difficult to use Matte Black Ink if you don’t know what you are doing. The reason why is that matte black ink is tied to your media type choice which must be one of the Fine Art media types. However, all of those are disabled UNLESS you make the correct paper choice which is very unintuitive located in the Paper Size list on the Page Setup section of the Epson printer driver as shown here:


Page Setup - Paper Size - Epson Printer Driver Mac

Choose Front Fine Art, Front Poster Board or Roll Paper to enable Matte Black Ink

You MUST choose one of the Front Fine Art, Front Poster Board or Roll Paper choices for your desired paper to make the Fine Art media type choices to become enabled. Once you do that, you need to set them to Watercolor Paper – Radiant White when using Legacy Etching or Legacy Fibre.

Windows is simple as the Fine Art media types are never disabled, so just select the Fine Art media type you want it shows you the ink that will be used. In fact, some printers will even let you choose the ink type for any paper type on Windows.

Windows Photo Black Ink Printer Dialog Settings

When using Legacy Baryta and Platine papers, you should use Photo Black ink by choosing media type Ultra Premium Photo Paper Luster (also referred to as Premium Luster Photo Paper (260) in some printer drivers) as shown here:

Baryta & Platine Photo Black Settings - Epson Printer Driver for Windows

Please make sure Ink reads Photo Black.

Windows Matte Black Ink Printer Dialog Settings

When using Legacy Etching and Fibre papers, you must use matte black ink which means choosing a Fine Art Paper media type. Choose the Watercolor Paper – Radiant White media type from the Fine Art Paper menu group in the Media Type list. If you’ve done everything properly, your print dialog should look something like this:

Etching & Fibre Matte Black Settings - Epson Printer Driver for Windows

Please make sure Ink reads Matte Black.

Advanced Black and White Settings

Advanced Black and White mode is a printer driver feature that tries to maximize the grayscale tones to give you the widest tonal range possible. Put in plain English, this means you should see more details in the dark areas instead of just pure black. Since this mode treats your image as a grayscale, any color you have will be ignored and the warmth or coldness of your print will purely be determined by the settings you choose in this dialog. Please keep this in mind as it is NOT intended to be a faithful reproduction of what you see on the screen, but rather a black and white image that shows a lot of detail in the darkest areas.

Given the phenomenal dmax of Legacy Baryta and Platine, these papers are ideal for using Epson’s Advanced Black and White mode (often referred to as ABW). Matte papers and inks never have the same level of dmax as resin coated papers using photo black ink, but the wonderful texture of these papers still make them suitable for use with ABW.

I’ve already done a big article on Advanced Black and White (aka ABW) here, so please review that for more details. Since I was testing this feature for the P800 and P600 anyway, I decided to include some screen shots below for the PC and Mac.

Whether you are using Windows or Mac, the basic steps for using ABW mode are as follows:

  1. Tell Photoshop or Lightroom to let the Printer Manage Colors (see more info in the sections that follow)
  2. Set your paper type and photo black or matte black ink choice (see previous sections) in the printer driver
  3. Set your ABW settings as desired (see the sections that follow)

While Windows and Mac dialogs look very different, the fundamentals on both platforms are roughly the same (except the odd paper size thing on the Mac).

Thee next sections show you how it should look for both Photoshop and Lightroom and previous sections show you the various nuisances for Mac and Windows about how to use photo or matte black inks.

Photoshop Using Advanced Black and White


Photoshop Printer Manages Colors for ABW Mode (Windows shown)

As previously shown for Photoshop, Windows and Mac are the same so the only key thing to note here is that you have to choose Printer Manages Colors from the Color Handling list. This disables the Printer Profile list because you are letting the printer driver do the color management. Everything else I mentioned with respect to printer profiles in Photoshop still applies (including checking 16-bit data on Mac).

After you’ve done this, then follow the instructions for using ABW for Mac or Windows later in this article.

Lightroom Using Advanced Black and White


Lightroom Printer Manages Color for ABW Mode (OSX Shown)

As previously shown, Windows and Mac are the same so the only key thing to note here is that you have to choose Managed by the Printer from the Color Management Profile list. This disables the Printer Profile list because you are letting the printer driver do the color management. Everything else I mentioned with respect to using printer profiles in Lightroom still applies (including checking 16-bit output on Mac).

After you’ve done this, then follow the instructions for using ABW for Mac or Windows below.

Advanced Black and White Printer Dialog Settings – Mac

On a Mac, you MUST use the Epson printer driver. This is not the AirPrint driver that will get installed automatically if you setup your printer right out of the box. If you don’t see these settings, please make sure you’ve set up using the disk and that you aren’t using the AirPrint version of the installed Epson printer.

Turning on Advanced Black and White Mode is easy, but you have to start by making sure Photoshop Color Handling is set to “Printer Matches Color” or Lightroom Color Management Profile setting is set to “Managed by Printer”. After that you do the following (for both):

First, make sure your Color Matching setting reads “EPSON Color Controls” instead of Color Sync:


Color Matching - Epson Printer Driver for Mac

Next, change the Basic Printer settings option labeled Print Mode from AccuPhoto HD to Advanced B&W Photo as shown here:


Printer Settings - Basic Section - Epson Printer Driver for Mac

Make sure you set the Media Type correctly (Luster for Baryta and Platine and Watercolor for Etching and Fibre) in this dialog, then click the Advanced Color settings to make further adjustments if desired:


Advanced Color Settings - Epson Printer Driver for Mac

See my article on Advanced Black and White (aka ABW) here, for more details on how to set this dialog as well as the Color Toning option shown here and on the basic section of this dialog.

Advanced Black and White Printer Dialog Settings – Windows

While I’m showing the driver for the P800 here, the fundamentals shown here work for all Epson printers on Windows that support Advanced Black and White mode. The key thing is to locate the Color media setting list on the main page and change that to Advanced B&W Photo as shown here:

Advanced B&W Photo Color Media Setting in Epson Printer Driver - Windows

After that you can click Advanced… to set advanced Color Controls settings for ABW mode:

Color Controls for ABW on Windows (via Advanced Button)

See my article on Advanced Black and White (aka ABW) here, for more details on how to set this dialog as well as the Color Toning option shown here and on the basic section of this dialog.

Print Your Legacy

While it may be pure marketing, I still find landing pages that feature videos of respected photographers talking about their use of these papers interesting. If you do to then be sure to check out the Print Your Legacy landing page with videos here.

Conclusion

A lot of people have come to my blog to read my Printing Series and have come away buying a new printer, then contacting me shortly thereafter to ask for advice on papers. For Epson users, my default response was always to pick up a pack of luster (review) for everyday use and get the Epson Signature Worthy Sample Pack (8.5 x 11", 14 Sheets) to find out what kind of paper you like for your best work. Now I’ll have to amend that and say pick up the Legacy sample pack as it takes Epson’s best papers to the next level.

The Epson Legacy Baryta and Platine are simply the best papers I’ve ever tested (and I’ve test a ton more than you see on this blog). I’ve got to get more packs in letter, 13x19 and 17” rolls as I’m wanting to reprint all my favorite prints on it – it’s that good! Please be sure to see my in-depth reviews of Platine and Baryta for more details.

The Legacy Etching and Fibre are both excellent papers, but they didn’t blow me away as much as the RC papers. Fibre feels super smooth and its color gamut is good, but if I’m out to impress I’m going to choose the more tactile Legacy Etching. I loved Cold Press Natural as one of the best papers to hold in my hands, so we’ll see if Legacy Etching is as good. It’s worth noting, that despite the name the texture is more pronounced but not intense (like a Hahnemühle German Etching) feel. I’d also consider Hot Press Bright to be my #1 go to paper for matte over both Etching and Fibre. With that said, for those who obsess about OBA’s, the Legacy papers are an answer to your prayers as the ultimate archival paper for centuries to come when paired with original Epson pigment inks.

I highly recommend the new Epson Legacy papers.

If you find this article to be helpful, my family would greatly appreciate you considering making a donation and/or using my links below when ordering your paper.

Where to order

Click here to learn more or order at Adorama now, or order the sample pack to just take it for a test drive. Click here to see B&H’s selections of Legacy Papers, including the sample pack.

Other articles you may enjoy

If you enjoyed this article, you may also enjoy these:

Disclosure

If you make a purchase using links found in this article, I may make a commission. It doesn’t cost you a penny more, but it does help to support future articles like this.

NOTE: I was not paid or solicited to do this article. I reached out to Epson after hearing other print masters who were testing it rave about how wonderful it was, and I agree. I was provided sample packs for testing and support for questions, but beyond that Epson had no involvement with this article and I was not compensated.

NOTE: This site requires cookies and uses affiliate linking to sites that use cookies.

If you enjoyed this article, please support future articles like this by making a donation or saving money by using my discount coupon codes. Either way, your support is greatly appreciated!

This blog is intended for freelance writing and sharing of opinions and is not a representative of any of the companies whose links are provided on this site.

The opinions provided are of Ron Martinsen alone and do not reflect the view of any other entity

Monday, February 1, 2016

Preorder Canon EOS-1D X Mark II Now

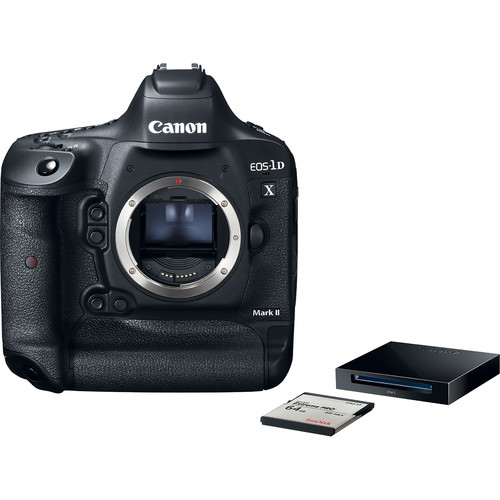
Canon EOS-1D X Mark II DSLR Camera Premium Kit
(body only $5999)

Product Highlights

As a 1DX owner, I’ve been eager to see what Canon came up with for the replacement to my camera. Now the wait is over, and it’s official. Here’s the highlights of what’s  included:

  • Newly developed 20.2 megapixel 35mm Full Frame Canon CMOS sensor;

  • Continuous shooting speeds of up-to-14 frames per second (fps) with Auto Exposure (AE) and predictive AF for viewfinder shooting and up to 16 fps1 in Live View mode;

  • Dual DIGIC 6+ Image Processors that transfer image data at extremely high speed for extended bursts during continuous shooting – up-to-170 consecutive RAW images at 14 fps. When shooting JPEG images you’re only limited by memory card capacity 2;

  • Capable of shooting 4K 60P and Full HD 120P video with Dual Pixel CMOS AF;

  • Enhanced wireless functionality (with the optional accessory Wireless File Transmitter WFT-E8) that supports the new high-speed IEEE 802.11ac standard and the ability to easily transfer photos and videos to compatible smartphones using Canon’s Camera Connect app*;

  • Digital Lens Optimizer to help correct aberrations in-camera (a feature that previously required post-processing on an external computer);

  • Improved 61-point viewfinder AF with expanded coverage and all AF-points selectable and supported to a maximum aperture of f/8;

  • Improved AI Servo III+ predictive AF algorithm for better accuracy;

  • Continuous red illumination of all AF points within the camera’s Intelligent Viewfinder II.

  • Compatibility with both CF and CFast memory cards for optimal performance and versatility.

Estimated ship date is 4/29/16. For a complete list of accessories CLICK HERE.

Compare the 1DX Mark II to other Canon DSLR’s and its predecessor using this awesome PDF.

If you are curious as to how that compares to the D5, then here’s the highlights for the D5:

  • 20.8MP FX-Format CMOS Sensor
  • EXPEED 5 Image Processor
  • 3.2" 2.36m-Dot Touchscreen LCD Monitor
  • 4K UHD Video Recording at 30 fps
  • Multi-CAM 20K 153-Point AF System
  • Native ISO 102,400, Extend to ISO 3,280,000!!!
  • 12 fps Shooting for 200 Shots with AE/AF
  • 180k-Pixel RGB Sensor and Group Area AF
  • 14-Bit Raw Files and 12-Bit Raw S Format
  • 1000 Base-T Gigabit Wired LAN Support
  • Available in dual XQD or CF only versions (woohoo, they listened!)

See more in my D5 article.

Ron’s Take

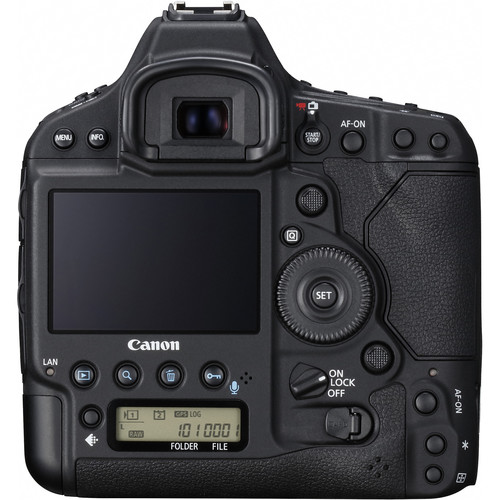
Canon EOS-1D X Mark II Rear View

Physically not much has changed beyond the greater resolution touch screen, and that’s a good thing as the 1D X body was very well designed. It’s also tough to re-learn a new body, especially if you keep your old body so I was glad for things to stay the same.

While some may be dissapointed that this wasn’t some 50+MP camera, I’m personally glad to see the 20.2MP sensor that should be on par or better than the D5. Hopefully this “newly developed” sensor will have the dynamic range and high ISO quality that meets or exceeds Nikon’s for the ISO they both offer. I was very dissapointed that Canon did match Nikon’s 153-point AF system and native 102,400 ISO, so I’m on the fence about what I’ll do next.

It also would have been a welcome addition to have the D5’s 2.3m dot touchscreen vs Canon’s 1.62m – especially when zooming in live view for critical focusing, so I’m dissapointed Canon didn’t do more for the LCD – especially given the price!

I’m eager to see how the new AF system works as the 1D X was a great improvement over its predecessors and the Nikon D4, but no match for the incredible performance of the D4s. The D5 is expected to top the D4s, so it should be very interesting to see how these to compete against each other. On paper Nikon should be the winner, but Canon’s better lens line up – including the amazing Canon 200-400mm f/4L IS with 1.4X Extender should prove a tough decision for wildlife and sports photographers.

I’ll test them both for sure and let you know what I think!

B&H First Look Video

More from the Press Release

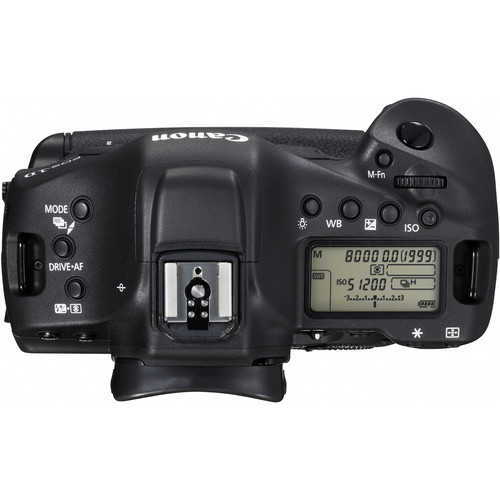
Canon EOS-1D X Mark II Top View

The Ultimate EOS Camera: Continuing a Legacy of High Speed and Performance

Building on the success of the Canon EOS-1D X professional digital camera, the Canon EOS-1D X Mark II camera is designed to deliver high-performance, speed, and image quality, with improved comfort for professional photographers. In addition to the new 20.2 megapixel full-frame CMOS sensor and Dual DIGIC 6+ Image Processors, the new EOS-1D X Mark II DSLR camera includes an improved 61-point High-Density Reticular AF II system with all AF points selectable by the user (and up to 41 cross-type points depending on the lens in use). The improved AF system includes expanded coverage that supports AF at maximum apertures up to f/8 with all 61 points for high precision autofocus even when using EF super-telephoto lenses with an EF extender. The camera also boasts excellent dynamic range and reduced color noise compared to its predecessor throughout its standard ISO speed range of 100 - 51,200. Expansion ISO speeds of 50, 102,400, 204,800 and 409,600 are also available. A first for the Canon EOS-1D series, this camera also features a 360,000-pixel RGB+IR metering sensor with enhanced precision and performance compared to its predecessor, improving facial recognition and tracking, as well as nature scenes. Additionally, the advanced AE system can detect and compensate for flickering light sources such as sodium vapor lamps that are often used in gymnasiums and swimming pools. When enabled, this anti-flicker system automatically adjusts shutter release timing to help reduce disparities in exposure and color especially during continuous burst shooting.

For filmmakers and photographers looking to do more than still photography alone with a DSLR camera and EF lenses, the EOS-1D X Mark II camera offers high resolution DCI 4K video at frame rates up-to-60p, with smooth movie recording to an in-camera CFast 2.0 memory card. An additional card slot supports standard CF memory cards up to UDMA 7. The built-in headphone jack supports real-time audio monitoring. Two additional EOS ‘firsts’ include 4K Frame Grab and 120p Full HD recording. The camera’s 4K Frame Grab function allows users to isolate a frame from recorded 4K video and create an 8.8 megapixel still JPEG image in-camera. When combined with the EOS-1D X Mark II’s high-sensitivity full-frame CMOS sensor, the new camera’s ability to record Full HD video at frame rates up to 120p will allow videographers to produce high quality slow motion video even in extremely low light. To make video shooting even more intuitive, the Canon EOS-1D X Mark II camera’s touch-screen LCD allows videographers to select the camera’s AF point before and during video recording with Dual Pixel CMOS AF, which provides responsive, accurate and quiet camcorder-like video autofocus to DSLRs.

“The innovations within Canon’s new EOS-1D X Mark II DSLR camera clearly set a new standard for professional cameras,” said Yuichi Ishizuka, president and COO, Canon U.S.A., Inc. “In developing the EOS-1D X Mark II camera, we looked to incorporate user-requested performance enhancements to bring professional photographers the ultimate EOS camera, a camera that has matured and been developed to meet their evolving needs.”

“Having f/8 capability on all 61 AF points is a tremendous benefit to wildlife photographers," noted nature photographer and Canon Explorer of Light Charles Glatzer. “In order to capture tight shots of animals without disturbing them, I frequently have to use very long lenses—sometimes with an extender attached, which further diminishes the aperture. The improved AF allows me to frame the shot exactly the way I envision it, without having to compromise.”

“This camera is a huge step forward,” remarked acclaimed photographer and Canon Explorer of Light Damian Strohmeyer. “Shooting sports in a gym at 8,000 ISO, it looked as good as 800 ISO from a generation or two ago. The images are tack-sharp, and the autofocus just doesn't miss. I've been amazed by what I've seen so far.”

“The autofocus was awesome,” agreed Peter Read Miller, sports photographer and Canon Explorer of Light. “The higher frame rate coupled with the speed of the CFast card was a definite advantage. It just never buffered out, even shooting RAW.”

The new EOS-1D X Mark II camera also offers a built-in GPS** receiver with compass for precise geo-tagged information of latitude, longitude, elevation and direction. This is especially valuable to wildlife photographers and photojournalists who need to track their locations, as well as providing sports photographers the ability to sync a multiple-camera setup with extreme accuracy and precision. It is also possible to use the camera’s built-in GPS to automatically sync the camera’s time to the atomic clock, an invaluable feature to professionals. An improved grip also makes the camera easier for photographers to hold and maneuver while shooting. In response to feedback from professional EOS users, the AF points in the EOS-1D X Mark II camera’s Intelligent Viewfinder II can be illuminated in red for improved visibility, especially when shooting in dark locations. AF sensitivity in low light has been doubled from EV -2 to EV -3 at the center AF point when the camera is set to One-Shot AF, enabling the camera to autofocus in extremely dark shooting conditions such as a moonlit nightscape. Viewfinder AF coverage has also been increased for greater compositional flexibility.

As with all EOS-1D series cameras, the EOS-1D X Mark II’s rugged construction and magnesium alloy body is weather resistant. The camera also features improved controls and more in-camera image quality enhancements than ever before, including a Digital Lens Optimizer function offering high quality aberration correction which can now be achieved without an external computer. This feature makes it easier for professional photographers to deliver finished files to their clients, especially in situations when access to a personal computer is impractical or inconvenient.

The estimated retail price for the Canon EOS-1D X Mark II is $5999 (MSRP) for the body or $6299 for the Premium Kit which includes a 64 GB CFast memory card and card reader. The new camera is scheduled to begin shipping to authorized Canon USA dealers in April 2016***. For more information and the full list of product specifications, visit: usa.canon.com/EOS1DXMarkII

Click here to see the full press release.

Where to order

Click here to learn more about this camera and all of the options available for it at B&H. Adorama is also taking pre-orders here (premium kit here).

Other articles you may enjoy

If you enjoyed this article, you may also enjoy these:

Disclosure

If you make a purchase using links found in this article, I may make a commission. It doesn’t cost you a penny more, but it does help to support future articles like this.

NOTE: This site requires cookies and uses affiliate linking to sites that use cookies.

If you enjoyed this article, please support future articles like this by making a donation or saving money by using my discount coupon codes. Either way, your support is greatly appreciated!

This blog is intended for freelance writing and sharing of opinions and is not a representative of any of the companies whose links are provided on this site.

The opinions provided are of Ron Martinsen alone and do not reflect the view of any other entity