Thursday, March 31, 2011

Part II: Epson Perfection V750-M Pro Scanner Review

image
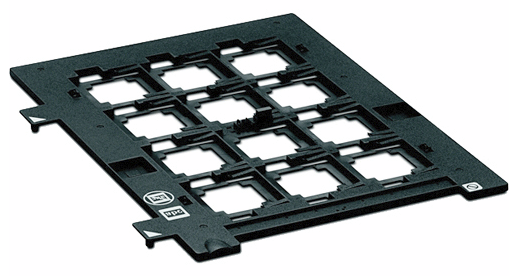
35mm Slide Holder (one of many holders included)
Image Courtesy of B&H

If you are just starting to read my Epson Perfection V750-M Pro Scanner review, please start by reading REVIEW: Epson Perfection V750-M Pro Scanner –Part I.

In Part II I’m covering the challenge of scanning film negatives in SilverFast Ai software included with the V750 and using a reference digital SLR photo to highlight the differences.

Canon 5D Mark II Digital SLR In-Camera JPEG

Mouse over to see before, mouse out to see after
Canon 5D Mark II w/ 24-105mm - f/22 for 1/60 sec @ ISO 400 – 35mm focal length
Raw to sRGB JPEG 12 Conversion in DPP 3.9
Faithful Pure Raw (hover) vs Camera Settings Raw (Mouse Out)

In the first part of the article I showed what Costco gave me for prints from my film, and as another point of comparison the image above shows what the Canon 5D Mark II captured. As you can tell this image is quite a bit darker but the image is rich, the noise is non-existent and the image is very sharp. In-camera processing (in the mouse-out shot) does some of those things automatically to give you the best result possible, but you can see from the faithful raw above (mouse over) that it’s not a huge difference. While I wouldn’t call this perfect, it is a technically accurate portrayal of this scene under the shooting conditions (it was cloudy and dark).

With this new reference point, let’s proceed again to doing more scans…

SilverFast Ai – Transparency Negative Scan Mode

Mouse over to see before, mouse out to see after
Canon EOS 3 w/ 24-105mm - f/22 for 1/60 sec with Kodak UltraMax ISO 400
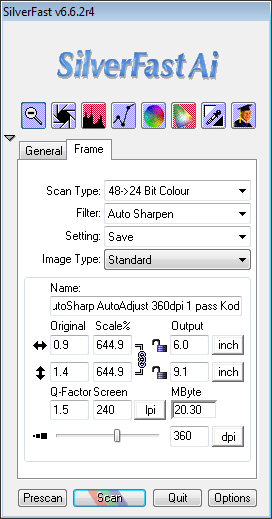
SilverFast Ai Kodak Max 400 AutoSharpen Auto Adjust 48->24bit Color Adobe RGB to sRGB
Hover over for +3ev w/ Color Cast Removal off
Mouse out for 0ev with Color Cast Removal on
Digital ICE Max Quality

During my testing I found that the 48->24bit Color version was sufficient since I had to down convert to sRGB 8-bit jpeg anyway. AutoSharpen doesn’t really do much but AutoAdjust (the button next to zoom below) does a decent job of giving you a usable image. I took all these settings did some testing and found that Digital ICE with Maximum Quality (to remove dust on the negative) produced the best result, but noise was still heavily present.

This software supports a 16 pass feature to remove noise, but in my case it just made the image more blurry. Noise was always very significant in all my scans, but for now I’ve not done anything about it.

You can choose the film you shot with when you scan negatives so I chose the closest thing I could find – Kodak Max 400. I wish there was an option for none, but sadly there isn’t. There’s also color cast removal (CCR) which seems to make a difference but it isn’t always obvious if it is for the best.

Lastly, just like with RAW images on a digital SLR, you can increase or decrease the exposure by up to 3 stops (according to the software manual) so the images above include both +3 and 0. Overall I liked the 0ev and while the color isn’t perfectly accurate, the image looks very nice. Detail is excellent throughout the image – more so than in the Costco print.

Here’s the settings I used:

SilverFast Ai General - Transparency Negative
Negatives are called Transparency

NegaFix - Kodak Other Max 400
You are forced to pick a film. The CCR tries
to automatically correct color casts, and the
brightness feature is reminiscent of raw
because you can adjust your exposure .

image
24-bit (8-bit file) was good enough for this exercise.

SilverFast Prescan Window - Zoomed Out
Using the Negative Guide helped to align the images in a way that SilverFast Ai
could quickly detect the shots (with minor positioning/sizing adjustments)

SilverFast Ai Prescan Window - Zoomed In
Zoom in to see what is going on for the selected negative frame
(NOTE: +3ev Version shown)

Despite SilverFast Ai’s controls to make adjustments (as one would do in Lightroom, Adobe Camera Raw, etc…) I refrained from using these features (just as I had refrained with the digital images). Given the nature of scanning it would be best to make these adjustments in the scanning software than in post-scan editing, but then the results here would be influenced by my edits rather than showing the scanners starting point as you see here.

SilverFast Ai’s Color Cast Correction Controls

I found the white balance/color cast correcting features of the software to be horrible compared to what we are spoiled with in modern digital raw processing software. Unless you have a PhD in color, most mere mortals are going to have a hard time getting anywhere using this software (which is where it is best to make these kind of changes).

Comparing the Digital to the Film Scan

Now this article isn’t about film versus digital as digital has won that war in my mind. Instead, this comparison is more about the performance of scanning an film negative at ISO 400 to see what errors could be introduced in the process. As you can see below there are white balance differences and noise is a big problem.


Digital SLR Image with Faithful with No In-Camera Edits


Scan with No Exposure Compensation


Scan with +3ev Exposure Compensation

Both scans have their merits but the results are quite different. I suspect part of it is that the auto adjustment for the darker image had a bigger impact on the color shift that happens. I think both shots are good and usable but neither is accurate. The bottom shot is the most accurate but the one above it is most visually pleasing. Keep this in mind when doing your own scanning as your objective should usually be to create a visually pleasing result – even if it isn’t 100% faithful to the original.

NOTE: The film and digital camera framing differences are due to camera body size differences when mounted on the tripod.

More Information

There’s lots to cover so I broke this article into multiple parts. Here’s links to the other parts of this review:

Lean more about this scanner at Epson’s website or order its replacement, the V850, at B&H or Amazon.

If you like this topic, be sure to check out my Printing Series too!

Disclosure

Epson provided this scanner for my review. I may get a commission if you use the links in this article, so please use them and help support the blog!

NOTE: This site requires cookies and uses affiliate linking to sites that use cookies.

If you enjoyed this article, please support future articles like this by making a donation or saving money by using my discount coupon codes. Either way, your support is greatly appreciated!

This blog is intended for freelance writing and sharing of opinions and is not a representative of any of the companies whose links are provided on this site.

The opinions provided are of Ron Martinsen alone and do not reflect the view of any other entity

Wednesday, March 30, 2011

REVIEW: Epson Perfection V750-M Pro Scanner –Part I


This and all images in this article are
Copyright Ron Martinsen unless otherwise noted.

Once upon a time back in the early 1990’s I purchased a Hewlett Packard Scanjet IIcx and until I got my Epson Perfection V750-M Pro Scanner, I hadn’t seen any scanner over the years out perform it. On paper most scanners – even the ones included with cheap multi-function printers, sound great, but like most things when you get them home they are an exercise in frustration for anything beyond just casual use.

I’m proud to report that with the V750, Epson has made a proper scanner. I now find myself using it for daily tasks like making photo copies, to important tasks like scanning color images for use on the web, to the most complex task – bringing film negatives into the digital world.

Setting up the Scanner

Beyond a bunch a tape and a the usual lock found on scanners, it was a snap to set up the scanner. I used both the USB and 1394 connectors and couldn’t observe a difference between the two. I stuck with the 1394 just because I was low on USB ports.

The scanner comes with X-Rite EZColor for creating scanner profiles. It was easy to use and seemed to do a great job. I liked having a calibrated scanner profile right out of the gate, so I was a happy camper. 

For my testing I used a Dell XPS 420 running Windows 7 64-bit and the latest versions of all of the software that I could find on the product web sites.

It was a nice plug and play experience with EPSON Scan and the excellent Copy Utility software:

EPSON Copy Utility for Perfection Scanners
Copy Utility works great for the quick and dirty document copy tasks
I often use it to output to Adobe PDF or Microsoft XPS

I’m a big fan of this user-interface (UI) and ease of use and reliability.

I was also able to enjoy the EPSON Scan software which I found to be very good, reliable and easy to use in a variety of intelligently designed modes (i.e., Full Auto, Home, Office, Professional). This really keeps things relevant for those who get a scanner like this for non-Photography reasons. Photographers should stick with Pro though for the best results.

I found the scanner operation to be quiet (impossible to hear when not scanning) and and dependable. I never had driver issues on the PC.

Getting Modern Day Film Results to Test


Canon EOS 3 (35mm Film Camera) with EF 24-105mm IS USM Lens

I wanted to test film prints, versus film negatives versus pure digital so started by capturing some images in a controlled environment to test with.

I started by taking shots of a friends house with my Canon 5D Mark II and my 24-105mm lens on a tripod using ISO 400 to match the film that I had in the film camera. After some experimentation I settled on f/22 for 1/60 second because I wanted to compare the effects of diffraction of modern day DSLR’s against a film camera using the same lens.

I then swapped the lens to the film camera and dialed in the same settings for an identical exposure on both cameras (ignoring film vs. digital sensor differences). My film camera was using a fresh roll of Kodak UltraMax ISO 400.

Developing the Film

When I shot film I honestly didn’t know what I was doing. I didn’t have the benefits of EXIF data and instant feedback to educate me so I despite the fact that I shot film since 1984 – I sucked. Really, I was terrible. I was a spray and pray shooter who developed his prints at a great lab for many years only to come away with the occasional good shot. I didn’t shoot slides and I had no interest in black and white.

When my first son was born in 1998 I did what we all did back then – I had a cheap Olympus point and shoot film camera and my old Canon AE-1 and I still sprayed and prayed. I’d get my shots developed at the drug store and when they sucked I blamed myself. I never blamed the film or the lab.

Fast forward to this exercise and I decided to do the modern day equivalent – I took my film to Costco for one hour developing. At first I was happy when I saw the prints because these prints were probably some of my best film prints from a technical perspective (even the ones not on the tripod), so I was satisfied with the results.

When I compared my prints with my display I realized they weren’t quite as good as I thought they were – in fact, I’d say they sucked. What’s worse is that they cropped the top and bottom of the image off without asking me.

Now the challenge was to use the scanner to see if the problem was me, the camera, the lab or the film.

EPSON Scan 3.83US – Pro Mode – Costco Print

To turn my print into a scanned image, I started by using EPSON Scan in Professional Mode using values I thought an average intelligent consumer would reasonably make (i.e., I didn’t troll forums for the evils of any settings I chose). Based on my prior testing I knew I hated the adjustments features of this app so I ignored all of them and basically chose to do a 48-bit photo at my Epson 3880 printer resolution at 100%.

After a little experimentation, I discovered that the method that yielded the most accurate results to what I saw on the Costco print under a GTI light box was the TIFF file format converted over to sRGB in Photoshop CS4. While this image is a bit more grainy than it appears in real life, this is an accurate representation of what I hold in my hand from Costco:

Click for a larger version
16-bit Adobe RGB Tiff converted to sRGB 8-bit JPEG
in Photoshop CS4 64-bit on Windows 7 64-bit
NO Post-Processing

Here’s are the settings I used to capture the image above:


Notice my Scanner Profile was used


Costco - TIFF Settings
This resulted in a 17.1MB 16-bit image file

I also tried BMP, JPEG, and PRINT Image Match II TIFF but none yielded results more accurate to the original than the TIFF settings shown above.

To save the image as a sRGB JPEG in Photoshop I used the following settings when converting:

Costco - Convert to Profile
Color space Conversion

Costco - CS4 JPEG
Save Options

I made no edits in Photoshop, even though I normally would do that with a scanned image.

The results were accurate but a little softer and noisier (probably due to the luster paper used by Costco) than the original.

SilverFast AI Epson 6.6.2r4 – Costco Print

One of the advantages of the Pro edition of the scanner is improved software, so I decided to use the product that Epson scanning gurus brag about – SilverFast AI, but I used the Epson edition that comes with the scanner.

Getting things working with SilverFast AI wasn’t easy. After an email exchange with support I discovered that SilverFast AI has a limitation that only one Scanner device can be active at a time so I had to shut down my Canon MP560 printer which had a scanner in it. Once I did that I could run the software, but sadly I couldn’t calibrate it because SilverFast wants you to use their IT8 chart – not the one that comes with X-Rite EZColor (included with the Scanner). Fortunately I could go to the CMS tab of Options and use my EZColor generated scanner profile as shown here:


My SIlverFast Ai Color Management Settings

After a little experimenting, I settled on these settings for my scan:


My Capture Settings

I didn’t find the sharpen to make a huge difference on or off so I just left it on (which is a difference from what I did on the EPSON Scan). I also chose to do a 48-bit scan to a 16-bit TIFF that I converted to 8-bit sRGB as I did in EPSON Scan. Here’s the result where you can mouse in and out to compare the two from each other:

Mouse over to see before, mouse out to see after
SilverFast AI vs. EPSON Scan Pro
(mouse in and out)
NO Post-processing

They are different, but both are pretty close to the original so I was happy with the scan. I think the EPSON Scan image was probably a tad more accurate, but this would be good enough for me for real world work.

More Information

There’s lots to cover so I broke this article into multiple parts. Here’s links to the other parts of this review:

Lean more about this scanner at Epson’s website or order its replacement, the V850, at B&H or Amazon.

If you like this topic, be sure to check out my Printing Series too!

Disclosure

Epson provided this scanner for my review. I may get a commission if you use the links in this article, so please use them and help support the blog!

NOTE: This site requires cookies and uses affiliate linking to sites that use cookies.

If you enjoyed this article, please support future articles like this by making a donation or saving money by using my discount coupon codes. Either way, your support is greatly appreciated!

This blog is intended for freelance writing and sharing of opinions and is not a representative of any of the companies whose links are provided on this site.

The opinions provided are of Ron Martinsen alone and do not reflect the view of any other entity

Tuesday, March 29, 2011

REVIEW: Off-Camera Flash Techniques for Digital Photographers by Neil van Niekerk

As promised in my teaser article, I have had a chance to read Neil’s latest book and I’m happy to say that it didn’t disappoint. Now it should be noted that this book is about techniques. This means it isn’t a substitute for your camera flash manual, so you may still need that handy when trying to figure how to get your flash system to perform some of the tasks in the book.

Chapter-by-Chapter Walkthrough

Here’s my observations of the various chapters of this book:

1. Why Use Off-Camera Flash

This is a good teaser that gets you excited about what is to come. While I didn’t think the first series of images really sold the point Neil van Niekerk was trying to make, the rest of the images starting on page 10 and beyond sure did. There’s really compelling shots that don’t feel like a flash was used and look like the kind of shot that many of us want to get.

2. Flash Equipment for Off-Camera Flash Photography

Here Neil talks about all the good stuff you’ll need to get going like the Westcott Magic Slipper Plate Adapter (kit), the 1051 (or 1004) stands, Pocket Wizards, Umbrellas, etc…It’s a fun place to get your geek on and spend more money before you get started, but the good stuff that will help you the most comes in the following chapters.

3. Concepts for Flash Photography

This is an excellent chapter that is similar to the one found in the On-Camera Flash Techniques book that teaches you the importance of understanding key concepts like flash sync speed. Good stuff for the new flash enthusiast!

4. Manual Flash vs. TTL Flash

The word manual and anything in photography sends most newbies into a panic, so Neil does a good job of showing the strengths of TTL. More importantly he does what some books miss - he explains how you can use flash exposure compensation to control the results you can get by default from a 580EX II or SB-900

5. Metering for Flash and Ambient Light

I start my Photography 101 classes off with metering because it is such an important concept that is frequently misunderstood. In flash photography things change so people find that what they know to be true without a flash fails when they turn the flash on. Neil does a good job helping you to meter properly and use your histogram to ensure you are getting the best results.

6. Balancing the Flash with Ambient Light

All good books have those few special chapters that are the ones that make them stand apart from other books. Chapter 6 is one of those for this book, and the concepts explain really drive home what is required to get a shot that is well balanced with the environment – under a variety of scenarios.

If you are lazy and only read one chapter – this is the one.

7. Positioning the Flash

This chapter is useful because it includes more than just words and great final results - it includes photos that show the light setup which can be helpful for those who don’t yet think they need an assistant for these kind of shoots.

8. Overpowering the Sun with Flash

Many photography experts like to mention the idea of overpowering the sun with the flash, but nobody explains the why and how better than Neil.

9. Off-Camera Flash on Location

This is a super important chapter as well as Neil shows how he builds up any given shot in stages to get his desired result. This is something that people don’t realize – Neil doesn’t just shoot one frame and have the perfect result, so why should you?

10. Sample Sessions

Neil finishes this book with a bang so to speak as there’s lots of real world challenges and solutions that help you to appreciate what goes on behind the scenes. It’s a bit like being a virtual assistant where you can learn from what Neil does in the field and translates that into your own work.  

Conclusion

Now oddly enough I think the subject of off-camera flash is covered in books much more than on-camera flash. While this book is good, I don’t think it is a important to new photographers as Neil’s first book – On-Camera Flash Techniques (which made my Which Books Should I Read list).

I’m going to list this book as a strong recommendation for non-Canon shooters (especially Nikon) who want something a little more in-depth to complement The Moment It Clicks or Hot Shoe Diaries by Joe McNally. If I had to pick one of those three, I’d pick this one simply because there’s more “how to” in this book than in Joe’s books (which are great as well).

For Canon shooters, I still think there is great value in reading this book but you will find Speedliter's Handbook: Learning to Craft Light with Canon Speedlites is the Canon Speedlite owners (i.e., 580EX II) dream come true – it’s EVERYTHING you wanted to know about the Canon flash system,accessories and more! It’s a much thicker book and if you’ve got the basics down, then you may find Neil’s book to be just enough to get you in the right direction (with 10% of the required reading time).

Flash Bus Tour attendees will find this book to be a great complement to reinforce to what you learned in Joe McNally & David Hobby’s class. Strobist fans will enjoy it as well.

Ordering

You can pick up Off-Camera Flash Techniques for Digital Photographers at Amazon.com, and while you are at it you can/should pick up On-Camera Flash Techniques.

Disclaimer

I was provided a copy of this book to review by the publisher, and if you make a purchase using the link provided I may get a commission. Thank you for supporting this blog by purchasing online using my link.

NOTE: This site requires cookies and uses affiliate linking to sites that use cookies.

If you enjoyed this article, please support future articles like this by making a donation or saving money by using my discount coupon codes. Either way, your support is greatly appreciated!

This blog is intended for freelance writing and sharing of opinions and is not a representative of any of the companies whose links are provided on this site.

The opinions provided are of Ron Martinsen alone and do not reflect the view of any other entity

Monday, March 28, 2011

Photo of the Week Winner – Discovery’s Last Launch

Lift Off!

I probably should have picked this sooner, but better late than never!

I like this shot because you can make out details of the shuttle and you can see great contrast and detail in the plume of smoke from the launch. I also like it because I think this is a legitimate case where dead center isn’t dead wrong for the subject because an offset shot would have lost detail in the exhaust smoke on either side. In fact, my biggest complaint about this shot is that I wish it was wider so I could see more smoke!

While this shot is in bad need of noise reduction software like Noiseware, and some post processing love with Nik Software products, I think it is a great starting point.

Congrats Nate for being at the right place at the right time for this historical event – and a nice capture under pressure (no do-over’s here). 

Sadly no EXIF data was available for this shot, but hopefully Nate will reply in the comments with more details.

Be sure to click this photo above and leave some feedback on Flickr so this reader can get your feedback both good and bad (be gentle) and feel the love from our readers here!

Learn more about how you can participate in the Photo of the Week contest by clicking here.

NOTE: This site requires cookies and uses affiliate linking to sites that use cookies.

If you enjoyed this article, please support future articles like this by making a donation or saving money by using my discount coupon codes. Either way, your support is greatly appreciated!

This blog is intended for freelance writing and sharing of opinions and is not a representative of any of the companies whose links are provided on this site.

The opinions provided are of Ron Martinsen alone and do not reflect the view of any other entity

Friday, March 25, 2011

B&H REVIEW: Canon REALiS SX80 Mark II 3000 Lumens SXGA+ LCOS Pro Photography Projector

Canon SX80 Mark II Image courtesy of B&H
Canon SX80 Mark II

Over the course of my life I've had several major obsessions. Beginning in 2000 I was obsessed with everything related to Home Theater, and in 2007 that obsession took a back seat to Photography. During my Home Theater phase I was fanatical about premium audio video (AV) equipment by respected names like Bowers & Wilkins (B&W), Runco, etc… 

Canon SX80 Mark II Image courtesy of B&H

Fast forward to 2011 when a series of events lead me down the path where I was asked for a projector recommendation from a respected pro photographer. Photography is all about color management, so right off the bad a slew of cheap projectors weren't in the running as they would never render my images to my satisfaction. To make matters works, my printing series had me making amazing color prints using the best computer monitors from NEC and Eizo. To say that my bar for a projector was high, or perhaps even unrealistic, was an understatement. In my mind I was expecting something that would blow away the Runco projectors of my home theater days and offer technical specs that were competitive with my home LCD or my computer displays. This meant that any projector I'd look at would have to support 1080p, wide gamut color with most of the Adobe RGB color space covered, it would need to be quiet and it would need to be cheap. After all, I can get an amazing 55" 1080p LCD on sale for $800 so why would I need to spend more than $1000 on a projector? Sounds familiar?

Well I quickly discovered that the technology required to make a great projector had a much higher cost of goods (according to Canon USA) than a television or HDTV only projector. To make matters worse, my requirements had me looking at displays that cost over $5000, yet many of them at this price range couldn't be color managed for photography.

After contacting experts at Epson, NEC and Canon I quickly got educated that my requirements and the reality of the industry right now were not in sync. What's more, the rules for projection are a little different so my desire to have a projector that could do 1920x1200 was pretty meaningless. I could easily accomplish my goal to have a big, high-quality image of my work projected onto a screen or wall using a this 1400x1050 projector. Read on to learn how as I never would have believed that I’d be happy with a display that could “only” do 1400x1050 because you’ve gotta have at least 1080p right?

Image Quality

Canon SX80 Mark II - Beezerker - Copyright Ron Martinsen
Actual Photo take of projected image (via USB stick) on white seamless paper in my studio
NO color or exposure adjustments on
projected image and no computer used
5D Mark II - ISO 800 – Image approximately 9’ wide x 8’ tall
Both images – Copyright © Ron Martinsen – ALL RIGHTS RESERVED

Image quality is everything to me when it comes to video equipment, so without having a projection screen for this review my expectations were low. I’m pleased to say though that this LCoS projector did fine no matter where I projected – beige walls, white seamless paper, really crappy conference room projection screens, etc… When I did finally get a chance to put it on a decent projection screen I was surprised that the image was not significantly better. I attribute this to the fact that the Auto Setup with Auto Color feature does a great job of compensating for less than ideal environments.

I tried to find fault with this projector, because I was convinced that a 1400x1050 projector would suck. It would never meet my video bar. However, I really had to search hard to find things to niggle about. In fact, the color calibration was so good out of the box that it matched the quality I was getting from my from NEC and Eizo displays in sRGB mode.

There is a very faint screen door effect when you walk right up to the image (arms length), but it’s not nasty like you find in DLP or some LCD displays. Instead it is very faint and becomes undetectable in as little as half the diagonal width of the image. Even inches away it isn’t super bothersome, but it is visible. From normal viewing distances you have no hint that this phenomenon exists so this shouldn’t be a negative in your decision to get this projector or not.

As someone who has become obsessed with printing via my printing series, I can’t think of a better device for soft proofing your image before printing. I can walk up within inches of my print displayed 9 feet wide and identify any problem areas before I dispense a drop of ink or use a sheet of paper. Those annoying flecks of dirt or sensor dust spots you might miss until you print are all going to be huge on a big display like this and I can easily see where my sharpening is good and where I’m getting artifacts. If my image looks great on the projector it will look great on the printer!

Calibrating

One really cool feature about this projector is that it features an Auto Setup feature that does keystone and focus projections to ensure that you have a great image very quickly. It does require that your projector lens is facing parallel to the flat surface it will project on, but it works quite well.

Once your image looks good you need to think about color, but again Canon has thought about this – with Photographers in mind. They’ve included a Photo mode which can be used in conjunction with ambient light adjustments to give fairly accurate colors right out of the box. I did find that calibrating the projector with my ColorMunki seemed to yield good results too, but I was happy enough with the projector results that I didn’t make a habit of using external calibration.

The image shown in the Image Quality section was projected from the display using the USB port’s factory settings changed to Picture mode and Auto Setup. I thought the results were great!

Aspect Ratio

As far as I could tell this projector does a great job of maintaining your images proper aspect ratio when you project it onto the screen (i.e., I never noticed an stretching or clipping), but what I found unusual is that the 4:3 mode was my preference over the 16:9 mode. I never would have guessed that because in my home theater it’s only been 16:9 since 2000. The reason for this difference is that the projector displays a larger image at 4;3 and since it doesn’t appear to stretch or clip the images I get a big image with no distortion. The example image (with me in front) earlier in this article is showing an image that has a 35mm film aspect ration in 4:3 mode but there’s zero distortion in the image. Canon just seems to be doing the right thing without user intervention.

Networking

SX80 Mark II Projector Control Network Web Page

I did find one complaint – the networking feature is very challenging to set up. Once you get it all working you can enjoy remote control using the web page of the device as shown above. However, it is geared toward PC users who are network gurus – not normal humans.

Windows 7 TCP/IPv4 Properties

Case in point – if you know how to get to the dialog above and change the values here, then you’ll probably like it – if not then it’s best you skip this feature as you’ll do more harm than good to your network. Even then this only works when your computer is connected directly to the projector, so if you don’t have two network cards that means you end up with no internet or networking to other computers to do this. Furthermore, I only saw how to interact with the controls of the projector – not send it images from my computer.

Searching the web, manual, etc… never helped. I ultimately gave up on testing this feature and moved on. I’d advise you to do the same.

What’s the D model for?

For those of you who are like me and want to get the best model, you’ll notice that a lot of Canon’s better projectors come in a regular version and  D version. The D is for the DICOM compliant version which is primarily relevant for the medical imaging community where gray scale steps are critically important. Unless you’ll be looking X-Rays, MRI’s, etc… with your projector, you probably don’t need the D version as it won’t give you any better results for your color photos.

One downside is that you can’t use all-important Photo mode if you use the DICOM mode on D projector. The only photographers who I can see benefit from it are those who are looking to display just black and white images as the improved gray scale support might provide value in that scenario.

Key Features

Canon has a great page with key features here, so I won’t rehash all of that. However, I will say that there’s more truth than hype in the comments they make in their features list. I roll my eyes as some OEM’s claims, but the sections for LCOS, SXGA+, 3000 Lumens, Zoom, Photo Mode, Advanced Color and Ease of Use were all very well done – and accurate! I highly recommend you read them if you are considering purchasing any projector as it gives you a guide of what to look for when purchasing.

I also found the following resources to be useful as well:

USB Support

One thing I never thought about until I had this projector was the support for USB. I had mixed feelings here because I found the picture quality to be excellent, but the choices were more limited than I had hoped.

The projector handled USB keys and navigating the file system directories very well – much better than expected. It seemed to choke on images greater than 30MB, but the reality is that if you resize your images for the native resolution 1400x1050 at 72dpi then they are very tiny and load quickly and look fantastic. In fact, the image projected in my photo at the beginning of the article was done this way (via Lightroom) and is only 609kb!

It seemed to handle sRGB and Adobe RGB color space jpeg files very well but it didn’t like ProPhoto which rendered inaccurately.

Real World – Photography 101 Class

I don’t like to review products and do a press release – I like to use them in the real world and report what I learned. In this case, I’m pleased to report that it worked like a champ for everything I threw at it.

I used it in my Photography 101 class each week for 4 weeks which gave me a chance to see how easy it was to transport it. While it comes with a case, I used a Think Tank Photo Airport Security v2.0 bag to transport it along with my camera gear. It fit perfectly and I think it protected it very well. It was also nice to have it on rollers, despite the fact that this projector feels lighter than my 5D Mark II with the 24-105mm lens on it.

I was able to demo it using Live View on my camera via HDMI as well as showing photos from USB sticks. In fact, I thought the experience via USB – without a computer – was the best of all as the images seemed to have a bit more oomph to them. I think this is because the software in the projector that loads the images was doing a better job with color management than Windows Live Photo gallery that I used from one of my laptops during the class. it also looked great with Internet Explorer 9 (which now finally honors color spaces in the RTM build).

I wasn’t able to figure out how to show the camera menu over HDMI or USB(although I’m pretty sure it’s possible over HDMI), and I couldn’t test with my Mac due the fact that I didn’t have a DisplayPort to HDMI adapter. It worked great with HDMI though when connected to HDMI devices. In fact, never once did I feel the image was inferior to my new Samsung 1080P LCD HDTV.

In addition to the fact that my images were displayed with perfect color and the screen was easy to read with the lights on or off, I was also thrilled to notice that it was pretty hard to obscure the beam onto the screen. It seemed to be a very narrow and tight beam so I could leave things on the projection table or point on things on the screen without having a huge shadow cast.

I also loved the fact that when class was over I could just unplug it right away and pack up all of my stuff. The projector fan would still run without power and cool off while I was putting away cables, laptops, etc… so when I was done the projector was cool enough to put away safely. I appreciated the lens cap too!

One other important point to mention is that this device renders text perfectly – no artifacts or jaggies were present during all of my presentations. Letters looked crisp and sharp which made me trust it as a soft proofing device for my images that I was ready to print.

I never had the need to test the audio so that part was skipped in my testing. Any real audiophile would always use an external sound device anyway <g>.

Buying a Projector for your Budget

To buy a Canon REALiS SX80 Mark II 3000 Lumens SXGA+ Projector, I recommend B&H.

If you are looking for the next step up then the Canon REALiS SX7 Mark II LCOS Projector is a good choice too.

If you really want that 1920x12000 resolution and can afford it, then the Canon REALiS WUX10 Mark II 3200 Lumens WUXGA Projector is a great choice.

If all of these out of your budget, then the Canon REALiS SX800 LCOS Multimedia Projector is the best balance of cost versus quality. It lacks the photo image mode and useless network input, but otherwise seems to be pretty darn close to the quality of the projector I’ve reviewed in this article.

You compare projectors here to see the difference between the models I’ve suggested.

Conclusion

If you are a photographer who wants to project your images on a projector, but you care about the color and quality of those images, I can say this is a great product for you. The image quality is so excellent that when you look at other competing products (or those that claim to be) you’ll frequently be sadly disappointed.

Great image quality is nothing if you can’t get those results yourself and this is where this projector shines the most – you can get everything dialed in with the Auto Setup and if necessary tweak from there (rare).

Odds are you’ve never seen a projected image this good, but once you do you are hooked. I can’t recommend this projector highly enough for those who care about quality.I hated sending it back and I’ve already started saving to get one one day. I LOVE this projector!

Learn more about this cool projector on Canon USA’s web site.

I’d like to thank Eddie Tapp, Chuck Westfall of Canon USA, and Yechiel Orgel at B&H for their assistance to make this review possible.

Disclosure

B&H provided this projector for me to borrow for the month of March so I could bring this review to you. I may get a commission if you purchase using my links, but I urge you to thank B&H by using the links you find on this blog to thank them for making this review possible.

NOTE: This site requires cookies and uses affiliate linking to sites that use cookies.

If you enjoyed this article, please support future articles like this by making a donation or saving money by using my discount coupon codes. Either way, your support is greatly appreciated!

This blog is intended for freelance writing and sharing of opinions and is not a representative of any of the companies whose links are provided on this site.

The opinions provided are of Ron Martinsen alone and do not reflect the view of any other entity
Thursday, March 24, 2011

Paris in 2000 Images–Killer Time Lapse

I ran across this cool video on Vimeo that my friend Gary Parker sent me – its worth your time to watch it!

Le Flâneur (music by The XX) from Luke Shepard on Vimeo.

A project by Luke Shepard, a student at The American University of Paris.
Location: Paris, France
Camera: Nikon D90
Music: 'Intro' by The XX (thexx.info)
Check out this interview for some background on the project:
blogs.nationalgeographic.com/​blogs/​intelligenttravel/​2011/​03/​paris-in-2000-images.html

NOTE: This site requires cookies and uses affiliate linking to sites that use cookies.

If you enjoyed this article, please support future articles like this by making a donation or saving money by using my discount coupon codes. Either way, your support is greatly appreciated!

This blog is intended for freelance writing and sharing of opinions and is not a representative of any of the companies whose links are provided on this site.

The opinions provided are of Ron Martinsen alone and do not reflect the view of any other entity

Tuesday, March 22, 2011

Canon 1D Mark IV Warranty Extended in Europe–USA Next?

I just ran across this article:

http://cpn.canon-europe.com/content/news/canon_extends_eos1dmark_IV.do

where Canon Europe says:

Canon has announced that it is extending its offer of a free two-year warranty for the EOS-1D Mark IV to include all cameras that are purchased before 30 June 2012.

This two-year warranty is a one-year extension on top of the standard Canon one-year European warranty that’s offered on all products, and it will be operating under identical terms and conditions. This gives photographers a total warranty period of two years from the date of purchase of their new product.

Canon is not only providing this extended two-year warranty on new EOS-1D Mark IV purchases, but it is also making it available to all existing owners of EOS-1D Mark IV bodies.

The extended warranty is available on EOS-1D Mark IV purchases that are made, or have been made, in specific countries in Europe. The countries where the two-year warranty is available are Austria, Belgium, Bulgaria, Cyprus, Czech Republic, Denmark, Estonia, Finland, France, Greece, Germany, Hungary, Ireland, Italy, Iceland, Latvia, Liechtenstein, Lithuania, Luxembourg, Malta, the Netherlands, Norway, Poland, Portugal, Romania, Slovakia, Slovenia, Spain, Sweden, Switzerland and the United Kingdom.

To be eligible for the extended warranty customers must provide a valid proof of purchase. For full terms and conditions please click here or download the 'Canon EOS-1D Mark IV Two-Year Warranty: terms & conditions' pdf from the 'Downloads' box on the right hand side of this page. Please note that within the Download pdf terms and conditions are available in all languages relevant to the participating countries, as mentioned above, where the warranty is available.

Information about Canon's standard terms and conditions of warranty will also be found in the two-year warranty leaflet that will be available in each EOS-1D Mark IV DSLR box from mid-April 2011.

It would lead one to believe there was something wrong with early models that warrants a repair. I’ve had some issues with low-light performance, but otherwise mine has been pretty solid.

Current Status

I have an email out to Canon to get a formal reply to learn more about what is going on here.

I will update this article when I learn more.

Ron

NOTE: This site requires cookies and uses affiliate linking to sites that use cookies.

If you enjoyed this article, please support future articles like this by making a donation or saving money by using my discount coupon codes. Either way, your support is greatly appreciated!

This blog is intended for freelance writing and sharing of opinions and is not a representative of any of the companies whose links are provided on this site.

The opinions provided are of Ron Martinsen alone and do not reflect the view of any other entity

ExpoImaging Rogue Grid – The “Must Have” On-Camera Flash Modifier

Save 15% using the coupon code ronmart09 (see details below)

Trust me when I say you read it here first – the hottest flash modifier this year will be ExpoImaging’s new Rogue Grid. This brilliant design fits nicely on the end of your speedlite (i.e., 580EX II, SB-900, etc…) using the brilliant built-in speed strap found on the mega-hot Rogue Flashbenders (i.e., the things that replaced the Honl’s and their stupid expensive stand-alone speed strap), and features 3 grids that can be combined or used alone to give you a 16, 25 or 45 degree grid as shown here: 

From what I’m seeing in the early test images shown here:

these things look awesome. I’m hoping that they work a lot better than the more costly and rectangular Honl Grids. They are good value too because they only cost about $43 with my discount (as of 3/22/2011) and come with 3 grids versus $70 for two Honl grids and a speed strap.

The second I heard about these I got in the queue to get the first batch of these. I can’t wait to try them out, so expect a review later this year. I wanted you to be the first to know about this cool new product but I know it won’t be the last time you hear about it.

Special Offer

My blog already has a discount coupon code in place for existing ExpoImaging products like the Rogue Flashbenders (review coming soon), ExpoDisc, and RayFlash, but I’m pleased to announce now that you can also save 15% when you use the coupon code ronmart09 to order your Rogue Grid.

Codes change so check the discount coupon code page for the latest code if this code doesn’t work.

Other Interesting Articles

If you liked this article, you may also like:

See the right panel and read me first tab for more great articles!

Disclosure

I’m a big fan of ExpoImaging products so I am doing this press release to promote this product that I think will be a big hit this year. I may get a commission if you purchase using the links in this article, so please support this blog by using the links!

NOTE: This site requires cookies and uses affiliate linking to sites that use cookies.

If you enjoyed this article, please support future articles like this by making a donation or saving money by using my discount coupon codes. Either way, your support is greatly appreciated!

This blog is intended for freelance writing and sharing of opinions and is not a representative of any of the companies whose links are provided on this site.

The opinions provided are of Ron Martinsen alone and do not reflect the view of any other entity

Monday, March 21, 2011

Photo of the Week Winner – The Veins of Madrid

The Veins Of Madrid: M-607 Highway :: HDR :: DRI

This shot was taken by Servalpe on highway M-607 near Hospital Ramón y Cajal, in Madrid, Spain. It was a 20mm shot for 16 second exposure at f/16 and ISO 100 using a Canon Rebel XSi (450d).

I love the colors and exposure of this shot plus the non-conventional box crop of this shot. It’s hard to find anything I’d change about it, so I say congrats and bravo!

Be sure to click this photo above and leave some feedback on Flickr so this reader can get your feedback both good and bad (be gentle) and feel the love from our readers here!

Learn more about how you can participate in the Photo of the Week contest by clicking here.

NOTE: This site requires cookies and uses affiliate linking to sites that use cookies.

If you enjoyed this article, please support future articles like this by making a donation or saving money by using my discount coupon codes. Either way, your support is greatly appreciated!

This blog is intended for freelance writing and sharing of opinions and is not a representative of any of the companies whose links are provided on this site.

The opinions provided are of Ron Martinsen alone and do not reflect the view of any other entity

Friday, March 18, 2011

Trey Ratcliff’s Flatbooks.com & Ron Martinsen Team Up for Printing 101 (NOW AVAILABLE)

UPDATED: 10/13/11

I’m proud to announce that I have teamed up with Trey Ratcliff and his publishing company, Flatbooks.com, to bring you Ron Martinsen’s Printing 101 Guide based on all the great experiences learned during my printing series last year.

This book is the coolest eBook you’ve ever seen – no doubt, but it’s also has some seriously cool content that no printer owner should be without!

Go get it here on StuckInCustoms.com!

Here’s a sneak peek of the inside:

I’d like to extend a big thanks to Trey & Griffin of The Traveling Designer for their support in this collaborative effort to bring this cool eBook to you!

If you make a purchase using links in this article, I may make a commission.

NOTE: This site requires cookies and uses affiliate linking to sites that use cookies.

If you enjoyed this article, please support future articles like this by making a donation or saving money by using my discount coupon codes. Either way, your support is greatly appreciated!

This blog is intended for freelance writing and sharing of opinions and is not a representative of any of the companies whose links are provided on this site.

The opinions provided are of Ron Martinsen alone and do not reflect the view of any other entity
Two GREAT Camera Flash Books

My reviews are coming, but these are too cool not to share right away.

The first book, Speedliter's Handbook: Learning to Craft Light with Canon Speedlites is the Canon Speedlite owners (i.e., 580EX II) dream come true – it’s EVERYTHING you wanted to know about the Canon flash system,accessories and more! This thing is as big as an algebra book with gobs of pictures so this is likely to find a long-term home on my Which Books Should I Read list.

The second book Off-Camera Flash Techniques for Digital Photographers is the sequel to a book that’s already on my must read list – On-Camera Flash Techniques which I love. While I think I learned more from the first one, this is still a great book for those who are ready to take those flashes off the hot shoe and do more with them.

Flash Bus Tour Fans

I know a lot of readers right now are coming from Joe McNally’s blog to see my Flash Bus Tour review, so welcome! Stay a while and check out my Discount Coupon Code page and world famous Printing Series for lots of great reasons to hang around here more often!

If you are a Nikon shooter then Joe’s books like Hot Shoe Diaries and The Moment It Clicks are probably already on your shelf (at least they should be). However, Neil’s Off-Camera flash book (a Canon shooter who switched to Nikon) is going to be a good resource for you to reinforce what Joe and David are teaching you on the tour.

If you are a Canon shooter (like me), then you’ve been frustrated by all of the great info from Joe and David that never seems to apply to our Canon flashes. Well our day has come as I am not aware of any Nikon flash book that is as comprehensive as the Speedliter’s Handbook. I’m a long way from finishing it, but so far I’m so jazzed that I feel like I just found a buried treasure!

No matter what camp you are in Joe & David’s tour is worth the price of admission, but this is good stuff for afterwards when you forgot everything they said (and sadly there’s no comprehensive handouts like a Kelby Training event).

Reviews Coming Later…

I will be reviewing both of these books (that I love) so stay tuned. In the meantime scroll down the right side of this blog and check out all of the other popular articles I’ve written. More good stuff is definitely on the way!

Disclosure

I may get a commission if you purchase using my links. Thanks for supporting this blog by using my links! It doesn’t cost you a penny extra and it helps me to bring you more great content!

NOTE: This site requires cookies and uses affiliate linking to sites that use cookies.

If you enjoyed this article, please support future articles like this by making a donation or saving money by using my discount coupon codes. Either way, your support is greatly appreciated!

This blog is intended for freelance writing and sharing of opinions and is not a representative of any of the companies whose links are provided on this site.

The opinions provided are of Ron Martinsen alone and do not reflect the view of any other entity

Thursday, March 17, 2011

Photo Thoughts: Experimentation is the key to happiness

 
All Images in this article are
Copyright © Ron Martinsen – All Rights Reserved

I was working on a photo last night and despite doing my usual bag of tricks, I just wasn’t happy with the shot. Here’s what it looked like when I was “done”:

Okay, not bad and a big improvement from the original but something about it wasn’t doing it for me. I decided to turn to my trusty friend Silver Efex Pro to see if it would show me some love and I came up with this:

Okay that’s looking a little better, but I still wasn’t saying “wow”, that’s it! When I was zooming in on the image to check something out I got a revelation on how a tight crop might be more fun. After some experimentation I ended up with this:

Mouse over to see before, mouse out to see after

Booyeah! Now I was happy and felt like I had something. I experimented with it and ended up with the black & white version you see when you hover over the image above or go to the beginning of this article.

One image – four different interpretations, and and ultimately one great result.

Let me know which one you like the best and why!

NOTE: This site requires cookies and uses affiliate linking to sites that use cookies.

If you enjoyed this article, please support future articles like this by making a donation or saving money by using my discount coupon codes. Either way, your support is greatly appreciated!

This blog is intended for freelance writing and sharing of opinions and is not a representative of any of the companies whose links are provided on this site.

The opinions provided are of Ron Martinsen alone and do not reflect the view of any other entity

Wednesday, March 16, 2011

地震被害の日本の皆様


Kyoto Golden Temple (金閣寺) – Copyright © Ron Martinsen – All Rights Reserved

地震被害の日本の皆様、

私と日本に長く住んでいた私の妻は、深い哀悼の意を表心から祈っています。被害に当たった皆さん、ご家族そして日本の全ての方々のご無事を心から願っておりながら、日本が一日も早く恐ろしい悲劇から大きな災難克服し前の姿を取り戻すことをお祈りします。

公開された話や、それ以外のコメントや話があればご自由にこのフォラムに残して下さい。 http://forums.ronmartblog.com

ちなみに、このブログのサポートありがたく思いながら、日本の赤十字にした寄付以外、私にできることがあれば、遠慮なく提案してください。

心の支援を続けながら、、、

ロンマチンソン、ムンヒ(家内)カイ(息子)


Ron’s Family Prays for Earthquake Victims in Japan
From Left to Right – Taylor (12), Kai (20 months), Moonhee, & Sierra

To my friends in Japan,

I would like all of you to know that my wife (who lived much of her life in Japan) and I are both praying for you during this difficult time. We have been horrified by the images we see on TV of the devastation that has occurred in your beautiful country. It sickens us that danger is still present due to the situation with the nuclear power plants and we are genuinely concerned for your safety.

Please know that we pray for your situation to improve and that your recovery from this horrific tragedy may be a speedy one.

The media is only showing us one side of the story, but if you have your side of the story you would like to share please feel free to do so in the form of a comment to this article or in the forums at http://forums.ronmartblog.com.

Thank you for your support of this blog! If there is anything I can do beyond the donations I’ve made to the Japanese Red Cross to help those in need, please do not hesitate to contact me.

Our hearts are with you!

Sincerely,

Ron Martinsen & Moonhee Kim (and our son Kai)


Tokyo (東京,) – Copyright © Ron Martinsen – All Rights Reserved

Please Donate Today

I encourage all of my readers to give up your morning coffee or weekly night out to eat and use that money to help the people of Japan who have been devastated by this horrific event. Please visit the Red Cross and choose the Japan Earthquake option. I’ve given several hundred dollars and I would encourage all my readers to give as much as you can as the people of Japan will need it to recover from this devastating event.

NOTE: This site requires cookies and uses affiliate linking to sites that use cookies.

If you enjoyed this article, please support future articles like this by making a donation or saving money by using my discount coupon codes. Either way, your support is greatly appreciated!

This blog is intended for freelance writing and sharing of opinions and is not a representative of any of the companies whose links are provided on this site.

The opinions provided are of Ron Martinsen alone and do not reflect the view of any other entity

Tuesday, March 15, 2011

REVIEW: ioSafe® SoloPRO (Coupon Code)

ioSafe SoloPRO

In January 2010 I wrote an article called Protect your photos and videos with ioSafe. During this review I became so impressed with the ioSafe that I didn’t feel comfortable storing my photos on a regular hard drive anymore. As a result I chose the ioSafe Solo as my only local storage solution for my photos and videos in 2010. This past August when I wrote about the fact that ioSafe® Announces the SoloPRO: Its Fastest Rugged External Hard Drive, I knew what I wanted to use to hold my 2011 photos.

My Configuration

drives

As you can see from the graphics above I’ve got some storage issues! My primary operating system drive is C:, my 2010 photo drive was the ioSafe (D:) and my photos before that were stored on E: which was a replacement for a handful of Western Digital Passport portable drives. All of my backups go to a 4TB Buffalo Systems NAS device (shown as both L & Y above) which is configured in a RAID 1 0 configuration. Until recently all of my data was being backed up to Mozy, but given their new policy which doesn’t allow unlimited backups I’m having to discontinue the service as it would be cost prohibitive to me to use their new plan.

For 2011 my images are now going to the ioSafe SoloPRO 1TB (I:) as shown above. Unfortunately I had to connect it to my computer via USB 2.0  (see below).

During the last month plus that I’ve had this drive I’ve noticed that it performs significantly faster than any of my other drives, so despite the fact that my internal drives are 7200 RPM 3GB/sec SATA drives and this is USB 2.0, the time it takes to save a large (400MB+) Photoshop PSD file is about 30% faster. I suspect that I am not getting the most out of my internal drives as my controller appears to be doing something stupid (running them in ATA mode) which also prohibits me from using eSata unless I switch my controller to RAID mode. The problem with RAID mode is that it reorders my drives and I can’t boot my to my Windows 7 OS or re-order the drives via the BIOS so I decided it wasn’t worth the headache to solve this problem.

At any rate, the added performance was a pleasant surprise as it wasn’t something I expected unless I was able to plug in via eSata.

Why ioSafe Products Rock

Okay, unless you’ve been in a cave somewhere, you’ve probably seen some of the cool demos that explain why these drives deserve the name safe! Here’s a cool example where they dunk it in the pool and then burn the heck out of it, yet the data is perfectly safe:

Here's another fun video where they not only burn it but they also run it over with an excavator:

Still not convinced? Let's see how it handles being shot with a shotgun and a M16:

A Real World Testimonial

Here’s a video of a house owned by Mike Smith of Servena Park, MD that burned with an ioSafe in it. In this article he states:

"We had family pictures, including some we scanned of my mom and dad," Smith said. "It's the sort of thing that if you think about, if you lose it, it really hurts."

Smith said he was walking through the post-fire mess of his home "when I remembered (the hard drive) was under my desk. I dug down through all the debris, and there it was. It was scorched, all right … I shipped it back to (ioSafe), and they recovered everything, our pictures and tax records, everything."

An Alternative to Offsite Backup

I love the idea of backing up my photos to services like Mozy, but I’ll admit that it was painfully slow and now is cost prohibitive. Given the fact that you can bolt this product into the ground for protection against theft (just like a real safe), and it can withstand most of the abuse one could ever throw at it, then why use off-site (a.k.a., backup in the cloud) anymore? I thought it might be for situations like a power surge or destruction that managed to penetrate the case, but ioSafe has thought about that too!

Data Recovery Service

All ioSafe products come with a data recovery service plan which you can optionally upgrade for a longer duration. This service will use extraordinary means to do whatever it takes to recover your data from your drive. These are the services that get data off those flight recorders on crashed airplanes, so odds are they’ll get at least some if not all of your data back. It’s $99 for 5 years of protection which is dirt cheap, so it was a no brainer for me to add this service when registering my drive.

Where to order

SPECIAL OFFER for ioSafe.com (Expires May 31, 2015)

 image
Example of entering the coupon code in the ioSafe cart
(please note that codes change and are case sensitive)

  • Click here to order and use the coupon code ronmart to save 5% OFF on any Solo G3 or SoloPRO.
  • Click here to order and use the coupon code ronmartNAS to save 10% OFF on any 214 or 1515+ when you buy direct from ioSafe.com.

WARNING: The discount coupon codes are CASE SENSITIVE!

Click here to learn about their full product lineup starting as low as $349 with a 2TB drive included (the Solo G3).

You can also get some ioSafe Devices at B&H and on Amazon.

Conclusion

What you get here is basically an high quality hard drive with about $200 premium for being in a fireproof case. This isn’t a bad deal for the peace of mind it offers. As a result, this is what I do for my photo masters each year. I use one of these per year and when the files are backed up they go onto a NAS (see my ioSafe 1515+ NAS article).

To learn more about this product or the full-line up of ioSafe drives, click here.  Be sure to come back here to get your discount code before ordering!

Other articles you may enjoy

If you enjoyed this article, you may also enjoy these:

Disclosure

I was given a ioSafe SoloPRO 1TB under no obligation from ioSafe which I used for my review in this article. I may get a commission if you purchase using the link on this blog, so thank you for your support by using my links.

NOTE: This site requires cookies and uses affiliate linking to sites that use cookies.

If you enjoyed this article, please support future articles like this by making a donation or saving money by using my discount coupon codes. Either way, your support is greatly appreciated!

This blog is intended for freelance writing and sharing of opinions and is not a representative of any of the companies whose links are provided on this site.

The opinions provided are of Ron Martinsen alone and do not reflect the view of any other entity

Monday, March 14, 2011

Photo of the Week Winner

Daily Photo #119 – January 20th 2011 – Big Mini

Okay, I’ll admit it that I’m a sucker for cars and photography of anything on wheels. If you look at my Top Photographers list you’ll see that Tim Wallace (the top car photographer in the world IMHO) is #1 on my list. This is why I could help but pick William Doran’s sweet shot of this Mini.

William is a repeat winner of the Photo of the Week title.

I thought the lighting and color of this shot was simply gorgeous and sans a few little niggles that I have with this shot, I could easily see myself printing one of these bad boys at 24x36 and hanging this image on my wall!

Congrats for the great shot William you managed to snag with a humble Nikon D60 at 18mm for 1/400 sec at f/5.6 (ISO 400) – I love it! Please do me a favor and reply in a comment on your setup on how you got this cool shot as I’d love to know more about it!

Be sure to click this photo above and leave some feedback on Flickr so this reader can get your feedback both good and bad (be gentle) and feel the love from our readers here!

Learn more about how you can participate in the Photo of the Week contest by clicking here.

NOTE: This site requires cookies and uses affiliate linking to sites that use cookies.

If you enjoyed this article, please support future articles like this by making a donation or saving money by using my discount coupon codes. Either way, your support is greatly appreciated!

This blog is intended for freelance writing and sharing of opinions and is not a representative of any of the companies whose links are provided on this site.

The opinions provided are of Ron Martinsen alone and do not reflect the view of any other entity

Friday, March 11, 2011

REVIEW: Joe McNally & David Hobby’s Flash Bus Take Seattle By Storm


Joe McNally (left) & David Hobby (right) kick off their tour in Seattle
Copyright © Ron Martinsen – All Rights Reserved

I was a lucky enough today to attend Joe McNally & David Hobby (of Strobist.com fame)’s Flash Bus Tour that kicked off in Seattle, Washington. It was a packed house of photography geeks eager to learn from these two flash masters.


It was a full house (more than I expected actually)
Copyright © Ron Martinsen – All Rights Reserved

David Hobby’s Morning Presentation

The morning started off with David Hobby of Strobist.com showing some of his techniques in a visual presentation. During this discussion David shows how he starts off taking shots to get the ambient light where he wants it, and then how he builds up from there to do his fill light, accent light and then lastly his key light. It was very fun to have David walk through his thought process and light configurations to show how he goes about getting his results.


Shot of the projector of one of David Hobby’s Setups

I thought it was great that David not only went into detail about what went right, but also the trial and error he goes through about what goes wrong as he tries to build the ideal light setup. David’s explanations were very thorough and showed the lighting configurations very well so it was easy to learn how he does his magic.

The only gripe I had about this presentation was that it lacked any handout notes so you are left with the decision to scribble notes or pay attention. I elected to just pay attention and listen as well as doing a few photos of the projectors so I could have visual notes to refer to later.

Joe McNally’s Afternoon Presentation


Joe McNally rocked the house right away with his killer presentation
Copyright © Ron Martinsen – All Rights Reserved

Joe McNally started his afternoon presentation exactly as you would hope after reading his awesome books The Moment It Clicks and Hot Shoe Diaries – with a hole shitload of gelled SB-900 flashes. He had the room lit up in blue and even featured jumps with electric guitars for a shot that makes you bend down and realize you aren’t worthy. Of course Joe made it all look so easy and did a great job of explaining how to get the amazing shots he does day in and out.


Black Swan attendee gets are 15 minutes of fame
Copyright © Ron Martinsen – All Rights Reserved

Just as Joe promised on his blog, attendees with the best costumes were featured as models during his shoot. Unlike David who just talked about his shots and showed a presentation of his setups, Joe let it all hang out and just setup up the lights (with a team of assistants) and actually made the photos he would discuss.


Another local attendee gets the limelight in her “70’s” outfit
Copyright © Ron Martinsen – All Rights Reserved

It was awesome to see Joe in action and see how he pulls off his magic. It was also interesting to note that he was fairly open to questions while he worked so you were able to see and hear his thought process (and see his miscues) in what it takes to get the shots that he does.

Conclusion

Everybody respects these guys for their body of work and what they’ve given back to the photography community in their blogs. However, it was a real honor to see these masters of the speedlite show how they build up to get the great shots that they get.

I’m a Canon shooter so I was worried how much I’d really get out of this presentation, but it was done in a way that your flash system really doesn’t matter. It was disappointing that there were special offers for pocket wizards for Nikon only and not Canon as well, but beyond that there wasn’t much ill will towards Canon shooters.

It was fast paced and informative, and a no brainer for the price. I highly recommend this tour if you are lucky enough to get a ticket before they sell out in a city near you.

Visit the Flash Bus Tour web site for more information.

Disclosure

I attended at my own expense (full price) and receive no compensation for your participating in the Flash Bus Tour. I only submit this article to you as a public service and as a token of appreciation to Joe and David for their great show today.

NOTE: This site requires cookies and uses affiliate linking to sites that use cookies.

If you enjoyed this article, please support future articles like this by making a donation or saving money by using my discount coupon codes. Either way, your support is greatly appreciated!

This blog is intended for freelance writing and sharing of opinions and is not a representative of any of the companies whose links are provided on this site.

The opinions provided are of Ron Martinsen alone and do not reflect the view of any other entity