If you like to get deals like this, please subscribe to my deals newsletter.
Disclosure
If you make a purchase using links found in this article, I may make a commission. It doesn’t cost you a penny more, but it does help to support future articles like this.
NOTE: This site requires cookies and uses affiliate linking to sites that use cookies.
If you enjoyed this article, please support future articles like this by making a donation or saving money by using my discount coupon codes. Either way, your support is greatly appreciated!
This blog is intended for freelance writing and sharing of opinions and is not a representative of any of the companies whose links are provided on this site.
The opinions provided are of Ron Martinsen alone and do not reflect the view of any other entity
Sunset Shoot with Bryan Peterson at Dr. Jose Rizal Park Copyright ® Ron Martinsen – All Rights Reserved
At the beginning of June 2011, I had the luxury of being Bryan Peterson’s assistant / Canon Technical Guy at his workshop here in Seattle, WA. Seattle has been my hometown for nearly 17 years, but Bryan is from the Northwest as well so it was fun to see parts of Seattle that I’ve never known through his creative eyes.
In this article I’ll share my experience in working with Bryan as an assistant and a student. I’ll also share a little bit about the students in the class as well as testimonial from one of the students in her own words.
My Favorite Images from the Workshop
To kick things off, let’s start with some of the fun images I managed to snag when I had free time to shoot. Here’s one of my favorites taken at the Graffiti Wall near the train tracks just south of Safeco Field:
Stop That Graffiti Punk!!!! Understanding Shutter Speed with Bryan Copyright ® Ron Martinsen – All Rights Reserved
One of the students from a previous workshop wanted to share what he had learned about shooting reflections, so we experimented together. Here’s one of the shots I got from that experiment:
Reflections at Pioneer Square Copyright ® Ron Martinsen – All Rights Reserved
Any photographer can capture beauty from beautiful places and people, but the better photographers find beauty where the world normally sees decay. Here’s a shot I took at an old building in the warehouse district that was amazingly colorful for such a place. Thanks to this exercise I looked at the world a little differently and found beauty in the most unexpected places.
No, that’s not from the Palouse, it’s crap growing out of concrete and a fence at a run down building! With Bryan you are always Learning to See Creatively.
Take a piece of concrete, some grass, a yellow flower and some lady bugs and you can end up with an okay photo like the one below. This was one of the early lessons Bryan taught us and it was actually both fun and liberating! Some will call it cheating and others may be outraged, but you are the photographer and your goal should be to have fun making great shots. Now we didn’t destroy a botanical garden to do this, but rather dug some stuff up at a run down dock.
Creative People Can Make Pictures Anywhere
The shot below was processed with HDR Efex Pro using 5 exposures. I used Color Efex to create one of the off the wall HDR shots you see these days as my tribute to making art out of a run down building. Bryan loves going to places like this to stir up creativity and now I see why.
Our first stop was at the Port of Seattle where we got to enjoy great views of tugboats, fishermen (see below), etc… but what we also ended up shooting were flowers and a other objects that weren’t what you’d expect for a location like this. This was a great case study of being observant about more than the obvious at any given location.
Fishermen at the Port of Seattle
I ended up with a lot of fun shots which you can see at here. Many are unprocessed and some are just flat out fails, but I learned a lot and had fun shooting outside of my comfort zone. Be sure to read the captions of the shots to learn more.
While I’ve had the pleasure of sitting down and talking to Bryan for a few hours in person and we’ve talked on the phone, this was my first chance to shoot with Bryan. In fact, I wasn’t really sure what to expect. Of course, his creativity came out big time so I learned to expect the unexpected!
Time Expired Bryan captures a cool shot of the parking meter with Joe’s “dead" body in the background
We were going by 8:00 AM (or earlier) each morning and wrapping up after 11:00 PM, so they were action packed days (with an afternoon break). During our various outings he’d record a little video for his PPSOP web site which usually featured a really cool shot. In the one above the subject is a parking meter that says “time expired” and offset in the background is Joe’s body. It was a brilliant shot that I would have never thought of, but I’ve seen done before (probably by Bryan <g>).
Bryan teaches while Amanda records a video for PPSOP. Hover over the image above to see my version of this shot.
Even though I live in Seattle, Bryan took me to a couple places I’ve never been like the amazing Graffiti Wall (which I’m not sure I could find again even if I tried!). Once again at this location he recorded another PPSOP video this time where his hand was the subject. His shot came out way better than mine, but it was fun seeing how he worked.
Mary Lou and I were the only Canon shooters, everybody else was Nikon
When I managed to break away from teaching and listen to Bryan, I learned some really cool things. Unfortunately I was busy teaching a lot so I found myself missing out on more than I hoped.
I also found Bryan to be a bit more quiet on shoots than I expected. He didn’t teach the the group as a whole as often as I expected, but rather he’d find someone and work with them one on one. Given the nature of this type of teaching some students mentioned to me that they wished they get more time with Bryan than they did. I tried to help out by giving them as much one-on-one attention as I could, so hopefully that helped.
It should also be noted that if you are observant you can gather around the person Bryan was talking to and learn a lot. If you take one of his courses I highly recommend that you do that!
The Students
Superstar Amanda was the youngest attendee so she was the resident fashion model!
I loved the people in this class. Every single one of them was a joy to be around and all were eager and enthusiastic students – an instructors dream!
The youngest student, Amanda (pictured above), found herself as the unexpected group model when a warm body was needed. She’s a pretty girl so it worked out great. Here’s a tip though - if you are a pretty girl attending a Bryan Peterson workshop you should plan on getting photographed – A LOT!
Amanda was a trooper throughout the workshop who was always willing to smile and have her photo taken. As a result she earned the nickname “Superstar” from Mary Lou.
Clowning Around with the Flash Joe, a repeat workshop attendee, is a fantastic guy with a heart of gold was a blast to be with on during the workshop
Joe had been to a Bryan Peterson workshop before and was the typical type of reader that I see on this blog. He had a great passion for photography and excellent equipment so he managed to snag some nice shots. He also had a rental car so he doubled as chauffer and refused to let people help pay for parking or gas. He’s just that kind of guy, and I really enjoyed hanging around and experimenting with some things (as above) while we were out shooting. With Joe there’s never a dull moment!
Making Something Out Of Nothing See that trash in Jim’s back pocket? It was the subject of his award winning shot that earned him a FREE BP Workshop!
Jim is in charge of a huge security staff at a Casino in Florida so he had many great stories to tell, but his real purpose was to learn. He was a sponge eager to master his camera and improve his skills. It was a real joy working with him because you could see the excitement on his face when he learned something new. I’m still in touch with Jim and suspect he’ll be a regular reader on the blog from now on.
Wade Closes In For The Macro Shot
Wade is a co-worker at my day job at Microsoft and was familiar with my blog. I hadn’t met Wade in real life prior to the class, but again I found another friend that I really enjoyed talking to. He was very quiet when shooting but his work showed his attention to detail, so it was fun to see what he ended up with at the end of the class.
Thoughts from Mary Lou Polvi
Mary Lou’s Critically Acclaimed Image from the Graffiti Wall
Mary Lou was the only one of the students in attendance at this workshop who had a Canon camera, so I spent a lot of one-on-one time with her. I think she had been given the workshop as a gift from her son as she didn’t even know that Bryan Peterson was a book author! However, she was a quick study who enjoyed using my 100mm macro lens throughout the week.
Mary Lou and I had a Canon shootout here
Mary volunteered to share her thoughts about the workshop as well as some of her images (here) that she took during the class. Here’s Mary’s thoughts in her own words:
… If you were in a creative funk, you won't be after the workshop is over. Bryan Peterson is a man of great creativity. I was expecting to do the regular tourist trap photo shoots. We went to places I would never have expected or found. His energy is boundless and his down to earth teaching style helped all of our levels of experience. What I liked the best was shooting in a place where there was absolutely "nothing" to shoot. We had a limited amount of time to come up with something creative. It amazed what wonderful photos were taken. We all turned "nothing" into "something" amazing.
I was fortunate to have Ron Martinsen as my Canon expert. Because of his equipment expertise I was able to take full advantage of my camera. I now have a much better understanding of my Rebel T1i and my camera lenses.
I can't wait to take another seminar next year. Between now and then I will put to use what I learned. I do know that my creativity has been taken to a new level.
Picked up a camera for the first time in Jan 2010. Trying to make my tripod be my best friend!
Here’s a shot Mary Lou took of me at the Graffiti Wall
Conclusion
The success of any workshop really boils down to three things:
Did you learn some new techniques to improve your skills?
Did you get some great photos?
Did you have a fun time doing it?
The answer to these three questions was a yes for me, and I think it was a yes for all of the students who attended. In that respect, the workshop was a huge success.
Waiting for the Sunrise Golden Hour at Kerry Park that never arrived As a group we decided we were tired to try any more sunrise shots – woohoo!
Based on my own observations and feedback I had from other students, I would have liked to have seen Bryan more engaged during the workshop.There were times when he was disconnected attending to business on his iPhone that was disappointing to the students who paid $995 to attend this course.
I would also like to have seen more group engagement where he taught to the group about things to improve their skills. If you were observant you could go find where he was talking to someone one-on-one and listen in, but I think it would have been better for him to announce “hey everybody, listen up” and teach some technique that all could benefit from.
With those quibbles aside, I was very happy with the locations chosen and the experiences learned during the session. I got some great shots as did the students who attended, so we were all excited at the end to show the world our new shots.
It was an honor to work along side this photography legend and pick up on his amazing creativity. I grew as a photographer and I got to meet some fantastic new people. I appreciate the opportunity to do this and I hope I’ll get a chance to work with Bryan again in the future.
Click here to learn more about Bryan Peterson’s Workshops. Be sure mention this blog if you sign up for the course as well as cc ronmartblog@martinsen.com in your signup mail to Bryan. If you don’t have time or financial resources to take one of his workshops then you should consider his PPSOP online courses like the Art of Seeing.
NOTE: This site requires cookies and uses affiliate linking to sites that use cookies.
If you enjoyed this article, please support future articles like this by making a donation or saving money by using my discount coupon codes. Either way, your support is greatly appreciated!
This blog is intended for freelance writing and sharing of opinions and is not a representative of any of the companies whose links are provided on this site.
The opinions provided are of Ron Martinsen alone and do not reflect the view of any other entity
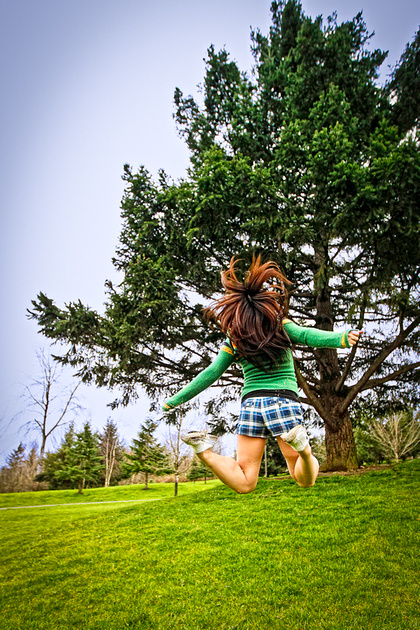
Assignment 4 – #3 Make a photo of someone jumping using the techniques learned during the course
The Art of Seeing online course featured on The Picture Perfect School of Photography (PPSOP) is effectively Bryan Peterson’s Learning To See Creatively book in the form of an online class. For four weeks you are given lessons with videos (in some cases) to study at your leisure, and an assignment to complete. Each assignment features three photo submissions and is personally critiqued with comments by Chris Hurtt and occasionally Bryan chimes in with a group or photo comment.
Assignment 4 – #1 Make a photo that conveys the idea of Indifference (from a long list of word choices – you pick)
The assignments are a bit challenging if you are like me and don’t have the gift of seeing. As a result of this fact, I struggled a bit at first when taking this class. However, I’m happy to report that I finally got the hang of it, I felt this class helped me grow as a photographer of environmental objects. I say this because the class isn’t about photographing people (until the final assignment), so if that is what you are looking for then you’ll want to look at the other course offerings.
I feel that the techniques learned in this class can help you with any type of photography, but it is going to be most helpful for shots you take while traveling or of your environment.
At first I was a little underwhelmed by the class as the first lesson lesson felt very familiar after reading Learning to See Creatively, and I had seen the video featured once before. However, the assignment is where the rubber meets the road, and I found myself struggling to do the assignment as instructed. This was a different way of thinking for me so I was out of my comfort zone, and honestly I think that was a good sign of what was to come.
Assignment #2 – Lines & Textures I started to get the hang of things during the second assignment This photo is unprocessed and straight out of the camera so it needs work
The critique for lesson one was respectful and encouraging, but real (i.e., not fluffy flickr style praise). I was also fortunate enough to get feedback from Bryan on this one too as I had questioned the usefulness of the exercise for hopeless causes like myself. However, as the class progressed I would come to understand the value of where we were beginning. Each assignment builds on the previous so this foundation was necessary for what was to come.
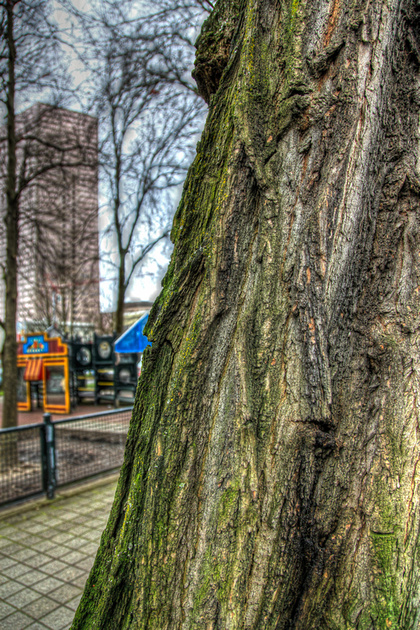
Assignment #2 – Lines & Textures As I began to see differently, I began to think differently. I laid down on a public sidewalk (to much attention from passers by) to get this shot
I did a smart thing for the second assignment and went to a different city (Portland) so I could get excited and feel creative energy that I struggle with sometimes in my familiar Seattle. I ended up seeing things I hadn’t seen before and taking shots that were unlike any I’ve taken. This was a great sign that the class was working to help me see more creatively. The photos from this assignment were well received by Chris as he could tell I was starting to get it!
Room for Improvement
Assignment 1 – #1 Things started off pretty bad with this textures and line assignment
I’m probably more picky than average when it comes to forming opinions about online training because I have had a great experience with Kelby Training & NAPP. I review lots of books and training products on this blog which also shape my expectations. What’s more, I’m also a photography / lightroom teacher so I have high expectations about the volume of information covered and the take away from a class when so many photography related companies have their hands out for our hard earned money.
I’ll admit that my first impression with the class left me underwhelmed because I felt the videos were below today’s standards founds on YouTube and Kelby Training. The lesson material also felt recycled from the book with no updates since 2003, so my honest first impression was – “that’s it”?
As the class went on I realized the real value wasn’t the material as much as it was the assignments and the thoughtful critiques that followed. When I accepted this reality and worked hard on my assignments, I found that I got a lot more out of the class than the superficial things I initially focused on.
While I would have appreciated a little more open communication in the course and more unscripted appearances from Bryan, I found Chris did a good job of making this class worth my time and energy. Seeing how I improved over the four weeks I took this course, the price of the class seems like a real bargain. After all, how many resources do you know of are going to increase your composition skills significantly for less than $200? New gear and software can’t do that, and generally online training without homework isn’t going to stick like this one did. When reviewed from that perspective, it’s a great deal.
I have shared my opinions with Chris and Bryan and they claim to be exploring ways to improve their classes in the future.
More Assignment Photos
I submitted a total of 12 photos over 4 assignments out of the 492 photos I took for this course (in four weeks). I dreaded the first two assignments, but while I was shooting for the second inspiration stuck and I was hooked. I enjoyed having an assignment to motivate me in the upcoming weeks, and I’m considering ways to keep motivating myself like this moving forward.
I’ve shown a few of my submissions earlier in this article, and here’s a few more that I used in the class (some are naturally more successful than others <g>):
Assignment #3 – Using Different Lenses at the same location
Okay, I’ll admit that I’m a sucker for color so I loved the shot above for its color – however, I now feel strongly that it sucks compositionally. This is a growing point for me as sometimes it’s difficult for me to decouple my attraction to sharpness and color with something that is genuinely interesting as a photograph.
Assignment #3 – Experimenting with Different Lenses Mouse over to see 50mm, mouse out to see 400mm
For Assignment 3 we had to shoot in the same spot over three different outings for at least an hour using different lenses set to the same focal length each time. You didn’t have to shoot the same subject, but you did have to revisit the same location each time. I ended up spending about 30 – 45 minutes each time over two days, but it was three separate outings and I go the point of the assignment. As you can see from the two photos above (hover over to see the 2nd) and the one below, you can get drastically different results - all of which have merit – but one will generally stand out as your personal favorite (i.e., the 400mm shot shown above was my preference).
When I wasn’t running from mall security and dogging annoying planter boxes, I managed to capture the shot below which I really like. It’s flawed in some ways, but I like it so that is the most important thing as I shoot for me.
Assignment #2 – Lines & Textures Yes, I wish I would have left more room up top too! Sadly there was nothing I could do about the planter box. No Photoshop and I got a visit from Mall Security after this!
The funny thing about the shot above is that anyone will quickly see that I should have left more room at the top of the frame, but honestly I didn’t even see that blue line when I composed the shot!!! I was so laser focused on the fountain and forced to shoot at 24mm that it was just luck that I got as much of the blue line as a did. However, this taught me a lot about how much I don’t see so it helped me see differently for the rest of the shoot (even that day after the security guards sent me on my way).
Assignment #4 – Disqualified but I liked it
In assignment 4, we were strictly prohibited from having people or body parts in all but the jump shot so the above image was disqualified. I chose to include my feet and play with the lines in this shot in a whimsical play with my 16mm lens. I had strategically placed my feet on the lines in this shot that was designed to convey the point of Access (although it may have qualified for risk, safety or caution as well). While not perfect, it represented another step forward in my experimentation into a new area as a photographer, so I was pretty happy with this one as well.
Conclusion
I’m quick to admit that my technical skills as a photographer FAR outweigh my talent for composition. In fact, my own self assessment is that my compositional skills suck – at least they did before I took this class. If someone would have walked up to me and said for less than $200 I can improve your compositional skills more in 4 weeks than you’ve progressed in the last 3 years, or your money back I would have thought they were smoking crack. I didn’t think it was possible as I felt like I was an old dog not capable of new tricks, so that’s why Bryan insisted that I try this course.
NONE of the shots featured in this article would have ever been taken had I not taken this course, because I just didn’t see the world that way. I looked for beauty, not lines and textures. I got stuck in the habit of almost always shooting with my lens wide open to the smallest f-stop number unless I was shooting a landscape or a flat surface, I never thought about trying different lenses for the same shot to see what different results I might get – despite reading suggestions many times to do this.
The lessons in this class forced me to do things I just don’t do. Like most people, I have a super busy life so I always waited until the last second to do the assignments and was forced to complete them in a time period shorter than I was supposed to, but I still learned – a lot.
I feel I am a better photographer because of this class and that’s something I couldn’t learn from reading or videos alone, so I highly recommend this course for those who feel frustrated that the composition of their photos are their weakest link in their current digital workflow.
Save 10% when you enter the customer code RONMARTBLOG in the shopping cart at PPSOP as shown above (don’t forget to click submit).
If this code doesn’t work, please check out my discount coupon code page for details as it will be updated if the code or terms change.
For a complete list of courses, click here and don’t forget to look at all four pages found by clicking the tabs above the first row of course offerings.
Face to Face Training Opportunities with Bryan
I will be teaching alongside Bryan as a technical assistant when he comes to Seattle for this June 8th – 11th class. These classes fill up super fast and we’ve got a few spots opened up just for readers of this blog article so sign up ASAP if you would like to attend.
For a complete list of on-location workshops taught by Bryan, click here. While there is no special offer – at this time – please mention this blog when signing up so he knows how important this blog is and hopefully will consider a special offer in the future.
Disclaimer
I may get a commission if you sign up for the course or if you purchase using any third party links. I was also allowed to take the course at no charge to bring this review to you.
NOTE: This site requires cookies and uses affiliate linking to sites that use cookies.
If you enjoyed this article, please support future articles like this by making a donation or saving money by using my discount coupon codes. Either way, your support is greatly appreciated!
This blog is intended for freelance writing and sharing of opinions and is not a representative of any of the companies whose links are provided on this site.
The opinions provided are of Ron Martinsen alone and do not reflect the view of any other entity