
Click here to learn more about the discount on Nik Software for readers of this blog.

What the heck is Dfine?
If you are like I used to be then you probably have no idea what the heck Dfine is. Other than being a name that is easy to trademark, it’s a pretty unintuitive name for a product that does noise reduction. What’s noise reduction? That’s using the power of software to analyze your picture and remove the nasty speckles introduced by using higher ISO’s on your camera (especially point and shoot cameras).
So how does it work?
Noise reduction can have unwanted side effects of removing textures or soften parts of the picture that you didn’t want softened. For example, stucco, brick, etc… can sometimes appear like legos with aggressive noise reduction. Should you decide that the default process was too aggressive you can use the U-Point controls in Dfine to remove the effect from a portion of the image. You can also use the brush feature to apply portions of the effect using a layer mask (which is effectively what the U-point controls are doing). If the default results aren’t aggressive enough, then you can add new measure points (default measure points shown below as boxes).
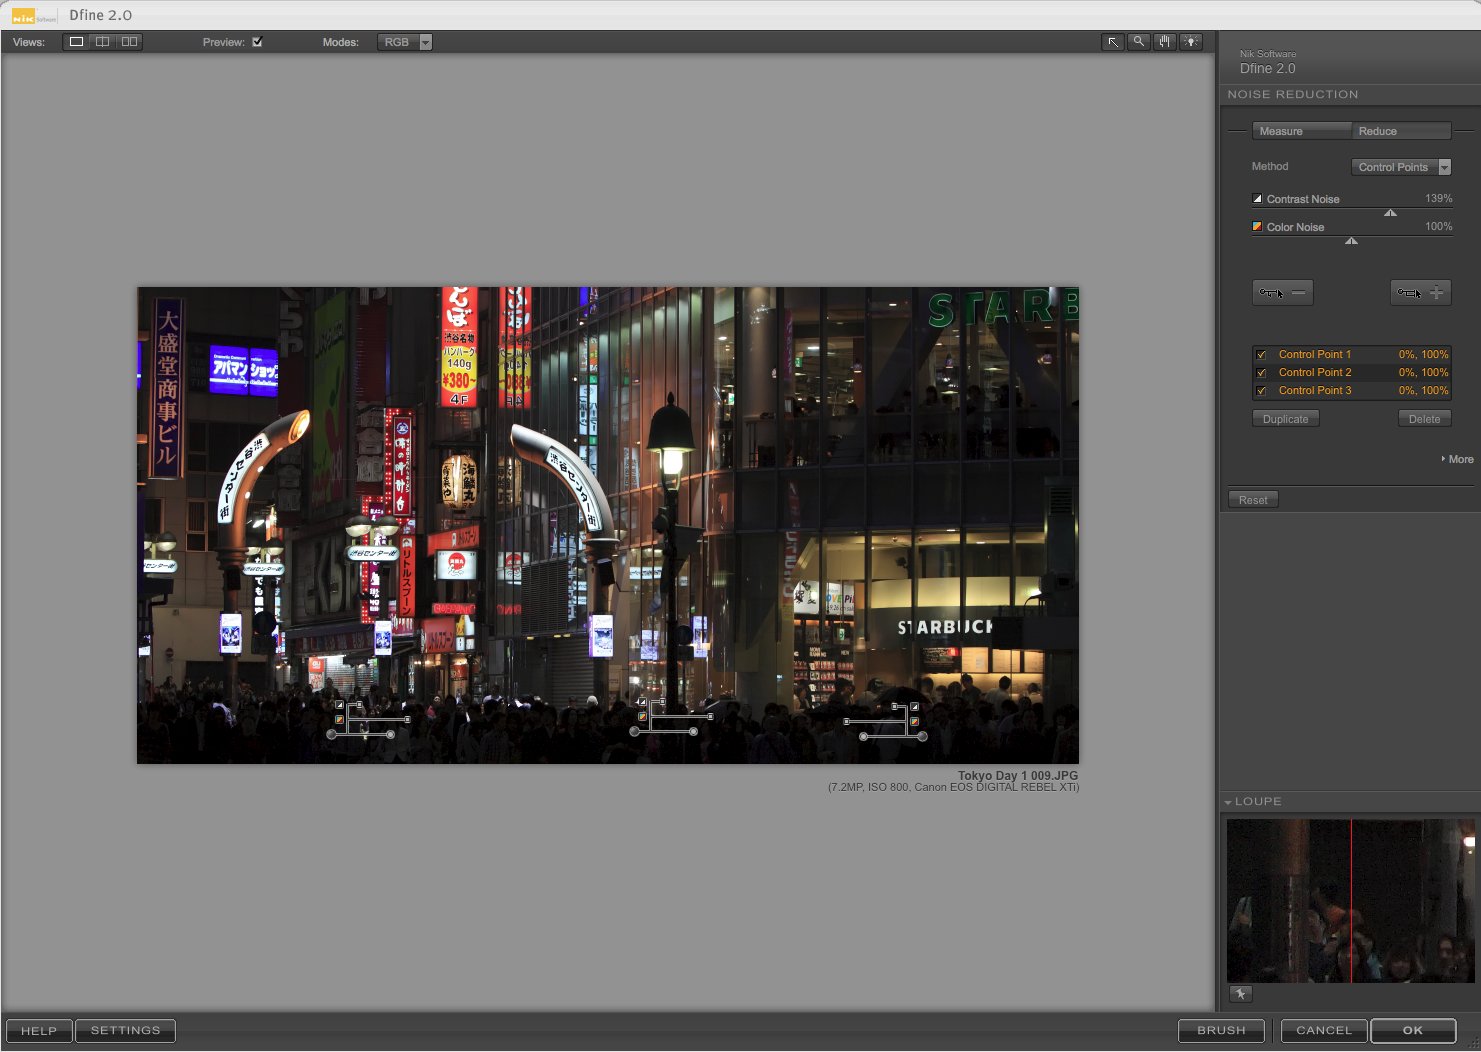
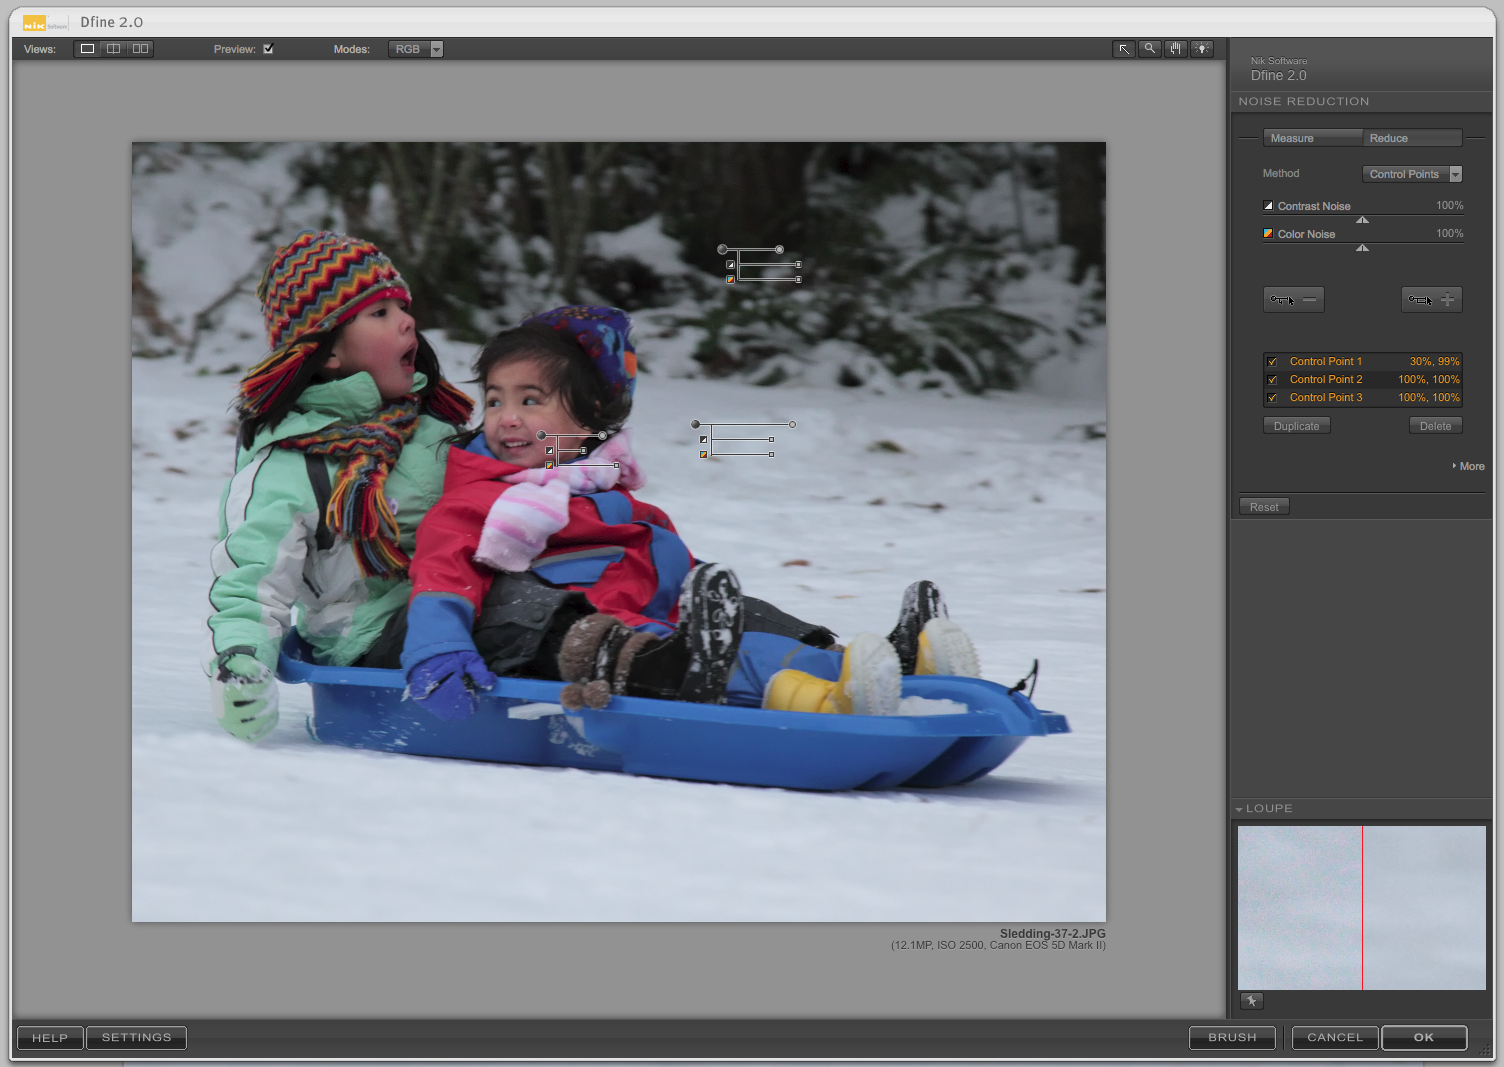
The good news here is that Dfine is VERY smart, so generally you can just launch it and its automatic profiling will hit the nail on the head. Here’s an example below (using build 2.102 – 4206) of its simple, but powerful user-interface (shown on a Windows Vista system, but its available for Mac OS as well):

Once you get comfortable you can use the Reduce feature to tweak the results to your taste (see some examples at the end of this article).
Noise Reduction Roundup Images
This product is one of three excellent after-market products that I am reviewing as part of my Noise Reduction Roundup article.
Initially I was processed the original images in Canon’s Digital Photo Professional (DPP) 3.5. When one of the product engineers raised a concern about JPEG compression I decided that it made more sense to import the RAW into Photoshop via Adobe Camera Raw (ACR) 5.2. I then used that single PSD to work on all the photos.
Here’s the exact process I used:
- Open CR2 in Photoshop CS4 32-bit on Windows Vista 32-bit
- This launches ACR 5.2, go to the Detail tab and set Noise Reduction to 0 (XMP data from disk has cropping info – XMP was generated from Lightroom 2.3 where I catalog my files)
- Open object as a Smart Object at Original Size
- Duplicate the layer twice
- Rasterize the third layer & copy 3 more times
- Name each layer (original, acr, photoshop, noiseninja, dfine, noiseware)
- Save PSD (these are huge)
- Apply corresponding filter to each named layer (using layer comps to define each layer and hide other layers) using default values (run filter, press OK when dialog appears)
- Save PSD
- Switch to each layer (using layer comps) and do a File | Save As… JPEG and choose 12 when the dialog comes up (although by accident I did 10 on Tokyo for all of them).
- For Chicago, I created a Text layer watermark and showed both the image and watermark layers.
- I realized that these images had the wrong color profile, so I had to re-open them all, apply the sRGB color profile and save again at JPEG 12.
The images below are part of the roundup images. The original link shows a JPEG 12 version of the original with no noise reduction added (the default setting is always to add a little). The Auto link was processed on a duplicate layer using the automatic settings (i.e., the same results you’d get if you ran the filter and just hit OK right after installing this product). This image was saved as JPEG 12 in Adobe Photoshop CS4. The Suggestion version was processed the same way, but with the instructions found below the links. As you can see from the images below the results are outstanding. Hover over images to see before and after (using auto) results, but you have to look very carefully. Hints about where to look are included for each image, but its best to click the hyperlinks to see the full size images and switch between tabs in your browser to see the differences. You may download and compare them in Photoshop, but please delete them when you are done comparing.
This article includes a before, auto and suggested 100% crop to compare the differences. For the best results, click on these images to view them at 100%.
The final article will include six 100% crops next to each other so you can more easily see the differences together, so stay tuned to this entire series for the best results.
Canon G9 @ ISO 400
Here’s a shot I took with a Canon G9 at ISO 400 which was fairly noisy, but thanks to Dfine you can see how nice it cleans up. Hover over the shot below to see the before and after (pay attention to the top of the image to see the bad noise in the original). This is straight out of camera with no post-processing, so it still needs a little work (especially sharpening):

| Original | Dfine Auto Fix | Josh's Suggestions |
Josh Haftel of Nik Software took a crack at this photo and performed the following steps:
- An automatic profile was applied.
- Another measurement rectangle was added by selecting Manual from the Method pull-down in the Measure section and then clicking on the add measurement rectangle. The new measurement rectangle was added to the dark gray ceiling at the top of the image. This was done to ensure that all areas throughout the image that contain distracting noise were used in the creation of the profile. Then the Measure Noise button was used to update the profile.
- The default settings of 100% Contrast and Color Noise were used globally.
Here’s a picture from Josh of where he placed the measure control:

Click Josh’s suggestions in the label under the photo to see the full size version that I created using his steps, and compare those to the original and auto versions.
Canon Rebel XTi @ ISO 800
Pay attention to the building in the back of the scene on the bottom left side of the image when you hover in and out below:
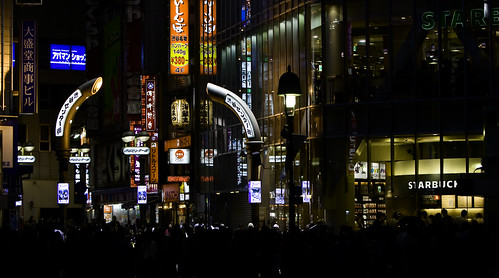

| Original | Dfine Auto Fix | Josh’s Suggestions |
For the picture of Shibuya Center, the default settings applied by Dfine 2.0 were used. I also added three control points with 0% Contrast Noise and 100% Color Noise applied evenly placed across the crowd, with the size set in order to cover the crowd. To do this, I set a minus control point to a point about ¼ from the left of the image, set color noise to 100%, then duplicated the control point twice, placing one in the middle and one at ¾, then selecting all three control points and moving the size slider so that each circle overlapped slightly. This last bit isn’t 100% required, however it could prevent details in the faces [in the crowd] from being reduced.
Here’s an image from Josh with the U-Point controls:
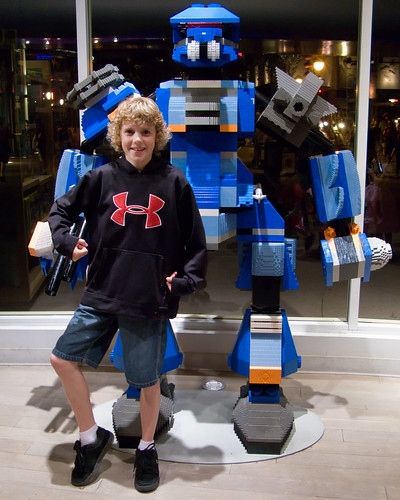
Canon 5D Mark II @ IS0 2500
Pay attention to the little girl’s hair when you hover in and out below:
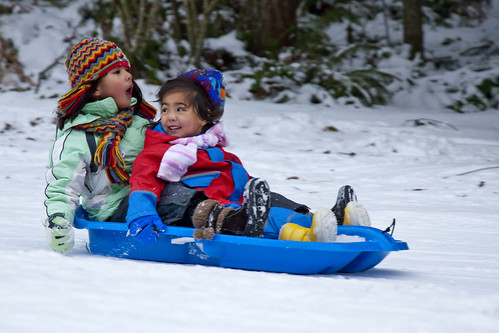

| Original | Dfine Auto Fix | Josh’s Suggestions |
Here’s Josh’s suggestions for this photo:
- An automatic profile was applied.
- Control points were applied to selectively apply noise reduction
- A minus control point was placed on the smaller child’s face with the Contrast Noise slider set to 50% and Color Noise set to 100%. The Size was set to cover both children’s faces.
- A plus Control Point was placed on the white snow, with the Contrast Noise slider set to 150%. The Size slider was set to cover all of the snow in the image.
In this image, using a lower Contrast Noise reduction amount applied to the skin of the children led to an increase of perceived detail to overcome the slight motion blur / camera shake. That is, retaining some noise can ensure the image seems more in focus than it truly is.
Here’s an image provided by Josh that shows where he placed the U-Point controls:
Canon 1D Mark III @ ISO 3200
Pay attention to the building on the left side of the image when you hover in and out below:
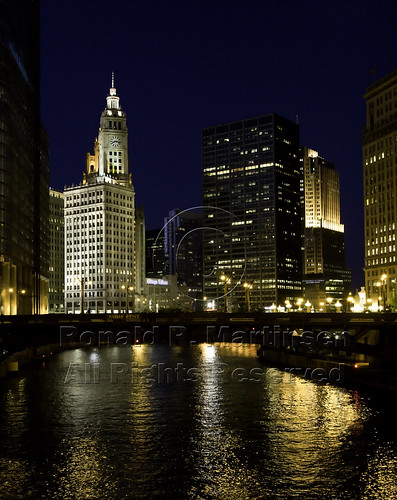

| Original | Dfine Auto Fix | Josh's Suggestions |
Here’s Josh’s suggestions for this photo:
This image does a great job of showing off Dfine 2.0’s most unique aspect: U Point® technology powered control points. Whereas other applications require that the user set a theoretical maximum noise reduction and then selectively paint in that amount of noise, Dfine 2.0 allows for noise reduction to be applied selectively to different parts of the image at the value most appropriate for that area, all without the need to create complicated masks or selections.
We believe very strongly in selectively applying enhancements, whether it is noise reduction, color and light adjustments, creative enhancements, or sharpening, which is why control points are found in every application we make. Control points enable photographers of any skill set make precise selections quickly, saving time and making more fine control possible, without reducing productivity.
In this image, there are various areas that need different levels of noise reduction. While the noise reduction algorithms that Dfine employs produce some of the highest quality results, it is not possible to break apart the relationship between noise and detail. That is, applying noise reduction to an image will have some impact to the detail of the image. Dfine 2.0 takes noise reduction to the next level by enabling precise and selective application of noise reduction, allowing the photographer to make the decision about the level of noise reduction to apply to each area. This ensures that the photographer can prevent noise reduction from being applied to areas in which the noise is not distracting and even to find the optimal balance of noise reduction and noise retention for each section. With Dfine 2.0, you can even determine the amount of color noise reduction and contrast noise reduction independently per area, something that is not possible in other noise reduction applications.
Here’s an image provided by Josh of where he placed the U-Point controls:

For this image, the following steps were taken to perform the noise reduction:
- An automatic profile was applied in the Measure tab.
- In the Reduce tab, control points were applied to the image.
- A minus (remove) control point was added to the dark water and then the Contrast Noise slider was moved to 30% and the Color Noise slider was moved to 100%. The size slider was set to cover just the water in the image.
- The first control point was duplicated and then placed on the bright orange water.
- A plus (add) control point was added to the sky towards the middle of the image with the Contrast Noise slider moved to 200% and the size set to cover the entire sky.
- The final result would be a combination of the global Contrast and Color Noise sliders (which were left at 100%) and the control points added. Any area that was not affected by a control point would be affected by the global sliders.
With these settings, the clear sky, which we all know to be detail free, could be very smooth while the water, in which the noise structure was mostly lost in the waves and ripples, could be left in tact, keeping a natural look to the water.
Conclusion
If you’ve followed my blog, you know that I have recommended every Nik software product I’ve tested. The reason why is simple – they make great software that offers outstanding default results which can easily be tweaked using their revolutionary U-Point controls. The automatic results I got with Dfine were near identical to Noiseware, yet selectively applying those results using U-Point controls or the brush feature made it much easier to control the final image that I could be happy with. In addition to all of this, Nik offers videos on their site and webinars that offer you a chance to see the product in action in the hands of Nik’s imaging gurus. While Dfine lacks the fine level control of Noise Ninja, and some of the advanced features of Noiseware, it offers enough control for my needs and provides results that I am very happy with. As a result, when doing noise reduction I’ll always try this product first to see if I can get the results I want, before I try out the others. However, when I total all the points Dfine falls a point short due to its default performance on the Chicago image. It’s default processing was consistently a little softer than Noiseware’s, so I have to give it a second place but only by a hair. If you already own this product, then stick with it.
Use the links below to view other articles in this roundup:
- Part 1 – Intro
- Part 2 – Nik Software Dfine 2.0
- Part 3 - Imagenomic Noiseware 4.1.1 Professional
- Part 4 - PictureCode Noise Ninja 2.2
- Greatest Saves Contest (win one the products from parts 2 – 4)
- Noise Reduction Roundup Conclusion – And the winner is…
Coupon Code – 15% OFF
Click here to get Dfine and the ENTIRE
Nik Complete Collection by Google now only $126.65
UPDATE (12/21/2010)
Learn more about using Manual Mode in Dfine in this article.
1 comment:
I would like to see if any of the noise reduction softwares tested are able to do a really good job at reducing noise in the red spectrum areas of an image wihtout leaving lots of artifacts.
A perfect example is the sledding photo tested. After noise reduction was applied, the blues, greys, whites, yellows, greens were all smoothed out pretty well without losing much detail. However, the red coat has loads of artifacts all over. I've tried Neat Image, Noise Ninja, and now it looks like Dfine has a similar story.
Is there some technique that would be good to use when trying to reduce noise cleanly in a high ISO photo with large patches of red in them?
Post a Comment