Showing posts with label Motorsports. Show all posts

Monday, February 1, 2016

Preorder Canon EOS-1D X Mark II Now

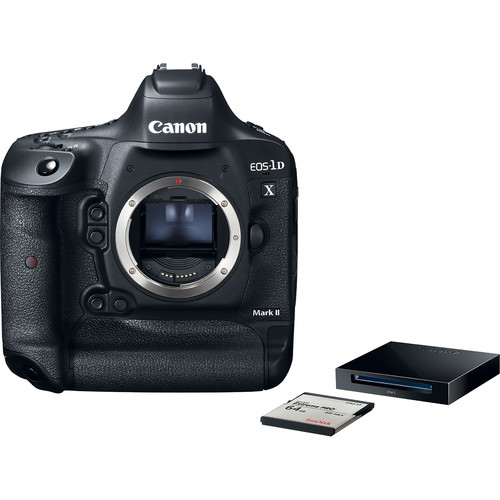
Canon EOS-1D X Mark II DSLR Camera Premium Kit
(body only $5999)

Product Highlights

As a 1DX owner, I’ve been eager to see what Canon came up with for the replacement to my camera. Now the wait is over, and it’s official. Here’s the highlights of what’s  included:

  • Newly developed 20.2 megapixel 35mm Full Frame Canon CMOS sensor;

  • Continuous shooting speeds of up-to-14 frames per second (fps) with Auto Exposure (AE) and predictive AF for viewfinder shooting and up to 16 fps1 in Live View mode;

  • Dual DIGIC 6+ Image Processors that transfer image data at extremely high speed for extended bursts during continuous shooting – up-to-170 consecutive RAW images at 14 fps. When shooting JPEG images you’re only limited by memory card capacity 2;

  • Capable of shooting 4K 60P and Full HD 120P video with Dual Pixel CMOS AF;

  • Enhanced wireless functionality (with the optional accessory Wireless File Transmitter WFT-E8) that supports the new high-speed IEEE 802.11ac standard and the ability to easily transfer photos and videos to compatible smartphones using Canon’s Camera Connect app*;

  • Digital Lens Optimizer to help correct aberrations in-camera (a feature that previously required post-processing on an external computer);

  • Improved 61-point viewfinder AF with expanded coverage and all AF-points selectable and supported to a maximum aperture of f/8;

  • Improved AI Servo III+ predictive AF algorithm for better accuracy;

  • Continuous red illumination of all AF points within the camera’s Intelligent Viewfinder II.

  • Compatibility with both CF and CFast memory cards for optimal performance and versatility.

Estimated ship date is 4/29/16. For a complete list of accessories CLICK HERE.

Compare the 1DX Mark II to other Canon DSLR’s and its predecessor using this awesome PDF.

If you are curious as to how that compares to the D5, then here’s the highlights for the D5:

  • 20.8MP FX-Format CMOS Sensor
  • EXPEED 5 Image Processor
  • 3.2" 2.36m-Dot Touchscreen LCD Monitor
  • 4K UHD Video Recording at 30 fps
  • Multi-CAM 20K 153-Point AF System
  • Native ISO 102,400, Extend to ISO 3,280,000!!!
  • 12 fps Shooting for 200 Shots with AE/AF
  • 180k-Pixel RGB Sensor and Group Area AF
  • 14-Bit Raw Files and 12-Bit Raw S Format
  • 1000 Base-T Gigabit Wired LAN Support
  • Available in dual XQD or CF only versions (woohoo, they listened!)

See more in my D5 article.

Ron’s Take
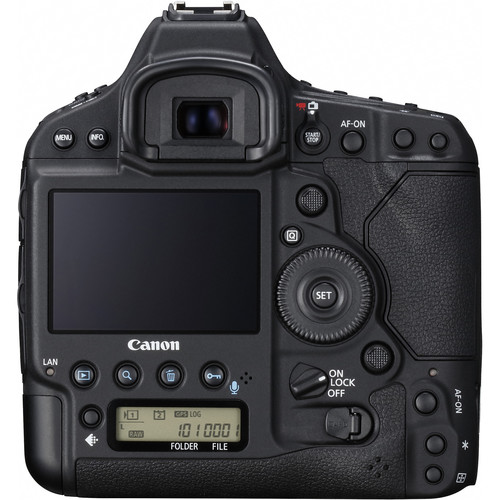
Canon EOS-1D X Mark II Rear View

Physically not much has changed beyond the greater resolution touch screen, and that’s a good thing as the 1D X body was very well designed. It’s also tough to re-learn a new body, especially if you keep your old body so I was glad for things to stay the same.

While some may be dissapointed that this wasn’t some 50+MP camera, I’m personally glad to see the 20.2MP sensor that should be on par or better than the D5. Hopefully this “newly developed” sensor will have the dynamic range and high ISO quality that meets or exceeds Nikon’s for the ISO they both offer. I was very dissapointed that Canon did match Nikon’s 153-point AF system and native 102,400 ISO, so I’m on the fence about what I’ll do next.

It also would have been a welcome addition to have the D5’s 2.3m dot touchscreen vs Canon’s 1.62m – especially when zooming in live view for critical focusing, so I’m dissapointed Canon didn’t do more for the LCD – especially given the price!

I’m eager to see how the new AF system works as the 1D X was a great improvement over its predecessors and the Nikon D4, but no match for the incredible performance of the D4s. The D5 is expected to top the D4s, so it should be very interesting to see how these to compete against each other. On paper Nikon should be the winner, but Canon’s better lens line up – including the amazing Canon 200-400mm f/4L IS with 1.4X Extender should prove a tough decision for wildlife and sports photographers.

I’ll test them both for sure and let you know what I think!

B&H First Look Video

More from the Press Release
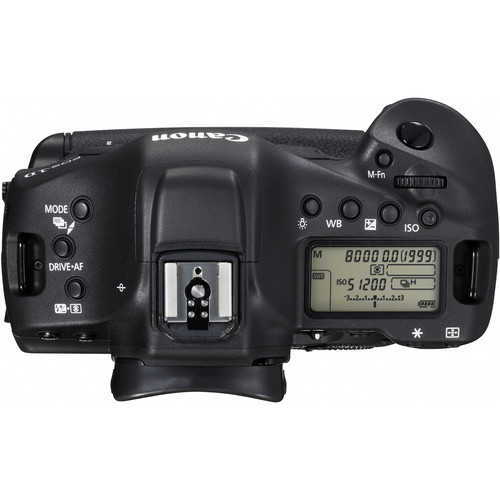
Canon EOS-1D X Mark II Top View

The Ultimate EOS Camera: Continuing a Legacy of High Speed and Performance

Building on the success of the Canon EOS-1D X professional digital camera, the Canon EOS-1D X Mark II camera is designed to deliver high-performance, speed, and image quality, with improved comfort for professional photographers. In addition to the new 20.2 megapixel full-frame CMOS sensor and Dual DIGIC 6+ Image Processors, the new EOS-1D X Mark II DSLR camera includes an improved 61-point High-Density Reticular AF II system with all AF points selectable by the user (and up to 41 cross-type points depending on the lens in use). The improved AF system includes expanded coverage that supports AF at maximum apertures up to f/8 with all 61 points for high precision autofocus even when using EF super-telephoto lenses with an EF extender. The camera also boasts excellent dynamic range and reduced color noise compared to its predecessor throughout its standard ISO speed range of 100 - 51,200. Expansion ISO speeds of 50, 102,400, 204,800 and 409,600 are also available. A first for the Canon EOS-1D series, this camera also features a 360,000-pixel RGB+IR metering sensor with enhanced precision and performance compared to its predecessor, improving facial recognition and tracking, as well as nature scenes. Additionally, the advanced AE system can detect and compensate for flickering light sources such as sodium vapor lamps that are often used in gymnasiums and swimming pools. When enabled, this anti-flicker system automatically adjusts shutter release timing to help reduce disparities in exposure and color especially during continuous burst shooting.

For filmmakers and photographers looking to do more than still photography alone with a DSLR camera and EF lenses, the EOS-1D X Mark II camera offers high resolution DCI 4K video at frame rates up-to-60p, with smooth movie recording to an in-camera CFast 2.0 memory card. An additional card slot supports standard CF memory cards up to UDMA 7. The built-in headphone jack supports real-time audio monitoring. Two additional EOS ‘firsts’ include 4K Frame Grab and 120p Full HD recording. The camera’s 4K Frame Grab function allows users to isolate a frame from recorded 4K video and create an 8.8 megapixel still JPEG image in-camera. When combined with the EOS-1D X Mark II’s high-sensitivity full-frame CMOS sensor, the new camera’s ability to record Full HD video at frame rates up to 120p will allow videographers to produce high quality slow motion video even in extremely low light. To make video shooting even more intuitive, the Canon EOS-1D X Mark II camera’s touch-screen LCD allows videographers to select the camera’s AF point before and during video recording with Dual Pixel CMOS AF, which provides responsive, accurate and quiet camcorder-like video autofocus to DSLRs.

“The innovations within Canon’s new EOS-1D X Mark II DSLR camera clearly set a new standard for professional cameras,” said Yuichi Ishizuka, president and COO, Canon U.S.A., Inc. “In developing the EOS-1D X Mark II camera, we looked to incorporate user-requested performance enhancements to bring professional photographers the ultimate EOS camera, a camera that has matured and been developed to meet their evolving needs.”

“Having f/8 capability on all 61 AF points is a tremendous benefit to wildlife photographers," noted nature photographer and Canon Explorer of Light Charles Glatzer. “In order to capture tight shots of animals without disturbing them, I frequently have to use very long lenses—sometimes with an extender attached, which further diminishes the aperture. The improved AF allows me to frame the shot exactly the way I envision it, without having to compromise.”

“This camera is a huge step forward,” remarked acclaimed photographer and Canon Explorer of Light Damian Strohmeyer. “Shooting sports in a gym at 8,000 ISO, it looked as good as 800 ISO from a generation or two ago. The images are tack-sharp, and the autofocus just doesn't miss. I've been amazed by what I've seen so far.”

“The autofocus was awesome,” agreed Peter Read Miller, sports photographer and Canon Explorer of Light. “The higher frame rate coupled with the speed of the CFast card was a definite advantage. It just never buffered out, even shooting RAW.”

The new EOS-1D X Mark II camera also offers a built-in GPS** receiver with compass for precise geo-tagged information of latitude, longitude, elevation and direction. This is especially valuable to wildlife photographers and photojournalists who need to track their locations, as well as providing sports photographers the ability to sync a multiple-camera setup with extreme accuracy and precision. It is also possible to use the camera’s built-in GPS to automatically sync the camera’s time to the atomic clock, an invaluable feature to professionals. An improved grip also makes the camera easier for photographers to hold and maneuver while shooting. In response to feedback from professional EOS users, the AF points in the EOS-1D X Mark II camera’s Intelligent Viewfinder II can be illuminated in red for improved visibility, especially when shooting in dark locations. AF sensitivity in low light has been doubled from EV -2 to EV -3 at the center AF point when the camera is set to One-Shot AF, enabling the camera to autofocus in extremely dark shooting conditions such as a moonlit nightscape. Viewfinder AF coverage has also been increased for greater compositional flexibility.

As with all EOS-1D series cameras, the EOS-1D X Mark II’s rugged construction and magnesium alloy body is weather resistant. The camera also features improved controls and more in-camera image quality enhancements than ever before, including a Digital Lens Optimizer function offering high quality aberration correction which can now be achieved without an external computer. This feature makes it easier for professional photographers to deliver finished files to their clients, especially in situations when access to a personal computer is impractical or inconvenient.

The estimated retail price for the Canon EOS-1D X Mark II is $5999 (MSRP) for the body or $6299 for the Premium Kit which includes a 64 GB CFast memory card and card reader. The new camera is scheduled to begin shipping to authorized Canon USA dealers in April 2016***. For more information and the full list of product specifications, visit: usa.canon.com/EOS1DXMarkII

Click here to see the full press release.

Where to order

Click here to learn more about this camera and all of the options available for it at B&H. Adorama is also taking pre-orders here (premium kit here).

Other articles you may enjoy

If you enjoyed this article, you may also enjoy these:

Disclosure

If you make a purchase using links found in this article, I may make a commission. It doesn’t cost you a penny more, but it does help to support future articles like this.

NOTE: This site requires cookies and uses affiliate linking to sites that use cookies.

If you enjoyed this article, please support future articles like this by making a donation or saving money by using my discount coupon codes. Either way, your support is greatly appreciated!

This blog is intended for freelance writing and sharing of opinions and is not a representative of any of the companies whose links are provided on this site.

The opinions provided are of Ron Martinsen alone and do not reflect the view of any other entity

Monday, May 27, 2013

5D Mark III with Motorsports - The 24 Hours of Nürburgring at the "Green Hell" by David Yowe

I often get asked, is the 5D Mark III really good enough for shooting sports? As a Canon EOS 1D X owner, I know that all it lacks from my pro camera is a faster burst mode and larger battery, so I tell people – heck yeah! This thing is no 5D Mark II with an antiquated AF system, so when one of my readers was sharing his experience with me of shooting the most awesome motorsports venue on the planet – the Nürburgring – I couldn’t resist asking him to guest blog for me.

I’m an avid amateur photographer with a passion for motorsports and have photographed several car races in the US and overseas. However, there was one race I always wanted to go to since seeing photos from Paddy McGrath at SpeedHunters.com, and that is the "24 Hours of Nürburgring". This sports car endurance race is held at the Nordschleife (the Green Hell) and GP circuit of the Nürburgring in Nurburg, Germany. About 200 cars and 500 drivers participate in this race, with each lap about 15.5 miles through the Eifel mountains. The race is attended by about 150,000 fans with most camping on site, which is something to be seen from scaffolding viewing platforms to make-shift buildings. The changing weather conditions, hilly terrain, high catch fencing, and "mud" make photography and getting around the Nordschleife part of the track challenging. But it's worth it, with great photography opportunities. The photos below were mainly shot from spectator viewing areas with a Canon 5D Mark III using a 300mm f2.8L IS II (with or without a 1.4x extender III) or 50mm f/1.2L using shutter priority and the camera settings below. The raw files were exported to the iPad (since this is all I take with me when traveling), with minimal editing using the Photo App, then imported into Pages for this blog posting. Hope the photos capture some of the experience that is the Nürburgring 24 Hours. If you would like to see more photos from this race and other races I've attended please check out my blog at http://dlymotorsportimages.com. Sorry for the short blog, but I'm in the middle of traveling back to the US. Many thanks to Ron for giving me the opportunity to post a guest blog on his website.

Camera settings
  • Metering = Spot
  • AF mode = AI servo (with back-button focusing can lock AF and use like One-stop AF)
  • AF area selection mode = AF point expansion (manual selection) 4 or 8 adjacent
  • AF Case 2 = Tracking sensitivity (-1), Acceleration/deceleration tracking (0), AF point switching (0)
  • AI Servo 1st image priority = Focus priority
  • AI Servo 2nd image priority = Focus priority
  • Selectable AF points = 61 points
  • AF point display during focus = All (constant)
  • VF display illumination = On
  • Drive mode = Single-shot (or multiple shot if needed)
  • ISO = 100 (or adjust as needed)
  • File format = RAW
  • Image recording = Record images to multiple card (CF card and SD card for back-up)

clip_image002Pre-race preparations on the front straight. Shot from the Mercedes Tribune (420mm, f/4, 1/2000, ISO 100)

clip_image004The start of the Nürburgring 24 Hrs. Shot from the Mercedes Tribune (420mm, f/4, 1/1000, ISO 125)

clip_image006A Lexus LFA about to pass a Porsche along the Tribune 5 straight. Shot from the top of Tribune 5a (300mm, f/3.2, 1/320, ISO 100)

clip_image008Audi R8 LMS going downhill in the rain at Breidscheid. Shot from the bottom of the spectator viewing area (420mm, f/4, 1/1000, ISO 100)

clip_image010Lexus LFA speeding around the corner at the bottom of Breidscheid in the rain. Shot from top of spectator viewing area. This was probably my "luckiest" shot (420mm, f/18, 1/13, ISO 100)

clip_image012Porsche 911 heading down pit lane. Was lucky to get access to the pits during night qualifying with another guest at the hotel I was staying at who had a spare pit pass. This was an experience of a lifetime to be able to go from one pit area to the next and to see the workings of teams in action (50mm, f/2, 1/50, ISO 800)

clip_image014BMW GT3 braking on the front straight before turning right into the Yokohama S in the rain. Shot from Bilstein Tribune (300mm, f/2.8, 1/200, ISO 12800)

clip_image016Audi R8 LMS about to make an outside pass on a BMW at the exit of the Wipperman S. Shot from the Brunnchen spectator area (300mm, f/2.8, 1/250, ISO 100)

clip_image018
Audi R8 LMS speeding through a right hand corner at Hohe Acht. Shot from safety car entrance to the track (300mm, f/9, 1/1000, ISO 100)

clip_image020Lexus LFA speeding down the straight between Tribunes 6 and 7. Shot from top of Tribunes. You can probably guess that this is one my favorite race cars. This car has great lines (300mm, f/7.1, 1/100, ISO 100)

Conclusion

I’d like to thank David Yowe for taking the time to share his excitement for motorsports photography at the coolest racing venue on the planet! You can see more of David’s work at http://dlymotorsportimages.com/.

Other articles you may enjoy

If you enjoyed this article, you may also enjoy these:

Disclosure

If you make a purchase using links found in this article, I may make a commission. It doesn’t cost you a penny more, but it does help to support future articles like this.

NOTE: This site requires cookies and uses affiliate linking to sites that use cookies.

If you enjoyed this article, please support future articles like this by making a donation or saving money by using my discount coupon codes. Either way, your support is greatly appreciated!

This blog is intended for freelance writing and sharing of opinions and is not a representative of any of the companies whose links are provided on this site.

The opinions provided are of Ron Martinsen alone and do not reflect the view of any other entity

Tuesday, October 23, 2012

The Business of Track Photography


All images in this article are copyright Jason Tanaka – ALL RIGHTS RESERVED

The grass is always greener on the other side.  How many times have you heard that?  When I first started shooting at the track, it was just simply awesome!  Playing with my shutter speed to see how slow I can get before subjects were too blurred.  Moving to different locations on the track to get that sweet angle.  It was just so cool, I wanted to do this for a living!  Who doesn’t like making money doing what they love?  Right?  Well let me take this opportunity to tell ya.  Running a track photography business isn’t exactly what I thought it was going to be like. 

Disclaimer:  My knowledge on this subject is strictly from shooting two wheeled riders here in this little corner of the US sometimes referred to as the Pacific northwest.  I haven’t worked in any other regions of the world or other motorsports markets, although I’d love the opportunity!  I’m sure other folks have their processes and methodologies, but the following is an overview of what I do. 

Day 1:   Prep

Shooting at the track normally begins the night before the track day.  I need to make sure I have all the necessary gear ready;  batteries charged, and flash cards empty.  Having to leave so early the next day, I normally pack everything into my car the night before (except for the expensive hardware).  Gear includes, but not limited to, rain gear, camera gear (bodies and lenses), knee pads, sunscreen, 3-legged chair, fluids (Gatorade), snacks and fruits (enough food to last the whole day).  All this gear must fit into gear bags that are very likely to be carried for the whole day, corner to corner.  Check the forecast to plan what I'll be wearing.  Since I try to blend into the scenery as much as possible, clothing is limited to dark and/or neutral colors.

Day 2: Track day

Depending on the location, up by 5:30am to leave early enough to fight traffic and make it to the track for the 8am riders' meeting.  After the meeting, I need to decide how my day will flow.  I need to make a general progression from corner to corner as I don't have time to go to any corner at any time.  Normally the previous corner or next corner are my choices to move to in between sessions, so I must plan accordingly.  I head out to my first corner around 8:45am and break out the gear.  Once there, I find my usual shooting angles and wait for the track to go hot.  9am and the track normally fills with the day's first riders.  Most riders are timid in the first session and don't make for good photos, but it is a good time to get me warmed up to the day's shooting.  Depending on the number of riders, I'll fire off 5-8 shots of each passing rider.  Multiply that by the number of riders as they lap every few minutes.  Within a single 20 minute session, I can easily fire off several hundreds of images that will later need to be filtered, processed, sorted, and uploaded.  Every 20 minutes a fresh group of riders hit the track.  Every third session the groups cycle through, starting with the beginner level, moving to the intermediate level, and lastly the advance level.  In between the cycles, I try to move to a different corner or angle.  Getting a variety of corners and angles will only help sales.  Getting the same shot over and over again limits the customer's selection.  The difficult part here is during the sessions, you are very limited on your movement, so for each session, I'm essentially stuck at that angle for 20 minutes.  This means for that 20 minutes, I'm going to get riders in the same angle over and over again.  There are a few minutes in between sessions to take a quick break, but no lunch breaks here.  Customers pay to be on the track, so I need to keep shooting.  This continues throughout the day till about 4pm or 5pm. At the end of it all, I'm exhausted!  I normally have about 64 gigs worth of RAW files, at about 5,000 to 8,000 images to process.  Time to head home and a nice hot shower.

Day 3, 4, 5, 6, 7...: Processing

Some folks may have this idea that photographers have a glorious life going from assignment to assignment, shooting in exotic locations.  It can't be further from the truth, with the exception of a few high profile photographers.  Along with the business aspects of running a photography business, processing photos takes a lot of time. 

Before I dive into the details about post processing, I just want to make a quick note on some of the camera settings used throughout the day.  This information is more for my fellow photographers out there reading this.

RAW files:  I shoot almost everything in RAW, including at the track. I normally carry more than enough CF cards to handle the payload.  The machine I use to process the images is hefty enough to handle the required disk space and CPU crunching of the RAW files. 

Shooting mode:  Tv.  Some ask why I don't shoot in manual mode and it's for a couple of reasons; exposure and white balance.  Here in the Pacific northwest, most days do not have consistent lighting.  Most days are partly sunny (if not raining) where patches of sunlight hit the track.  Trying to keep exposure and white balance in sync with conditions like this would be almost impossible.

The process:

  1. Download all my memory cards to my computer (30 minutes)
  2. Import them into my image processing software (Lightroom) and pre-process (render previews) the images (60-90 minutes).
  3. Eyeball each and every image, weeding out blurry, out of focused, poorly composed images (5-8 hours).
  4. Adjust exposure, contrast, white balance, etc. on each and every image (5-8 hours).  For me personally, it’s important to always deliver the best quality images to my customers.  If this means post processing each and every one, so be it.  I don’t run a ‘shoot and burn’ type of business.
  5. Sort images (2-3 hours).  Riders normally have numbers and sometimes would like to buy galleries of their images.  Upon rider request, I create their galleries and post them online for purchase.
  6. Upload the images (6-8 hours). Slowly but surely, the images get uploaded.

In between all this, there is still the business to run, emails to answer, go to a full time day job, and live a life.

Summary:  Why?

So lets see. Prepare the day before, one full day of shooting and several days of processing.  How many hours is this? It's at least a full week, so lets say 40 hours.  How much would you say is a good hourly rate for this type of skilled work? Lets say $50/hour.  At 40 hours, we'd hope to collect $2000.  Minus federal taxes we pay (28%) and sales tax (9.5%).  This brings us down to about $1300 for a week of work.  Minus fuel expenses, health insurance, wear and tear on hardware, etc....  Is it what really happens?  Not so much.  Average Joe doesn't see the work and skill required to make my photos.  $10/photo or $45/gallery is way too much and they aren't going to spend their hard earned money on photos that he thinks his uncle Bob can take.  On a really full day, 30 riders per group with 3 groups; 90 riders total.  On average, 1 out of 10 will buy a gallery at $45 ($405) and 1 out of 15 buy a single photo at $10 ($60).  This comes to a grand total of....  $465 for the whole day.  Minus sales and fed taxes, we're down to about $303 for the 40 hours of work.  Yes. that's $7.57/hour.  Don't forget the cost of travel, wear and tear on gear, insurance, web hosting, etc...  So, how many folks out there work for less than $7.57/hour?

So why do it?  Why take time off from work, put the stress on your gear, and sit in front of a computer for so many hours?  Because I love photography.

Disclaimer

This guest blog was provided as is from the author. It does not reflect the views of ronmartblog.com and no activity from this article financially benefits this article.

NOTE: This site requires cookies and uses affiliate linking to sites that use cookies.

If you enjoyed this article, please support future articles like this by making a donation or saving money by using my discount coupon codes. Either way, your support is greatly appreciated!

This blog is intended for freelance writing and sharing of opinions and is not a representative of any of the companies whose links are provided on this site.

The opinions provided are of Ron Martinsen alone and do not reflect the view of any other entity

Tuesday, February 7, 2012

GoPro or Go Home–HD Hero 2 Review (Motorsports Edition) UPDATED: 2-27-2012

GoPro HD Hero 2 Motorsports Edition
Shown above at near actual size outside
of its waterproof case (shown behind it)

My love of cars is what got me into film photography in 1984, and to this day my passion for all cool things on wheels still trumps all of my many passions. As a big fan of Formula 1 racing, when I saw advertisements for the GoPro camera show up a few years ago I was intrigued, but my expectations were low. As a result I never bothered to get one – even for review. However, when one of my friends showed his GoPro video on Facebook it got my attention – especially since it was taken with the original GoPro and it looked so good.

This prompted me to contact my friends at B&H to see if I could finally review one these gadgets. They agreed, so when it arrived I was bubbling with excitement. However, when I took it out of the case I thought – hum, this looks like a piece of junk that you’d get off eBay. It was a low tech camera in bad need of more buttons and it just didn’t impress me. As a result, I wasn’t expecting very good results, and the horrible Northwest winter wasn’t given me a chance to take it out for a proper test. This weekend the great weather arrived, so I decided to have some fun taking it out mounted to a Porsche 911 C4s Cabriolet and a Lotus Exige for a little mountain road spin.

Here’s one of the few time lapse shots I managed to snag before the sun went down, but I thought it was a great one:

Mouse over to see before, mouse out to see after
Country Road Time Lapse Fun
Mouse over to see the in-camera JPEG original
Mouse out to see my edit of the file

After I got home and files started to come off the SD cards, I quickly realized that what this camera lacks in features it makes up for in quality. I was very happy with the results as you’ll see later in this review.

What’s Included in the Motorsports Edition

GoPro HD Hero 2 Motorsports Edition

I’ve got to say that the GoPro HD Hero 2 Motorsports Edition comes in one of the most impressive boxes I’ve seen to date. It’s a big plexiglass box with a shiny black surface that makes you think – wow, this is cool. Of course, I wish they would have tossed it in a cheap box and put a few more buttons on the camera – but more on that later. Here’s what’s included:

  • Rechargeable Lithium-Ion Battery
  • Waterproof Quick-Release Housing
  • Assorted Mounting Hardware
  • USB Charging Cable
  • 3 x Curved Adhesive Mounts
  • 2 x Flat Adhesive Mounts
  • J-Hook
  • Suction Cup Mount
  • 3-Way Pivot Arm
  • 1-Year Limited Warranty

In layman’s terms, that’s everything (yes, really it is everything) you need to go out and start getting some cool videos or photos with it mounted to your car. I was skeptical at first. The directions didn’t inspire confidence when it said that the suction cup should be mounted 24 hours in advance in room temperature conditions! Fortunately in my testing it worked okay in cool conditions (50’s Fahrenheit) and mounted seconds before driving off with it. Not once did the suction cup even come close to coming off (in fact, sometimes it was tricky to remove), so I think this is pretty much the lawyers warning versus the real performance possibilities.


Everything you need is really included

Since I was reviewing this unit I passed on the adhesive mounts and elected to go for the suction cup mount. I tried it on glass, steel, aluminum and fiberglass and it worked like a champ on all of them. Even on curved surfaces it seemed to have a death grip needed for the twisty mountain roads.

The only thing I think was missing was perhaps one more mounting gizmo that would allow me to do the wheel shot shown above in landscape mode so I could do video. Instead, I could only do that one in portrait which is why I chose to do a time lapse. I’m sure this gizmo exists and it might even have been in my kit, but I just didn’t see how to get that configuration. As you’ll see in the videos below, I had what I needed to get the video shots I think most people want to accomplish.

Using the GoPro HD Hero 2

GoPro HD Hero 2 Motorsports Edition

As I mentioned earlier, the GoPro HD Hero 2  comes in a fancy box which I think is their way of overcompensating for the cheapo first impression the HD Hero 2 gives. However, this is a powerful little camera with a pretty reasonable lens – especially for this price point! I found that in practice the only thing this gizmo lacked was more buttons. It’s two buttons are so overloaded that it can be maddening at times, but I think this was done to minimize the failure points when using the waterproof housing buttons. Perhaps that is true, but honestly I’d rather more buttons with only one or two accessible via this way. In fact, the #1 button missing is the OFF button!

In fact, I think the #1 video most people will make on their GoPro is one like this:


GoPro Button Press Fail

This is shot of me trying to go through the menus to change a setting, but accidentally hitting the wrong button and recording myself fumbling around. I got a bunch of those which are funny at first, but it gets old pretty fast.

These issues aside everything was fairly well documented (not outstanding, but good enough) so I was able to figure out how to get this gizmo going. It’s pretty much fully automatic so you just pick your resolution, field of view and recording type (video, stills time lapse, etc…) and you are good to go. There’s a lot of little options for things like date and time and the all-important flip ( so you can video with the camera upside down), but nothing fancy here. In fact, one noticeable omission was a manual exposure mode so you can do a slow shutter speed shot to get awesome car images like Clint Clemens is famous for.

I should point out that I just used random SD cards I had – including one that was about three years old (so it isn’t super fast), and all just worked – no issues.

Videos

Gripes aside, the proof is in the pudding, so I put this gadget to the test to see what I could get. While YouTube doesn’t do the videos justice, I was pretty pleased with the results.

Be sure to the videos at 100% (which means no full-screen if you are on a display that can do greater than 1280x960). Keep in mind that no laws were broken in the making of these videos. Instead we simply used creative angles and low gears (to get loud engine revs) to make the videos slightly more exciting. Of course, this is no Hollywood production, so for most they may be as exciting as someone else play a video game, but trust me – you’ll love your own videos as much as the videos of the baby! ;-)

Here’s a video of a Lotus Exige driving downhill on a twisty country road. This video was shot at 1920x1080 at the maximum field of view for that resolution. The lead car is a 911 with the camera mounted to the top of the back bumper: 


Play in HD

This was good, but as you can see the daytime running lights of the Lotus kinda ruin it. In addition, the wide field of view means you want your follow car to be very close. Lesson learned, so in this one we try to get a little closer (about 1 car length) with no headlights on. This time I also tried using the 1280x960 resolution for a larger field of view:


Play in HD

You won’t be seeing me up for an Academy Award for these videos, but overall I thought the quality was decent. There are some popping sounds from rocks hitting the case, and the engine sounds are muffled because I used the waterproof door instead of the skeleton door (due to heavy dust from winter road sanding). Audio is definitely the weakness even with the skeleton door, and carful attention and some rubbery bits might be useful in getting the best results out of your audio if you care about that. In fact, external audio is probably best.

Conclusion

Overall I was happy with the exposure, dynamic range, and white balance of this camera – especially at this price point. It is a nice all-in-one solution that is a great value and fun. Given how much it would cost to do this in a DIY project, it is totally worth the price!

One tough part of using this device is its lack of an LCD. This means it is like the old days when shooting film where you can’t see results until later. If you are serious then you’ll want to bring a fast laptop (ideally with an SSD drive ) and an equally fast card reader so you can proof your results in the field. Personally though I just winged it and had fun, and that was good enough for me.

I wish it had more features (i.e., raw file support) and discrete buttons (or even better – a remote). Of course if it did it would probably cost more than I’d be willing to risk. It’d suck to lose this camera in an accident, but at $299.99 it’s cheap enough that I’d probably be more interested in seeing what it recorded before it died than I would about replacing it.

UPDATE

Shortly after I released this article people started send me all sorts of cool links. The best ones were about the cool accessories that I think will excite you as much as it does me! Click here to learn about the new remote coming this spring, and here's a link to the $80 LCD panel. I guess you can have everything! I love it!

I love this gadget and would highly recommend it to adrenaline junkies! In fact, I’m actually going to buy one myself!

Click here to see or buy the GoPro HD Hero 2 Motorsports Edition on B&H. If you aren’t into motorsports, then click here to see other options.

Disclaimer

B&H provided me with a unit to test. I had so much fun that I’m considering purchasing it. I may also get a commission if you make a purchase using links in this article.

NOTE: This site requires cookies and uses affiliate linking to sites that use cookies.

If you enjoyed this article, please support future articles like this by making a donation or saving money by using my discount coupon codes. Either way, your support is greatly appreciated!

This blog is intended for freelance writing and sharing of opinions and is not a representative of any of the companies whose links are provided on this site.

The opinions provided are of Ron Martinsen alone and do not reflect the view of any other entity

Friday, August 8, 2008

Formula 1 Photography Update

So the purpose of this blog began as a place where I would log my journey into the world of professional photography where I hoped to have a chance to shoot F1 photos semi-professionally. I've since learned a lot and realized that I may have set my aspirations WAY too high.

My First Attempt at FIA Accreditation

With tickets purchased for the 2007 Chinese Grand Prix in Shanghai, China, I began my quest to get FIA (Federation International Automobile - the Formula 1 governing body) permission for a press pass to the race. After much work, I found that you have to apply via their media accreditation procedure which among other things, requires a sponsor as well as previous publications showing your work (which is a bit of a catch 22, because how do you show previous work without a pass?).

Well, to make a long story short, I got two small magazines to agree to publish articles, so I needed to get to a race before China to get them content so I signed up to attend the 2007 United States Formula 1 Grand Prix at the Indianapolis Motor Speedway. It would turn out to be the last GP in the US, so it was great that I was able to attend. It also gave me an opportunity to practice taking some shots.

Step 1 - The 2007 United States Grand PrixUSGP Test Shoot

The photos from my first F1 race shoot made me very happy, but when I started to share them with others I realized very quickly that others thought they sucked - bad. However, I learned something after taking over 3000 pictures, so that was the most important thing (more on that later).

With pictures in hand, I finally decided it was time to make my articles, so I sent the first pictures and story off to The Spiel who promptly published my article (half of which was in color) in their July 2007 issue. With some additional work, I got my pictures (only) published in the October 2007 issue of The Star on pages 86 through 91. The Star also agreed to publish my next article from China and sponsor me, so I was ready to apply for accreditation. I tried to follow the rules to the letter, but I quickly discovered that my odds were slim since my magazines were exactly the kind of magazines they DID NOT want to see, but I figured the worst that could happen is that they would say no. On September 20th, 2007 I got an official FIA response to my application - denied.

Accreditation Denied, so Off to the 2007 Chinese Grand Prix in Shanghai

I was pretty disappointed, but I knew my odds were slim so I traveled off to Shanghai, China to enjoy the 2007 Chinese Formula 1 Grand Prix at the Shanghai International Circuit.

I enjoyed the race, despite a mishap which destroyed my best lens but left me with about 2000 pictures, some of which were actually very good (by my standard).

This resulted in my third published Formula 1 article in The Star which was entitled Shanghai Surprise. I was the author of both the words and the photographer, and I was pleased with the result. However, I learned something very important in the process - be sure to prepare your images yourself because busy publishers won't do it for you. There were some shots that needed some work (including cropping), but I didn't bother to do it myself so I was disappointed to see how they ended up in the magazine. Oh well, lesson learned.


Attempt 2 - The 2008 Canadian Grand Prix

Armed with better gear, including a Canon 1D-Mark III I thought that I would have a much better chance at getting "the shot" that would make me feel like a real F1 photographer. After taking over 6000 photos, I think I got a few that I can be proud of. Unfortunately, I haven't had the time to process them and get more than 3 on the web.

Lessons Learned

While the Canon 1D-Mark III is much better than my Canon Rebel XTi, the fact remains that you need to take A LOT of shots because you are going to have more misses than hits. Now maybe there are pros who would disagree with me, but they are probably a lot closer to the action than I am in the stands or using a Nikon D3 with the buffer memory expansion service.

There's a few other things I learned:

  • If you can sneak down to lower in the stands, do it and apologize (or move) later. It doesn't matter how big your lens is, the closer you can get the better. (duh)
  • If you can go out of your comfort zone and shoot manual on a fixed spot and let the vehicle come to you, you can get better shots, but this takes A LOT of discipline.
  • It's better to switch to JPEG to get the shots than to be stubborn and stay in RAW
  • 17 GB of camera storage is not enough for a full day of shooting at the track. Plan for 2000 raw shots per day.
  • Sunscreen can erase the printed label next to your buttons on a Canon Rebel XTi
  • Trust your camera's metering more than your LCD or image histogram

Ron's Race Recommendations

  1. Get a good monopod with an even better head. Without this you will not get pro quality shots (unless your are using something else for support)
  2. A long zoom lens is hard to beat. Good examples are the Canon EF 100-400mm f/4.5-5.6L IS USM or Nikon AF VR Zoom Nikkor 80-400mm f/4.5-5.6D ED, but there's some fantastic primes like the Canon EF 400mm f/2.8L IS USM or Nikon AF-S Nikkor 400mm f/2.8G ED VR too. However, you aren't going to get a big prime like this into a race, so stick with the big zooms.
  3. Hold your camera with your right hand and put your left hand on the TOP of your lens (at the end of the barrel) and create opposing force between your two hands to create a tripod like steady. This alone made more difference in my shots than a more expensive camera or anything. This is the key to getting pro sharpness!!!!
  4. Bring a towel to keep your hands clean and be sure not get sunscreen on your camera, but be sure to use PLENTY of sunscreen. Carry lots of water too (frozen bottled water in your bag are great for the end of the day).
  5. Use evaluate metering and try experimenting with your SINGLE auto focus point (never let the camera decide) to get your intended subject in focus
  6. If using a lens with IS, be sure to change it in the proper mode for panning (Canon users, this is mode 2)
  7. Push-pull lenses are your friend. If you do step 2, you'll discover that it is impossible to zoom during a pan and get a sharp shot with a twist zoom.
  8. Make sure you can shoot at 400mm, even if it means you have to use a Canon EF 2x Tele-extender or Nikon TC-20E II 2x Teleconverter for D-AF-I & AF-S Lenses. Teleconverters are pretty good these days, and post-process sharpening is even better. Don't be afraid to use one of these and be stupid and shoot at 200mm. Nearly all of my shots from my first two races were with a 2x teleconverter, and I don't regret it one bit. In case you are wondering, don't get the 1.x teleconverter if it won't push you out to 600mm+ on a cropped body.
  9. A Hoodman Loupe is a wonderful tool for examining your pictures between sessions in the field. I wouldn't shoot a race without one.
  10. Try something different after each 100th shot you take, but stick with the same thing for at least 100 shots (excluding special events like accidents). If your camera supports it, voice record a note about what you did (I forget to do this).
  11. Focus on the drivers head and frame your shot accordingly.
  12. Don't get hung up on trying to get the perfect pan shot as head on shots like this are good because they can be cropped to look like this. On a side note, this shot was a JPEG because my buffer was filling too quickly when I had 10 minutes to shoot at near eye level with the track.
  13. Bring your wide-angle lens and get pictures of the action. My first double truck was of a wide angle crowd shot.
  14. Don't forget to take lots of pictures on your way to and from the track (as well as evening festivities) to help tell a story about your experience. You'll be happy you did later (and I regret not doing this more).
  15. Carry a pro quality camera bag that can hold a lot of stuff in a small space like a Glass Taxi.

  16. Bring ear plugs!!!!

  17. Record the race at home as you'll be too busy shooting to really pay much attention during the race.

  18. Don't chimp while the action is going on as there will be plenty of time to do that between race sessions. An occasional glance to make sure you are capturing your intent is good, but move on fast.

  19. 1/250 second is your friend for panning. Unless you are shooting an ordinary car which is going to be going < 100 mph, you'll find that anything slower isn't going to work very well for panning (unless you like really blurry pictures). You can go up to 1/320, but faster than that and you start freezing action which kills the sense of speed.

  20. Personally, I find that f/11 is the best aperture to get the driver as well as most of the car in the shot, but I generally have to shot around f/8 due to the light required to do that at 1/250+ and ISO 100. During my first race I thought f/2.8 - f/5.6 would be good, but I think that results in too much of the car being blurry.

  21. Don't be afraid to raise your ISO. Many digital cameras today actually perform better at ISO 200 than ISO 100, so don't be stuck on ISO 100. While going beyond ISO 400 may not be good for some cameras, you should own a camera that can at least do 400 well as overcast days with long lenses means you'll be needing a higher ISO. The Nikon D300, D700 or D3 are an excellent choices for high ISO situations, as are the Canon 40D, 5D, Canon 1D-Mark III. However, Nikon definitely has a huge advantage here.

  22. Scout out the track for the best seats in advance and realize that row A may not be the front row (as I discovered in Canada where A comes after ZZ). However, on most tracks you want to be high because the fence will ruin your shots on the lower rows. Don't rule out the cheap general admission seats either as they can be at track level and you may get lucky and find a hole in the fence.

  23. Bring rain gear for you and your camera so you can still shoot in the rain. Ponchos may look funny, but they work well.

  24. Fully charge your batteries each night before you shoot and bring at least two sets (1 is fine with 1D Mark III's). If your camera supports a battery grip, then use it with extra batteries - you'll need it.

  25. Bring a laptop with large capacity external drives or a Epson P-5000 / HyperDrive to allow for offloading your files each day.

In the end, the most important thing is to have fun. It may take a while to get great shots that your super happy with, but you'll enjoy many of your shots in the privacy of your own home.

In my case, I may be done shooting F1 for a while as it is starting to become cost prohibitive to me. I may consider other motorsports that are cheaper like MotoGP or possibly even IRL. However, what I have learned for now is that I'll have to make a name for myself a different way as this sport is just too tough to do on your own with a sponsor or some other means of funding.

NOTE: This site requires cookies and uses affiliate linking to sites that use cookies.

If you enjoyed this article, please support future articles like this by making a donation or saving money by using my discount coupon codes. Either way, your support is greatly appreciated!

This blog is intended for freelance writing and sharing of opinions and is not a representative of any of the companies whose links are provided on this site.

The opinions provided are of Ron Martinsen alone and do not reflect the view of any other entity