Showing posts with label SB910. Show all posts

Wednesday, June 10, 2015

Lighting Tips on a Budget by Rogue and 15% Discount Offer!

Click to learn more on B&H
Rogue Flashbender 2 Portable Lighting Kit

My friends at Rogue have been creating awesome products for flashes that have been all the rage for years now, but their web site has been rather simplistic to say the least. To address this shortcoming they’ve launched a new site this past April that now features a bunch of videos and blog articles to help you to master their full suite of affordable light modifiers.

Rogue New Lighting Blog and Videos

However, the really cool part is that they’ve extended the ronmartblog.com 15% off discount from their old site to this new site so you can save on their huge lineup of products.

Cool Videos Filtering Feature

Isn’t it frustrating when you watch videos that don’t really apply to you because they use too many products you don’t have or want? Wouldn’t it be great if you could filter the videos to only include what you have or what you are interested in? Well here’s a great solution on Rogue’s Video Page:

Click to go to the videos page

How to save 15%

Click here to see their full list of products and add any items you want to the cart, then begin the checkout process which begins with an order summary like this:

CLICK the discount code link

Be sure you click the link to enter the discount code. Once you’ve done that, enter my discount code which currently is ronmart09 and CLICK APPLY as shown below. If that doesn’t work then check my discount coupon code page for the latest code. If that still doesn’t work then contact me.

Enter the discount code and click APPLY

If you did everything right you should see the discount code and the amount deducted along with a summary at the bottom similar to this:

If you do it right, you should see your discount like this with a summary at the bottom

What’s new for FlashBender 2

If you’ve already been using FlashBender products or have read my previous reviews, then you’ve probably wondered what’s new for version 2. To help with that I’ve created this slightly underexposed image to highlight the difference in the reflective surfaces:


New (left) vs Old (right)

While it is immediately obvious that the new system to attach the FlashBender to the flash is smaller and more secure, what’s less obvious at first glance is that the material used on the reflective surface is lighter and thinner – but just as effective. The net result is a lighter and more secure product.

If you’ve used the first version of the Rogue XL Pro Lighting Kit that I reviewed, you’ll be happy to know that the new one uses the new FlashBender 2 system and includes an egg crate grid as shown below:


New Egg Crate Grid Feature on FlashBender 2 XL Pro Lighting System

The left shot shows it attached and the right shows that this is the same system as v1 with a carrying case a egg crate attachment.

Be sure to use my previously mentioned coupon code to pick any of these up on the Rogue website or at B&H.

KelbyOne

Other articles you may enjoy

If you enjoyed this article, you may also enjoy these:

Disclosure

If you make a purchase using links found in this article, I may make a commission. It doesn’t cost you a penny more, but it does help to support future articles like this.

NOTE: This site requires cookies and uses affiliate linking to sites that use cookies.

If you enjoyed this article, please support future articles like this by making a donation or saving money by using my discount coupon codes. Either way, your support is greatly appreciated!

This blog is intended for freelance writing and sharing of opinions and is not a representative of any of the companies whose links are provided on this site.

The opinions provided are of Ron Martinsen alone and do not reflect the view of any other entity

Monday, April 28, 2014

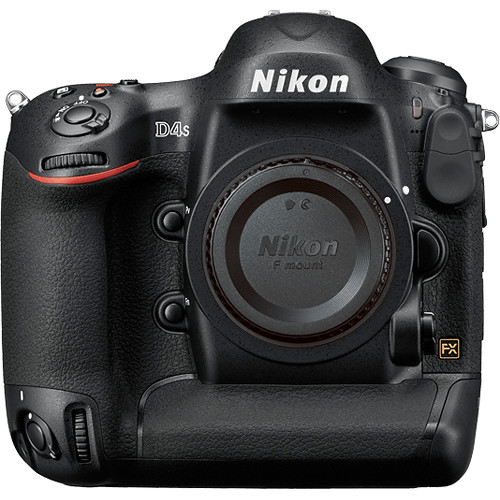
REVIEW: Nikon D4s–The Greatest AF Performance I’ve Ever Experienced (Part I)

Nikon D4S DSLR Camera

I’ve shot nearly 2000 shots with this amazing camera and I can’t wait to share the results with you. This is, without question, the best Nikon I’ve ever used – by far, and it even has me looking at my Canon gear wondering why it can’t be this good! I’ll explain why I feel this way in my full review, but here’s a few nuggets to hold you over until then.

Swing Test


D4S, f/2.8 @ 70 mm, 1/1600, ISO 450, No Flash, Shade WB, 70-200mm lens

When I test sports cameras, I like to do a swing test as it is one of the toughest challenges for an autofocus system. My son was in wild form and in a different series (not shown here) he gives this system the ultimate focus test, and the results blew me away. If you like swing shots this clear, you are going to like what I have to say.

Dynamic Range and High ISO


D4S, f/7.1 @ 70 mm, 1/640, ISO 25600, No Flash, AWB

The results I got will remind you why full size DSLR’s still rule and demonstrate how far the mirrorless systems have to go to get this kind of performance. Without question this camera is expensive, but it definitely proves that you get what you pay for in this case. It’s definitely solid up to 25,600, but come back to see about the higher ISO’s to learn if they are actually usable or just marketing hype.

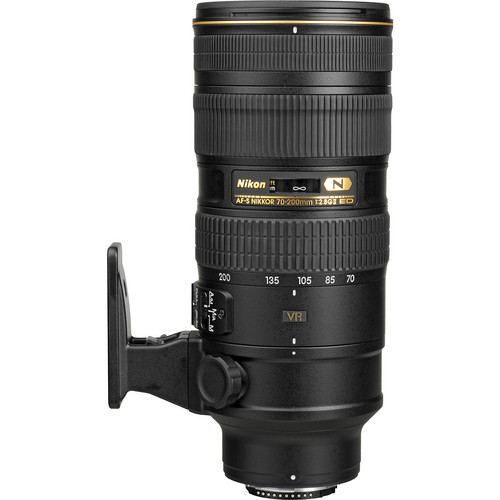
Paired with the 70-200mm f/2.8 VR II

Nikon AF-S Nikkor 70-200mm f/2.8G ED VR II Lens

A sports camera must be paired with a 70-200 f/2.8 lens as they are a combo that are made for each other. While I’ve been critical of the Nikon 70-200 as it’s left me very underwhelmed compared to its Canon counterpart, this copy (provided directly by Nikon) when paired with the D4s had my jaw dropping!

Keeping track of a kite against an impossibly busy background – virtually flawless…


D4S, f/2.8 @ 200 mm, 1/800, ISO 100, No Flash, 70-200mm Lens

Handheld at 1/15 sec, no problem…


D4S, f/2.8 @ 200 mm, 1/15, ISO 320, No Flash, Handheld

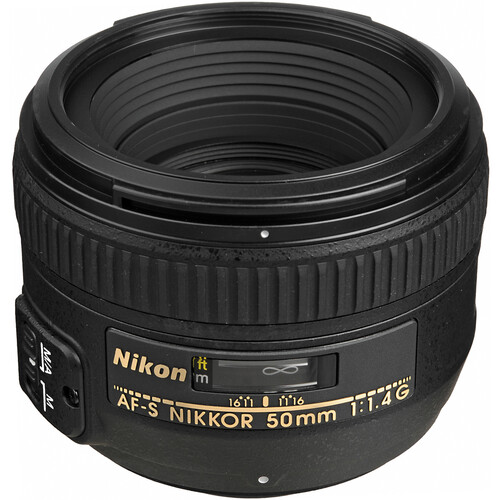
Paired with the 50mm f/1.4G

While there’s no question that the D4s is an amazing sports camera, I thought it would be fun to test it as a portrait camera. While I haven’t shot my studio shots yet, I’m very pleased with what I’ve seen thus far. I think you will be too!

Nikon AF-S Nikkor 50mm f/1.4G Autofocus Lens

While not my best shot by a long shot, I was impressed with the overall image quality of this shot as it clearly demonstrates the caliber results you can get with this camera when paired with a good portrait lens.


D4S, f/1.4 @ 50 mm, 1/320, ISO 100, No Flash, 50mm Lens

Real World Images


f/4 @ 105 mm, 1/320, ISO 1400, No Flash, Vivid Picture Style

I’ll feature more real world images in future installments of my review. All of the images featured in this article are straight out of the camera with ZERO post-postprocessing. They are the original in-camera JPEG images that have been renamed by Lightroom but not modified in any other way. I’ve got over 300 more I’ll be sharing in future articles as well!

Conclusion

Lot’s more to come in the future articles for this review, but rest assured that this is going to be a VERY highly recommended camera. I was a big fan of the D600/D610, and D7100, but the D4 had left me very unimpressed due to poor focus performance. The D800 left me underwhelmed due to noise and usability challenges with all those megapixels. However, this is the dream camera that we’ve all been waiting for and it lives up to being worth its mega price tag. If you shoot Nikon and want the best, THIS IS IT!

Here’s the rest of the articles associated with this review:

Where to order

Click here to learn more or order the D4s on the B&H web site.

Other articles you may enjoy

If you enjoyed this article, you may also enjoy these:

Disclosure

If you make a purchase using links found in this article, I may make a commission. It doesn’t cost you a penny more, but it does help to support future articles like this.

NOTE: This site requires cookies and uses affiliate linking to sites that use cookies.

If you enjoyed this article, please support future articles like this by making a donation or saving money by using my discount coupon codes. Either way, your support is greatly appreciated!

This blog is intended for freelance writing and sharing of opinions and is not a representative of any of the companies whose links are provided on this site.

The opinions provided are of Ron Martinsen alone and do not reflect the view of any other entity

Monday, February 11, 2013

COMPARISON: Flashpoint Soft Box for Shoe Mount Flashes vs Lastolite Joe McNally 24" Ezybox

Lastolite Joe McNally 24" Ezybox vs Flashpoint Softbox
Lastolite Joe McNally 24" Ezybox vs Flashpoint 24” Softbox

My friends at Adorama sent me a Flashpoint 24” Softbox to see how I liked it, so I decided to do a very quick (like 20 minute) test to check it out. You know, this is the kind of thing you typically do when you get something new where you rip open the box and just try it out right away (while UPS is still on your block!). I was already a big fan of my Lastolite Joe McNally 24" Ezybox (which is just a branded version of this), so I thought I’d try it out really quick before watching a movie with my wife last night.

Ezyboxes collapse faster, but are huge whereas the Flashpoint is easier to travel with
Ezyboxes collapse faster, but are huge. The Flashpoint is easier to travel stuff in your luggage

I couldn’t rope my wife into being a model, and my kids were getting the popcorn ready so please bear with my quick and dirty review here (and lame pics of yours truly with laying on the sofa hair <g>).

Physical Comparison

Before I discuss how each unit performs as a softbox, it’s important to discuss how practical they are as portable softboxes. This is where the Ezybox has set the golden standard (in my opinion) for great performance and easy of use.

Sure Westcott has the Apollo in a variety of sizes, but I never liked it because the flash is inside means that you either need something like Pocket Wizards or a sync cord because there is no line of sight with your trigger. I preferred to use my old 580EX II’s (or NikonSB-910’s) with line of sight rather than Pocket Wizards so the Apollo was out of the question for me.

Of course Westcott offers the outrageously priced $229+ magic slipper and softbox kits to match the Ezybox, but even that didn’t perform as well as the Ezybox and it wasn’t very portable. As a result, the Ezybox, trigrip (for shooting through) or an umbrella has always been my portable soft light solution.

As you can see from the photos above, the Ezybox collapses quickly into a nice flat triangle and comes with a storage bag, but it’s so large you can’t fit it in typical luggage bags. This means if you want to travel with this gadget then you need to carry it on the plan which is a bit of a hassle. The first thing I noticed about the Flashpoint was how compact it was because I knew I could toss that into any of my existing luggage bags.

Ezybox includes everything you need like a plastic slipper that holds your flash

Setting up the Ezybox is equally easy but over time it gets a little wonky shaped (see above) unless you wrestle with it a bit. It’s okay though because light doesn’t care much if the box is a bit off kilter – it just works. It features a plastic slipper for your flash that just pops in the back and it also has proven to be durable and just work.

Inside the Ezybox there is a inner baffle and it comes with white or silver inside

The Ezybox works like a proper softbox and even features an inner baffle. My McNally version has a white interior, but it’s also available in silver as well. What’s more, the Velcro on the recessed lip on the inside and around the outside can be used to mount accessories like an eggcrate grid.

Ezybox vs Flashpoint side view

When you put the Ezybox next to the Flashpoint, you quickly see the quality advantage of the Ezybox which drives up the price, but you also see that the Flashpoint offers the same size box for a fraction of the cost.

Ezybox vs Flashpoint head on view

Head on you quickly see one big difference – the Ezybox has a smaller surface area thanks to its very nice recessed design. However, both offer roughly the same amount of soft light for your subject, so the biggest difference here is the control you get from the recessed design.

If you look inside of the Flashpoint you see a very “Apollo-like” interior with no inner baffle or obvious support for accessories:

The No-Frills Flashpoint Interior

It’s Spartan, but it works. From behind it’s much like the Ezybox, but it uses a much taller tower of brackets:

Flashpoint Rear View

Setting up the Flashpoint is much more challenging thanks to its very annoying tent-like poles (shown in the first picture in this article) that are common to pro softboxes. While nicely designed Velcro straps help make inserting and removing the last two very easy, its still a pain and not as quick as the all-in-one design for the Ezybox by Lastolite.

Softbox Performance Comparison

Flashpoint behind the scenes setup

Since I was alone and in a hurry, I tried to do this quick test on the cheap. Instead of using my reflector (which I’d get out later), I just grabbed a piece of foil and tossed it on a tripod for a quick mild fill light on the opposite side of the Flashpoint box. It wasn’t pretty, but it worked. On the white seamless I just tossed a purple Rogue Gel on a flash to get a little color in the background.

Flashpoint test #1
Flashpoint test #1 (f/2.8 for 1/60 sec @ ISO 400)

Initially I used my 600EX-RT flash with the ST-E3 in radio mode to trigger them, but I’d switch to a 580EX II’s triggered by optical instead radio just to give them a real workout. They performed well, so I got started with my testing. As you can see from my setup and the shot above, this simple one light configuration turned out okay. Sure, I could have dialed it in better but what I saw was that I got nice soft light from the Flashpoint, so I was happy.

Ezybox test #1 (foil shown off my arm, but it was on my arm for the close up)

Ezybox test #1
Ezybox test #1

I got less light spill and a slightly softer light with the Ezybox, but overall the two performed equally well. There’s lots of tests I could do here, but I just wanted to see if I could get this basic shot – it did it with no problem. I had more shots than you see here, but the performance was similar so I just grabbed one randomly to demonstrate that it doesn’t suck for you.

Over and under "Clamshell" setup
Over and under "Clamshell" setup with reflector

Just in case anyone might complain that neither of these boxes gives much light, I thought I’d have fun with a clamshell setup to show that bright light is no problem.

Flashpoint test #2 (f/13 for 1/60sec @ ISO 100)

You’ll notice here that I was able to do f/13 at ISO 100 with no problem (at 0EV and ETTL). I also elected to use a 580EX II only with a 600EX-RT as a optical trigger (but a ST-E2 or another 580 would have worked just as well) to show that you can use older flashes (and whatever you need to trigger them) and get good results.

Conclusion

While I hated the complexity of setting the Flashpoint up, the reality is that you get used to it really quick and it only takes a few minutes longer than the super easy Ezybox. Lightwise they both performed well, but I did prefer the Ezybox recessed design which helps prevent as much light spillage and also the interior baffle to soften the light even more. Both of these issues could be addressed by the do-it-yourselfer, so for those on a budget the Flashpoint 24” Softbox offers a great value. It’s also can’t be emphasized enough how easy it is to air travel with the Flashpoint vs the Ezybox, so some may find it worth picking up a Flashpoint for that reason alone.

Where to order

Click here to order the Flashpoint 24” Softbox or you can click here to order the Lastolite Joe McNally 24" Ezybox on the Adorama web site.

Other articles you may enjoy

If you enjoyed this article, you may also enjoy these:

Disclosure

If you make a purchase using links found in this article, I may make a commission. It doesn’t cost you a penny more, but it does help to support future articles like this. While I paid for my Ezybox, I was given a Flashpoint soft box – at my request – by Adorama for testing for this review.

NOTE: This site requires cookies and uses affiliate linking to sites that use cookies.

If you enjoyed this article, please support future articles like this by making a donation or saving money by using my discount coupon codes. Either way, your support is greatly appreciated!

This blog is intended for freelance writing and sharing of opinions and is not a representative of any of the companies whose links are provided on this site.

The opinions provided are of Ron Martinsen alone and do not reflect the view of any other entity