Showing posts with label problem. Show all posts

Friday, March 28, 2014

Do you like the new Fujifilm X-T1 selector buttons?

X-T1-Selector-Buttons-vs-X-E2
X-T1 Selector Buttons shown up top,
X-E2 shown at the bottom

Never before in my entire history with photography have I ever jumped on the bandwagon and complained about things that the incessant Internet whiners and trolls have complained about for seemingly every camera that gets released.

When I reviewed the X-T1 I found it to be an outstanding camera in many ways – one that is a front runner for my 2014 camera of the year – BUT it has a design feature that I can’t ignore. In fact, the design feature is so problematic in my usage for the camera that I had to give this outstanding camera a not recommended rating. This was extremely painful for me to do because I loved the camera in many other ways, so I hate to discount that over something that on the surface might feel so petty. However, the number of shots I missed because of fighting with these buttons compelled me to face this issue head on for my readers who trust my reviews.

After my review I got a call from my contact at Fujifilm who expressed that the team at Fujifilm was confused by my review because they had not heard of ANY complaints about the new selector button design. In fact, the person I spoke with defended the design as being an improvement over the predecessor and that my subjective opinion was contrary to every other review they had read on the Internet. I was told that it’s not a problem for any real pro photographers. Hum, I didn’t know Zack Arias wasn’t a real pro photographer (see below).

Fujifilm, I do not think that I’m alone in my opinion of the new selector buttons.

I’ve been a straight shooter for this blog for the past 7 years and I’m not about to start sweeping things under the rug anytime soon. What I see on the web are multiple threads about the selector button issues which you can find here:

  1. http://www.fujix-forum.com/index.php/topic/19115-want-to-fix-that-4-way-dial/ – this is my favorite as they hack a fix using electrical tape!
  2. http://www.fujirumors.com/improved-d-pad-buttons-x-t1-yes-according-openbloom-video/ – fast forward to 3 minutes into the video
  3. http://zackarias.com/for-photographers/gear-gadgets/fuji-x-t1-first-impressions/ – (see the Worst parts section at the end) – “I wish the 4 buttons on the d-pad in the back were larger or more pronounced. I’d like them to be identical to the ones on the X-Pro1
  4. http://cameralabs.com/reviews/Fujifilm_X-T1/ – “But the X-T1's buttons are small with shallow presses; the difference is particularly evident when comparing the cross keys on both cameras. They're just too small on the X-T1, and real-estate shouldn't be an excuse as the EM1 squeezes much larger ones into much the same body size. I'd urge you to pick up both cameras and compare the controls for yourself
  5. http://www.fujix-forum.com/index.php/topic/20647-x-t1-selector-q-and-focus-assist-buttons-are-different-on-my-replacement/
  6. http://www.theverge.com/2014/3/11/5492410/fujifilm-x-t1-review - The four-way buttons on the back are small and fiddly,

If you search the web you can find more, but this gets the point across. I’m not really the ONLY one who has this issue.

Video Demonstration of the Issue

Here’s a video where I demonstrate the X-E2 which does things right and the issue I see with the X-T1:

Conclusion

The X-T1 is an excellent camera, and I love it in many ways – but this isn’t one of them. This is my personal opinion, and I just ask those of you who have actually gone out and shot more than a dozen subjects outside of a store with this camerado you agree that this new design is an improvement over the previous selector button design?

I feel it is a disservice to prospective buyers not to be open an honest about the things that can be improved – on any product. With this in mind, I call into question the integrity of ANY reviewer who doesn’t bring up the issue of this new selector button design.

Perhaps I’ve come down too hard on this issue, but my opinion is that – my opinion. In my opinion, I would not purchase this product due to this design. I know I’m not alone as one of my readers has returned TWO X-T1’s he purchased because of this issue.

NOTE: If you leave a comment on this blog the comment must be screened and approved due to spambots. You only need to submit one time and I’ll approve the first chance I get. As long as your post isn’t spam to other sites and isn’t disrespectful, it will be approved – even if your opinion differs from mine.

Other articles you may enjoy

If you enjoyed this article, you may also enjoy these:

Disclosure

If you make a purchase using links found in this article, I may make a commission. It doesn’t cost you a penny more, but it does help to support future articles like this.

NOTE: This site requires cookies and uses affiliate linking to sites that use cookies.

If you enjoyed this article, please support future articles like this by making a donation or saving money by using my discount coupon codes. Either way, your support is greatly appreciated!

This blog is intended for freelance writing and sharing of opinions and is not a representative of any of the companies whose links are provided on this site.

The opinions provided are of Ron Martinsen alone and do not reflect the view of any other entity

Thursday, March 28, 2013

SOLUTION: Having problems downloading Nik Complete Collection by Google? Try this!

After reading my article entitled Nik Complete Collection by Google now only $149 ($126.65 with coupon code), many people contacted me about the problems they were having. My favorite was – “is this spam kinda like those mails to get a free copy of Office?” I’m happy to report, no this is the real deal!

Here’s a couple answers to common problems:

I didn't get the email, what do I do?

Start by checking your junk mail folder. If you can't find it there, check your deleted items. If that doesn't work, then try to think if you had a different email account that you used to register or purchase your Nik software. If none of that works, then send an email to supportus@niksoftware.com to request a new email.

I clicked on the link but it wasn't a exe. What do I do with this file?

Odds are you are using Internet Explorer. Instead of clicking, choose right click Save As... and save it as a exe on your desktop. If that doesn't work, download the file and RENAME it to have a .exe extension, then run it. Alternatively you can use Chrome as shown in my videos and this won't happen as it lacks this security feature to prevent you from downloading malicious exe's off the web.

And you can click here to get more answers plus see videos of how to install the upgrade on the Mac or PC in Lightroom or Photoshop.

If you liked this article, you might also enjoy these:

NOTE: This site requires cookies and uses affiliate linking to sites that use cookies.

If you enjoyed this article, please support future articles like this by making a donation or saving money by using my discount coupon codes. Either way, your support is greatly appreciated!

This blog is intended for freelance writing and sharing of opinions and is not a representative of any of the companies whose links are provided on this site.

The opinions provided are of Ron Martinsen alone and do not reflect the view of any other entity

Monday, August 29, 2011

Understanding Epson’s Printable Area Feature to Avoid Uneven Margins on the 4900

In my original review of the Epson Stylus® Pro 4900 I complained about a problem where the margins on my printed page were not even and despite choosing “center image” in Photoshop. Here’s a scan of a print that demonstrates this issue:

Mouse over to see centered maximum printable area, mouse out to see standard printable area
Scans from a V750 of Actual Prints from a 4900
Mouse over to see centered maximum printable area with even top and bottom margins
Mouse out to see standard printable area with the large bottom margin
The aspect ratio of the actual image file causes the wider side margins, and this is expected

Notice when you hover over the image you see a corrected version printed on the 4900, but when you mouse out you see the default behavior which is a large bottom margin. Based on my initial research the explanation I was given was that the cut sheet media margins are .12 inch (3mm) for the top, right, and left margins and .56 inch (15mm) for the bottom margin, and the workaround I found on several sites on the web said to create a custom paper size that .25 inch larger than the actual paper size and print as normal to trick the printer into doing the right thing.

This advice may have been a workaround in the past for older printers which were rumored to have a similar issue, but Epson has a built-in solution for this issue on the 4900. On the Mac it is just a paper size setting, but on Windows you need to use the Printable Area feature.

Mac versus Windows

I should point out that this issue is pretty easy to resolve on the Mac, but its quite a bit more complicated on Windows. I use the Windows 7 64-bit primarily for my printing so I hit a snag that you might hit as well.

Mac Solution

Here’s a video that shows how to solve this issue on a Mac:


Play in HD

For those who can’t view video, here’s some screen shots that show how to fix the problem:


Step 1 – Go to the Layout portion of the Print dialog

Step 2 – DO NOT Choose the (Sheet) Option
Choose just the paper name (US Letter here), or (Sheet – Maximum)
Notice how each option will show the margins
and you want options with even margins on all four sides


Step 3 – Verify your selection on the summary page


Photoshop’s preview can be misleading, but when you’ve done it right you should see big white margins on the top and bottom

On Windows things get more complicated

I don’t suspect many Mac users will face any issues with the margin, but Windows users have a completely different user-interface from Epson for printing and I found it to be a little bit more tricky than the Mac. As a result it is much easier to hit the problem where it seems there’s nothing you can do to get rid of the gap at the bottom of your page, but I’m happy to report that there is a solution.

Demystifying the Paper Settings Source List

Mouse over to see the Printable Area button change, mouse out to see it come back

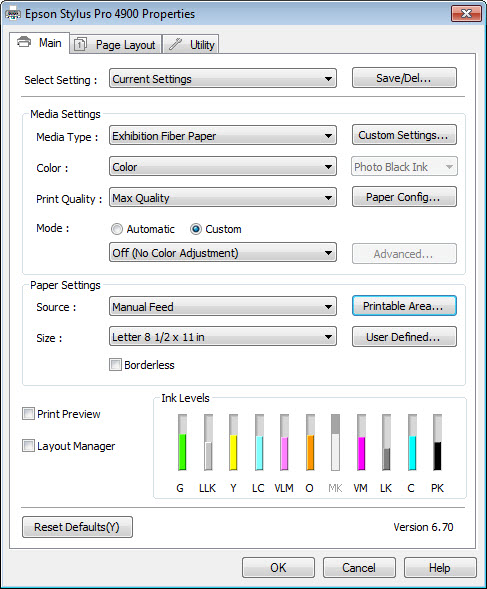
In this dialog I want you to pay attention to the section that reads Paper Settings and notice the Source row. This is where you choose between Roll, Roll (Banner), Paper Cassette and Manual Feed.

If you change the source to Paper Cassette or Manual Feed you get a Printable Area … button.

If you change the source to Roll Paper or Roll Paper (Banner) then the button changes to Roll Paper Option... button. (Tip: you should always open this dialog and change Auto Cut to Normal Cut if you would like the printer to automatically cut the page after printing and use Auto Rotate to ensure that printer will rotate the document to economize the roll paper).

Mouse over the image above to see the Printable Area button change to “Roll Paper Option…” when the source changes to Roll Paper. Mouse out to see the button change to Printable Area… when the source is Manual Feed.

Using the Printable Area Feature

Now that you know how to find the Printable Area feature, let’s talk about how to use it and why it is so important.

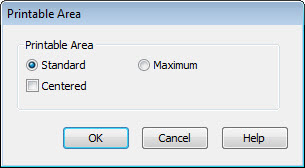
Here’s the default settings for the Printable Area Button when you click on it:


This is what causes a 0.56 inch (15mm) bottom margin

What this means is that your printable area will have margins that are .12 inch (3mm) for the top, right, and left margins and .56 inch (15mm) for the bottom. Printing with these settings will cause the printing problem where the bottom margin has too much space. Photoshop won’t always make this issue obvious when showing its preview as you can see here:


Everything seems okay in Photoshop’s Print Dialog, but it is not
Print now and you’ll have a big bottom margin and your print won’t be centered

What you need to do is click the Centered check box as shown here:


This is one fix to the problem
Check the Centered Option

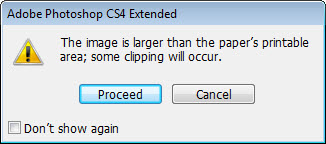
When you choose the centered option, your image will be centered to the page. If your image is like mine where its height was set where you don’t check Scale to Fit Media in Photoshop, then clipping will occur, so you’ll see this dialog when you try to print:

That is rarely a good thing when you see that dialog, so stop printing. Fortunately Photoshop seems to show the problem that will occur in its print preview as you can see here:


Photoshop is pretty good about showing clipping as you can see above
Notice how the black lines are clipped from the top and bottom of the image
But also noticed that at least the image is with correct margins shown

My Preferred Solution For Windows

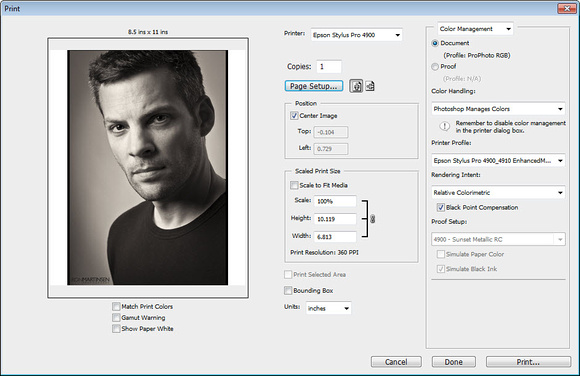
The way I like to solve this problem is to use the Maximum Printable Area option with the Centered check box checked as shown here:


My Favorite Settings
Maximum and Centered

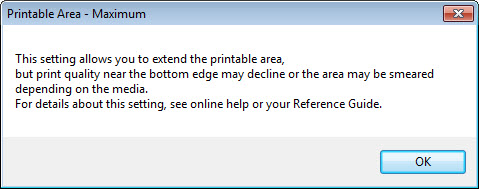
However, be aware that when you click OK you will get this warning:


Maximum Printable Area Warning
Use at your own risk

In my testing I haven’t had the smearing issue that this warns me about, but I’m quite certain this dialog is here for a good reason so your mileage may vary. If it turns out that you do have smearing issues then set your printable area to Standard and check centered, but in Photoshop make sure you check the “Scale to Fit Media” option (which most people do anyway).

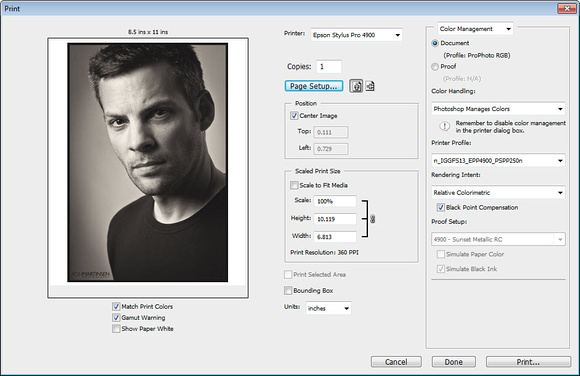
If you continue then you’ll end up with a Print dialog in Photoshop that looks like this (print preview area is the same in CS4 & CS5):


When all is well you should see what seems like 0.12 inch (3mm) Margins
On the top and bottom of your print and your image is centered

Video for Windows Users

Believe me, I know this is terribly confusing so I’ve created a video for Windows users as well so they can see how to work around this problem:


Play in HD

WARNING: The Printable Area Settings reset when you switch sources…

When I review a printer I try very hard to read the manual and be very careful with my settings to make sure that everything is tested fairly and accurately. However, in this case I hit an unexpected snag that ended up being user error due to behavior in the dialog that I did not expect.

Based on my notes, screen shots, etc… it appears that my error was that I had a custom setting (the preset stuff at the top of the dialog) created which used manual feed as the source, yet when I was doing my testing I was switching that value to paper cassette which resets the values in the Printable Area dialog. My notes indicate that I was checking the Printable Area settings, but I was doing this BEFORE switching the source to paper cassette and therefore causing those values to reset. While this isn’t a very user friendly feature, and it would be handy to have this value displayed in the current settings window, I now understand my operator error and apologize to Epson for the error in my original review.

What about Position Center Image in Photoshop?

At first I thought this check box was useless because of the problem I was seeing, but once you have the 0.12 inch bottom margin then it works as expected, so generally speaking you’d want it checked.

Yes, this means that to have a centered image you need to check one seemingly hidden checkbox in the printer driver and another one in Photoshop. This is true both on the Mac and Windows.

What about Lightroom or Aperture?

I have not tested it, but the solution shown above should work for both Lightroom and Aperture since the workaround is contained in the operating system print driver and not in the application. If it doesn’t then I encourage you to use this information as the basis for a workaround, and if you do get one then create a document like this for others to learn from you.

Conclusion

Professional printing certainly requires a lot more attention to detail than printing out your email or plain text word document which is why I always capture screen shots and keep notes for EVERY print I make. It’s also why I am careful to take my time and check everything before hitting print to make sure I get the best results possible.

There are a lot of settings that need to be checked (and in this case re-checked) to ensure an accurate print, so sometimes mistakes happen. Keeping a checklist and working slowly and carefully is your best bet to uncovering why something went wrong and ensuring that your checklist is updated to avoid the same problem again in the future. Please visit my printing series page for more information on printing.

I hope this document helps to solve what can be a very frustrating problem, and that you’ll share this link with others. I apologize for the inaccuracy of my review on this subject initially, but as you can see in this huge document that on my Windows system it is kind of easy to make a mistake.

Disclaimer

This article contains links which may result in a commission if you make a purchase.

NOTE: This site requires cookies and uses affiliate linking to sites that use cookies.

If you enjoyed this article, please support future articles like this by making a donation or saving money by using my discount coupon codes. Either way, your support is greatly appreciated!

This blog is intended for freelance writing and sharing of opinions and is not a representative of any of the companies whose links are provided on this site.

The opinions provided are of Ron Martinsen alone and do not reflect the view of any other entity

Wednesday, January 19, 2011

Nik Software Coupon Code Problem & Fix

NOTE: The pricing in this article has changed, but as of this time the information is still accurate. Current pricing details are here:

Nik Complete Collection by Google now only $149 ($126.65 with coupon code)

My blog offers the best discount you can get online for Nik Software, but it’s been brought to my attention that there’s been a problem using my 15% off promo code when you click email from Nik Software that pre-populates the cart with a code. The problem is that just in that it doesn’t work, so here’s how to fix it:

1. Click the Remove button as shown below (click for a larger version):

Click Remove

2. Now add my code (currently RMARTINSEN, but check my Discount Coupon Code page for the latest code) and hit apply for a larger discount (click for a larger version):

image

My discount is larger and still offers the free upgrade to Silver Efex Pro 2, so it’s a win-win scenario. I also get a commission for this referral so I appreciate your support!

Contact me or Nik Software if you have any questions, but be sure to mention that you are trying to use my code.

NOTE: This site requires cookies and uses affiliate linking to sites that use cookies.

If you enjoyed this article, please support future articles like this by making a donation or saving money by using my discount coupon codes. Either way, your support is greatly appreciated!

This blog is intended for freelance writing and sharing of opinions and is not a representative of any of the companies whose links are provided on this site.

The opinions provided are of Ron Martinsen alone and do not reflect the view of any other entity