Thursday, August 30, 2012

Last Day–Photoshop CS6 & Lightroom 4–$400 Off (EXPIRED)

THIS OFFER HAS EXPIRED

Adobe Photoshop Lightroom 4 + Photoshop CS6 for Mac

Click here to get Photoshop CS6 and Lightroom 4 for only $389.90 (save $400!!!!) AND get FREE a Kelby Training DVD (a $94.98 value)!

This offer expires when online ordering stops on August 31, 2012.

See my Lightroom 4 review here.

Disclosure

If you make a purchase using links found on this blog, I may make a commission. This offer is subject to the terms of B&H and may change or get cancelled at their discretion.  The information provided is what I understood at the time this article was published.

NOTE: This site requires cookies and uses affiliate linking to sites that use cookies.

If you enjoyed this article, please support future articles like this by making a donation or saving money by using my discount coupon codes. Either way, your support is greatly appreciated!

This blog is intended for freelance writing and sharing of opinions and is not a representative of any of the companies whose links are provided on this site.

The opinions provided are of Ron Martinsen alone and do not reflect the view of any other entity

Wednesday, August 29, 2012

B&H has Canon EOS 1D X in Stock!


Available at B&H for $6,799.00 USD & free shipping

I’m loving my 1D X in the field right now, so when B&H informed me that they had some in stock I thought I’d share it with you right aw. Click here to get yours now, and click here to see one of my reviews. I’ve been using it this week to get you more footage so you can see how great this camera is in real world use doing landscape shots.

Stay tuned for more articles coming back to my blog next week when my summer break ends and I resume my normal schedule.

Thanks for your support!

Ron

Disclosure

If you make a purchase using links found in this article, I may make a commission.

NOTE: This site requires cookies and uses affiliate linking to sites that use cookies.

If you enjoyed this article, please support future articles like this by making a donation or saving money by using my discount coupon codes. Either way, your support is greatly appreciated!

This blog is intended for freelance writing and sharing of opinions and is not a representative of any of the companies whose links are provided on this site.

The opinions provided are of Ron Martinsen alone and do not reflect the view of any other entity

Saturday, August 25, 2012

UPDATED: B&H Offers Photoshop CS6 for $400 Off–only $249.95 (FULL VERSION) until August 28th (EXPIRED)

THIS OFFER HAS EXPIRED

B&H has informed me that they are offering a special UNADVERTISED ON THEIR WEB SITE deal for Adobe Photoshop CS6 for Windows OR Mac for only $249.95 (after a $400 one-time use promo code is sent after the purchase). I don’t really get this offer but I suspect it has to do with the rules around minimum advertised pricing regulations.

To take advantage of this offer you must buy ONE of the following qualifying products to get the $400 off coupon code for Photoshop CS6 mailed to you within 72 hours of your purchase (click links to order):

If you have already purchased one of these from B&H, then simply send their customer service department an email and a link to this blog article and they will send you the coupon code within 72 hours.

IMPORTANT

BE SURE TO to click here to order save big on Photoshop CS6 after you get your coupon code. You MUST use the coupon code BEFORE it expires on August 31st, 2012.

B&H doesn’t mention this on their website, how do I know this is legit?

To help the skeptics who may think this is a scam, I encourage you to contact B&H customer service. They will confirm that this is a legitimate offer despite it not being mentioned anywhere on their web site. Here’s also the exact email that B&H sent me with the updated details of this offer:

image

Disclosure

If you make a purchase using links found in this article, I may make a commission. This offer is being passed along as sent from B&H. I do not make any promises or guarantees of the terms. For any questions contact B&H directly. 

NOTE: This site requires cookies and uses affiliate linking to sites that use cookies.

If you enjoyed this article, please support future articles like this by making a donation or saving money by using my discount coupon codes. Either way, your support is greatly appreciated!

This blog is intended for freelance writing and sharing of opinions and is not a representative of any of the companies whose links are provided on this site.

The opinions provided are of Ron Martinsen alone and do not reflect the view of any other entity

Friday, August 24, 2012

REVIEW: The Adobe Photoshop CS6 Book for Digital Photographers

The Adobe Photoshop CS6 Book for Digital Photographers is an update of a classic book that every Photoshop owner should have near their desk.  If you already own The Adobe Photoshop CS5 Book for Digital Photographers, then you’ll find that this book is very similar with some nice new updates to keep your skills relevant to current trends. The biggest obvious difference is that Chapter 6 (Jonas Sees in Color – Color Correction Secrets) gets dropped and replaced with the new Chapter 12 – Videodrome chapter which is a must read if you are wanting to learn what Photoshop CS6 can do with video.

Chapter by Chapter Walkthrough

Because I’ve reviewed preview editions of this book, I’m catering my walkthrough a bit to those who have read the previous version. If you haven’t, don’t worry, you can still get an idea of what’s included but you might find it handy to read one of the previous edition reviews if you are feeling like you are missing something. Each version of this book drops a little of the old and picks up the new, but each one is strong enough to stand on its own – if you own the version of Photoshop that the book was written for.

Here’s my thoughts on the chapters in this edition:

Chapter 1 Mini Series – Using Photoshop CS5’s Mini Bridge

One of the cool new features of CS5 was the miniature version of Bridge built in to a panel directly into CS5. This chapter covers a lot of things you never would have guessed it would do. It replaces the “London Bridge – Bridge Essentials” content from the CS4 edition, so it’s worth a read if  you’re coming from CS4 or skipped this chapter in the last book. There’s some very cool stuff you can do with Mini Bridge so check it out.

Chapter 2 WWF Raw – The Essentials of Camera Raw

This is an improvement over Chapter 3 of the CS4 edition where now more practical tips are added, but near identical to the CS5 edition. It’s worth a read if you aren’t using Lightroom or are new to Adobe Camera Raw (ACR). If you read the

Chapter 3 Raw Justice – Camera Raw – Beyond the Basics

I highly recommend this chapter, especially if you haven’t read the 7 Point System. There’s lots of practical tips here that every photographer should know and it starts to show why you should care about Adobe Camera Raw (ACR) even if you own Lightroom.

If you read the previous version of this book then it’ll feel like déjà vu all over again, but there’s a a few hidden gems scattered throughout. The one I think many will appreciate is the “Getting the Old CS5-Style Fill Slider Back” (which also applies to Lightroom). I hated Adobe for getting rid of this one, so if you haven’t figured out what to do to get it back then you’ll love this!

Chapter 4 Attitude Adjustment – Camera Raw’s Adjustment Tools

This was a good chapter in the last book and it’s actually improved quite a bit here. The last main three sections on selective white balance; reducing noise just in shadows; and getting more out of adjustment brush effects are “doh, why didn’t I think of that” tips that beginner to intermediate users will love. 

Chapter 5 – Scream of the Crop – How to Resize and Crop Photos

If you read the last book then skip to the next chapter, but if you haven’t then this is pure gold – especially for new and frustrated users. You might actually stop saving cropping for Lightroom and do it directly in Photoshop after reading this!

Chapter 6 – Black & White – How to Create Stunning B&W Images

For me Silver Efex Pro is the only way to create Black & White now, but if you are pinching pennies and need to do it the old fashion way then there’s much goodness here. It feels identical to the previous book because not much has changed in Photoshop. It’s an easy skip for repeat readers or those who have accepted the reality that the Nik Software suite is simply a must own collection for anyone serious about photo editing.

Chapter 7 – We are HDR – Creating HDR Images

CS6 has come a long way with HDR over the past few versions. However the only reason you use Photoshop for this is because you are pinching pennies. Proper HDR is best done in HDR Efex Pro 2, or Photomatix. In this article I compare different HDR products including CS6 so you can see which HDR solution is right for you.

If you decide to get Photomatix then Trey Ratcliff's Photography, HDR and Post-Processing Course is a must own in my book.

Chapter 8 – Little Problems – Fixing Common Problems

I loved this chapter before and it keeps improving. CS6 has some awesome stuff like content aware scale and move added, so everyone should read this chapter. Scott added several new sections over the last edition for things like dealing with backlit subjects and creative content-aware related sections. He nixed the fixing dark eye sockets section (which can be solved easily using Viveza), but left in goodness from the previous edition like selecting hair & compositing. This is a must read chapter!

If you like this chapter then you’ll love Photoshop Compositing Secrets, so I highly recommend you pick that book up when you are done reading this one.

Chapter 9 – Side Effects – Special Effects for Photographers

This is a major update to catch up with current trends, so if you are a previous edition owner and are wondering if there’s much that is new – this is where you’ll find a good chunk of it! Personally I try to re-read every chapter of this book each time a new edition comes out because I find that there’s too much for me to absorb through just one pass through the book. I rarely find time to read it twice before a new edition comes out, so I add a few items to my toolbox each time I read one of these killer books by Scott Kelby! This edition includes cool new things like the Instagram look, tilt-shift effect (using the new blur gallery), lighting effects, liquify tricks, and so much more. Don’t skip this chapter!

Chapter 10 – Sharpen Your Teeth – Sharpening Techniques

Just when you think that you can’t beat this old dead horse much more, Scott goes and adds some new stuff that makes you glad you read the chapter. Sharpening is a critical part of photography these days, so I recommend you read this chapter. Personally I find Sharpener Pro easier, but CS6 can create results that are as good in the right hands. This chapter helps you to get those skills. Previous edition owners can skip this chapter though as nothing has really changed.

Chapter 11 – Fine Print – Step-by-Step Printing and Color Management

This a good super high-level summary of what I cover in more depth in my Printing 101 eBook. This chapter gives you a taste of what you are jumping into if you decide to do your own printing, before you’ve told yourself – yes, I’m going to do this! My book is for those who are definitely getting ready to get into printing, or who already have but are frustrated with mediocre results.

This chapter is a carryover from the previous edition with only one minor section about contact sheets added.

Chapter 12 – Videodrome – Editing DSLR Video in Photoshop

I despise doing video because it’s so time consuming and I’m just not really ready to learn new software. I want to take my Photoshop knowledge and be able to apply it to my video, but that hasn’t been possible – until now. Scott mirrors my thoughts exactly and does what we all want – he just shows us how to make use of Photoshop’s video features right away using what we already know. This subject is big enough for a whole book (hint, hint, Scott!), but until we get that this is the primer that I think most readers will appreciate.

Chapter 13 – Workflow – [Scott Kelby’s]  Step-by-Step Workflow

If there is one reason to keep your old versions of this book it’s because Scott always does something new in this section for each book, and personally I like to have the old ones around. This one is useful even if it’s a little more simple than some of the past editions (mainly due to advancements in Photoshop). It’s really geared towards the beginner who is looking for that “ah,ha moment” where they start to tie things together to see how the stuff they’ve learned can be used on their photos.

I still STRONGLY recommend Scott’s 7 Point System book even though it’s written for CS3. If you like this chapter then you’ve gotta get the 7 Point System – that book changed my life!

Conclusion

Anytime I know I’m going to be on a long flight I like to take the books from this series and re-read them because I always pick up great new things each time. While it’s more of a recipe book that you'll use as a reference, I find myself using this book at least once a month for some tricky challenge I face. I love it and can’t live without it!

Skill Level: ALL - Beginner to Advanced
Value:
Excellent (worth every penny)
Recommendation: Must Own for those who don’t have previous editions and worth the upgrade for those doing video or who want to pick up modern day skills.

If you are too busy or lazy to read a book like this, then you might consider KelbyTraining.com too. While I prefer to have this as a reference book to quickly to the solution for the problem I’m currently facing, there’s lots of great videos on Kelby Training (discount) that are more in-depth. I also find that Kelby Training keeps me up to date on the latest techniques as they are always adding new videos each week. Some good examples are Photoshop CS6: Brushes and Painting and Photoshop CS6: What’s New?. There’s also tons on Lightroom 4 too!

Click here buy your copy today and help to support this blog!

If you liked this article...

You might also enjoy these articles too:

See more articles in the right column of this blog.

Disclaimer

If you make a purchase using links found in this article, I may make a commission. I was also given a copy of this book by the publisher so I could see what was new and share that info with you.

NOTE: This site requires cookies and uses affiliate linking to sites that use cookies.

If you enjoyed this article, please support future articles like this by making a donation or saving money by using my discount coupon codes. Either way, your support is greatly appreciated!

This blog is intended for freelance writing and sharing of opinions and is not a representative of any of the companies whose links are provided on this site.

The opinions provided are of Ron Martinsen alone and do not reflect the view of any other entity

Tuesday, August 21, 2012

REVIEW: Canon EF 40mm f/2.8 STM–Pancake Schmancake?


Canon EF 40mm f/2.8 STM Pancake Lens
Buy now from Adorama or B&H

When Canon announced its new 40mm pancake lens speculation quickly picked up about Canon entering into the mirrorless market (which materialized with the EOS M). However, detailed observers quickly noticed that this was an EF lens – not an EF-S or the new EF-M style lens. What this means is that this lens can be used on both full-frame as well as cropped sensor cameras by Canon.

Now why would Canon release a tiny lens like this for a big bulky full-frame camera? Well that’s where the other new moniker on this lens comes into play – the STM designation. STM stands for “Stepping Motor” but what this really means is that it’s a new motor mechanism that is quieter and seemingly faster than Canon’s Ultrasonic Motor (USM) found on most of its lenses. The reason why they did this is that when you do video on a DSLR those big USM lenses would make noise that was audible in the videos audio track, so when Canon added full-time continuous autofocus to the Canon T4i they needed a lens that could keep up with the performance demands without making too much noise.

Crunchy Pancakes?

Now a logical person would naturally think that because of STM and the tiny size of this lens that it would be super quiet right? Well oddly enough the unit I tested was audible from an arms length away while its much larger cousin – the EFS 18-135mm IS STM (see here) – is actually is near impossible to hear at a hand length away. So in the noise department this lens left me rather disappointed. Granted, it did outperform even nice L lenses with USM in terms of output noise, but I wouldn’t call this a super quiet lens.

Is this lens as sharp as everyone says it is?

It’s been a tough summer for bloggers so I suppose many are looking for the next hot thing to boost their incomes, but I’ve got a good day job that pays the bills so I’m here to tell you the truth about this lens. The truth that I experienced with this lens is that it’s about what you’d expect for a $199 prime lens – it’s super sharp in the center, but the quality quickly fades from there as you can see in this blur index from my favorite lens analysis site – slrgear.com:

Canon EF 40mm f/2.8 STM Pancake Lens Blur Index
Full details at http://slrgear.com/reviews/showproduct.php/product/1523/cat/10

If you aren’t used to reading one of these things then let me point out that 0 is pink which is the sharpest you can get and the scale on the right goes up from there in color to the most extreme blur of 12. Blur isn’t all bad because it can be desirable in a portrait lens, but better lenses typically have great edge to edge sharpness once you get them to f/8. With that fact in mind, you’ll see that this lens is really sharp in the center but quickly fades into a less sharp area and then gets inconsistent at the edges. This is common for cheaper or older designed lenses, and given the price of this lens isn’t that bad.

What this blur index tells me is that this is a better portrait lens than it is a landscape lens (where you typically want good edge sharpness). Now compare that to Canon’s 24-105mm f/4L IS USM lens at f/8 (and 35mm because there’s no 40mm mark on the lens):

Canon EF 24-105mm f/4L IS USM Blur Index
Full details at http://slrgear.com/reviews/showproduct.php/product/145/cat/11

What this tells me is that the 40mm pancake lens is going to be sharper in the dead center but the 24-105mm is going to be better at the edges which you can clearly see in these bookshelf test images:


Canon EOS 5D Mark III, 40mm STM, f/8 @40 mm, 13s, ISO 100 (Click for original)
Notice how the center is super sharp, but the white text on the pea green
book on the far right is soft compared to the image below?


Canon EOS 5D Mark III, 24-105mm, f/8 @40 mm, 13s, ISO 100 (Click for original)
Notice how the center is softer, but the white text on the pea green
book on the far right is much sharper compared to the image above?

You have to view both images at full-size and pixel peep to see the differences, but you’ll notice the blur index is pretty accurate. The center of the image is sharper for the pancake lens and the edge is sharper for the 24-105mm just like the blur index indicates.

Now to be fair the pancake lens does a good job considering the fact that it’s 1/5th the cost of the 24-105mm and it’s sharper in the center. Perhaps this is what all of the fuss is about, but honestly this lens just didn’t impress me in real life. It’s build quality reminded me more of the super cheap nifty fifty than it’s better built 50mm f/1.4 sibling. This on top of the aforementioned noise (something also found with the nifty fifty) made less than impressed with this lens right from the start.

You can’t always judge a book by its cover so I figured I must be missing something about so I took it out and shot hundreds of shots with it. I expected to be dazzled like I was when I first used the 50mm f/1.4, but the real result was that I was left with a lot of soft shots that failed to impress. Of course there were some successes like the flower shot at the beginning of this article, but they were few and far between. When using it on the camera it was made for – the Canon T4i – I was even more disappointed. As you can see below:


Canon EOS REBEL T4i, 40mm STM, f/8 @ 40 mm,13s, ISO 100
Click for a full-size original

Conclusion

You can use the data from the blur index here and on SLRGear.com to judge for yourself, but overall this lens left me underwhelmed. Sure, it’d be a decent lens if you’re going to shoot a portrait with them in the center like this mastiff puppy:


Canon EOS REBEL T4i, 40mm STM, f/3.2 @40 mm, 1/160, ISO 100

However, you typically want a longer lens for portraits (I prefer at least 100mm and ideally 200mm+). This makes it too short for portraits, too noisy for video, too slow for sports. Honestly, I’m pretty unimpressed!

In real life I found that this lens performed so poorly that I most often preferred shots with the EF-S 18-135mm f/3.5-5.6 IS STM (like this or this) instead.

The other STM lens – EF-S 18-135mm f/3.5-5.6 IS STM

There’s actually several STM lenses, but the EF-S 18-135mm f/3.5-5.6 IS STM is one you can get as part of the kit for the T4i. As you can see from the blur index below, this lens is closer to the L than the pancake lens:

Canon EF-S 18-135mm STM Blur Index
Full details at http://slrgear.com/reviews/showproduct.php/product/1522/cat/11

Of course, the blur index doesn’t show you the reality that the 18-135mm has much more chromatic aberrations than the pancake or 24-105mm lens. It also doesn’t show you that the images from the pancake lens didn’t have the same warmth I’d get from 18-135 STM. However, this zoom lens actually impressed me much more because it’s a zoom that is quieter and performs quite well as a travel lens (especially with landscapes).

For video there was no comparison as the 18-135 STM significantly outperformed the 40mm 2.8 pancake by a significant margin.

The Bottom Line

If money is burning a hole in your pocket and you think the 40mm STM is for you, then buy it. However I’d caution you to open it carefully, treat it gingerly and save the box as I suspect that once the thrill wears off many will quickly become bored with this limited use lens. I’d suggest considering the 50mm f/1.4, 24-105mm or Sigma 85mm  as better alternatives. If you’ve gotta get a STM lens, then go for the T4i kit.

Ordering Information

Please support this blog by ordering from B&H who loaned me this gear so I can bring you articles like this:

Other articles you might enjoy

If you enjoyed this article, you might enjoy these as well:

Disclosure

I borrowed the 40mm STM, 18-135 STM and T4i from B&H with their permission for this review and returned it afterwards.

If you make a purchase using links found in this article, I may make a commission.

NOTE: This site requires cookies and uses affiliate linking to sites that use cookies.

If you enjoyed this article, please support future articles like this by making a donation or saving money by using my discount coupon codes. Either way, your support is greatly appreciated!

This blog is intended for freelance writing and sharing of opinions and is not a representative of any of the companies whose links are provided on this site.

The opinions provided are of Ron Martinsen alone and do not reflect the view of any other entity

Monday, August 20, 2012

Canon T4i Review–Part II–Image Quality and Video


Nice depth of field and bokeh
f/4 @ 40 mm (pancake lens),1/125, ISO 100
Manual single focus point inside the flower

See my article entitled “REVIEW: Canon Rebel T4i with Real World Photos & STM Lenses” for the first part of my review. In this article I discuss additional details about image quality, performance and video that were not addressed in the first article.

A word about the EFS 18-135mm STM kit lens

Honestly, most kit lenses – especially on entry level cameras – usually suck, so it’s rare that I have much good to say about them. While the optics of the EFS 18-135mm STM kit lens aren’t going to come close to what you’d find in a Canon L lens, I was surprised to find that it was quite usable as a starter lens.

In my testing I found the EFS 18-135mm STM kit lens (B&H and Adorama) to outperform the 40mm pancake (B&H and Adorama) in many ways on the T4i (more on that in another article). As a result, I feel like this is a kit lens worth using until you can afford some better glass. I also feel like it’s worth keeping for doing video simply because of the fast and silent focusing it can do automatically when mounted to a T4i. In this respect, I found the STM lenses to outperform their L lens counterparts in terms of video continuous autofocus usability.

Compared to the Sony NEX-7 and Fujifilm X-Pro1

Once upon a time I never would have even dreamed of discussing a non-DSLR camera in a review of a DSLR, but the competition is improving so it’s worth mentioning now. I also still think that if your long-term strategy is to grow into better DSLR’s or use the great lenses offered by the major DSLR platforms of Canon and Nikon, then you should always start with a DSLR.

Now if you read my Sony NEX-7 review then you know that I think it beats the pants off the X-Pro1 and is competitive with DSLR’s. In testing the T4i against the NEX-7, I’d have to give the Sony the nod  as being the better camera. I’ve been a long time fan of the Rebel series so I never thought this day would come, and apparently Canon didn’t either.

The Rebel T4i is a great camera in many ways, but it’s days of stomping the compact cameras has officially ended. Of course the T4i is cheaper so if your budget is tight you can still find solace in having a great camera that is a good starting point for growing into the Canon system. However if your objective is just to buy a camera that takes great images and you don’t plan on investing in many lenses, then the Sony NEX-7 is going to give you better images in a smaller form factor for sure.

Does sensor quality make a difference? (A 5D Mark III comparison)

Now nobody in their right mind should think that I’m saying that would be T4i buyers should get a 5D Mark III because it has a better sensor. For well over $2000 more, it should! However, I think it’s helpful to do a side by side comparison just to inform people on what the differences are so you can level set your expectations when using a entry level camera. As much nonsense as there is on the web (and from electronics store sales people) you’ll hear people say things like “just as good” when discussing how the Rebel T4i compares to it siblings. However, there is a measurable difference that I think you should be aware of so you don’t go nuts thinking that your lens is back focusing or you have a defective camera. You get what you pay for, and while I think think the T4i is a great camera – it doesn’t really come with a high-end sensor.

I’ve included images below. You should click each image to see full size versions of each image and compare them in two separate browser windows. For beginners who might not see the differences right away, let me help orient you on the similarities and differences:

  1. If you are going to just put small images on the web or print 4x6 prints then it’s going to be tough to notice the difference between the result you get with a T4i vs a high end camera like the 5D Mark III. The reason why is because detail is lost when you make an image small, so all of that data loss starts to put them on a much closer level. However, you’ll look at see that the 5D Mark III image (bottom) has a broader range of colors. At first it may seem that the T4i is better because its brighter, but that’s only because it can’t capture the range of color tones (called Dynamic Range) found in the 5D Mark III image. Where this becomes most obvious is in the shadow areas where upon close inspection you’ll see more shades of browns and black. People typically can’t  place their finger on this difference other than to say that the 5D Mark III image just feels richer.
  2. Notice how that both images use the same identical lens, but the T4i requires a 15 second exposure to get a correct exposure whereas the 5D Mark III only needs 10 seconds. This is a characteristic of a better sensor that translates into faster shutter speeds (which means lower ISO’s needed), so you have less noise in your images – it also often means less motion blur in the automatic modes of the camera. Since the most common complaints of new DSLR owners are noisy and blurry images, it’s easy to see here why that happens because the lesser sensor gives you a double dose of trouble – even if you use the same exact pro lens. If you use cheap kit lenses then problem is compounded even worse, so when not using a tripod typically you’ll find many higher end sensors just give you a sharper image with less noise.
  3. Now one advantage (or disadvantage – depending on your intent) of the smaller sensor of the T4i is that you have a deeper depth of field. To see this below look at the front of the bookshelf at the bottom of both photos and notice how the 5D Mark III image is kind of blurry. To the beginner the greater depth of field of the T4i is preferable as that is what we are used to in our point and shoots. However, blur isolates a subject so it can come in handy and can be harder to get in the smaller sensor. Where this really comes into play is on the edges of the image where the T4i’s smaller sensor will only use the sharpest part of the lens, so it’s sharpness on the text of the books on either edge of the frame will be better than the 5D Mark III. All of these points are advantages shared by all cropped sensors (including the 60D, 7D, etc…) so some landscape photographers find the cropped sensor to be preferable, whereas portrait photographers typically prefer the full frame as edge blur is more desirable in portraits.


T4i f/8 @100 mm, 15s, ISO 100 on a tripod using the 70-200mm II lens.
Click for original


5D Mark III with the same lens and settings
but the camera indicated 10 seconds for a correct exposure

There’s other differences like distance from the subject that favor the cropped sensor, but I’ve excluded that from this comparison to give you a better set of images to explore for other characteristics.

Here’s a 100% crop of images from both cameras so you can see some of the differences previously discussed. The T4i does a great job, but the larger sensor of the 5D Mark III is just going to give you more detail and color (for both raw and in-camera jpeg).

image

image

If you look at the two images above and struggle to see the differences, or simply don’t care about the differences, then your money is best spent on a entry level camera like the T4i. The same is true if you’ll never print large images (13x19” or greater) as small prints are very forgiving and rarely show much of the extra details of the larger sensor. You will see a difference, but it will be subtle at smaller sizes. At larger sizes there’s no comparison – the larger sensor is mandatory. It’s also worth noting that magazines and most prints sold are letter size or smaller, so they typically won’t benefit much from the better sensors. Good post-processing can typically narrow the gap so that it’s indistinguishable even to most trained eyes.

It’s also worth noting that if you were to take previous generation cameras (especially full frame sensors of two generations back), you’d probably find that the T4i is as good or better in some cases. The reason why is that technology has improved drastically so the detail possible on a smaller sensor is better than ever.

The lesson here – don’t become obsessed with pixels and sharpness. If your budget is stretched buying a T4i then don’t stress – it’s a decent camera that will give most normal users fantastic results. It’s not “as good as”, but it’s still pretty darn good.

Real World Video

Okay, I’m not a videographer so this is really more like really bad video (think Blair Witch Project bad). However, it’s the stuff that any parent typically has hours of sitting on their hard drive (or on old tapes). These are all done with auto ISO in manual mode at 1/30 sec and f/3.5 to 5.6 using the camera defaults. I found the AF FlexiZone Multi mode to be the most effective with my son, but you need to pay attention and occasionally tap the touch screen LCD to help the AF system focus on the right place for the best results. In these videos I did NOT do this so this is what the camera did all on its own. The single zone is the most accurate, but is useless with kids. The face tracking did terrible in my experiments so I’ve spared you the blurry videos it gave me.

As I mentioned previously, the STM lenses are worth their weight in gold when doing video as they outperform non-STM lenses by a large factor. From a nice short minimal focus distance to fast and silent continuous auto focus – they offer the best results I’ve seen from a DSLR. A cheap camcorder or point and shoot will outperform in terms of focus performance, but the image quality of a DSLR blows them away. Manual focus is still the way to go for proper video, as is having better stabilization that isn’t found on any DSLR.


13 seconds - follow movement with kit lens


1:26 - circle subject and zoom in and out with kit lens


20 seconds – backlit with 40mm pancake lens


1:11 – indoors at dusk with kit lens
This is what you could expect from typical birthday party scenarios

As much as I hate doing video, what I saw in the T4i is promising for the future of DSLR’s. It’s offering of continuous AF is a Canon first that isn’t even found on the 1D X or 5D Mark III. It’s certainly usable to video kids birthdays if you don’t mind the occasional out of focus moment (as you can see in my videos above).

I’m no fan of the 40mm pancake lens for video

The 40mm pancake lens really let me down while shooting video. Nearly all of the videos I shot were blurry and out of focus as the lens failed to keep up with moving action. If I manually focused or had a stationary subject it would be fine, but forget about using it with kids. It was also much noisier than the kit lens (by a significant amount), but I never noticed it making that much of a difference on the video itself.

The kit lens performed reasonably well as you can see from the videos above. It’s not perfect, but it’s much more usable (and beats full time manual focusing of moving action).

Sound Quality

A lot of noise was made in the press release about the sound quality improvements in the T4i, but you be the judge. Honestly, I thought the sound sucked and was more muffled. Perhaps internal sound proofing was added to help with keeping camera focusing noise out of the video, but the sounds in the audio felt very muffled to me. In short, pick up an external mic if you care about sound quality.

More Real World Sample Images

A dirty little secret for a long time in the world of reviews was that many reviewers were afraid to show their out of camera shots for fear of being judged. After all, any great photo you’ve seen is typically processed to give it that perfect crop, vibrant color, perfect exposure and amazing sharpness. In some cases this was all done in-camera by gifted photographers with great lighting and exciting subjects.

Many consumers seeing these amazing shots would think that they only needed to buy that camera and/or lens and get those great shots. However, when they did they were often disappointed with their dull, lifeless shots because that’s not real world. I touch on this point on my other blog in the article entitled “Let the eyes tell the story”.

I have broken that trend – intentionally – and I’m happy to see that other major sites are starting to follow (to a lesser degree). What you see on this blog in my camera reviews are shots that normal people would take (i.e., family shots) under real world conditions (crappy lights, environments, backgrounds, etc…) without any post-processing. I share the in-camera JPEG’s so you can see exactly what you’d expect to get with some basic knowledge of photography. In short, these are the worst “keepers” (meaning that obvious user error shots are often excluded) you could expect to get from a T4i:


Decent Dynamic Range
f/4.5 @42 mm (kit lens), 1/50, ISO 100, No Flash, AWB
The RAW file can be used with Viveza or the 7 Point System
to brighten the dark area at the bottom of the sculpture


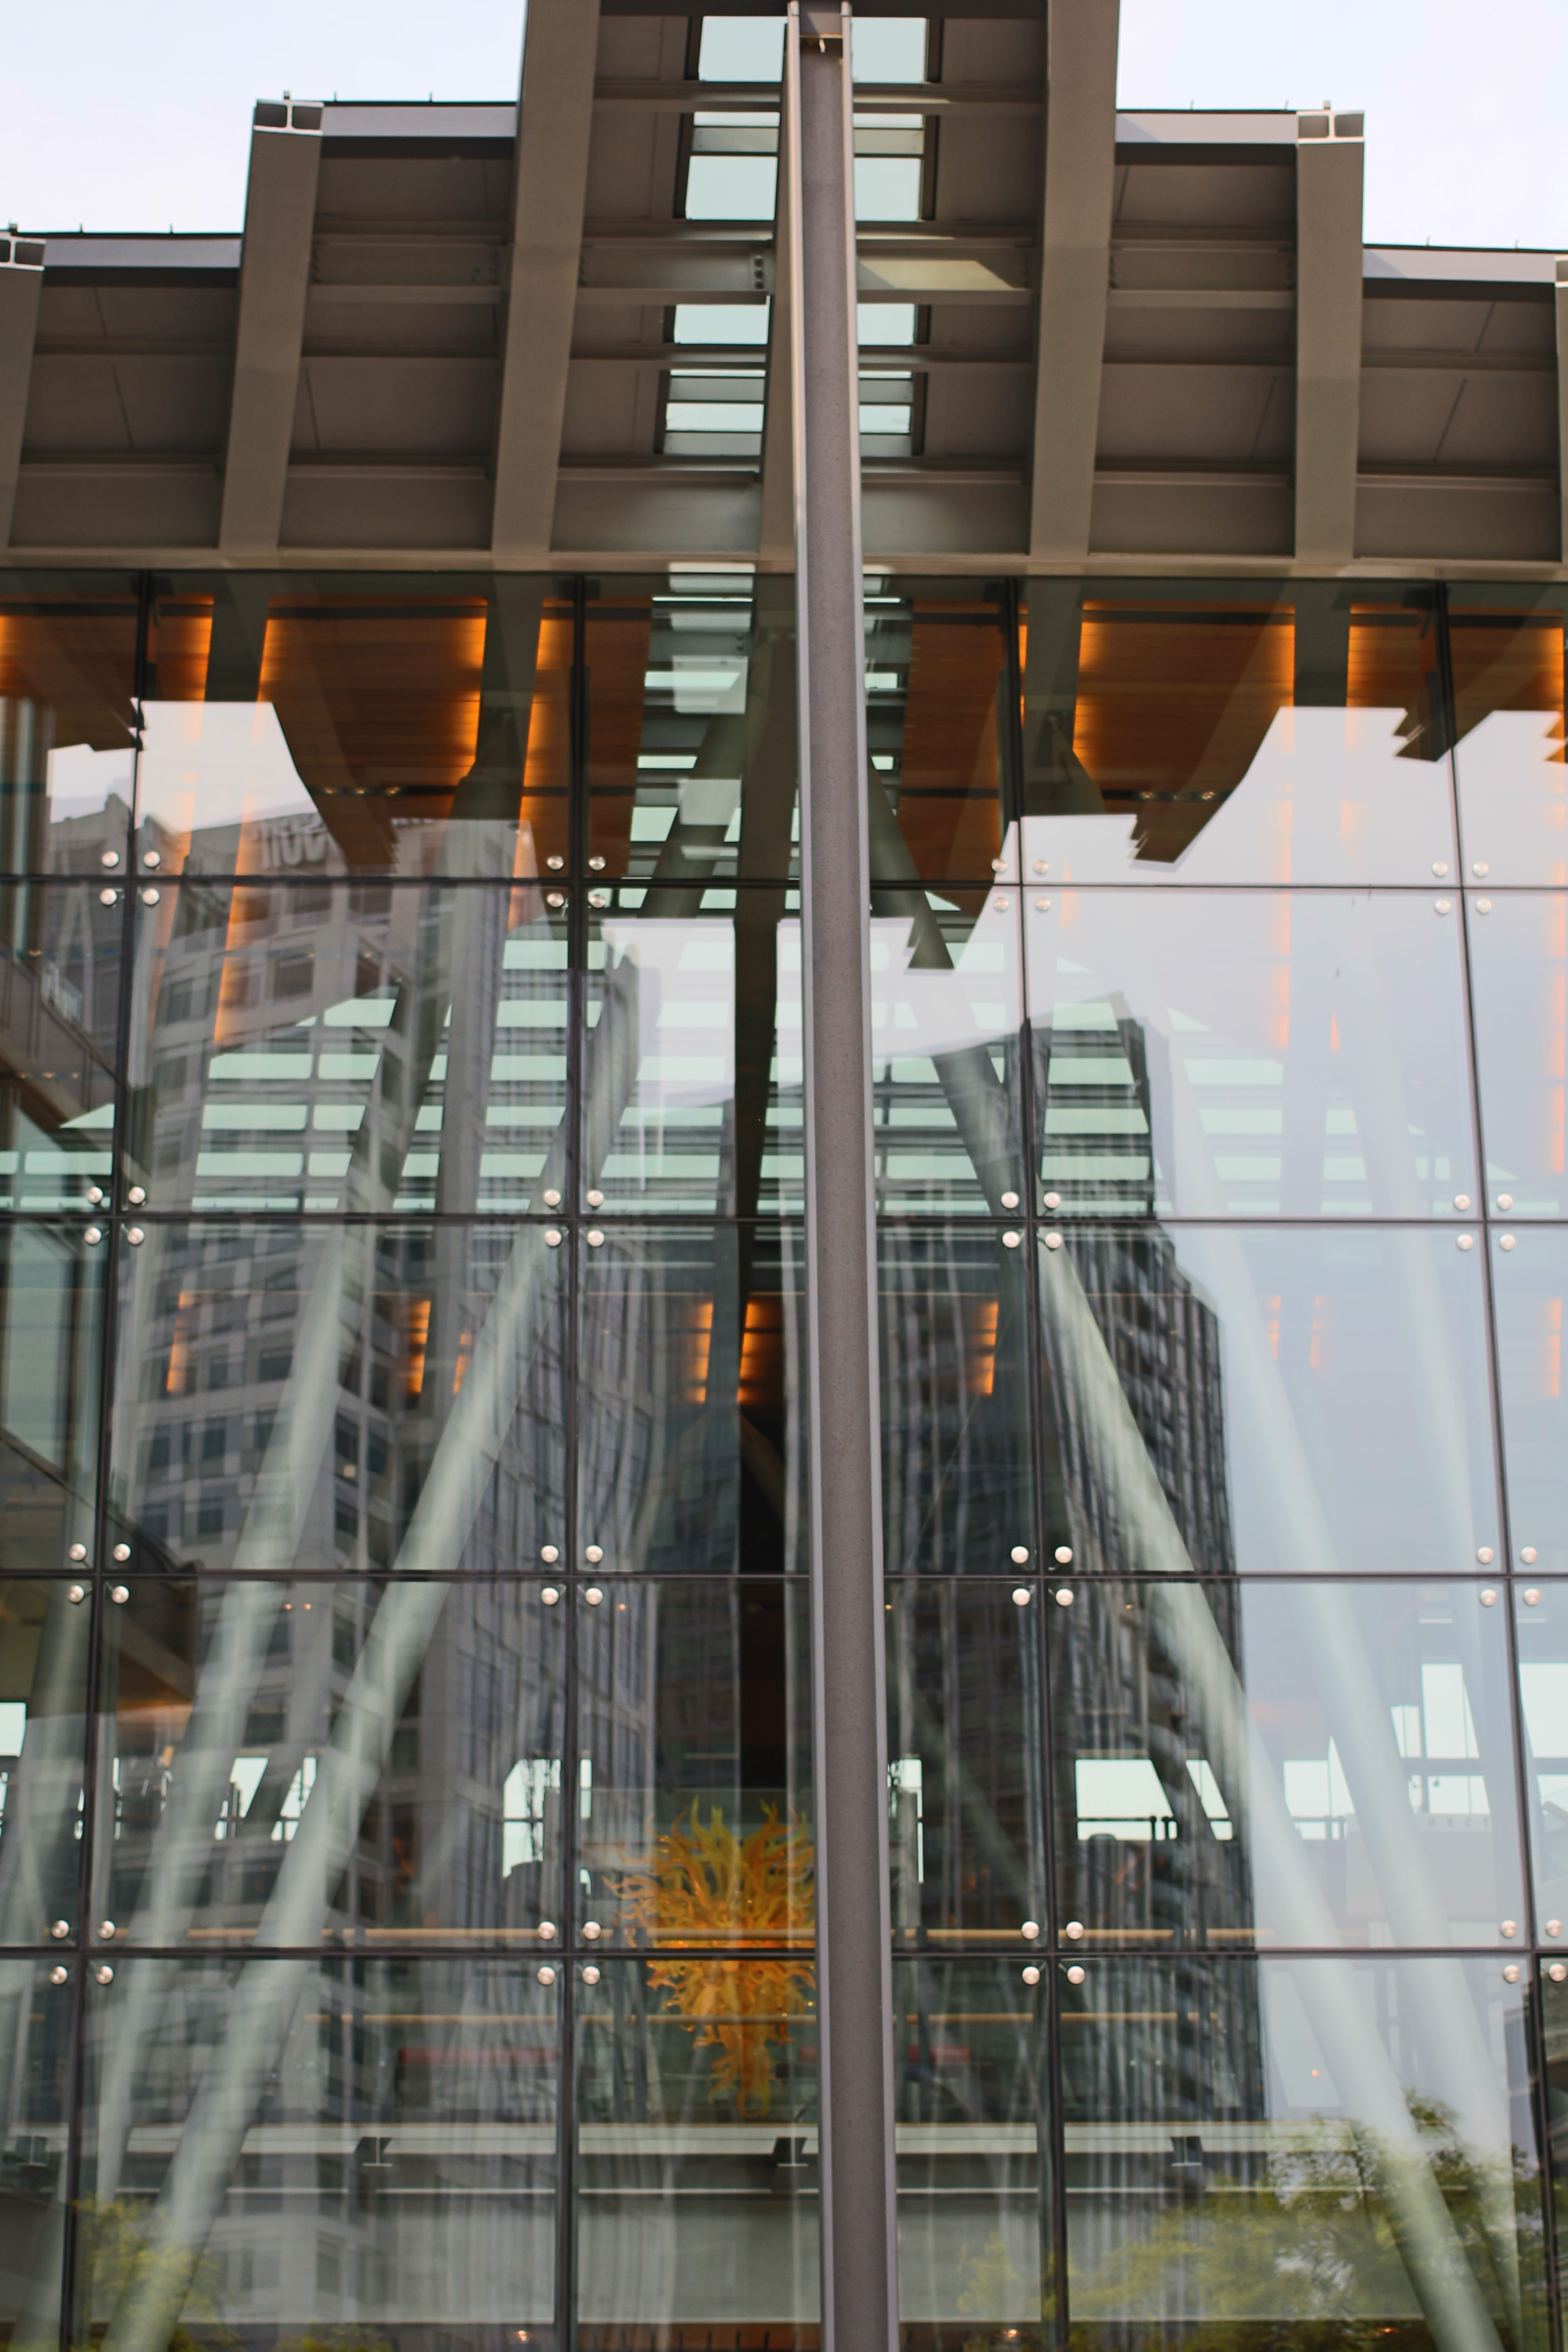
Great Zoom (216mm effective) from the 18-135mm kit lens
f/5.6 @135 mm, 1/200, ISO 160
Taken from the same spot as below


Great wide angle (28.8mm effective) from the 18-135mm kit lens
f/3.5 @18 mm, 1/800, ISO 100
Taken from the same spot as above


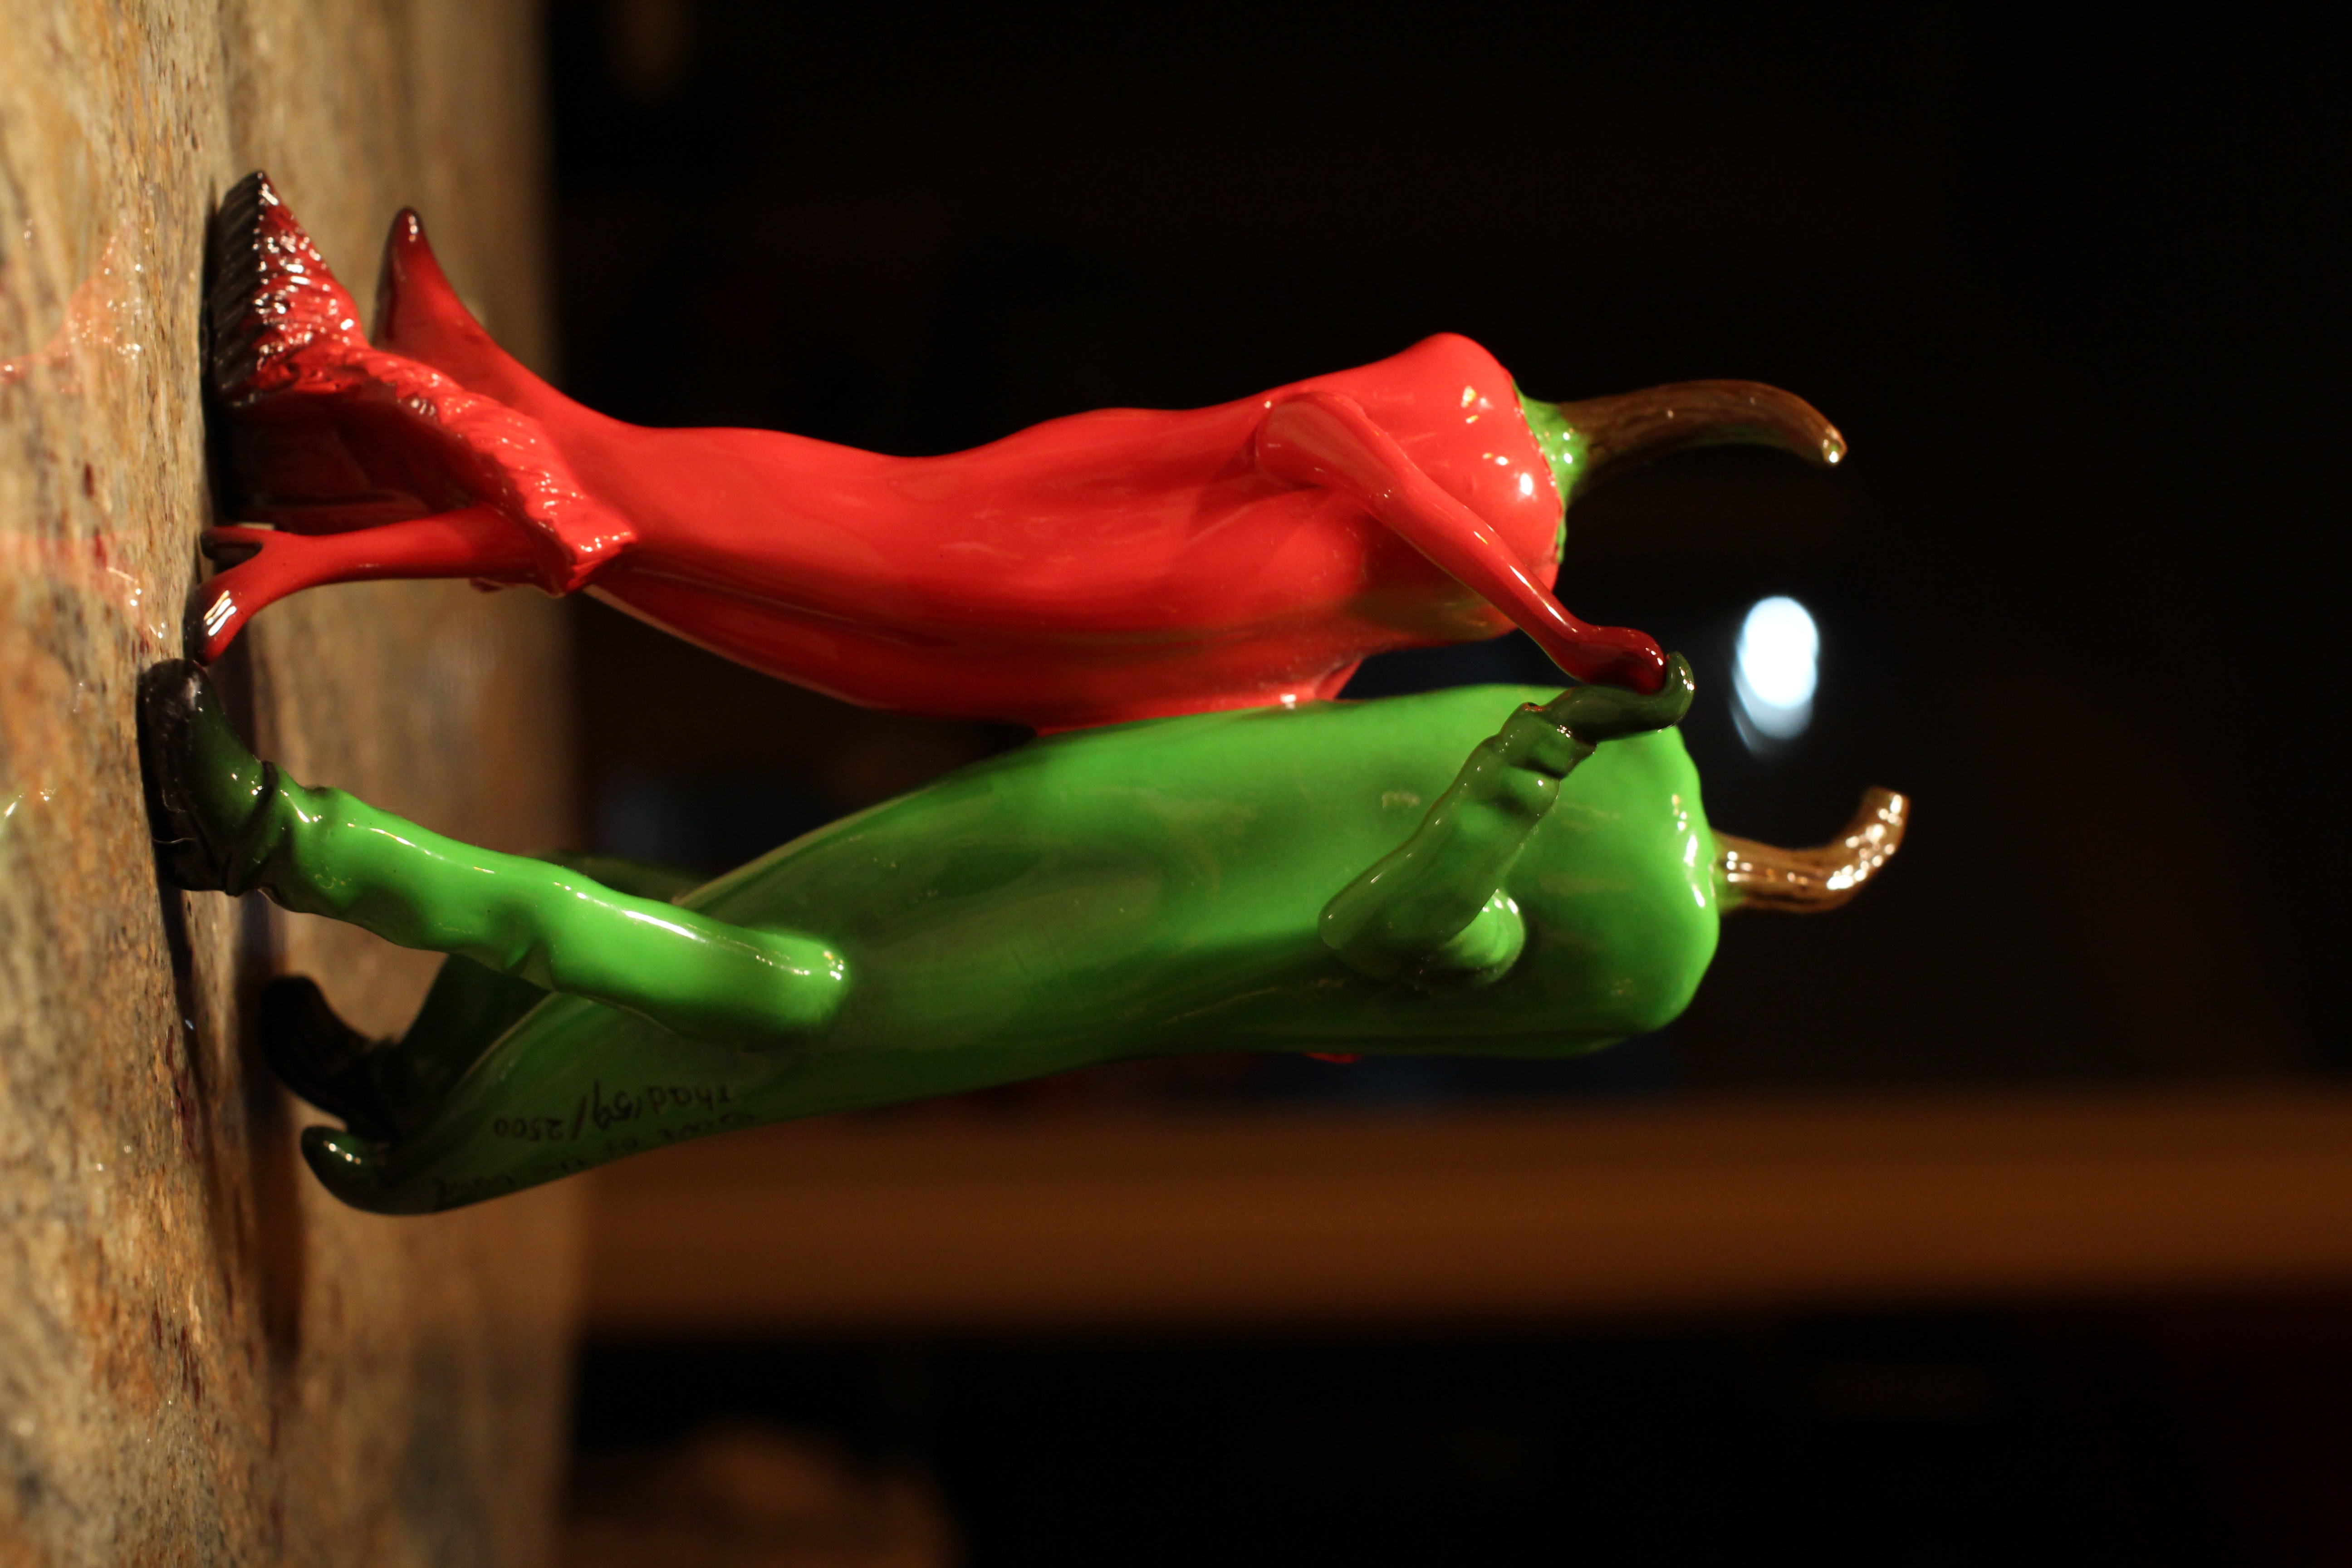
Good detail and bokeh from the kit lens
T4i, f/5.6 @135 mm, 1/320, ISO 1250
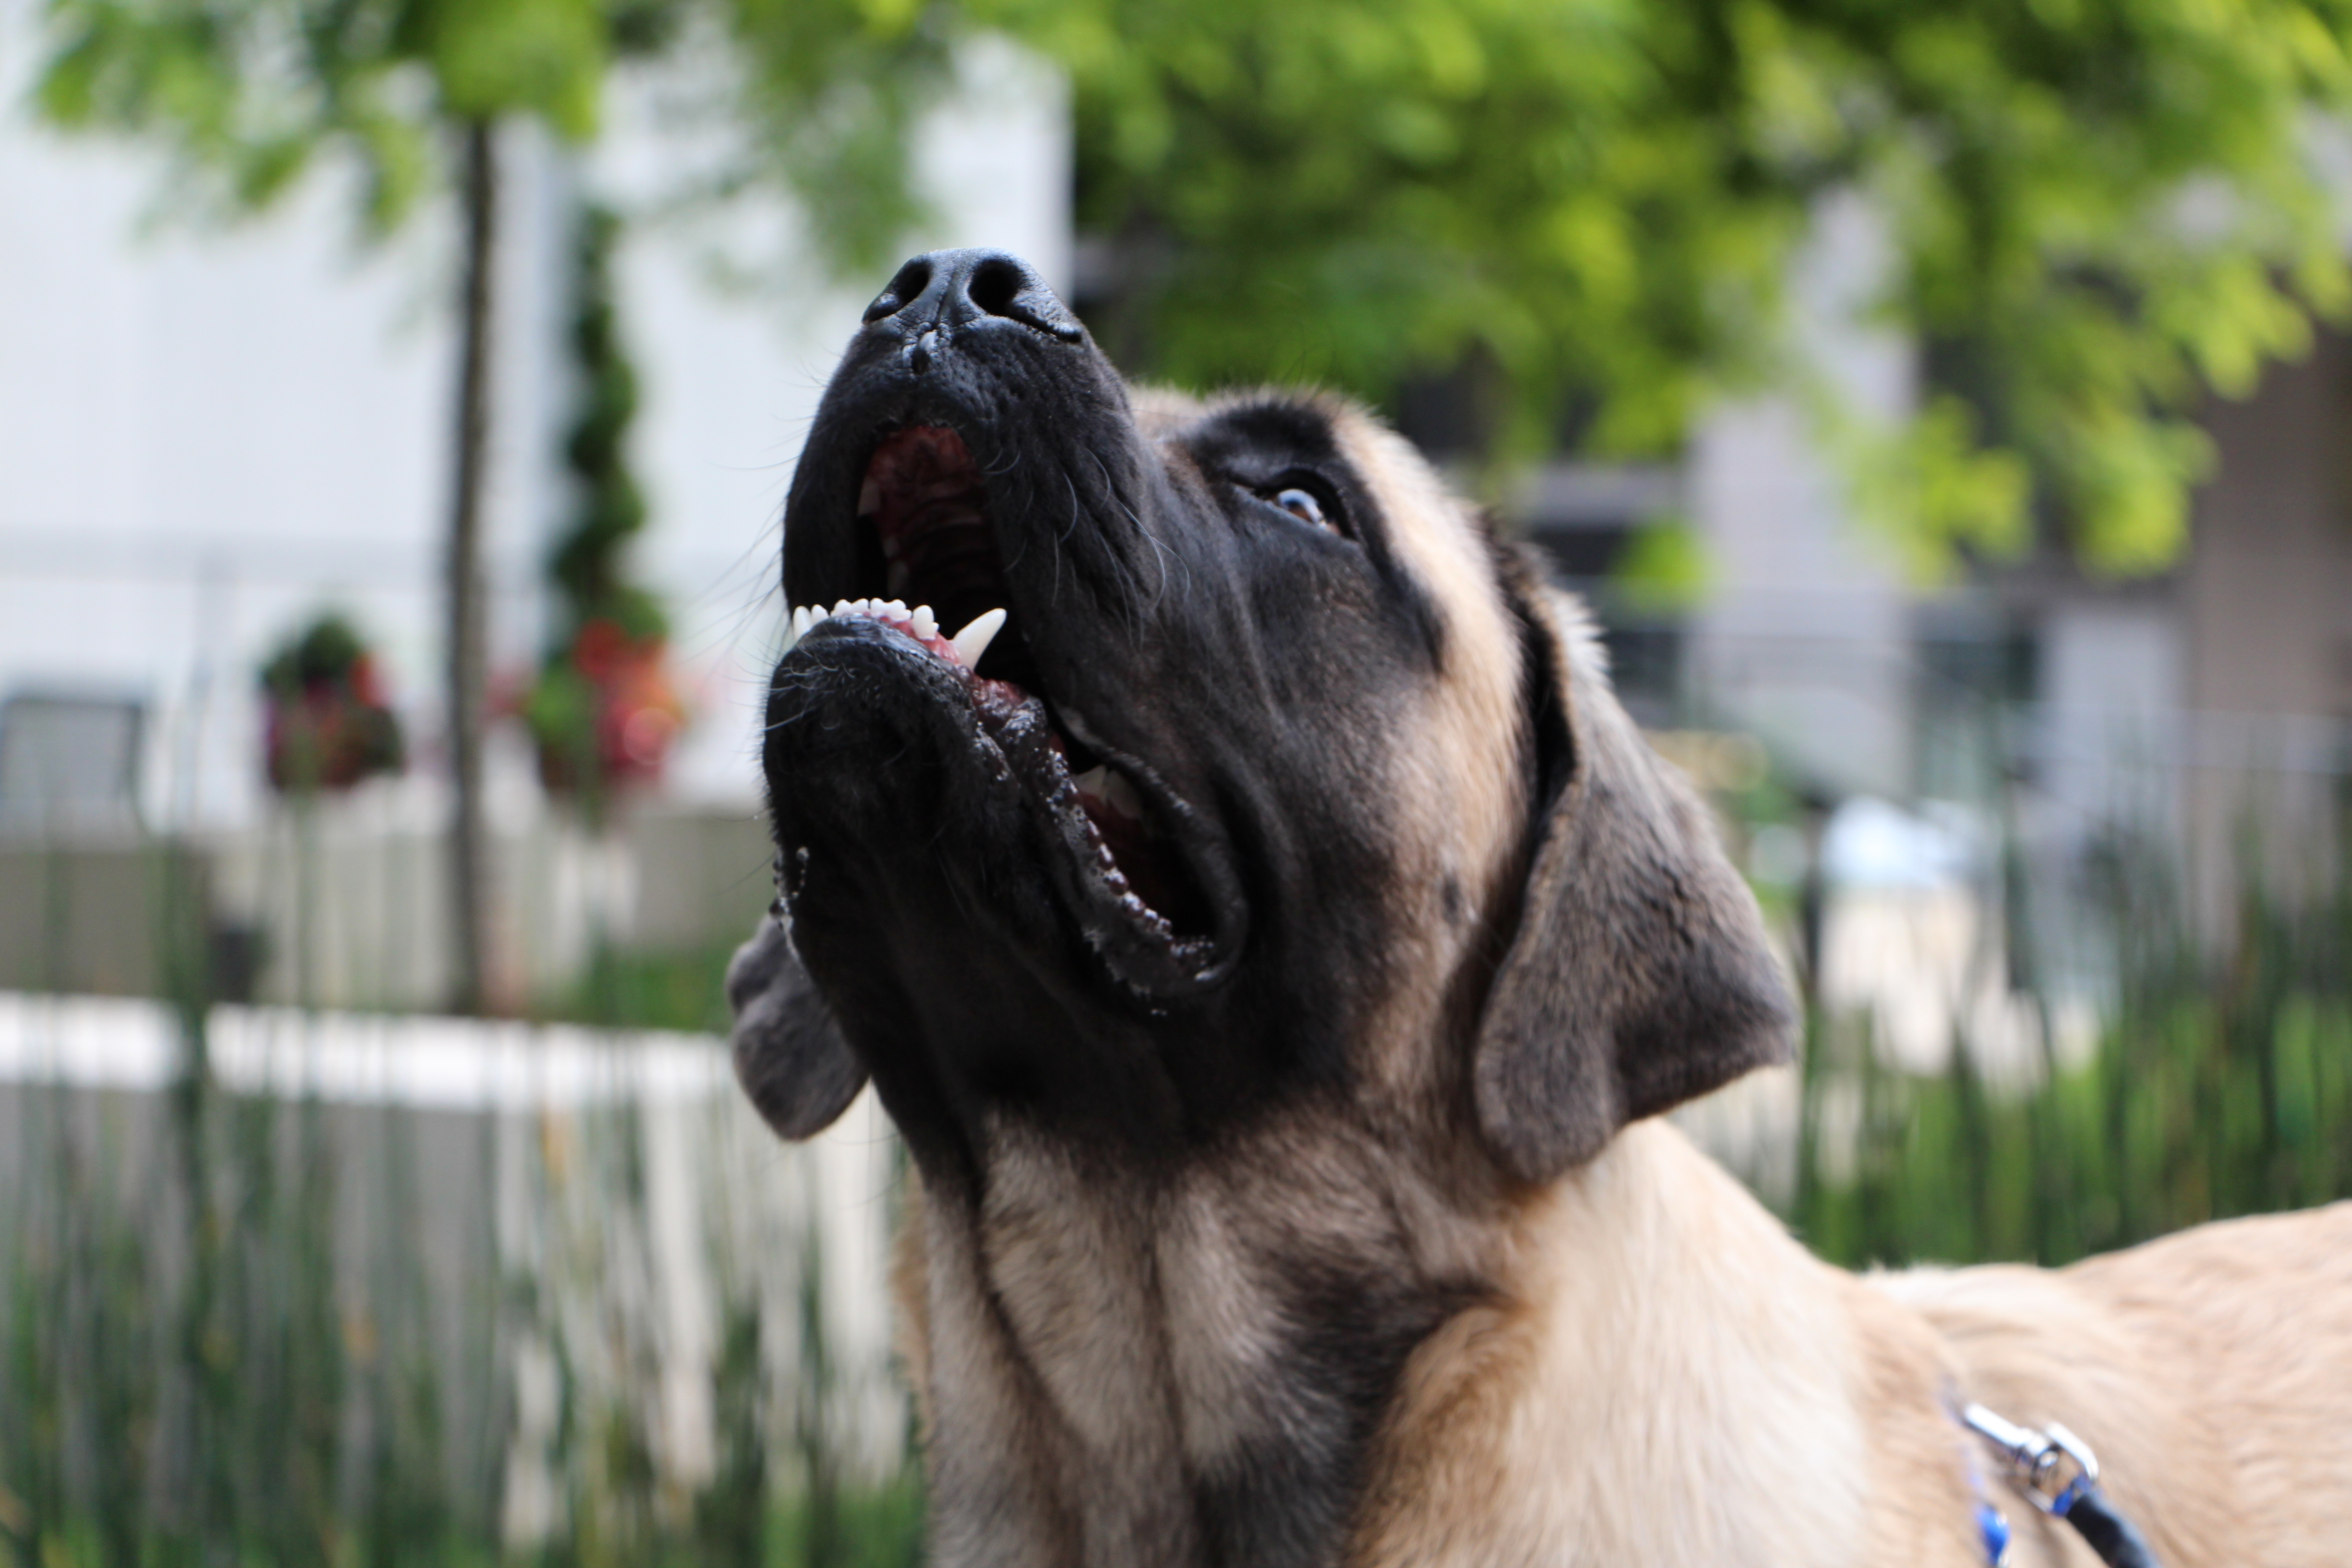

Decent autofocus
f/5 @ 69 mm,1/160, ISO 250


Unless you enjoy beatings, don’t use the in-camera flash on your spouse!
Invest in a 430 EX II or
600EX-RT instead
f/5 @ 74 mm,1/125, ISO 100, Flash Fired


Can’t afford an external flash? Find good light and let the T4i do it’s job
f/4.5 @35 mm, 1/125, ISO 200

T4i in-camera HDR is pretty lame, so plan to get HDR Efex Pro 2 instead
In-camera HDR chooses three different exposures and combines them (originals not preserved)
Compare to below with no HDR


Program (P) Mode Exposure – NO HDR
f/6.3 @40 mm, 1/320, ISO 400
Polarizers are helpful for reflective glass


Kit lens does well at f/11
f/11 @18 mm, 1/50, ISO 800


Noiseware or Dfine come in handy to remove noise indoors
f/3.5 @18 mm, 1/125, ISO 3200
Willing to pay a lot more for better results indoors? Read this!

See the full gallery at http://ronmart.zenfolio.com/t4i for more images. Read my review of Zenfolio to see why I prefer to store my pictures there.

See my article entitled “REVIEW: Canon Rebel T4i with Real World Photos & STM Lenses” for the first part of my review where I have my conclusion and other thoughts.

Where to buy

Here’s where I recommend purchasing from:

  • Order now from B&H
  • Canon EF 40mm f/2.8 STM
  • Canon Rebel T4i Body Only
  • Canon Rebel T4i w/18-55 IS
  • Canon Rebel T4i w/18-135 IS STM
    ORDER NOW from Adorama
  • Canon T4i Body ONLY
  • Canon Rebel T4i with EF-S 18-55 IS II lens
  • Canon Rebel T4i with EF-s 18-135 IS STM
  • Canon EF 40 F2.8 STM lens
    Other articles you may enjoy

    Disclosure

    If you make a purchase using links found on this blog, I may make a commission. I appreciate your support and thank you for using my links or sharing links from this blog on your own favorite forums.

    I was provided a loaner camera and lenses from B&H so I could bring this article to you.

  • NOTE: This site requires cookies and uses affiliate linking to sites that use cookies.

    If you enjoyed this article, please support future articles like this by making a donation or saving money by using my discount coupon codes. Either way, your support is greatly appreciated!

    This blog is intended for freelance writing and sharing of opinions and is not a representative of any of the companies whose links are provided on this site.

    The opinions provided are of Ron Martinsen alone and do not reflect the view of any other entity

    Wednesday, August 15, 2012

    REVIEW: Canon Rebel T4i with Real World Photos & STM Lenses


    The Canon T4i impresses even in the challenging swing test

    My first digital SLR was a Rebel, so I have a soft spot for this entry level camera. Through the years it has always impressed me with its innovations that typically are not found on its more advanced siblings until the next generation. With this disclaimer, I was excited to get a chance to review the new Canon T4i to see what lies ahead for our future DSLR’s.

    What’s New

    You can read here for a complete list of what’s new, but the big highlights are:

    Touch screen LCD – Honestly I hated this and disabled it right away. It was so easy to get unwanted key presses that I only see it as being useful for people with tiny fingers with the camera mounted on a tripod.

    ISO 12,800 Support – If you are shooting static subjects in reasonable light on a tripod this ISO might be useful to some, but most will find that 1600 is the peak ISO before noise reduction starts crushing detail. The high mode of 25,600 is simply not usable.


    ISO 6400 looks worse than ISO 51,200 on the 5D Mark III

    Continuous AF during HD Video Recording – I’ll try to cover this more in another article, but here’s where the T4i really impressed me. While the performance isn’t as fast an average camcorder over the last 20 years, it’s usable and much better than anything I’ve used on a DSLR thus far. The new Hybrid AF seemed to shine at picking up new subjects and generally doing the right thing when you pointed to a new subject. It’s certainly the most amateur / mom-friendly video AF system I’ve seen, so this is sure to be a big selling point for this camera.

    HDR Backlight Control – This feels like a carryover from the G1X where it’s really just for tripod use only as artifacts were common when handheld as shown here:


    A tripod is recommend for the HDR mode

    Overall Impressions

    This is a classic Rebel in that it is a functional camera that is easy for beginners. It offers lots of ease of use features that make it a real point and shoot DSLR, and features like the Hybrid AF, swivel LCD and stereo sound make it nice camcorder replacement.

    The Q menu is excellent and the controls are laid out nicely on the camera. While this camera doesn’t have the safety button for the mode dial, I found that this design never moved (and is actually preferential over the safety button design).

    Image Quality


    f/5.6 @135 mm, 1/200, ISO 160, No Flash

    The dynamic range of this cameras sensor isn’t anything to write home about. It was fine for the last generation, but with all of the stiff competition out there – especially in the mirrorless category (like the NEX-7) – it’s starting to feel outdated with no improvement over the G1X. That said, it’s not terrible – even with the STM kit lens – it’s just wise for prospective owners to not look at the 5D series (5D Mark II Or 5D Mark III) as you’ll start digging into your pocket for an expensive upgrade.


    f/5.6 @95 mm, 1/1000, ISO 2000, No Flash

    Real World Sample Images

    This entire article features in-camera JPEG images with zero modifications. All images are copyright Ron Martinsen with all rights reserved. You may click the images to view the originals, but you may not modify, print, or otherwise consume these images for any purpose – private, commercial, non-profit or otherwise.

    Click here to see the fully gallery, but here’s a few examples:


    Tough conditions, but the T4i did okay
    f/5.6 @50 mm, 1/60, ISO 125, No Flash, AWB, AV +1EV


    Shooting blind with AI Servo and the STM kit lens got acceptable results
    f/5.6 @18 mm, 1/500, ISO 1600, No Flash


    I was impressed with the AI Servo performance of the T4i
    f/5.6 @135 mm, 1/500, ISO 800, No Flash


    The EF 18-135 IS STM kit lens is pretty decent for beginners
    f/5.6 @85 mm, 1/500, ISO 3200, No Flash

    ISO Performance & Bookshelf Test

    My recommendation is to avoid anything above ISO 1600 on this camera unless it’s absolutely necessary. After 1600 the in-camera JPEG’s start to exhibit quite a bit of lost detail as the in-camera noise reduction tries to clean up the image. The images are usable, but if you’ll be printing at 5x7 or greater you are going to see the issues with this cameras images that are above 1600.


    f/8 @100 mm, 15s, ISO 100, No Flash on a tripod using the 70-200mm II lens.
    ISO 100 – decent quality and detail, but a little washed out tonal range
    Click for original


    This is the limit of my comfort level with this camera
    f/8 @100 mm, 1s, ISO 1600, No Flash
    Click for original


    Look at the wood grain on the bookshelf to easily see the detail lost by in-camera
    noise reduction, and the shadows show lots of noise
    f/8 @100 mm, 1/8, ISO 12800

    Flash Woes

    The built-in flash is still abysmal compared to Nikon’s entry level DSLR’s, and I was quite shocked to see that this camera didn’t work with my 580EX II flash (but worked fine with the 600EX-RT) when it was mounted to my camera. Here's what I kept getting with the 580EX II in ETTL mode no matter what I tried:


    My T4i didn’t like the 580EX II


    The 600EX-RT flash worked fine with identical settings
    50mm f/1.2L, f/1.6 @50 mm, 1/60, ISO 400

    The T4i can trigger remote flashes (not in RT mode though), so like the 7D it works great indoors when triggering Canon speedlites. I had no problems using it to trigger my 580EX II or 600EX-RT when they were configured as infrared slaves, but the EasyWireless feature wasn’t very easy (i.e., the flash failed to fire) in my testing.

    40mm f/2.8 STM Pancake Lens

    image
    Buy now from Adorama or B&H

    The all-new 40mm f/2.8 STM (which stands for stepping motor which is supposed to be smooth and silent) is all the rage by a lot of people who have never even held this lens, but honestly I was pretty unimpressed. For starters I expected it to be super quiet when focusing since it is a STM lens, but honestly it is not. In fact, I’d argue that many of my USM lenses are significantly quieter than this lens (you’ll see in future videos).

    This lens was good at making a lot of real-time focusing adjustments which make it great for video, but it’s still no camcorder performance. Instead, you have to touch the LCD screen (in single point AF mode for best results) to get it to focus on a new subject, so severe out of focus moments aren’t uncommon. It does a great job of focusing and sometimes gets it right on its own without touch input, but it’s not as fast as old camcorders and it certainly isn’t silent.

    Out of 228 photos I’ve taken with this lens so far, here’s the only one that I felt was worth sharing:


    T4i, f/5.6 @40 mm, 1/6, ISO 800, No Flash, On Support

    Yeah, that one didn’t impress me much either.  This lens just isn’t as sharp as some early reviews lead me to believe, so it felt more like a kit lens than a great prime. It’s a pretty cheap lens to buy (B&H and Adorama), but it feels that way too in practice. The Fujifilm 35mm f/1.4 XF R Lens for the X-Pro1 destroys this lens, but its over twice the price so I guess my expectations were too high for this one.

    I’ll be doing more testing with this lens on different cameras, so this story isn’t over yet. However, if you are in the market for a T4i then I wouldn’t advise getting this one. If you don’t believe me, then just make sure you buy from a place with a good return policy as I think you’ll change your mind once you see for yourself.

    EF 18-135 IS STM Lens


    Detail and bokeh were acceptable with the kit STM lens
    f/5.6 @85 mm, 1/125, ISO 250, No Flash

    This lens impressed me because it was super quiet and fast focusing. It lived up to the STM moniker and made a good impression as a starter lens. While this lens won’t appear on my Which Lens Should I Buy? list, I’d say it’s a great lens for a tight budget – especially if you are short on cash or want to do video. It’s not super sharp and doesn’t have the warmth of better lenses, but it isn’t too shabby.

    Conclusion

    I still need to do a little more testing, but thus far the Rebel feels a bit like the DSLR version of the G1X. It’s a decent camera that gets the job done, but it feels a little dated and behind the game. I still prefer it over entry level Nikon cameras, but the gap is narrowing with this release.

    The T4i video performance is solid and it will create images that will please beginners. That said, there’s a reason why I say “Parents Rejoice” in this 5D Mark III review because the extra ISO performance really does make your life easier as a parent to get those shots in your own real world environments (like kitchens and family rooms).

    UPDATE: See part 2 of this review at Canon T4i Review–Part II–Image Quality and Video.

    Where to buy

    Here’s where I recommend purchasing from:

    Order now from B&H
  • Canon EF 40mm f/2.8 STM
  • Canon Rebel T4i Body Only
  • Canon Rebel T4i w/18-55 IS
  • Canon Rebel T4i w/18-135 IS STM
    ORDER NOW from Adorama
  • Canon T4i Body ONLY
  • Canon Rebel T4i with EF-S 18-55 IS II lens
  • Canon Rebel T4i with EF-s 18-135 IS STM
  • Canon EF 40 F2.8 STM lens
    Other articles you may enjoy

    Disclosure

    If you make a purchase using links found on this blog, I may make a commission. I appreciate your support and thank you for using my links or sharing links from this blog on your own favorite forums.

    I was provided a loaner camera and lenses from B&H so I could bring this article to you.

  • NOTE: This site requires cookies and uses affiliate linking to sites that use cookies.

    If you enjoyed this article, please support future articles like this by making a donation or saving money by using my discount coupon codes. Either way, your support is greatly appreciated!

    This blog is intended for freelance writing and sharing of opinions and is not a representative of any of the companies whose links are provided on this site.

    The opinions provided are of Ron Martinsen alone and do not reflect the view of any other entity

    Monday, August 13, 2012

    Ask Ron: Does the 5D Mark III make autofocusing faster with traditionally slow focusing lenses?


    Keeping up with a toddler is tough enough, slow AF lenses take that challenge to a whole new level. My hit rate was about 1 out of every 20 for this fast little dude
    Canon
    5D Mark III with Canon 85mm f/1.2L – 1/125sec @ f/2 ISO 400 (flash fired)

    A reader writes:

    I’ve heard that the autofocus system in the Canon 5D Mark III is so good that even traditionally slow focusing lenses work much better than in the past. Is that true?

    I’ll cut to the chase and say, not really. In my real world testing I found that two of my favorite, but also most frustrating lenses (which I’ve bought and sold twice) performed just as bad as they always have with cameras from the past. This is a subjective test, not scientific one, so some may choose to argue with me. However, I didn’t find myself saying “wow, look at all of these perfectly focused shots I’m getting”. Instead, I was typically saying “f#@k” as shot after shot would often be out of focus.


    Even when you do everything right and hit your target, these lenses can still disappoint
    85mm f/1.2L at f/1.2 for 1/125 sec at ISO 400 (flash fired)
    Focus was aimed at the right eye but I hit the eyebrow due to the shallow DOF of f/1.2


    Remember, a f/1.2 lens is going to have a shallow depth of field
    which is a challenge even if the camera nails the focus
    50mm f/1.2L at f/4 for 1/125 sec ISO 1250 (flash fired)

    Now I’ll add the disclaimer that at f/1.2, it doesn’t matter what lens you are using or how fast it is or the camera its attached to. f/1.2 is shallow so moving subjects are going to cause misses unless you track subjects like a sniper. I tried to discount those “user error” misses from my testing and just pay attention to my keeper rate when doing typical shooting (sometimes as high as f/4 or f/5.6).


    Out of 40 shots, only a handful acquired the focus quickly enough for the moving subject
    Most often the camera would hunt for focus so long that the shot was gone
    50mm f/1.2L at f/4 for 1/125 sec at ISO 1250 (flash fired)


    Ultra-low light, kids and these lenses? Fugetaboutit! I was aiming for the eye and got the ear
    as the camera was hunting for a while with this lens to get any focus at all
    50mm f/1.2L at f/4 for 1/125 sec and ISO 1250 (flash fired)

    Keep in mind that it’s in my best interest to tell you that these lenses do focus faster as your buying them from links in this blog helps support what I do. However, I’m here to tell you the truth as I see it, and I say that these great pieces of glass still focus like crap with current cameras like the 5D Mark III. Hopefully we’ll get new versions in the future that address this problem.

    I should also note that I don’t expect that this is isolated to just these two lenses. Great lenses like the 135mm f/2 are probably just as slow too.

    The Test Lenses

    The Canon 50mm f/1.2L and 85mm f/1.2L (available for rent by LensProToGo.com) are legendary for their wonderful bokeh and excellent sharpness. They are indeed magical lenses, but for those who have plunked down the $1500 – $2000 for these two lenses, you’ve quickly found out that it’s easier to get an out of focus shot than it is to get one of those magical shots. Some say that the big heavy glass is hard for the little AF motor to move, and others cite the longer minimum focus distance. However, the real reason doesn’t matter – the fact is that these are very tough lenses to use if you are taking photos of anything that moves as they are glacially slow to acquire a focus and often will hit the wrong spot or not track very well. As a result, these are lenses that you do have to spray and pray a little bit with as everyone I’ve known (including some very well known pros) has said that no matter what camera you have, you’ll have more misses than hits.

    When you nail a shot with these lenses it’s still magical, so I’m not saying don’t buy these lenses – I’m just saying set your expectations properly and plan to be deleting more than you keep with these lenses – even if you have a fancy new camera. Personally, slow focusing lenses these will stay on my “rent as needed” list rather than my buy list.

    Given the legendary status of these lenses and the fact that they are generally a pain in the ass to use, I thought they’d be great candidates to use to answer this question.

    For the record, the 50mm f/1.2L performed SIGNIFICANTLY better than the glacially slow 85mm f/1.2L.

    How I Tested

    I followed my family members (mostly my toddler) around in low light situations and attempted to grab some candid shots. I typically used the spot auto focus feature (new for the 5D Mark III & 1D X) as I find that it has laser pointer focus with other lenses. However, I tried all of the different focus types when I was getting a high fail rate just to ensure that I wasn’t hitting a limitation of the focus mode I was using.

    I tried with both AI Servo for moving subjects and One Shot for stationary subjects. Generally speaking, AI Servo failed really bad with these lenses.

    Since I was using a flash, the 1/125 sec shutter wasn’t typically an issue as the flash would freeze movement. If I was shooting without a flash, I would have shot many of these at 1/500 sec or faster.

    What about the 1D X?

    From what I saw during my real world testing, my 1D X offered no measurable improvements over the 5D Mark III in this particular test with these two lenses. I’ve noticed improvements in its AF system overall with super fast AF lenses like the 70-200mm, but the slow focusing lenses are still cumbersome with the 1D X as well from what I’ve seen.

    Special Offer

    This article was brought to you by LensProToGo.com. They generously donated a free rental of the 50mm f/1.2L and 85mm f/1.2L for the weekend so that I could experiment with them to answer this question.

    LensProToGo.com has been gracious enough to offer you a 5% discount off any order when you enter the coupon code MART5 as shown below in yellow:

    LensProToGo.com Coupon Code

    Where to Buy?

    Click here to buy the 50mm f/1.2L from B&H, or click here to buy it from Adorama.
    Click here to buy the 85mm f/1.2L from Adorama, or click here to buy it from B&H.

    Disclosure

    If you make a rental or purchase using select links in this article, I may make a commission. See the special offer for more disclosure details.

    NOTE: This site requires cookies and uses affiliate linking to sites that use cookies.

    If you enjoyed this article, please support future articles like this by making a donation or saving money by using my discount coupon codes. Either way, your support is greatly appreciated!

    This blog is intended for freelance writing and sharing of opinions and is not a representative of any of the companies whose links are provided on this site.

    The opinions provided are of Ron Martinsen alone and do not reflect the view of any other entity