Showing posts with label tip. Show all posts

Wednesday, June 17, 2015

Can’t Find Anything To Photograph? Get Closer!

BAIMG_1692

One of the most frustrating things I often hear from my students is that there’s nothing to photograph because there are too many distractions around the subject. However, in the real world of photography, distractions are just a fact of life so you learn to deal with them.

Copyright (c) Ron Martinsen - ALL RIGHTS RESERVED

Tonight I went for a walk with my son and didn’t bring my camera because I fell victim of the “there’s nothing to shoot where I’m going” excuse. However, I did have my iPhone so while I was out I challenged myself to try to come up with a shot for each colorful flower I saw along the way.

Copyright (c) Ron Martinsen - ALL RIGHTS RESERVED

What you see in before shots sections this article are the scenes that my eyes saw that made me say “yeah, there’s nothing to shoot there” and the after is the shot was a result of me getting closer. I’ve not heavily cropped – what you see is mostly what was in camera, except I’ve used a 3:2 aspect ratio for the images in the article (iPhone 6 uses 16:9 aspect ratio).

These shots do have simple 2 minute edits – done mostly with Perfectly Clear.  While the after shots aren’t necessarily good photographs, they do illustrate my point about getting close to my subject to remove distractions and capture something that was an improvement over the scene before me.

Copyright (c) Ron Martinsen - ALL RIGHTS RESERVED

In all of these cases I could have just walked by and not taken a photograph, and to be honest that is often what I do when I’m out walking with my son.

Copyright (c) Ron Martinsen - ALL RIGHTS RESERVED

However, my friend Bryan Peterson wrote a great book called Learning to See Creatively that reminds us that the world is filled with things to photograph. You simply need to open your eyes and find them!

Copyright (c) Ron Martinsen - ALL RIGHTS RESERVED

As you look through the shots in this article, I challenge you to think this way on your next walk.

Copyright (c) Ron Martinsen - ALL RIGHTS RESERVED

I challenge you to post a before and after image to the ronmartblog Facebook page or flickr group.

Copyright (c) Ron Martinsen - ALL RIGHTS RESERVED

Show me what you saw and what you actually took!

Copyright (c) Ron Martinsen - ALL RIGHTS RESERVED

Even if you don’t end up with art, it’s a good exercise to remind you that shots are all around us if we just look for them and take a couple steps to get closer to our subject!

Other articles you may enjoy

If you enjoyed this article, you may also enjoy these:

Disclosure

If you make a purchase using links found in this article, I may make a commission. It doesn’t cost you a penny more, but it does help to support future articles like this.

NOTE: This site requires cookies and uses affiliate linking to sites that use cookies.

If you enjoyed this article, please support future articles like this by making a donation or saving money by using my discount coupon codes. Either way, your support is greatly appreciated!

This blog is intended for freelance writing and sharing of opinions and is not a representative of any of the companies whose links are provided on this site.

The opinions provided are of Ron Martinsen alone and do not reflect the view of any other entity

Tuesday, January 27, 2015

Top 10 Things To Improve Your Photography

Follow these tips to start making better photographs

I’ve been blogging about Photography since 2008. During that time I’ve enjoyed the opportunity to review well over a thousand different products – some of which have been for the blog and some have been products I purchased personally. During my journey I’ve learned a lot, so what follows are the 10 most valuable things I’ve learned since I first became a photographer in 1984 with my Canon Rebel AE-1.

What follows here are the tips I would give my family and friends if they came to me today asking for advice on how they could improve their journey in photography.

  1. Get educated on how to take great photos  – Great gear helps but knowing how to use it matters even more. Simply put, you can spend tens of thousands of dollars on great gear and you’ll certainly get sharper images that are super clean with faster shutter speeds than those who buy the bargain basement gear. However, a tack sharp boring shot is still a boring shot.

    Knowing how to use your gear and how to compose a scene goes a long way into making even the most basic gear look impressive which is why great pros can blow your $10k gear investment away with their iPhone shots.

    To learn how to make the most of the gear you have, I strongly recommend you check out my which books should I read? article. Even if you can’t handle reading books, it also offers great training suggestions from my friends at KelbyOne and BPSOP.

    Photographers like me also offer training, so contact me or a favorite photographer  for details on how you can get educated by people who can really help.


Do as much as you can in-camera, but software helps you get the best results

  1. Edit your images to enhance and remove distractions – Even if your only camera is your cell phone, to get the results you are expecting from your camera you’ll need to know some basic post-processing techniques.  To do that you’ll want the right software to make that task easy. You’ll also have the reality of managing your huge library of photos, so you’ll need the right products to help you find your photos quickly and easily. As a result, at least an investment in Lightroom will do wonders but there’s also a variety of great plug-ins that can help you get results quickly and easily.


A high quality bag can save your gear from disaster


BlackRapid makes great straps and bags for small cameras

  1. Protect your camera investment! If you get serious about photography you’ll quickly spend well over $500 and more likely thousands. With a major investment like that you should take care of it by both storing it properly and in many cases getting camera insurance. A great camera bag can help you hold all of your stuff in an organized way as well as protect it from the inevitable falls.

    TIP: Avoid camera bags with the name of camera makers on them – it only tips off thieves that you are carrying expensive camera gear and who makes it.


Show the world before the place where you stored your photos fails or gets lost

  1. Show the World Your Photos – Your photos that only live on electronic storage are pointless. Something inspired you to take that shot, so be proud of your work and let people see it.

    Sharing could be old school printing (which is even more fun when you printing your own photos) or as fancy as an online portfolio website.  However the reality for most is that they’ll end up being shared on social networks like Instagram, Google+. Facebook, etc… which makes more sense than them sitting on your phone until it gets lost or stolen or on a hard drive until it crashes. At least if you lose your data there’s some place you can go to see that important photo (especially those of your children).

    TIP: Stop obsessing about megapixels! Normal people don’t need the super megapixel cameras like the Nikon D810 or Sony a7R. Your 1080p HDTV is only 2.1 megapixels and even the hot new 4k TV’s are only 8.29 megapixels.  What’s more, social media sites like Facebook and Instagram need even less pixels! 


Self-printing can be a fulfilling final step of sharing your artistic vision with the world

  1. Print some of your favorite photos at least once a year – Think about it – how will people 50 or 100 years from now see the photos you taken of your family members, vacations, or even of yourself? Digital devices fail and digital storage relies on people making backups. Since backup storage and file formats always change, who will keep this process going 100 years from now?

    Here’s a great article that sends this point home that I encourage you to read.

    Printing doesn’t have to be complicated. Printing could be as simple as taking your photos (including the unedited ones) down to your local photo print store or shipping them off to an online print service. If you enjoy seeing your photos printed then you can enjoy the complete end to end vision of your artistic intent by printing your photos yourself

Canon Speedlite 600EX-RT

Nikon SB-910 AF Speedlight

  1. Get Better Light – Yes, the beauty of sunrise and sunset can make for gorgeous natural light, but sadly it’s not always there where you want it and when you need it.

    If you’ve invested in a high end camera that supports a flash then get one! Having flash on the top of the camera far away from the lens can really make a huge difference between a good shot and a dark and noisy one.

    Get a good flash like the Canon 600EX-RT or the Nikon SB-910 then read On-Camera Flash Techniques to learn how to use it. You don’t need 4 or even 2 of them because you are not Joe McNally, so just get one get one and learn how to use it properly on your camera. It will help you tremendously when you are indoors.

    TIP: Remember aperture is for creative intent, so don’t be duped by “fast lens” stupidity. It amazes me how people think they don’t need a flash anymore once they buy their 50mm f/1.4 lens because it’s a “fast lens”.

    First of all, all the 50mm f/1.4 lenses I’ve ever used have PAINFULLY slow autofocus so you certainly aren’t going to be focusing faster. In fact, in low light – you’ll be lucky if your shots are even in focus because you’ll be focus hunting so much! A fast focusing f/4 lens with stabilization might actually help you get the shot better than your

    Secondly, a lower f-stop number WILL give you more light and more light means faster shutter speeds. However, think about your creative intent and depth of field. If you intend to capture a full scene, then the super shallow depth of field you get with f/1.4 is NOT the aperture you should be using. f/5.6 of even f/9 might make more sense for your creative intent, so your new nifty 50 isn’t going to buy you significantly faster shutter speeds than the f/4 lens you probably already had.

    A shallow depth of field f/1.4 shot can be awesome, but it is very limiting and certainly not appropriate for every shot indoors of a child, a concert, an event or every travel shot. As a result, don’t be fooled into thinking that a small investment in a 50mm lens means you don’t need to know how to use a flash.


Drastically improve your handheld shots with this cool trick from Gary Parker


Tripod & Ball Head Recommendations

  1. Want sharp shots without a flash? Learn how to stabilize your camera. Yes, it is true that if you have a good hold of your camera with your arms supported against your body you can get a sharp shot. However, most of us mere mortals still have shaky hands so stabilizing our camera can mean the difference between a razor sharp shot and a fuzzy shot.

    If you can get a lens (or camera) with electronic image stabilization (e.g., IS, VR, OIS, OSS, OS, etc…) then that will certainly help, but often times even that isn’t enough. If it is not, then use this special handheld technique or DISABLE your electronic image stabilization and use a good tripod (tripod & head recommendations).


Canon 24-70mm f/2.8L II USM (my review)
Nikon AF-S 24-70mm f/2.8G ED

  1. Get Great Lenses FIRST – I’ve said it a million times, but I’ll say it again. Lenses are like audio system speakers. You can have a $100,000 audio system but if you connect it to $99 speakers you’ll get $99 sound. The same is true with lenses, so a used camera with the latest and greatest lenses will get you SIGNIFICANTLY sharper images than the latest camera and kit lens bundle at your local warehouse club or bargain online store.

    Check  out my which lens should I buy? article for my recommendations and check it regularly as I try to update it when there are big changes. In fact, I’ll probably update it later this month to reflect some of the great lenses I’ve tested recently.

Canon EOS 70D
Canon EOS 70D
  (Review)
Nikon D7100
Nikon D7100
(Review)

  1. Get a good camera to start with and stick with it until you have everything else first. Yes, having a great camera that performs well at high ISO’s like the Nikon D610 / D750 or Canon 6D / 5D Mark III can be extremely valuable, but having a good lens and a flash might mean you never have to use high ISO’s for most of your shots (assuming you aren’t a sports photographer). As a result, having a great flash and lens to go with your less expensive camera like the Canon 70D or Nikon D7100 (or even a less or used model) makes more financial sense.

Fujifilm X30
Fujifilm X30

Sony Cyber-shot DSC-RX100 III
Fujifilm X100T
Fujifilm X100T

  1. Got a limited budget? If so, then don’t get a camera with interchangeable lenses. Photography is fun, but it is also an endless money pit. If you have thousands to spend, then go ahead and get a DSLR or mirrorless system with interchangeable lenses. Yes, you read that right – mirrorless cameras with interchangeable lenses may be small and the lenses slightly cheaper than their DSLR counterparts, but you’ll still blow even the most generous budget if you go there.

    If your objective is to take great photos without going broke, then get a great compact like the Fujifilm X30 or the Sony RX100 III. If you insist on better image quality then consider a Fujifilm x100s or the x100t which will give you DSLR quality, but with a fixed lens so you have to think about your photography.

    Still too expensive? Consider getting the best smart phone you can afford the next time your phone is eligible for an upgrade. The latest models offer incredible image quality in a compact package.

    Got a big budget? You still might want one of these cameras when you are “packing light”.

Conclusion

Photography is fun, but it is no different than other hobbies like golf or sewing – it’s easy to spend a fortune and still get poor results. My advice here is based on years of experience and is offered to try to save you both money and frustration along your journey.

If you enjoyed this article please help me out by sharing it with your friends and on your social media sites. You can also follow me on Facebook.

Other articles you may enjoy

If you enjoyed this article, you may also enjoy these:

Disclosure

If you make a purchase using links found in this article, I may make a commission. It doesn’t cost you a penny more, but it does help to support future articles like this.

NOTE: This site requires cookies and uses affiliate linking to sites that use cookies.

If you enjoyed this article, please support future articles like this by making a donation or saving money by using my discount coupon codes. Either way, your support is greatly appreciated!

This blog is intended for freelance writing and sharing of opinions and is not a representative of any of the companies whose links are provided on this site.

The opinions provided are of Ron Martinsen alone and do not reflect the view of any other entity

Friday, October 3, 2014

KelbyOne Special Offer–5 Months for $89.10 (EXPIRES November 13, 2014)

image

Check out my article entitled Nikon D810 & SIGMA 50mm Art Series Automotive Photography via Kelby One & Tim Wallace if you’d like more info about why I think KelbyOne is cool and easily the best value in photography.

Where to order

Click here and use the promo/redemption code RMKO14 as shown above to get 5 months for the price of 4 AND SAVE an extra 10%! This limited time special offer expires on November 13, so act now if you have been waiting for a chance to binge watch KelbyOne videos at a discounted rate.

If you decide you want to go for the full subscription, then check out my normal special offer for KelbyOne and Photoshop World here. I also have a behind the scenes video and more about KelbyOne in case you want to learn more.

Other articles you may enjoy

If you enjoyed this article, you may also enjoy these:

Disclosure

If you make a purchase using links found in this article, I may make a commission. It doesn’t cost you a penny more, but it does help to support future articles like this.

NOTE: This site requires cookies and uses affiliate linking to sites that use cookies.

If you enjoyed this article, please support future articles like this by making a donation or saving money by using my discount coupon codes. Either way, your support is greatly appreciated!

This blog is intended for freelance writing and sharing of opinions and is not a representative of any of the companies whose links are provided on this site.

The opinions provided are of Ron Martinsen alone and do not reflect the view of any other entity

Thursday, December 22, 2011

Travel Photography: Photographing People At Night In New York City (Manhattan)

A Distorted View of New York (c) Ron Martinsen - ALL RIGHTS RESERVED
Manhattan Nightscape
All photos in this article are Copyright Ron Martinsen – ALL RIGHTS RESERVED

How many times have you gone on a trip where you see some cool nightscape and you tell your loved one – “hey, let me take a photo of you against that great view”?

Now think about how many times you’ve been happy with the result. If you are like most people, the answer is usually “very few” (at best). For most when you throw in the challenge of the evening shooting where high ISO’s and slow shutter speeds are virtually inevitable then things get even worse!

I’m no stranger to this problem myself, but I’ve learned a few things over the years that certainly help – A LOT! All of the shots in this article were taken in New York City in 2011 while I was there attending the PhotoPlus Expo. Most shots are at ISO 3200 or 6400, but I was also lucky to have a great assistant or two and borrowed lights to get some shots that I’m happy with.

I hope you’ll enjoy both the advice and the shots as you read through this article.

Introduction

Shooting at night in a big city like New York introduces some serious problems.

Your subjects are typically backlit against bright lights or mixed lighting. If you’ve been to the Flash Bus Tour, Strobist or Planet Neil then you probably know that you’ve gotta start by exposing your background first and then adding your fill light. This means you’ll be shooting manual and you’ll not always trust what your camera meter is telling you.

To get good results, you’ve gotta know your gear. If you don’t then I highly recommend you read my Which Books Should I Read? article and possibly get a subscription to Kelby Training (see my discount coupon code page for details).This article will not go into those details as that is beyond the scope of this article. Off-Camera Flash Techniques, Speedliter's Handbook, and Sketching Light all offer great advice on how to to get the shots shown in this article.

1. If you plan to shoot when travelling then come prepared


A Lastolite EzyBox and an assistant will get you great shots in the field

Many of us don’t have the budget to shoot on location, so our travels will be business trips or family vacations. If your goal is to get great shots during your limited shooting time on one of these events, then you really have to be prepared. While more gear is always better, there’s way to be smart and still have a great shoot.

First and foremost you need to be realistic about what you can accomplish with the gear on hand and the objective of your trip. What I mean by this is that if the objective of your trip is to get great photographs, then bring (or rent) the gear you need to get the job done. Companies like LensRentals.com will drop ship your rental gear to your destination so you can have what you need without hauling it on the plane.

Here’s the minimum kit that I recommend (in addition to your favorite camera):

  1. A comfortable backpack like the Streetwalker Pro or if you have a lot of gear then a roller bag like the ThinkTankPro Airport Security. Your shots will be much better if you are comfortable and can bring everything you need. For me I always load my Airport Security bag with everything I need when shooting is my primary objective.
  2. I like to have a 70-200mm lens and a 16-35mm lens so I can do both wide angle and telephoto shots. I usually use sneaker zoom for the rest. I’ll take my 24-105mm when I just want the one size fits all compromise lens.
  3. A Lastolite EzyBox and an assistant will get you great shots in the field. This is really how the big boys do it, so if you want to look like a pro you’ve gotta bring the good stuff. This also means you’ll need some remote triggers like the Pocket Wizard Mini TT1, Flex TT5 and AC7.
  4. At least one good reflector like the Lastolite TriGrip. Even better, consider using what small flash master Joe McNally uses as shown here at B&H. See the 2nd part of my PhotoPlus Expo article for my 2 cents on Joe’s collection.
  5. Rogue FlashBender and Rogue Lighting Filters are a must to help you throw light where you need it as well as control the color of the light.

Sure there are a bazillion other things you can bring, so you can see my gear page or my holiday gear guide to get ideas on what else you can bring. Personally I pack my bag as full as I can stand it.

2. At a MINIMUM, bring a good flash for outdoors

If you want good shots then you are going to need good light.

At a minimum this can be an on-camera flash like a 580EX II or SB-910. Indoors the cheaper flashes can work, but outdoors you are going to want a the best flash money can buy (e.g., the Quantum QFlash is great too).

The shot above of Sandy is an example of a shot done just with a 580EX II on my camera with it pointing directly at my subject (something you can kinda get away with outdoors). I also had an orange Rogue Gel on my flash to warm up the light hitting her skin.

Tip: If you haven’t already, read On-Camera Flash Techniques to learn how to get great shots with the on-camera flash.

3. Avoid photographing your subject in the dead center of the frame

As Rick Sammon says, Dead Center is Dead Wrong. If you want to convey a sense of being in a different location, then your photos should include a little of the location with you. How subtle or pronounced it is depends on your proximity of the subject and the ability of your equipment, but the key thing is to have both – with one dominant subject. The way you do that is to put your subject at the left or right edge of the frame and pay attention to the background.

In the photo above I get Wall Street in the background and only let Kaethe occupy 25% of the frame (the minimum your subject should be in most shots). While the physical distance and laws of physics make it impossible for me to have both subjects in focus at the same time, you can appreciate a nice portrait and your memory will fill in the blanks. Wall Street adds a nice splash of color and you can tell that there’s something big happening in the background.

4. Take your cityscape and portraits separately

Your photo should only have one primary subject. While it would be great to have photos of Manhattan and your friend, don’t try to do both in one shot. In the photo above I successful capture beautiful QiaoQiao with a nice Manhattan backdrop for a splash of color and location. However, I don’t try to make them both subjects in the same shot.

When I was done with the shot above I stepped to the side of QiaoQiao and took this Manhattan shot:

The net result is that I have two good shots instead of one crappy shot that doesn’t do justice for either QiaoQiao or Manhattan. (TIP: Topaz Labs Adjust 5 (review) is for processing city shots)

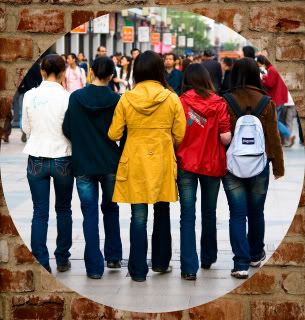
5. Groups - the same rules apply, but it’s more tricky

Mouse over to see before, mouse out to see after
Mouse Over for Before “Fail” Shot
Mouse Out for After (Fixed using
InFocus by Topaz Labs)

Groups are always tough, but they are even more tough to shoot when you are out having fun and are trying to do an impromptu group photo. The key thing to remember is that you need to apply the same rules as your individual shots, but you’ll need to configure the people differently.

In the above shot I decided to line group up in an alternating pattern to make them more interesting, but I also was mindful of the background so I could convey the sense that they were in Times Square. I then tried to use the top third of the shot to get the nightscape to give a sense as to where these girls were.

What I did fail to do in this shot actually is adjust my aperture (hey, shit happens) so f/2.8 got all of the girls except for the foreground girl in perfect focus. The foreground girl was totally blurred, but I used Topaz Labs InFocus to bring her back into the shot. While this photo won’t end up in a portfolio or a gallery, it’s still a decent group shot that these girls can show their friends when talking about their great trip to The Big Apple! Let this be a lesson though – either shoot with a larger f-stop number or get everybody on the same plane.

6. If you have a friend in your destination city, ask them if you can borrow their gear

The last time I was in New York City, I was extremely fortunate to have one of my blog readers – Cliff Pickett – offer to help me out. Not only did he act as an assistant, he also loaned me gear which helped me to get a lot of great shots while I was there. He also got me access to the best place to shoot in all of New York City!

Keep this in mind when you are travelling – there may be a friend, or long lost cousin that might be able to help you out when you are in town. You never know, that cousin you never met that your Mom tells you to see when you visit city X, might just be a cool photography geek that can be a huge help to you!

They may save you some rental expenses or extra luggage fees too, so plan to treat them to dinner too! :)

7. Be ready for the unexpected

Seriously, I wouldn’t have guessed in a million years that I’d see Elmo in Times Square on his cell phone making a call in front of a huge bottle of Corona beer! Shit happens when you are in the big city, so always have your camera ready to shoot. This means flash on, lens cap off, and camera settings dialed in as conditions change.

If I didn’t have my camera (and in this case my crew) ready to go, there’s no way I would have go this shot.

8. Be spontaneous and get your subjects to come to life

As a photographer we need to think of so many things when shooting that it is easy to make a technically strong, but terribly boring shot. Instead of taking DMV mug shots outside, ask your subject to get a little crazy and then start firing away. Have them look off camera and think about something that makes them happy and fire away.

Another thing I’d like to point out is that keeping an eye on what is behind your subject is important. The crap in the background like power lines, signs, lamp posts, garbage cans, planters, etc…. are all nasty to look at in your photo so try to avoid them if you can. While a quick shot of Elmo dancing my get you a free pass on the background clutter, generally speaking it can just ruin a shot.

9. Photograph strangers

This is a tough one for many people, but you’d be surprised how many people will let you take their photo if you ask. It helps to have a business card and tell them who you are and what you do first, and you should always offer to give them a free image in exchange for their time. An 8x10 print or 800px on the long side JPEG is sufficient. What’s more, is that you can have them fill out a release for you after they contact you to get their print. This keeps you from shoving a contract in their face while on the street, and lets them go about their business.

Tip: Ask the people who you find attractive! Yep, that’s right, try asking the good looking folks because generally good looking people are happy to get their photo taken, and you’ll be happier with shots of people you find pleasing to look at! Once you do, you’ll have people of all sorts of looks asking to have their photo taken!

10. Find or recruit buddies to help assist


Taken with the Canon 8-15mm f/4L Fisheye Zoom (review)

There are lots of photographers in the world these days, and local groups for strobist, smugmug, etc… mean there are always people willing to go out and do a photo walk. As a result, you can recruit these people to help you out and help them in exchange as well. It’s tough to get great shots without an assistant, so I highly recommend you find one and plan ahead!

I’d like to thank my buddy Joe Gambardella who I met at the Bryan Peterson Workshop in Seattle (review) and Cliff Picket for their generous time and support during my Times Square and Rooftop shoots.

Conclusion

Travel Photography is one of my favorite things to do, but I’m only able to travel once or twice a year. Being out of my element sparks new creativity possibilities, but also new challenges.

Most of us aren’t Joe McNally so while we read great books like Sketching Light and think I’d like to try that sometime”, few of us actual do – especially when we are out of town. However, I’d like to encourage you to stop making boring shots when you travel. Haul a little more gear with you and go make some great shots! 

Feeling Trapped And Longing For More Creative Outlets?

As photographers we get into creativity ruts from time to time, but travelling is the best way to see the world differently. Reading books like Learning to See Creatively or taking a course from The Perfect Picture School of Photography can really help inspire some new thinking, so a new environment may be just what you need to get those creative juices flowing again. I know it always helps me!

See the introduction part of this article for more ideas on how to improve your camera skills too!

If you like this article and want to see more like it, please leave a comment on the blog to let me know what you think.

Disclosure

I may get a commission if you make purchases using links in this article. Thanks for supporting this blog by using my links!

NOTE: This site requires cookies and uses affiliate linking to sites that use cookies.

If you enjoyed this article, please support future articles like this by making a donation or saving money by using my discount coupon codes. Either way, your support is greatly appreciated!

This blog is intended for freelance writing and sharing of opinions and is not a representative of any of the companies whose links are provided on this site.

The opinions provided are of Ron Martinsen alone and do not reflect the view of any other entity

Wednesday, July 21, 2010

Welcome to ronmartblog.com (Best of the Blog List)

This page has moved. Please use the READ THIS FIRST tab at the top of this site.

NOTE: This site requires cookies and uses affiliate linking to sites that use cookies.

If you enjoyed this article, please support future articles like this by making a donation or saving money by using my discount coupon codes. Either way, your support is greatly appreciated!

This blog is intended for freelance writing and sharing of opinions and is not a representative of any of the companies whose links are provided on this site.

The opinions provided are of Ron Martinsen alone and do not reflect the view of any other entity

Wednesday, November 26, 2008

Cool PhotoFrame 4.0 Tip

In playing with PhotoFrame 4.0 I was pleased to see the cool background they had, but despite looking at the videos on the web site I couldn't figure out how (within PhotoFrame) to create a frame that punched a hole through a background like the photo shown above. Thanks to Brian Kraft at onOne Software, I finally know how now. Here's the directions:

  1. Add background
  2. Add instant frame
  3. Go to Frame menu and select "Invert"
  4. Change the instant frame color to "Transparent"
  5. Make sure your options are set to "Apply to new layer"

NOTE: This site requires cookies and uses affiliate linking to sites that use cookies.

If you enjoyed this article, please support future articles like this by making a donation or saving money by using my discount coupon codes. Either way, your support is greatly appreciated!

This blog is intended for freelance writing and sharing of opinions and is not a representative of any of the companies whose links are provided on this site.

The opinions provided are of Ron Martinsen alone and do not reflect the view of any other entity