Wednesday, June 12, 2013

Celebrating the Black & White Print

clip_image001

My friend Dan Steinhardt at Epson has informed me that they’ve released a cool new video series called “In Celebration of the Black and White Print”. It features some great black and white workflows using my one of favorite black & white products, Silver Efex Pro (click here for the lowest price on the web) and my everyday printer – the R3000 by Dan and Tony Corbell. It also has some great print master interviews with John Sexton and Kim Weston.

If you love black & white printing, then I’m sure these super high quality video will be an enjoyable use of your time!

For more interesting printing topics, check out my printing series page.

NOTE: This site requires cookies and uses affiliate linking to sites that use cookies.

If you enjoyed this article, please support future articles like this by making a donation or saving money by using my discount coupon codes. Either way, your support is greatly appreciated!

This blog is intended for freelance writing and sharing of opinions and is not a representative of any of the companies whose links are provided on this site.

The opinions provided are of Ron Martinsen alone and do not reflect the view of any other entity

Tuesday, June 11, 2013

What Gear Should I Bring To Disney?


Disney Reality (Unedited X20 Shot)
You’ll often be shooting during harsh mid-day sun while you are slathered in sunscreen with massive crowds
all around you. This leaves you with limited angles to get a shot and even If you get some things to go right
you can still get an epic fail like this shot with sunscreen on the lens!

It’s funny how often this question comes up, but during the summer it seems to happen weekly. You are going to one of the Disney properties with the family and you are deciding what gear you should bring. Most often this is the “dad” trying to decide what lenses and camera(s) to bring, but occasionally I get a mom asking this question to.

Why are you going to Disney?


Disney is almost always about family (Unedited X20 Shot)
Disney Photo Pass Photographers will photograph you with your camera if you ask
They may not be perfect shots, but they are free keepsakes that you’ll cherish years later

At Disneyland a few years back my wife stopped me and grabbed me by the biceps and said “is this Disney boot camp? Are we here to have fun or to complete your checklist?” This was a life changing moment for me because I knew she was right – the goal of Disney is to have fun with your family, not to take photos or see every attraction. Sure, we want to have nice memento photos of the event, but unless you go alone on assignment your objective is NOT photography. This is a good time to leave your hobby/passion at home and focus on the family, but I can relate with the desire to still have great keepsake photos to remember the event. Here’s some tips on how you can do that:

  1. Leave the DSLR at home – Yes, I know this is painful as there are so many beautiful colors and things to photograph at Disney, but are you there to take photos or to have a great experience with your family? I’ve talked to hundreds of photographers who before their trip thought they could do both, but I have not spoken to a single spouse who agrees that they accomplished that objective. Your objective is to spend time with family, so leave your big camera and lenses at home. Should you decide to bring them, you’ll often find that they get in the way and you never have the lens you want for any given moment in time. Stopping to switch lenses or add a flash isn’t going to make your spouse or kids happy, so trust me when I say DO NOT GO THERE!
  2. Get a killer small camera – I’ve written articles in the past where I’ve taken a G9 to Disneyland, and for Disney World this year I’m taking the X20. Whatever camera you take – make sure it is compact. If you want great photos with a compact camera then you better be willing to pony up some bucks because all of the great ones I’ve reviewed have been in the $500+ range. A used Fujifilm X10 is a good budget solution, but at the end of the day you are going to want a camera that you can lift, click and get the shot – without a lot fiddling around. Great high ISO performance is a huge plus, and personally I prefer a zoom lens over fixed lens solutions like the Sony RX-1 of Fujifilm X100s. See the right side of my blog for a complete list of cameras I’ve reviewed.
  3. Open up your wallet – While the shots may not be as good as one’s you would take with your fancy, schmancy DSLR, go ahead and pay for Disney Photo Pass to take DSLR shots of you and your family. Your family will appreciate you being in the shot and you’ll get your high quality keepsakes. Sure they are shooting with Rebel-class cameras, but odds are they will still be better than yours small camera by virtue of a larger sensor. These folks often know where the great places are to shoot because these people take the same damn shot a thousand times a day in that spot! Sadly though these photographers range from mediocre to downright sloppy, but you’ll care less about composition / quality 20 years from now when your little ones are all grown up.

Tip: Involve your family in your limited photography by letting them take the shots too – even the small kids.


While not perfect, this shot taken by my 5 year old daughter (at the time)
was one of my favorites of the trip – because it was her photo!
Involving family may not get you perfection, but it might get you pleasant
memories. I highly encourage it!
 

Screw you Ron, I’m bringing my good camera

Okay, let’s assume I’m an idiot and don’t know what I’m taking about about. At a minimum if you are going to bring your good gear then consider a mirrorless like the Fujifilm X-E1 where you’ll have a smaller body and lenses to haul around. If you aren’t willing to make that investment and you must bring your big DSLR, then consider a big zoom like a Canon 28-300mm or Nikon 18-300mm so that you aren’t changing lenses. Sure you’ll sacrifice a little quality over your high end pro lenses, but that can most often be fixed in post-processing via sharpening. Personally I find 200mm is plenty of reach – especially with cropped sensor cameras. If you want great quality then a dual lens setup with a 24-70 f/2.8L II & 70-200mm or a 70-300mm can be a a good choice. 

One thing I ask before you do this though is have your spouse read this article. ;-) While s/he may not say anything at first, it’s been my experience that 100% of the time the spouse gets fed up with the Disney vacation becoming a photo walk. Their visions of a happy family enjoying a wonderful experience together are already ruined by the sheer exhaustion that typically happens during a Disney vacation, so your clicking a half dozen photos every 5 minutes is not going to help keep that frustration at bay.

Thanks for depressing me, now what?!!!


Disney offers many fun shooting opportunities (Unedited X20 Shot)
While your images might not be DSLR like, good weather and light can give you some
solid images that look great after simple editing with Color Efex

When I give people Disney Camera advice I usually get the following reactions:

  1. You don’t know what you are talking about MY spouse is different – This is the photographer who usually has a piece of photography gear thrown at them by their formerly unflappable spouse who never got angry once in the X years they had been married. If you think this, then hire a good lawyer because there will come a day – and it may be 20 years from now – where you’ll need it because you are clueless about to read your partners true intentions.
  2. Crap, I’ve spent $4000 on gear and you are telling me I need something else now? – This is the tough one that even I faced, but I’d also consider you do what I did – reach out to your friend network and see if you have a friend who will loan you the camera you need – perhaps even in exchange for you loaning them your DSLR. Even if you are terrified of loaning someone your gear, TRUST ME – gear at Disney will take more of a beating than anything your friend will typically do with your DSLR back home! You are the one who is going to add scuffs and dings to their precious camera. You can also consider renting which is cheaper than purchasing, so if you go back to your DSLR when you get home then your rental money will be well spent.
  3. Okay, I trust you – now what?!! – See #2, but generally speaking you want an all-in one solution. Sure cameras like the x100s and RX-1 are tempting, but the lack of zoom will prove frustrating at Disney. My weapon of choice in the past was the Fujifilm x10, but now is the x20. It’s hard to go wrong with either, but the x10 does have the advantage of its EXR mode which is pretty much a full-auto that “just works”. Sure you won’t have raw files, but are you REALLY going to go through and process the RAW versions of all 450+ Disney photos you took? Are these really your portfolio images, or are they really for your family and parents? The truth of the matter is that these photos will often be keepsakes that are shared privately so the content will outweigh the quality 99.999999% of the time. As a result, take advantage of the engineering you’ve paid for in your camera and take advantage of the work done to create very usable JPEG images that are sure to make mom happy! If you can get RAW images out of your camera then do that too for the extra insurance you get with having a raw handy.

If you REALLY want to do it right…

Okay, with the lecture behind me I can honestly say that any Disney property is a photographers dream. While you probably won’t get the release you need to use the photos commercially, it can still be a great place to add photos to your personal collection. If you really want to do Disney right as a photographer my biggest advice is to carve out a few days where it’s just you and your camera at the park. This removes you from any family obligations so you can be there for the park opening and most importantly, sunset. What’s more it’s my understanding that you can still bring tripods into the park, so you can setup and take your time to get the great shots of your favorite locations. This also allows you to take super long exposures with a ND filter to help eliminate moving people from your shot. While flash photography isn’t allowed in the attractions, a good DSLR with great high ISO performance is going to help you a lot at freezing the action. Point and shoots generally don’t cut it here, and the smaller form factor cameras that do often don’t have the high ISO range of some of the better DSLR’s.

Lens wise you’ll benefit from having a lens or dual camera setup that minimizes your lens changes, but generally speaking you’ll probably not want anything larger than a 70-200mm lens – even if you are by yourself. A macro is always handy at Disney as is a standard zoom lens.

You can do yourself a huge favor when you are on your own by timing your visit to occur during off-peak times. This will mean shorter park hours, so if your real objective are fireworks, the light parade or Cinderella’s castle at night then peak season might be a better bet. Generally after the fireworks and last parade the park remains open for about an hour with a much smaller group of people. This is where the photographers come out with the tripods and set up the perfect shot.

Don’t leave home without this…

Whether you choose to shoot with a point and shoot or DSLR, there’s a few must haves that you’ll want on your trip:

  1. Hoodman Loupe – If you do any daytime shooting it will be very difficult to see your LCD in the bight California or Florida sunshine, so you’ll be very glad to have something that can cover your screen so you can view your LCD image with some degree of accuracy. Especially when the light goes harsh this is important as camera meters have to make tough tradeoffs in hash light, so you’ll end up with images that can easily be too bright or too dark. Knowing that before you get home is important, and your histogram won’t always tell you what you really need to know – does my exposure look the way I intended.
  2. Lens cleaner and microfiber – You’ll need a lot of microfibers in fact because you’ll be sweating profusely with sunscreen getting smeared on your camera during the hustle and bustle of getting around the park. Wiping your lens with your shirt or a napkin isn’t going to cut through residue, so clean your lens & LCD often and properly to get the best results. Typically when you are waiting in line for an attraction is a good time.
  3. Lens Hood – Your lens should always have a hood on it in sunny conditions (at a minimum), so if you don’t have a hood at Disney you’ll probably end up with a lot more lens flare and washed out shots than you were expecting.
  4. Flash – A flash – especially one that supports high-speed sync – can be invaluable tor getting you proper fill flash exposures in harsh conditions. If you are stuck with an on-camera flash then just use a single layer of a white napkin or a ketchup cup, because you don’t want to be the dork at the park with reflectors and an assistant!
  5. Essentials – It goes without saying that sunscreen, water, hand sanitizer, and something like baby wipes to keep the oils off your hands are very helpful – at any location on a hot day. There’s a bunch more, but there are tons of books written on what to bring to Disney.

TIP: I’ve seen sunscreen completely erase lettering on cameras before, so if you care about your gear then be careful to avoid sunscreen on it.

Conclusion

Disney Parks are a great activity for the family, so unless you have very deep pockets I’d suggest spending the money on your family first. A good point and shoot or even cell phone will give you the memory shots that you want from a trip, and the picture pass can give you some DSLR shots for the most scenic photo ops with the family. Investing in great memories with your family is going to pay better dividends in the end too!  As such, to me Disney is about fun with loved ones, not photography.

If you don’t have a family yet or have tons of money to burn, then make a special trip to Disney as a photography destination and enjoy everything but the rides during the peak lighting conditions. Stay at the Disney owned hotel closest to the park and dump your gear off mid-day to enjoy the park or rest, and save your shooting times when the odds are in your favor. There’s lots of fun things to shoot and you’ll have a lot more fun when your family isn’t yelling at you stop taking photos and saying c’mon!

Disclosure

If you make a purchase using links found in this article, I may make a commission.

NOTE: This site requires cookies and uses affiliate linking to sites that use cookies.

If you enjoyed this article, please support future articles like this by making a donation or saving money by using my discount coupon codes. Either way, your support is greatly appreciated!

This blog is intended for freelance writing and sharing of opinions and is not a representative of any of the companies whose links are provided on this site.

The opinions provided are of Ron Martinsen alone and do not reflect the view of any other entity

Friday, June 7, 2013

Automotive Photography Legend Tim Wallace comes to Kelby Training (Discount Available)

Click to view full size
Copyright (c) Tim Wallace - ALL RIGHTS RESERVED

My favorite automotive photographer Tim Wallace has some  great content on  Kelby Training to show you how he does his magic. I loved watching this class,  and some of his others! It’s really great stuff!

Here’s a shot that I did shortly after watching his first video.

Click here to read my review of Kelby Training and enjoy a discount. There’s a lot of great stuff on Kelby Training, so this is just the tip of the iceberg. You’ll love it!

NOTE: This site requires cookies and uses affiliate linking to sites that use cookies.

If you enjoyed this article, please support future articles like this by making a donation or saving money by using my discount coupon codes. Either way, your support is greatly appreciated!

This blog is intended for freelance writing and sharing of opinions and is not a representative of any of the companies whose links are provided on this site.

The opinions provided are of Ron Martinsen alone and do not reflect the view of any other entity

Thursday, June 6, 2013

COMPARISON: Rokinon vs Canon 24mm Tilt Shift Lens

I’ve been hearing good things about the image quality of Rokinon lenses lately, so I thought I’d give one a try using tilt-shift lenses (defined) since those are so expensive from Canon that they are cost prohibitive to most of my readers (myself included). Would the Rokinon equivalent lens really be in the same league when it cost $1000 USD less (at the time of this writing with Canon rebate)?
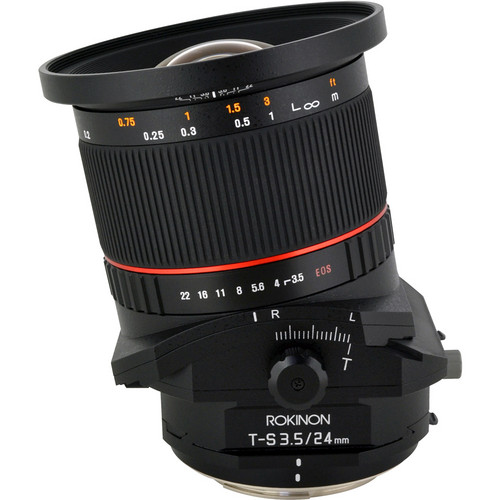
Rokinon Tilt-Shift 24mm f/3.5 ED AS UMC Lens for Canon
($999 USD)
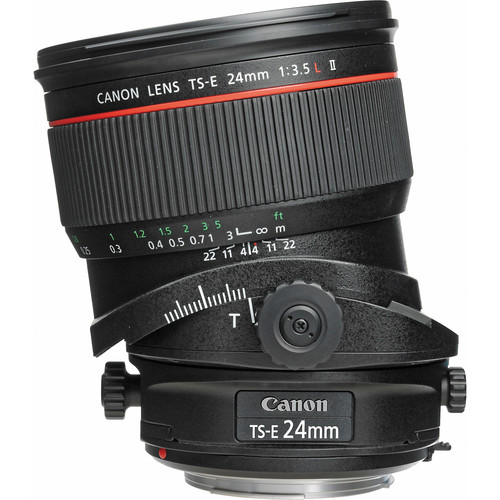
Canon TS-E 24mm f/3.5L II Tilt-Shift Manual Focus Lens
($2,199 USD)

Using a Tilt Shift as a Regular Lens

These are two really sharp and nice lenses. While the tilt and shift features will prove handy, you can also really enjoy them as just a regular 24mm lens. Both offered super sharp results with no adjustments at all:


Canon EOS 5D Mark III, f/8 w/ Canon TS-E 24 mm, 3.2s, ISO 100, No Flash


Canon EOS 5D Mark III, f/8 w/ Rokinon TS-24mm, 3.2s, ISO 100, No Flash

It was raining when these shots were taken and I was holding an umbrella to protect the lenses, so I didn’t bother to do a shift to correct the perspective. This is pretty much how these quick snapshots came out of the camera with the only variable was the lens swap. The difference in framing was probably due to me bumping the tripod a bit, but both seemed to perform great in my opinion.

Using a Tilt Shift for Perspective Control

Here’s a tough real world environment where distortion reigns supreme:


Canon EOS 5D Mark III, f/10 w/ Canon TS-E 24 mm, 1/25, ISO 100, No Flash

By doing a simple upward shift and re-composing the camera I can correct the distortion of the trees that are currently leaning inward:


Foreground corrected with an upward shift and recompose (Canon)

Now my trees look better. The building in the background is still off a bit due to my angle which is one of the challenges of being at this level. I can correct the trees or the building, but not both unless I get myself higher up where everything is level on the same plane (instead of the angle that I am now).

Here’s another example of that challenge as I take a shot of multiple objects that are on a slope (and the art object is actually not straight in real life which creates more challenges):


Canon EOS 5D Mark III, f/10 w/ Rokinon 24mm, 1/8, ISO 100, No Flash

We are used to looking at images like this so at first things seem okay. If we shift and recompose we can fix the tree on the left to make it nice and straight as shown here:


Left tree corrected, but art object is now worse


Art object corrected, but trees are worse than the original

To avoid these types of problems you should stay on the same plane as your subject when making your correction, and try to have all of your subjects on the same plane a well (if possible). See the bookshelf example below for a demo where one adjustment fixes all the problems.

Physical Differences

Physically you can tell where the money difference goes, but surprisingly the Rokinon didn’t feel like a cheap lens. It has more substance and quality feel than a typical Canon EF-S lens, but the devil is in the details. The Rokinon may have a red ring, but it’s no pro lens by any stretch of the imagination!

The Rokinon lacks contact points, so the aperture must be set on the lens instead of through the camera
The Rokinon (right) lacks contact points, so the aperture must be set
on the lens instead of through the camera

I hated the controls on the Rokinon quite a bit because they were tiny, hard to grip, very cheap feeling, and overly tight to rotate – yet the lens slipped out of position easier. It also drove me insane that it lacks a red dot on the top of the lens (instead it’s on the silver edge of the mount). This made it very difficult to get this lens on at night without a flashlight.

The Rokion has a slightly larger lens bulge which made it more prone to lens flare, and it doesn't come with a lens hood like the Canon
The Rokion (right) has a slightly larger lens bulge which made it more prone to lens flare,
and it doesn't come with a lens hood like the Canon

Canon (left) has an advantage of bigger knobs that lock down better

The cheapo gray knobs on the Rokinon (right) sucked - a lot - in real world use

Some will like that the Rokinon had a pinch lens cap like Nikon (and now Canon offers on some newer lenses).

Bookshelf Test

For my first test, with the camera placed on the tripod and doing a typical bookshelf shot like readers of this blog are used to seeing, I then did the following adjustments (in clockwise order starting with the top left image):

  1. Full shift up – no re-focus
  2. Full shift left – no re-focus
  3. Full shift right – no re-focus
  4. Full shift down – no re-focus

The objective of this test was to just compare how the light, bokeh, and focus were impacted by the shifts. To eliminate variables, all images were shot at f/8 @24 mm, 25s, ISO 100, and No Flash using a Canon 5D Mark III. The results are impossible to interpret unless you zoom to 100%, but here’s a single 12000x8000 pixel file for both lenses to help speed up the comparison. Individual files are also available at http://photos.ronmartblog.com/lenses/24mmtiltshiftcompare.


Canon Tilts & Shifts - Click and view at 100%


Rokinon Tilts & Shifts - Click and view at 100%


100% Comparison - NO SHIFT, Canon (left) & Rokinon (right)
Click for a larger image

For fun I decided to take a shot with my Canon 24-70 f/2.8L II lens and then swap lenses using the same exact position for a no-shift comparison of these lenses against each others and a benchmark lens. You can see a 100% crop above, and here’s a link to the Canon TS-E 24mm image and the Rokinon TS 24mm image for additional review.

What I found was that the Canon was slightly brighter and better at the edges over the Rokinon, but otherwise they were both excellent lenses that compared favorably to the non-tilt shift lens.

Practical Shift Test

I don’t care much about the tilt feature of a tilt shift lens, but I do like it for shifting to perform perspective control. To limit the variables, I once again used the same bookshelf setup and camera settings to simulate a scenario that required shifting the lens to correct distortion.


Canon (shown with hood) - Practical Shift Test
Click to view at 100%


Rokinon - Practical Shift Test
Click to view at 100%

I had a minor angle error in my Rokinon shot, but it didn’t impact my conclusion. Both lenses did a great job after making an upward shift, a camera angle adjustment to re-compose, and a re-focus.

Conclusion

My overall conclusion was that you have to look pretty hard to see the differences, so the Rokinon impressed me quite a bit. Really all that I could fault the Rokinon for was a seemingly inferior bokeh and the fact that it was a little darker.  Sure, the Rokinon controls are garbage but they work so if you are gentle on your gear it should probably be fine. Image quality wise I’d call it “as good as” Canon, so there’s a lot you can do with that extra $1000 (like pick up other Rokinon lenses). Personally, I’ll just rent from

Tilt-shift lenses aren’t for everyone since they can be very tricky to use. Manual focus will be bothersome to some, but the real gotcha is the recompose requirement and exposure challenges once a tilt or shift has occurred. This is a pro users lens for sure, but it can be super rewarding too if you spend some time with it. It’s also a must for architecture because as good as the tilt shift correction is in Lightroom (especially 5) and Photoshop, you get more depth of field out of doing it in camera than you do when you correct the perspective in post-processing.

Where to order

Click here to order the Rokinon Tilt-Shift 24mm f/3.5 ED AS UMC Lens for Canon from the B&H web site.

Click here to order the Canon TS-E 24mm f/3.5L II Tilt-Shift Manual Focus Lens from the B&H web site. The current $200 OFF rebate ends on June 6th, 2013 at 8:59 PM Pacific, so act fast if you want this lens.

Where to rent

For expense, low-frequency usage gear it makes more sense to rent than buy for most people. That’s why I recommend LensRentals.com and BorrowLenses.com for your renting needs. See my discount coupon code page for a special discount when renting gear as well!

lens rental

Not familiar with or worried about renting online? Check out my lens rental series where I show you what to expect and how it compares to renting from a local shop.

Other articles you may enjoy

If you enjoyed this article, you may also enjoy these reviews:

Disclosure

If you make a purchase using links found in this article, I may make a commission. It doesn’t cost you a penny more, but it does help to support future articles like this.

B&H loaned me the lenses used in this article for this review.

NOTE: This site requires cookies and uses affiliate linking to sites that use cookies.

If you enjoyed this article, please support future articles like this by making a donation or saving money by using my discount coupon codes. Either way, your support is greatly appreciated!

This blog is intended for freelance writing and sharing of opinions and is not a representative of any of the companies whose links are provided on this site.

The opinions provided are of Ron Martinsen alone and do not reflect the view of any other entity

Monday, June 3, 2013

Which Books Should I Read?–2013 Edition

UDPATED: June 3, 2013

So you've got a new digital SLR camera, great lenses, and awesome software so you are ready to go right?

Now you are all excited, but you've discovered one little problem - your camera doesn't seem to work as good as others. Well my friend, let me assure you that it ISN'T a back focus problem, and your camera works just fine (99.9% of the time)! The problem is more likely that you haven't acquired the skills to get those amazing shots you see other photographers taking.  Let's start by getting real and learning how those other photographers do - it's called experience my friend!

How do I get that experience - NOW?

In this age of instant gratification, everybody wants results now. You just spent a couple grand or more on a camera so you think you should be shooting stuff that my Top Photographers would be in awe of, but the reality is that you aren't going to be a great photographer over night. However, the good news is that you can improve your photography skills drastically by reading the right books right now!

So Ron, what books do you recommend?

Without a doubt, the best (and most popular) book on the market right now is The Digital Photography Book by Scott Kelby (a fantastic no-nonsense author). This book will teach you what some people take years to learn, and the best part is that the book is a quick read. Most people will finish it in around an hour. In fact, this book is so great that I suggest you keep it in your backpack and read it again when you find the time! In fact, I recommend whole series of books because the additional editions pick up where the previous volumes left off. Collectively they will teach you more in a short time than you’d learn on your own over the course of several years.

After you know the basics on how to use your camera and gear, you'll probably discover that your pictures are more technically sound but still considered pretty boring by others. The best way to remedy that is to start Learning to See Creatively - a phenomenal book by Bryan Peterson (another outstanding author and amazing photographer). Some will argue that Understanding Exposure should be read first, and in many ways I agree with that recommendation. Understanding Exposure will teach you how to use your camera to create interesting compositions, but you have to be willing to read your manual and switch out of P mode (fully automatic) to take full advantage of it. However, if I had to pick one for the beginner I'd stick with Learning to See Creatively because you might might not be ready to read that camera manual just yet.

However, this is only half the problem because you'll have good gear, but still struggle with how to use it. Scott Kelby’s books will teach you how to use it, and Bryan Peterson’s books will teach you how to become a better photographer. However, there’s still the subject of inspiration on how to shoot differently than you have been up to this point in your life. This of course is the challenge for you, and for those who master it like Joe McNally you'll see what wonderful things you can do. In Joe's latest book, Sketching Light (and his others The Moment it Clicks & Hot Shoe Diaries) you'll see some great shots from a truly gifted photographer, hear some great stories. You’ll have a few tips on how to get those great shots, but for most of us it won't be enough info to turn us into explorers of light – at least not yet!

To begin your journey to master lighting there is one book that I deem to be the bible on subject of light that I am convinced will amaze you (if you have the patience to read it from cover to cover and understand the content). This wonderful book is called Light: Science and Magic: An Introduction to Photographic Lighting. If there is one book I wish I could read over and over again until every concept was permanently etched into my brain it would be this book. I'll admit that it is a text book style that isn't nearly as fun as Scott Kelby or Bryan Peterson books, but if you take the time to read it then you'll learn more about light than most photographers you know. It WILL help you become a great photographer, but knowledge and application are two separate things, so this is one area (like creative composition) where only experience will help you. However, without the knowledge this book offers, it would take a lifetime to gain the experience needed to be a master. This book saves you 20 years, so I can't recommend it highly enough.

With that said, I know that some people just won’t be able to handle reading Light because it can be pretty intense. If you want a more practical approach to “how do I get better shots with that $500+ flash I bought”, then look no further than On-Camera Flash: Techniques for Digital Wedding and Portrait Photography by Neil van Niekerk. It is a short, easy-to-read book that teaches you everything you want to know and little that you could care less about. In short, it’s a practical book that will make your photography much better.

f you take pictures, you owe it to yourself to own Lightroom. It is quite simply the best photo management product on the planet right now and it will help you get the results you wished you could get from you DSLR when you purchased it – without the need to own Photoshop.  You should definitely pick up Scott Kelby’s Lightroom for Digital Photographers. It will show you how to use this great product to process your pictures to get the kind of results you hoped you get when you put your hard earned money down to buy a DSLR.

Show me the money

The funny thing about Digital Photography is that it is really easy to ramp up quickly and begin to take amazing shots. In fact, odds are that in your first year of photography you'll take a shot that everyone thinks is simply amazing. In fact, it will be so good that you'll find yourself being asked by friends to shoot a wedding so you'll need to learn really quickly how to do a decent job, so again Scott Kelby comes to the rescue again with The Digital Photography Book - Volume 2. While there are more exhaustive books on the subject that are quite good, this is enough to get you going to shoot that friend or family member's wedding that you just got signed up to shoot because your fee is in their budget (yeah, free :-)).

Of course, after you pull off that first wedding or group shot you now think you are ready to quit your day job and become a big name photographer. For a great book that will give you a reality check, check out Best Business Practices for Photographers by John Harrington. 

But Ron, I hate books what else can I do?

Sign yourself up for Kelby Training as it’s the best bang for the buck resource on the web for photographers. NAPP is a close second for Photoshop users (or Photoshop Elements User Magazine if you use PSE instead of Photoshop). PPSOP is also great if you like interactive training.

The MUST HAVE Photography Books

  1. The Digital Photography Book (or the collection if you can afford it) – Trust me, it’s like having a pro friend with you to answer your every question!
  2. Learning to See Creatively (2b. Understanding Exposure for those with extra funds to spend and who are willing to take their camera out of auto mode)
  3. On-Camera Flash – Techniques for Digital Wedding & Portrait Photography (for the “show me how” types)
  4. Light: Science and Magic: An Introduction to Photographic Lighting (for the “show me why” types)
  5. Scott Kelby’s Lightroom for Digital Photographers  (if you take my advice and purchase Lightroom)

If you can't afford to purchase them then go to your local library and borrow them (as I did initially) and you'll discover why these are must own books. However, if you do purchase them, I’d appreciate it if you use my links here to help support this blog.

But what about Photoshop books?

I'm so convinced that the Earth could be be completely covered in all of the Photoshop books out there, so I've chosen to leave this topic out of this article. When you are ready you can read article on recommended Photoshop books.

But what about other books to inspire my creativity?

I've gone through a stack of about 10 books that fall into this category, and I have come to the following generalizations:

  • Any Bryan Peterson book is going to be outstanding. In addition to those previously mentioned, I have reviews of Understanding Shutter Speed, and Beyond PortraitureJoe McNally’s books mentioned previously are also great to get the creative juices going.
  • I also find that most Peachpit Press photography books are quite good.
  • The Web is a phenomenal resource for inspiration. Visit sites like 500px, Flickr, your favorite photographers home page, and others and you are certain to find plenty of inspiration.
  • Most inspirational books are good to browse once, less useful to own. Your best bet is to look at them at the library or your favorite bookstore and save yourself the money for other things.

What about Michael Freeman or <insert name>’s books?

Michael Freeman writes some very popular photography books that many (engineers usually) swear by, but personally I swear at them. I found them more boring than reading an insurance policy or legal document. If you thought the book Light that I recommend above was an easy read and the level of detail you like, then you’ll love Michael Freeman’s books. If you cleaned your room and/or fell asleep reading Light, then you probably won’t care for Michael’s books.

Everyone also has their favorite books, so this is just the tip of the iceberg. I’ve read hundreds of books on Photography – mostly for the blog – and these are what I boiled my list down to the most useful for normal people with lives.

Conclusion

Simply by asking this question and reading this blog post you are a step ahead of many by taking the initiative to making your photos much better. Get out there and start reading and I assure you your camera will start working better and you'll start getting the kind of shots that will amaze your friends and family, but more importantly they'll impress and excite you!

To stay up on my latest recommendations, be sure to check out my recommendations store on amazon.com. I also post book reviews which you can find in the index on the right column of this blog.

Happy Shooting!

Other articles you may enjoy

If you enjoyed this article, you may also enjoy these:

Disclosure

If you make a purchase using links found in this article, I may make a commission. It doesn’t cost you a penny more, but it does help to support future articles like this.

NOTE: This site requires cookies and uses affiliate linking to sites that use cookies.

If you enjoyed this article, please support future articles like this by making a donation or saving money by using my discount coupon codes. Either way, your support is greatly appreciated!

This blog is intended for freelance writing and sharing of opinions and is not a representative of any of the companies whose links are provided on this site.

The opinions provided are of Ron Martinsen alone and do not reflect the view of any other entity